
Xmedcar - Documentation
Introduction
Thank you for purchasing Xmedcar - Pharmacy & Medical WooCommerce WordPress Theme! In this documentation, you will find comprehensive guides on installing, configuring, managing, and updating your theme, as well as setting up specialized pharmacy features, importing demo content, and using custom Elementor widgets.
Preview Images Notice: All images used in the live demo website are for preview purposes only. They are not part of the theme download package and are not included in the final purchase files.
Key Theme Features
- Order via Prescription: Quick-order prescription upload system with admin request management and conversion to WooCommerce orders.
- Pharmacy Management: Expiry Date tracking, Temperature Controlled badge, Medicine Type taxonomy, and Salt/Composition details.
- Generic & Branded Medicines: Substitute medicine recommendations and category filtering.
- Pincode Checker: Postal code delivery checker and COD eligibility widget.
- Subscribe & Save: Medicine subscription refill system for chronic treatments.
- Elementor Integration: 25+ custom Elementor widgets for building modern healthcare stores.
Theme Support Policy
We are always happy to help and value our customers. Support for our items includes:
- Responding to questions regarding theme features and functionality.
- Fixing verified theme bugs and reported software issues.
- Providing regular theme updates for WordPress and WooCommerce compatibility.
Item support does NOT include:
- Custom code development or bespoke design modifications.
- Support for un-bundled third-party plugins or custom server environments.
Support requests are processed on business days from 8:00 to 20:00 (GMT + 5.30 ) within 24hrs (usually less) in the order they were received. Support request sent during weekends/holidays will be processed on Monday or the next business day.
If you have any questions regarding to theme issues, please send us support request here.
Custom Development & Customization Services
If you require custom website development, specialized functionality, backend/frontend custom work, theme updates, or plugin customization, please contact our expert technical team HERE for paid customization services.
Our More Items
Alukas - Modern Jewelry Store WordPress Theme
PressMart - Modern Elementor WooCommerce WordPress Theme
Kapee - Modern Multipurpose WooCommerce Theme

EmallShop - Responsive WooCommerce WordPress Theme
WordPress Information
To install this theme you must have a working version of WordPress already installed. If you need help installing WordPress, follow the instructions in WordPress Codex. Below are all the useful links for WordPress information.
- [WordPress Codex] - General info about WordPress and how to install on your server.
- [First Steps With WordPress] - General info about multiple topics about WordPress.
- [FAQ New To WordPress] - The most popular FAQ’s regarding WordPress.
Recommended PHP Configuration Limits
Low PHP configuration limits can cause issues such as white screen errors, demo import timeouts, empty page saves, or upload size errors. Ensure your web hosting server meets or exceeds the following recommended PHP limits:
How to Increase PHP Limits:
You can increase your PHP configuration limits using any of the three options below:
-
Option A: Edit
.htaccessFile
Open the.htaccessfile located in your WordPress root directory and add the following lines at the bottom:php_value max_execution_time 600 php_value memory_limit 256M php_value post_max_size 32M php_value upload_max_filesize 32M php_value max_input_time 300
-
Option B: Edit
php.iniFile
Open or create aphp.inifile in your website root folder and set:max_execution_time = 600 memory_limit = 256M post_max_size = 32M upload_max_filesize = 32M max_input_time = 300
-
Option C: Contact Your Web Hosting Support
If your hosting server restricts direct configuration edits, contact your hosting provider's support team and ask them to increase your PHP limits to the recommended values above.
Download Theme Package
To download your purchased theme files and license certificate, log in to your ThemeForest account and navigate to your downloads page.
Downloading Guide:
-
Log in to ThemeForest:
Visit ThemeForest.net and log in with your Envato account credentials. -
Go to Downloads Page:
Hover over your username at the top right of the page and click Downloads. -
Locate Xmedcar Theme:
Find Xmedcar in your list of purchased items and click the green Download button next to it.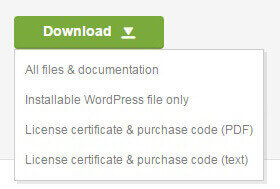
-
Select Download Option:
Choose your preferred download package from the dropdown menu:- All files & documentation (Full Package): Downloads the main ZIP file containing documentation, licenses, parent theme xmedcar.zip, and child theme xmedcar-child.zip. (Extract this ZIP on your computer before uploading).
- Installable WordPress file only: Downloads only the ready-to-upload xmedcar.zip theme file directly.
- License certificate & purchase code (PDF or Text): Downloads your license certificate containing your purchase code required for demo import and support.
Theme Installation
Before installing the theme, ensure you have downloaded your package from ThemeForest. If you downloaded the All files & documentation package, extract the ZIP file on your computer to locate the installable theme file xmedcar.zip and the optional child theme xmedcar-child.zip.
You can install the Xmedcar theme using any of the following methods:
- Method 1: Install via WordPress Dashboard (Recommended & Easiest)
- Method 2: Install via FTP / cPanel File Manager (For large file uploads)
Method 1: Install via WordPress Dashboard (Recommended)
-
Log in to WordPress Dashboard:
Log in to your WordPress admin area (e.g.,yoursite.com/wp-admin). -
Navigate to Themes:
Go to Appearance => Themes on the admin sidebar menu. -
Click Add New:
Click the Add New button located at the top of the Themes screen.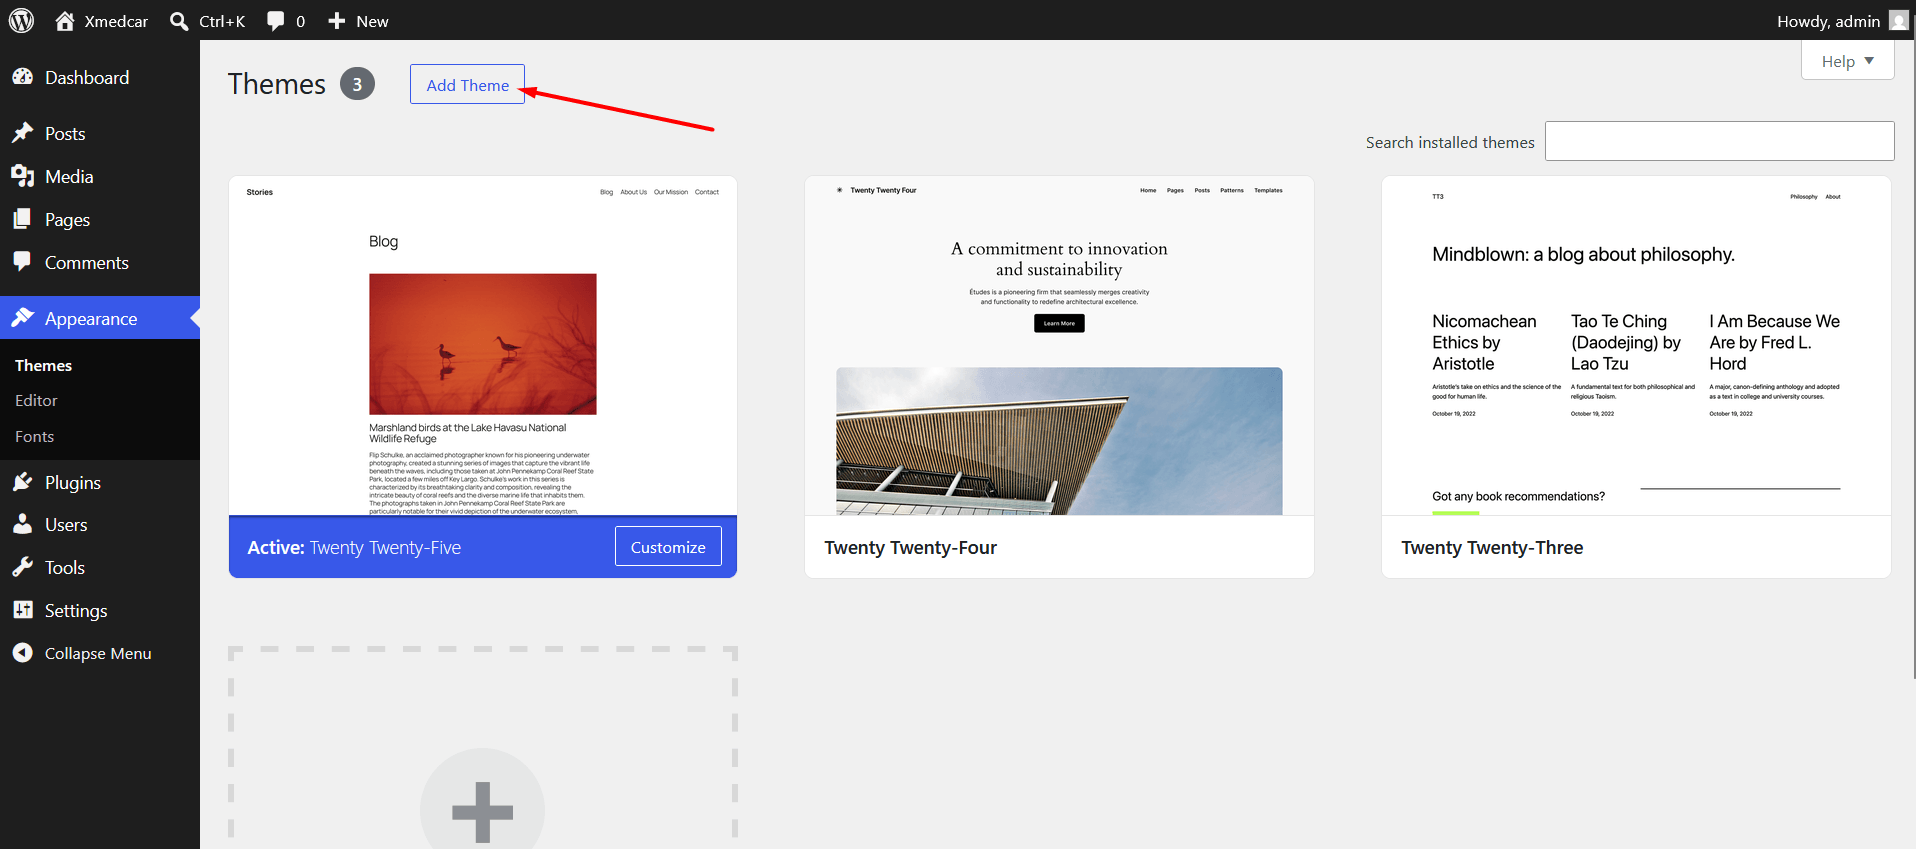
-
Upload Theme File:
Click the Upload Theme button at the top of the page.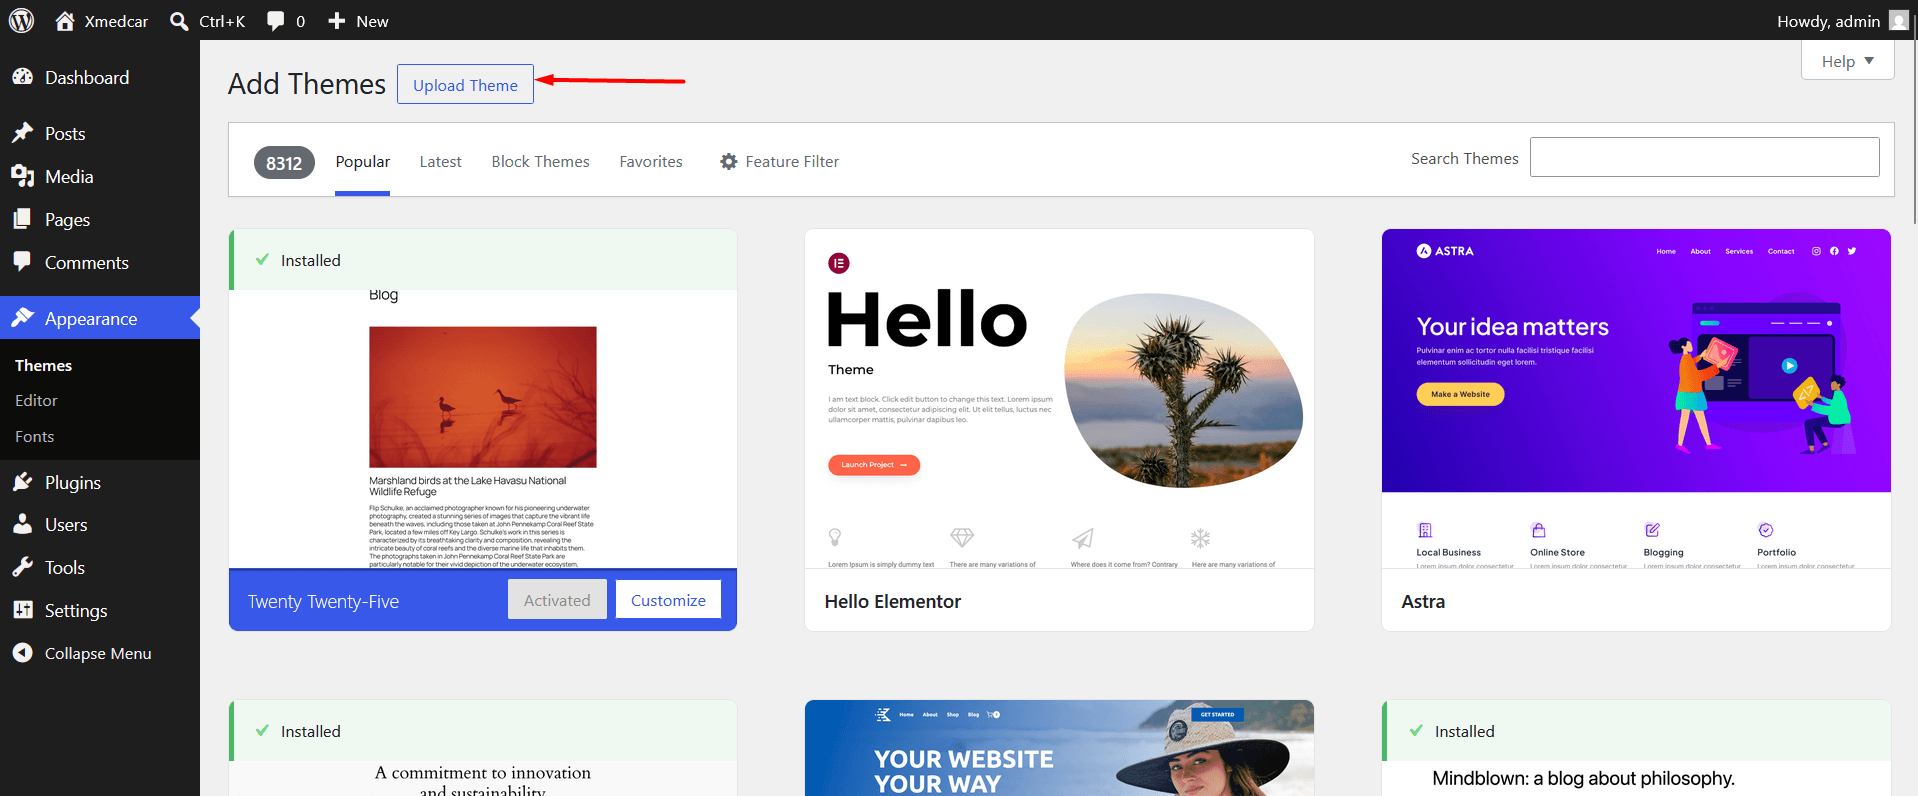
-
Choose File & Install Now:
Click Choose File, select the xmedcar.zip file from your computer, and click Install Now.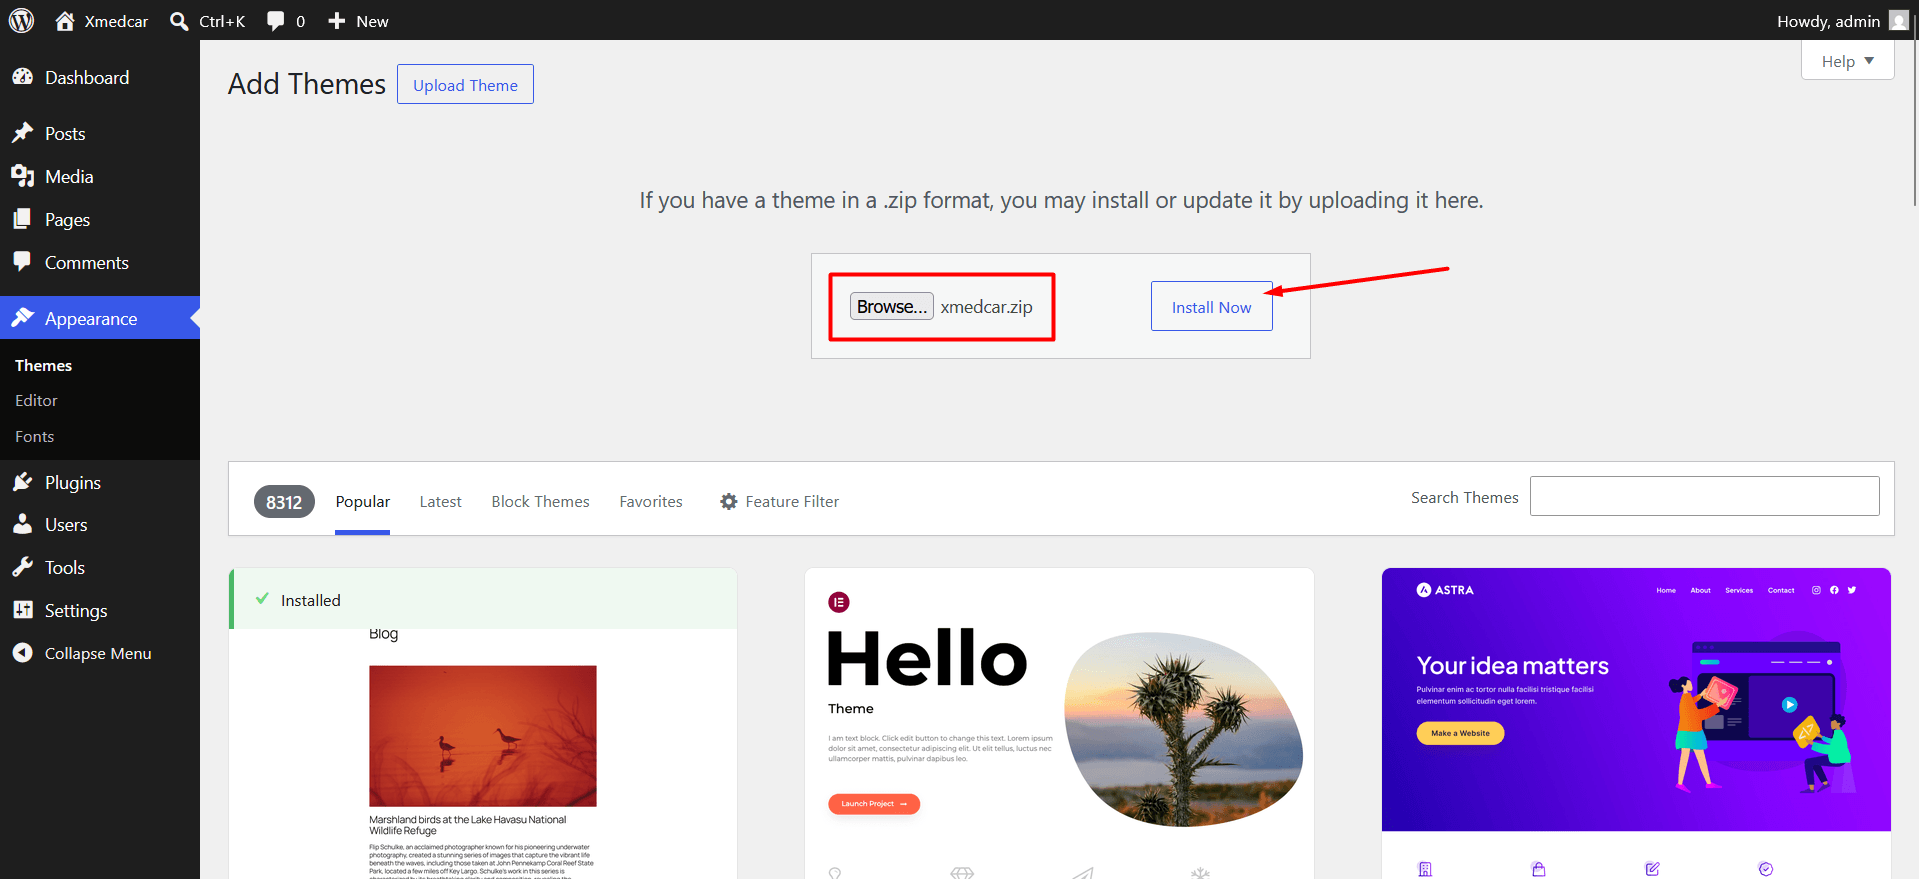
-
Activate Theme:
Once the installation completes successfully, click the Activate link to activate Xmedcar on your site.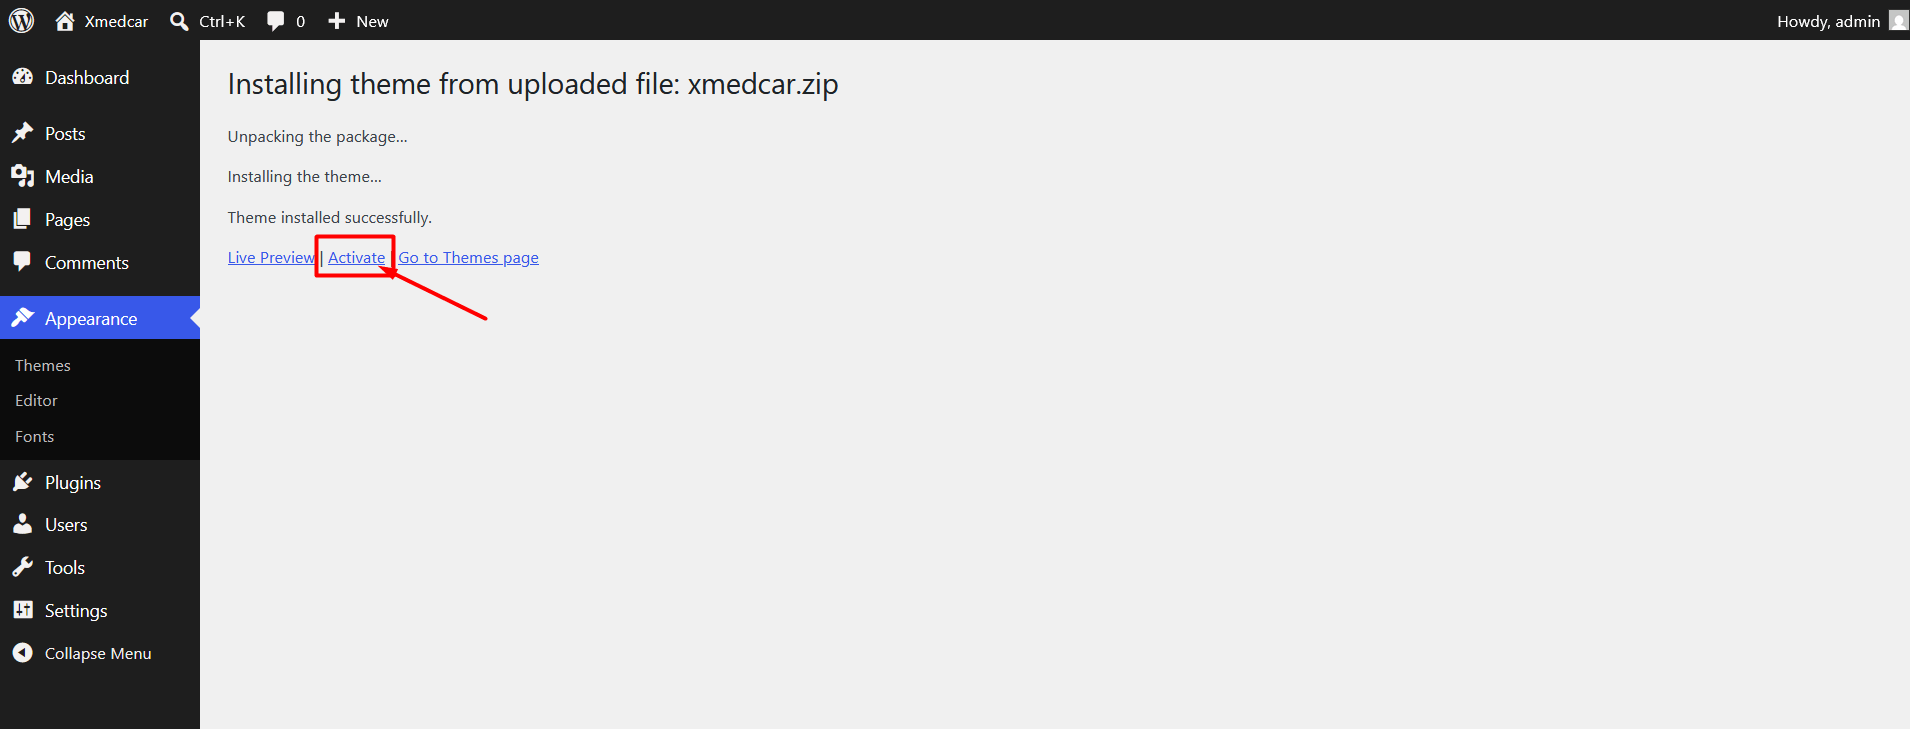
Method 2: Install via FTP / cPanel File Manager
-
Unzip Theme Package:
Extract the xmedcar.zip file on your computer to obtain the uncompressedxmedcarfolder. -
Connect to Your Server:
Connect to your web hosting server using an FTP client (such as FileZilla or Cyberduck) or open your hosting provider's cPanel File Manager. -
Navigate to Themes Directory:
Navigate to the WordPress themes directory path:../wp-content/themes/. -
Upload Theme Folder:
Upload the extractedxmedcardirectory folder directly into../wp-content/themes/. -
Activate Theme in Admin:
Log in to your WordPress Dashboard, go to Appearance => Themes, locate Xmedcar, and click Activate.
Plugin Installation
After installing and activating the Xmedcar theme, a notification banner will appear at the top of your WordPress admin dashboard stating that the theme requires and recommends several plugins (such as Xmedcar Core, WooCommerce, Elementor and others) to function properly.
Plugin Installation & Activation Guide:
-
Access Required Plugins Installer:
Click the Begin installing plugins link in the top admin notice banner, or navigate to Appearance => Install Plugins from the admin sidebar.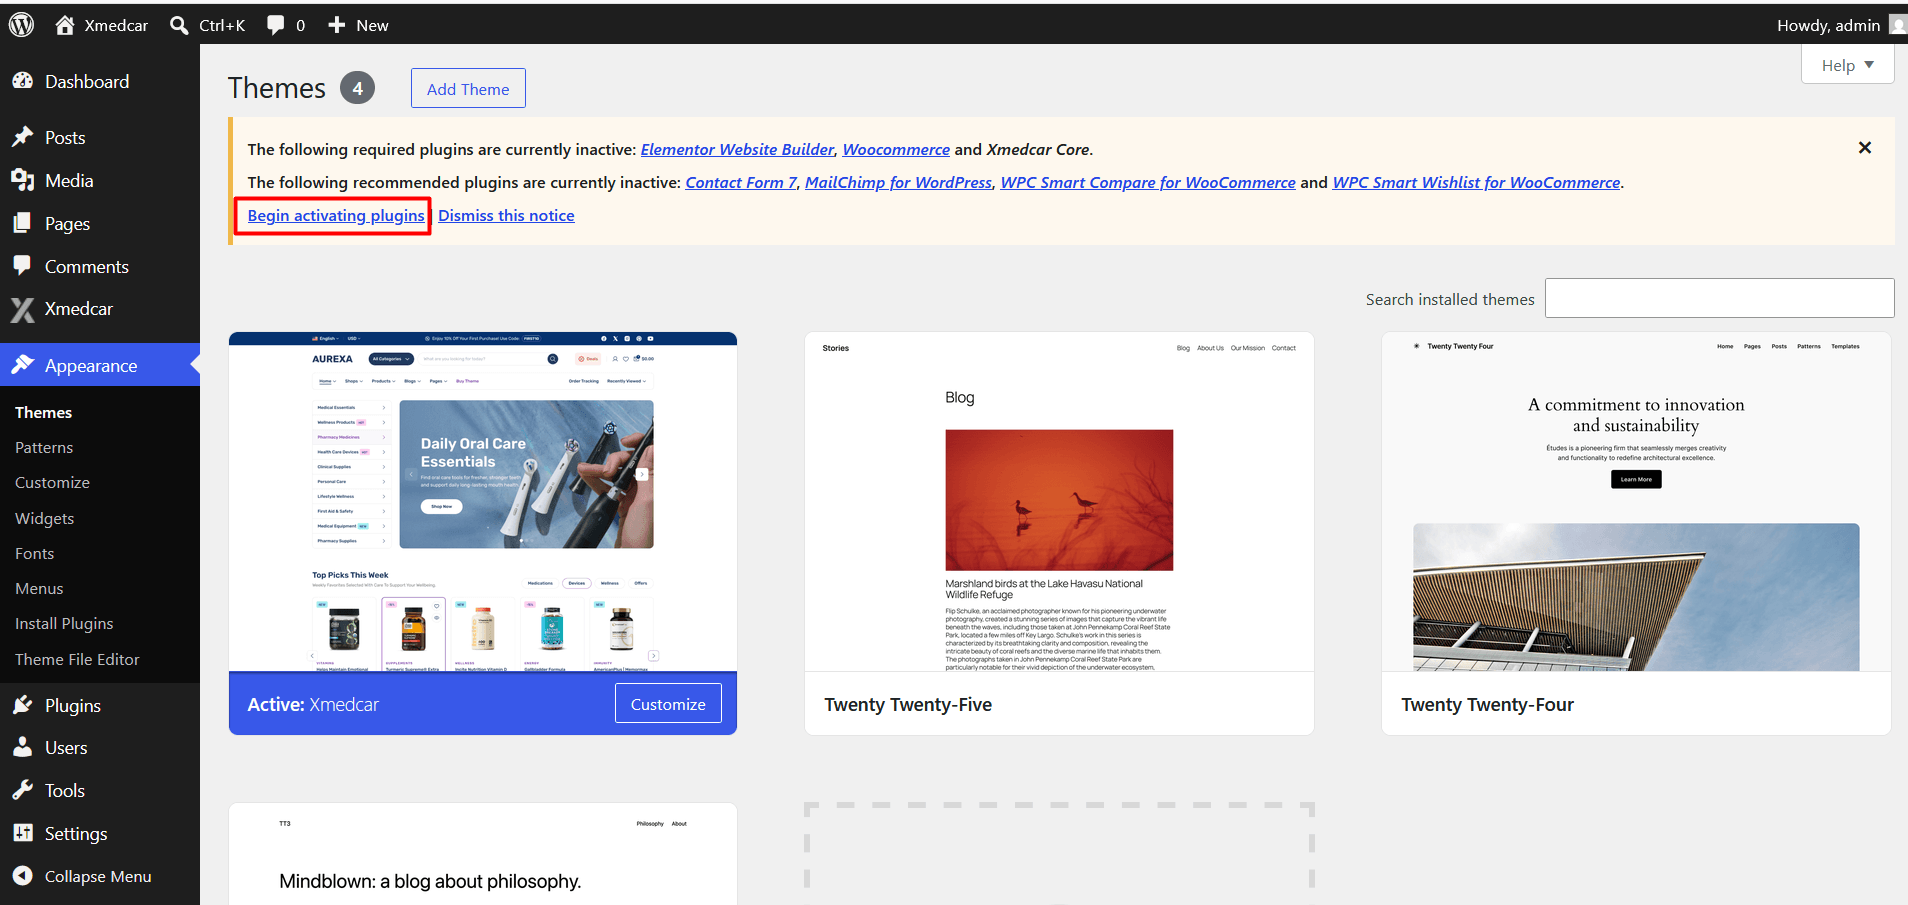
-
Select All Plugins:
Check the top checkbox next to Plugin to select all required and recommended plugins in the list. -
Bulk Action Install:
Select Install from the Bulk Actions drop-down menu and click Apply. WordPress will download and install all selected plugins automatically.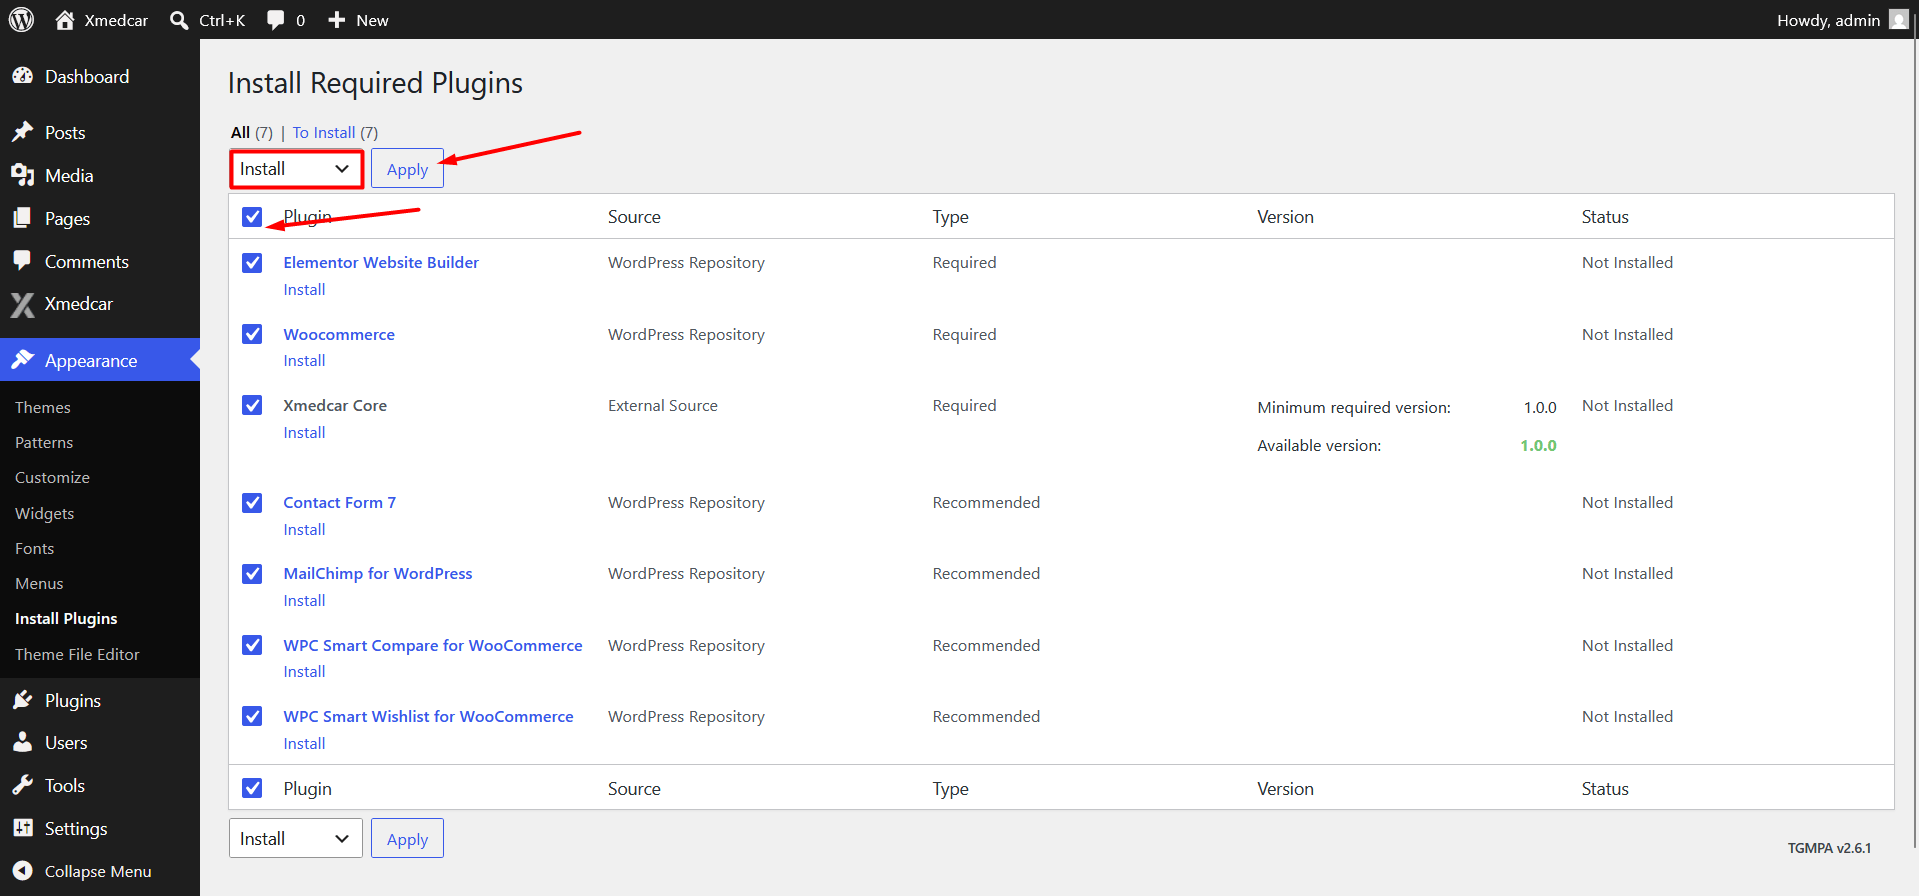
-
Return to Installer:
Once all plugins complete installation, click the Return to Required Plugins Installer link at the bottom of the installation log.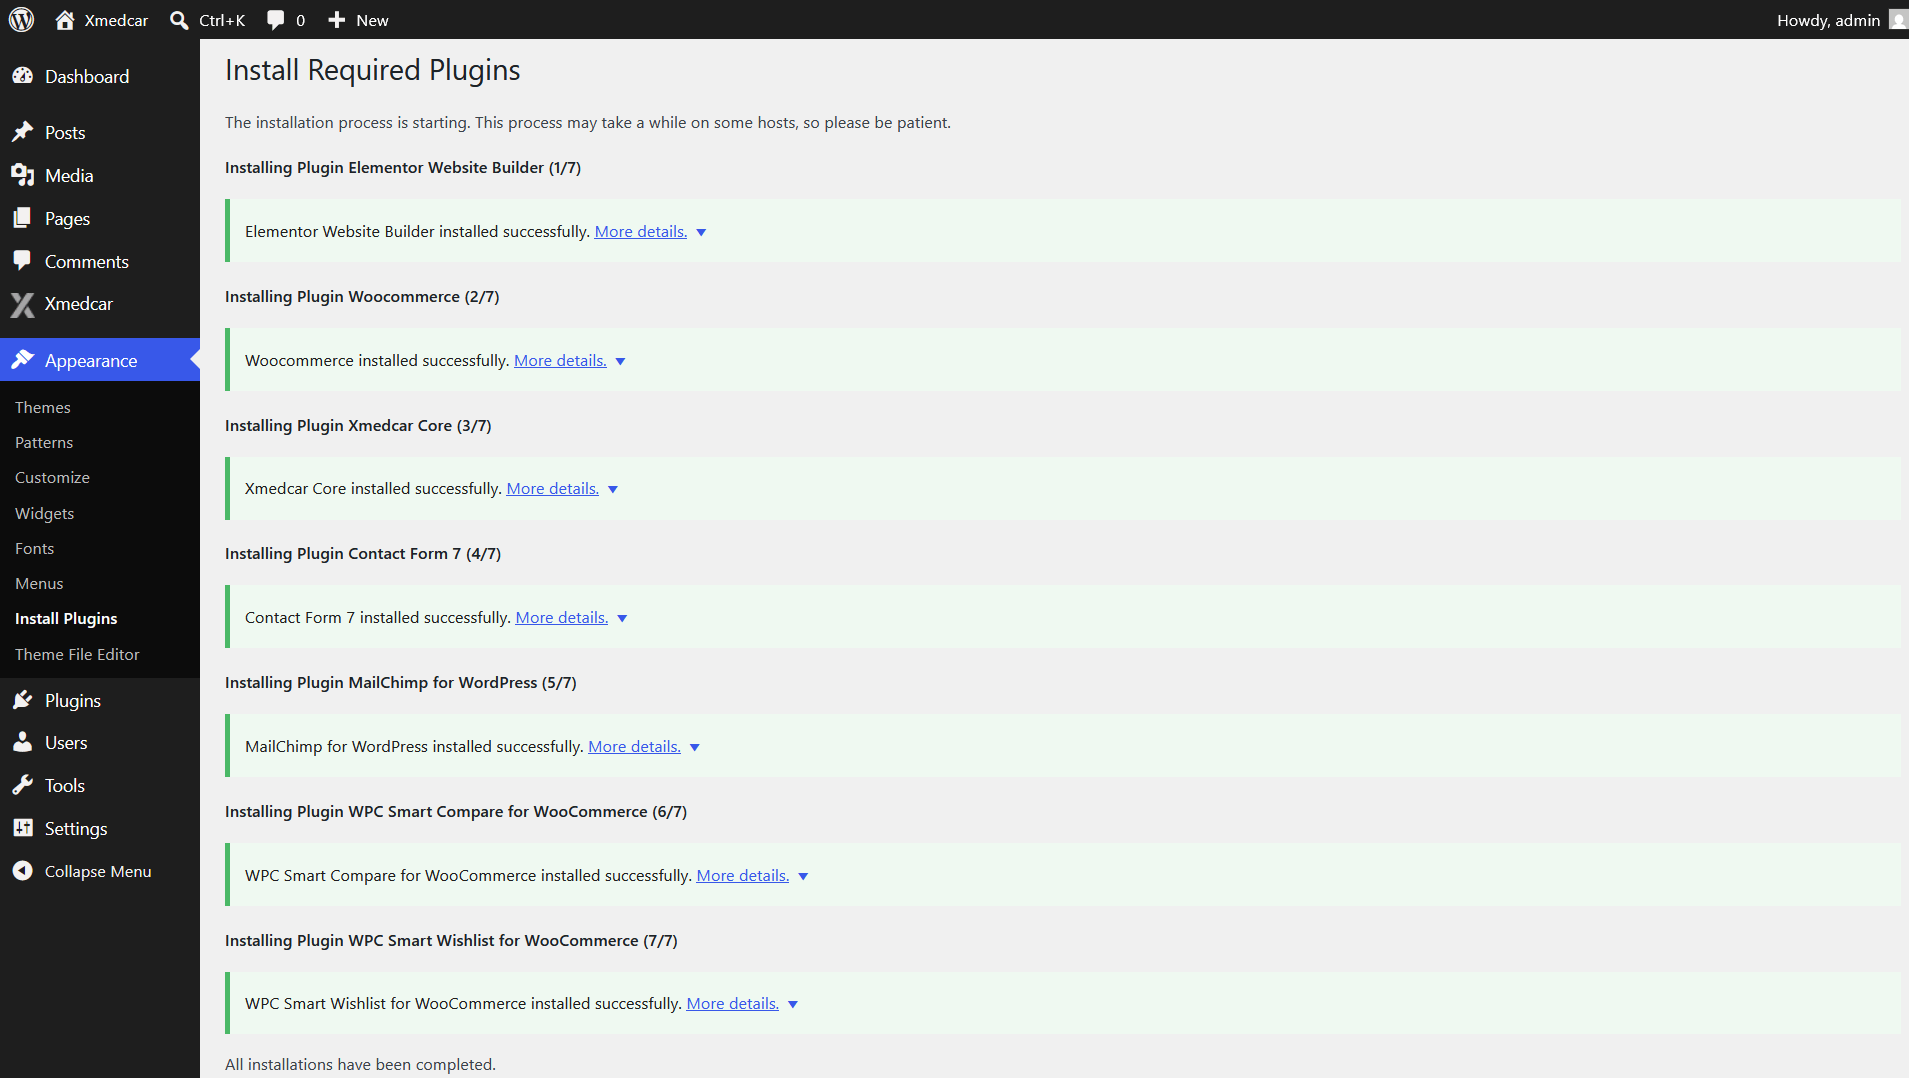
-
Bulk Action Activate:
Select all plugins again by checking the top checkbox, select Activate from the Bulk Actions drop-down menu, and click Apply.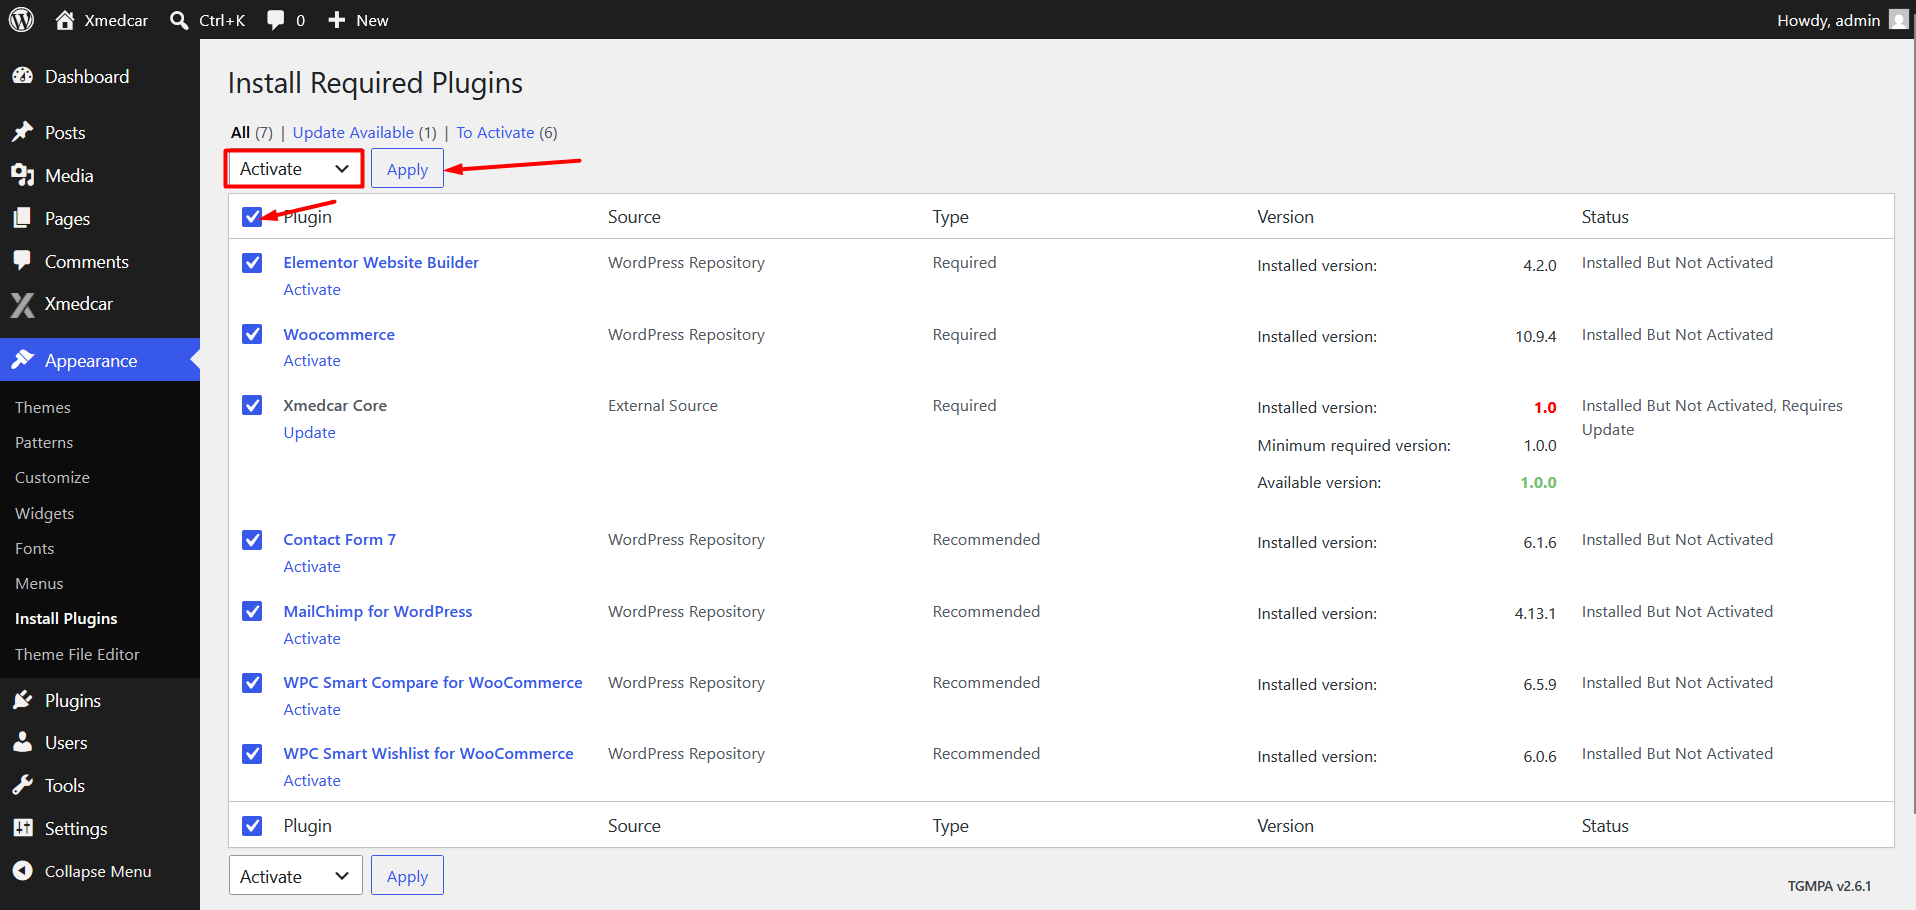
Import Demo Content
Xmedcar comes with an easy 1-click Demo Importer that allows you to replicate our live demo website layout—including pre-built pharmacy homepages, sample WooCommerce products, Elementor page layouts, navigation menus, and widget settings—in just a few minutes.
Pre-Import Checklist: Before running the demo importer, make sure you have installed and activated all required plugins (go to Appearance => Install Plugins) and that your server meets the recommended PHP limits (memory_limit = 256M and max_execution_time = 600).
1-Click Demo Import Guide:
-
Log in to WordPress Admin:
Log in to your WordPress Dashboard. -
Navigate to Demo Import:
Go to Xmedcar => Demo Import from your admin sidebar. -
Select Your Preferred Demo:
Browse the pre-built pharmacy homepage layouts and click the Import Demo button under your chosen design layout.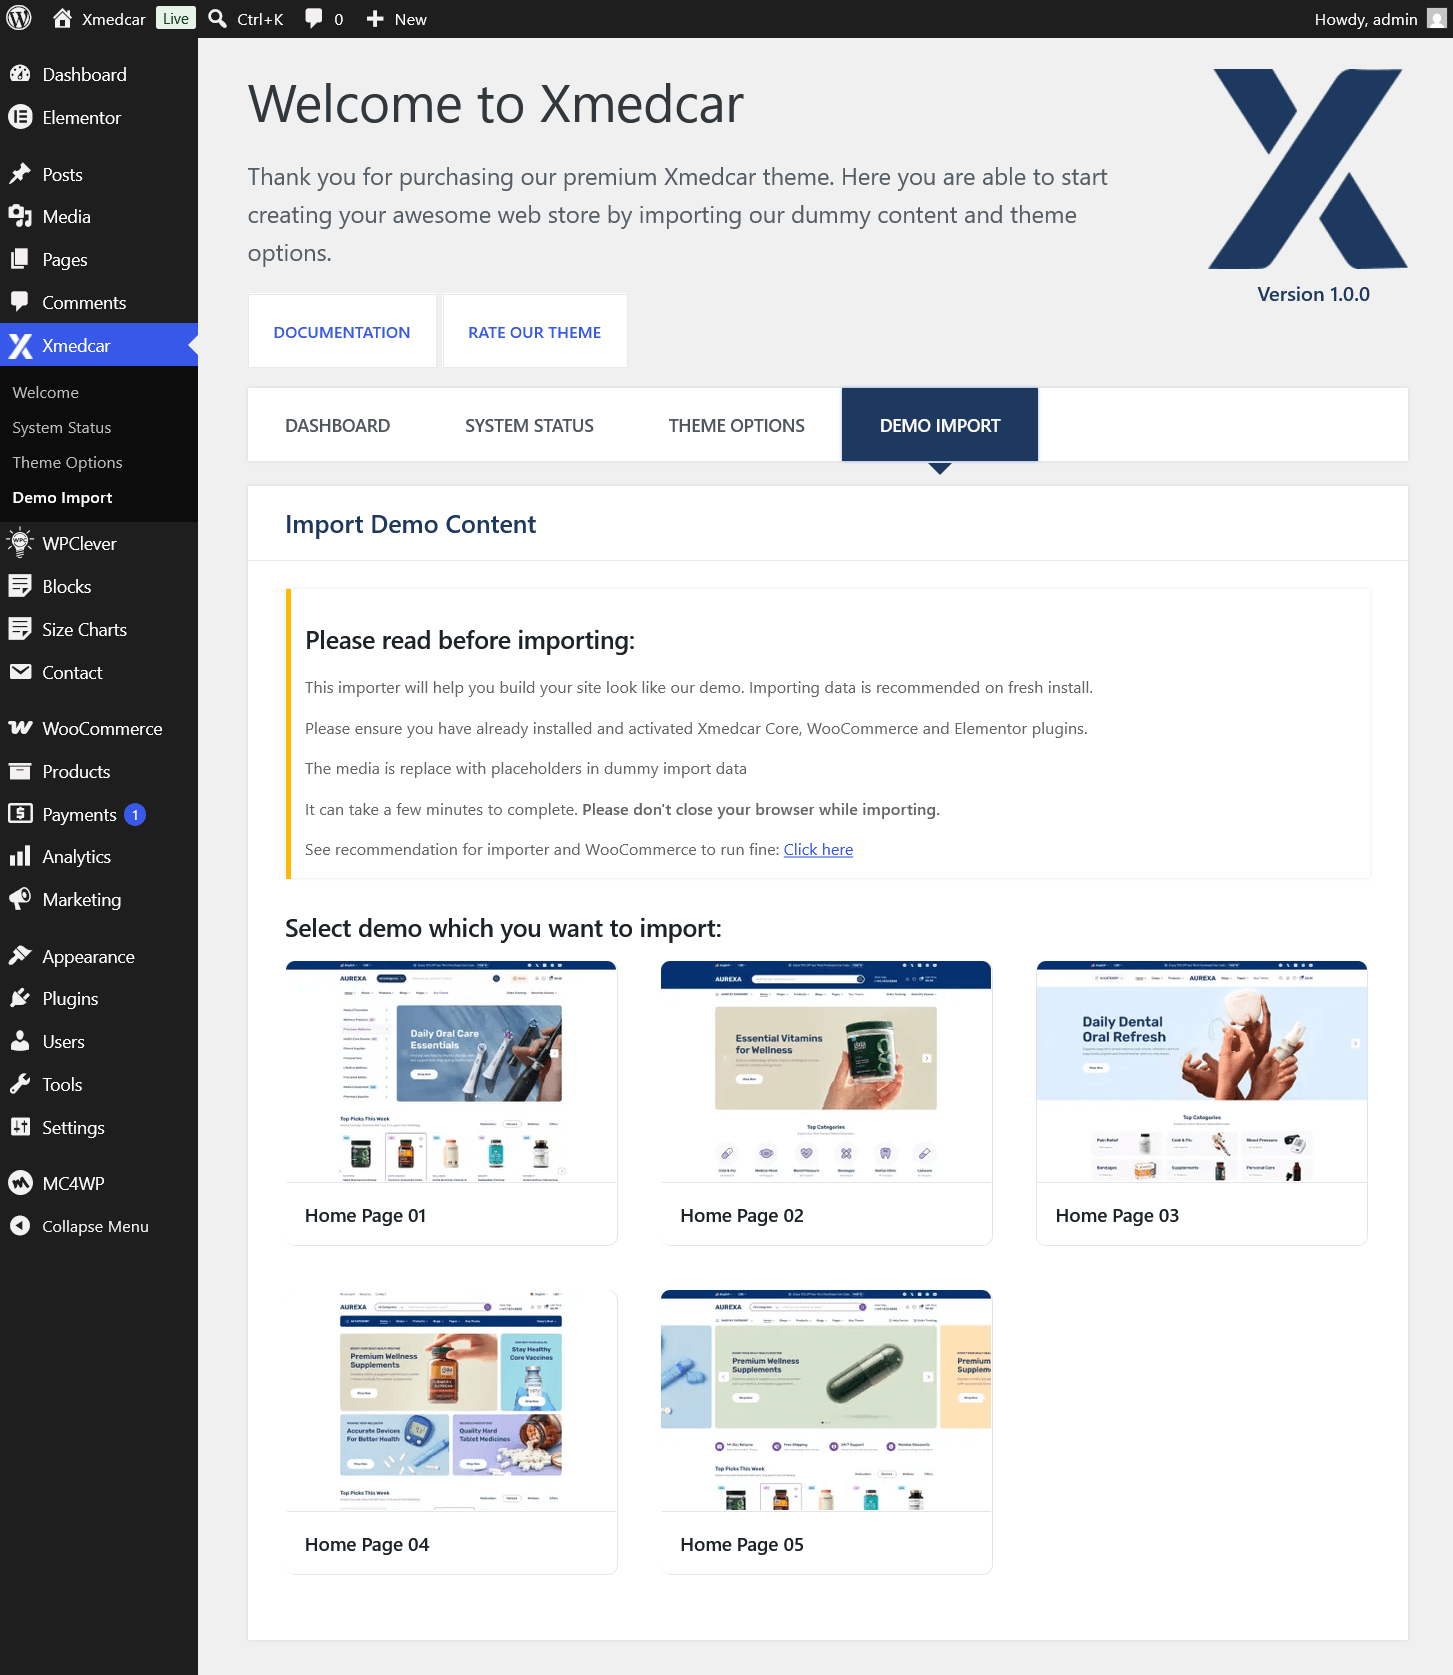
-
Choose Content Items & Start Import:
Select the demo content components you wish to import (Full Demo Import, Theme Options, Menu, Widgets) and click Import.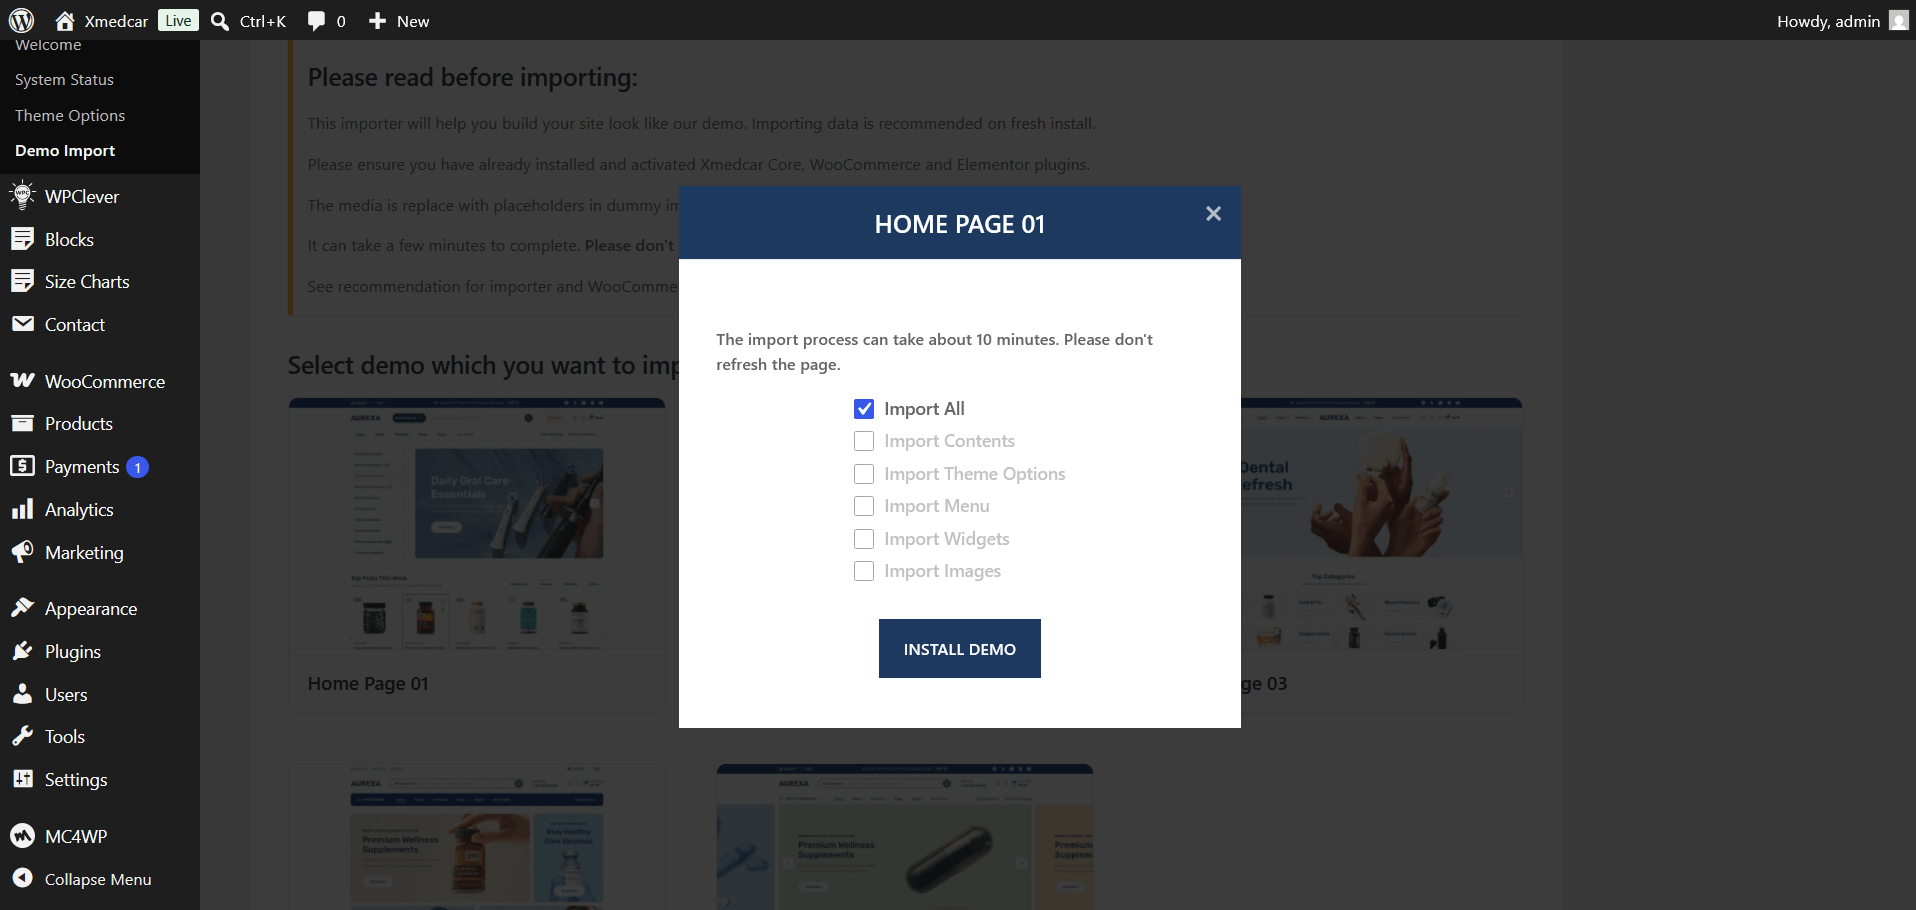
-
Wait for Completion Notice:
The import process takes approximately 5 to 10 minutes depending on your hosting server speed. Please do not close or refresh your browser tab until the completion message is displayed.
Notice: All sample stock images used in the live demo website are for preview purposes only and are substituted with placeholder images during import.
Theme & Plugin Translation Guide
Xmedcar is fully translation-ready and localized for any language. The easiest way to translate theme and plugin strings directly from your WordPress Dashboard is using the free Loco Translate plugin.
Important Location Notice: To translate your entire store, you need to translate both the main Xmedcar Theme and the bundled Xmedcar Core Plugin. Always select System (languages/loco/) or Custom as the file location when creating a new language. Avoid choosing the Author location, as files stored inside theme/plugin folders will be overwritten during updates.
Part 1: Translating the Xmedcar Theme
-
Install Loco Translate Plugin:
Navigate to Plugins => Add New, search for Loco Translate, install, and activate it. -
Select Xmedcar Theme:
Go to Loco Translate => Themes on your admin sidebar and click Xmedcar.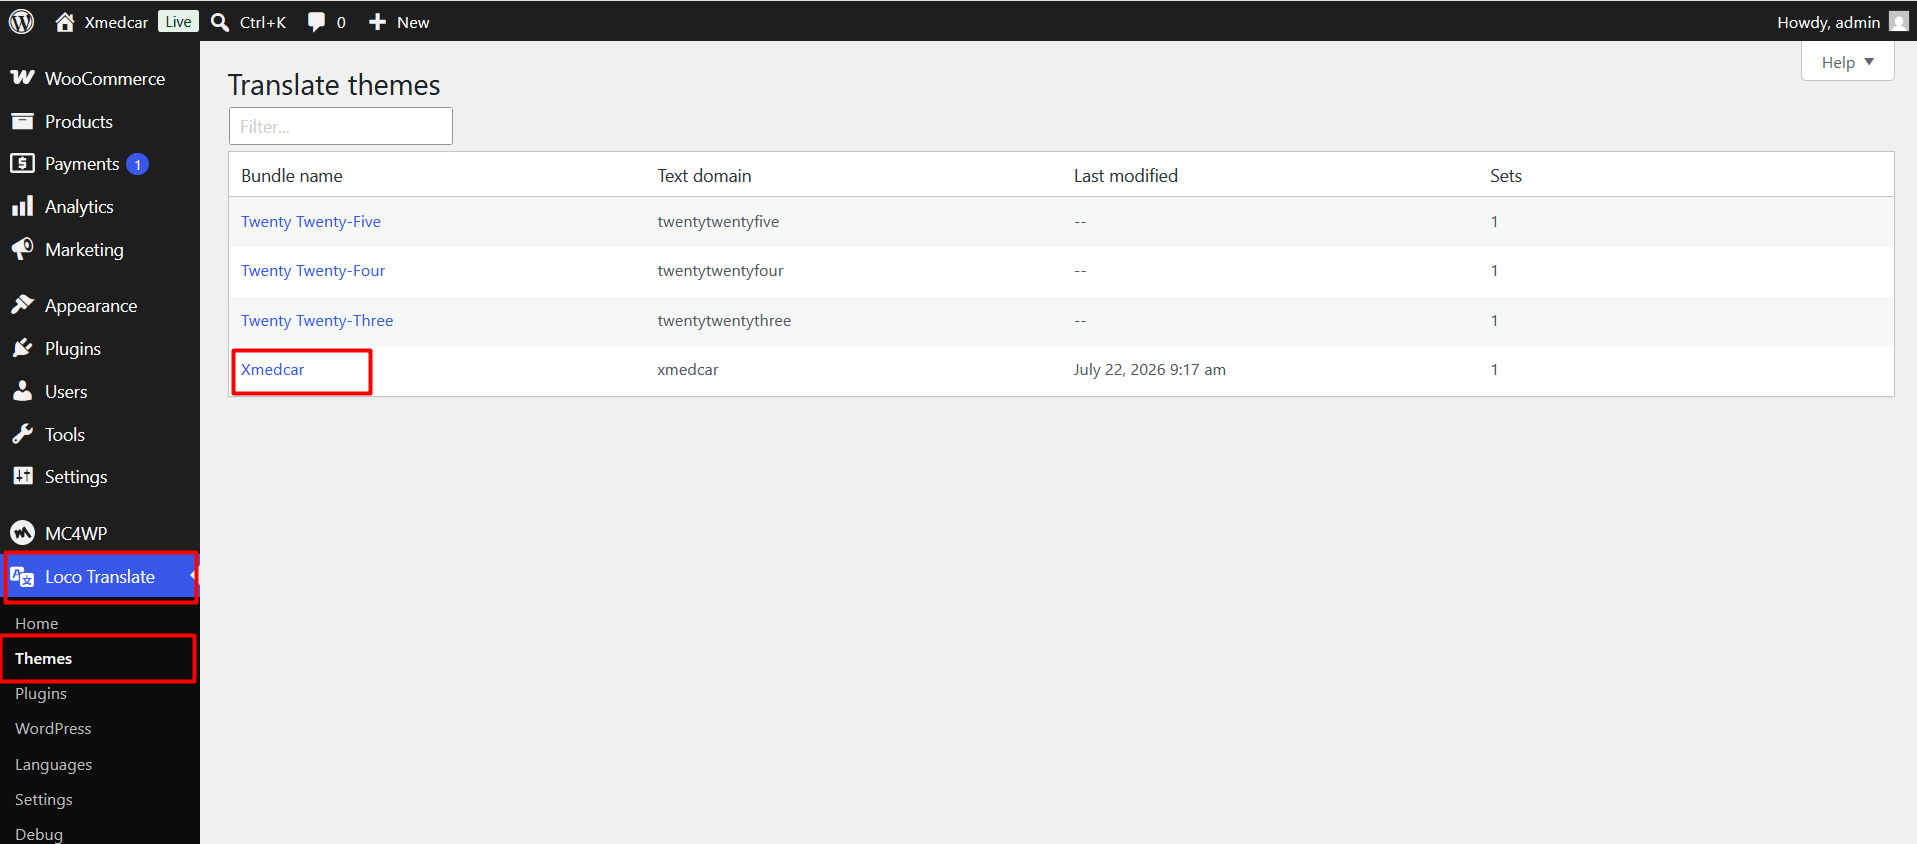
-
Add New Language:
Click the New Language link at the top of the page.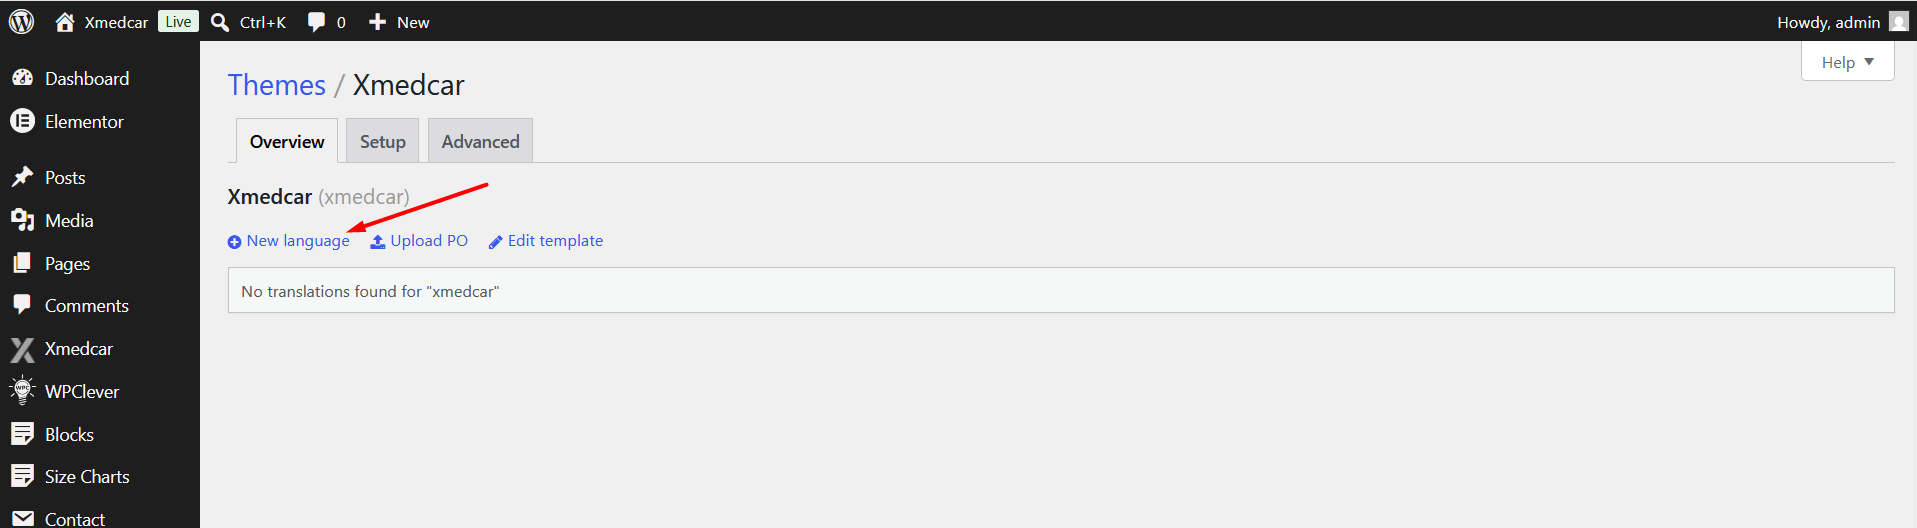
-
Choose Language & Safe Location:
Select your website's target language from the dropdown menu. Under Choose a location, select System (languages/themes/) then click Start Translating.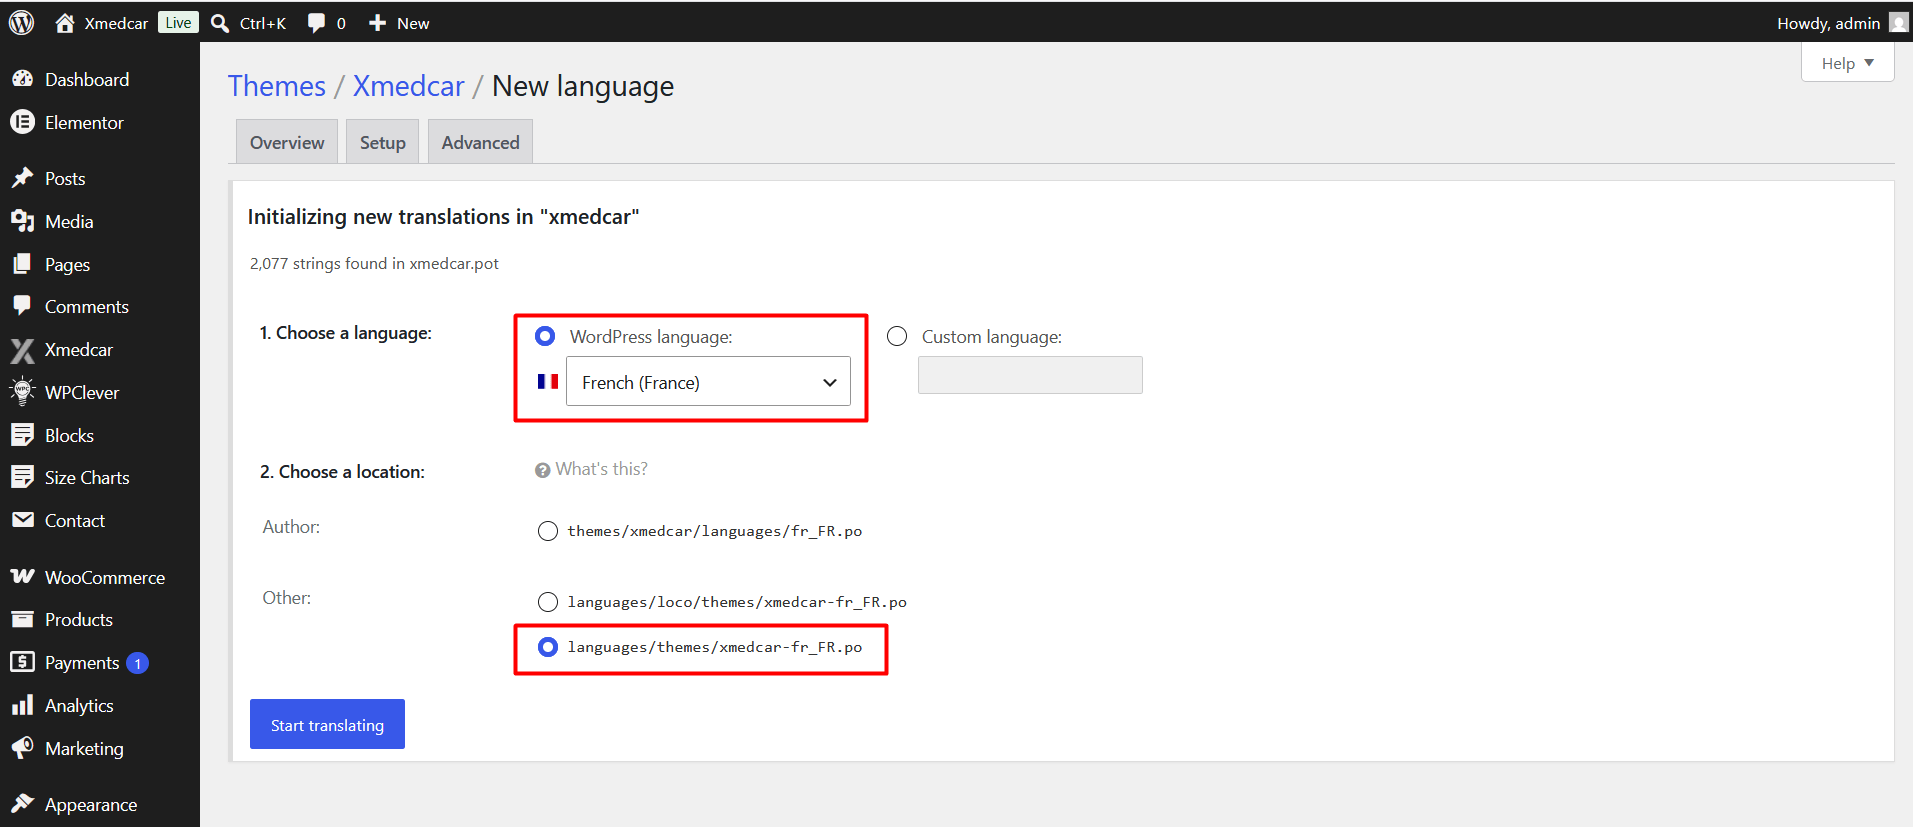
-
Translate Strings & Save:
Select any source text string from the list, enter your translation in the bottom translation pane, and click Save.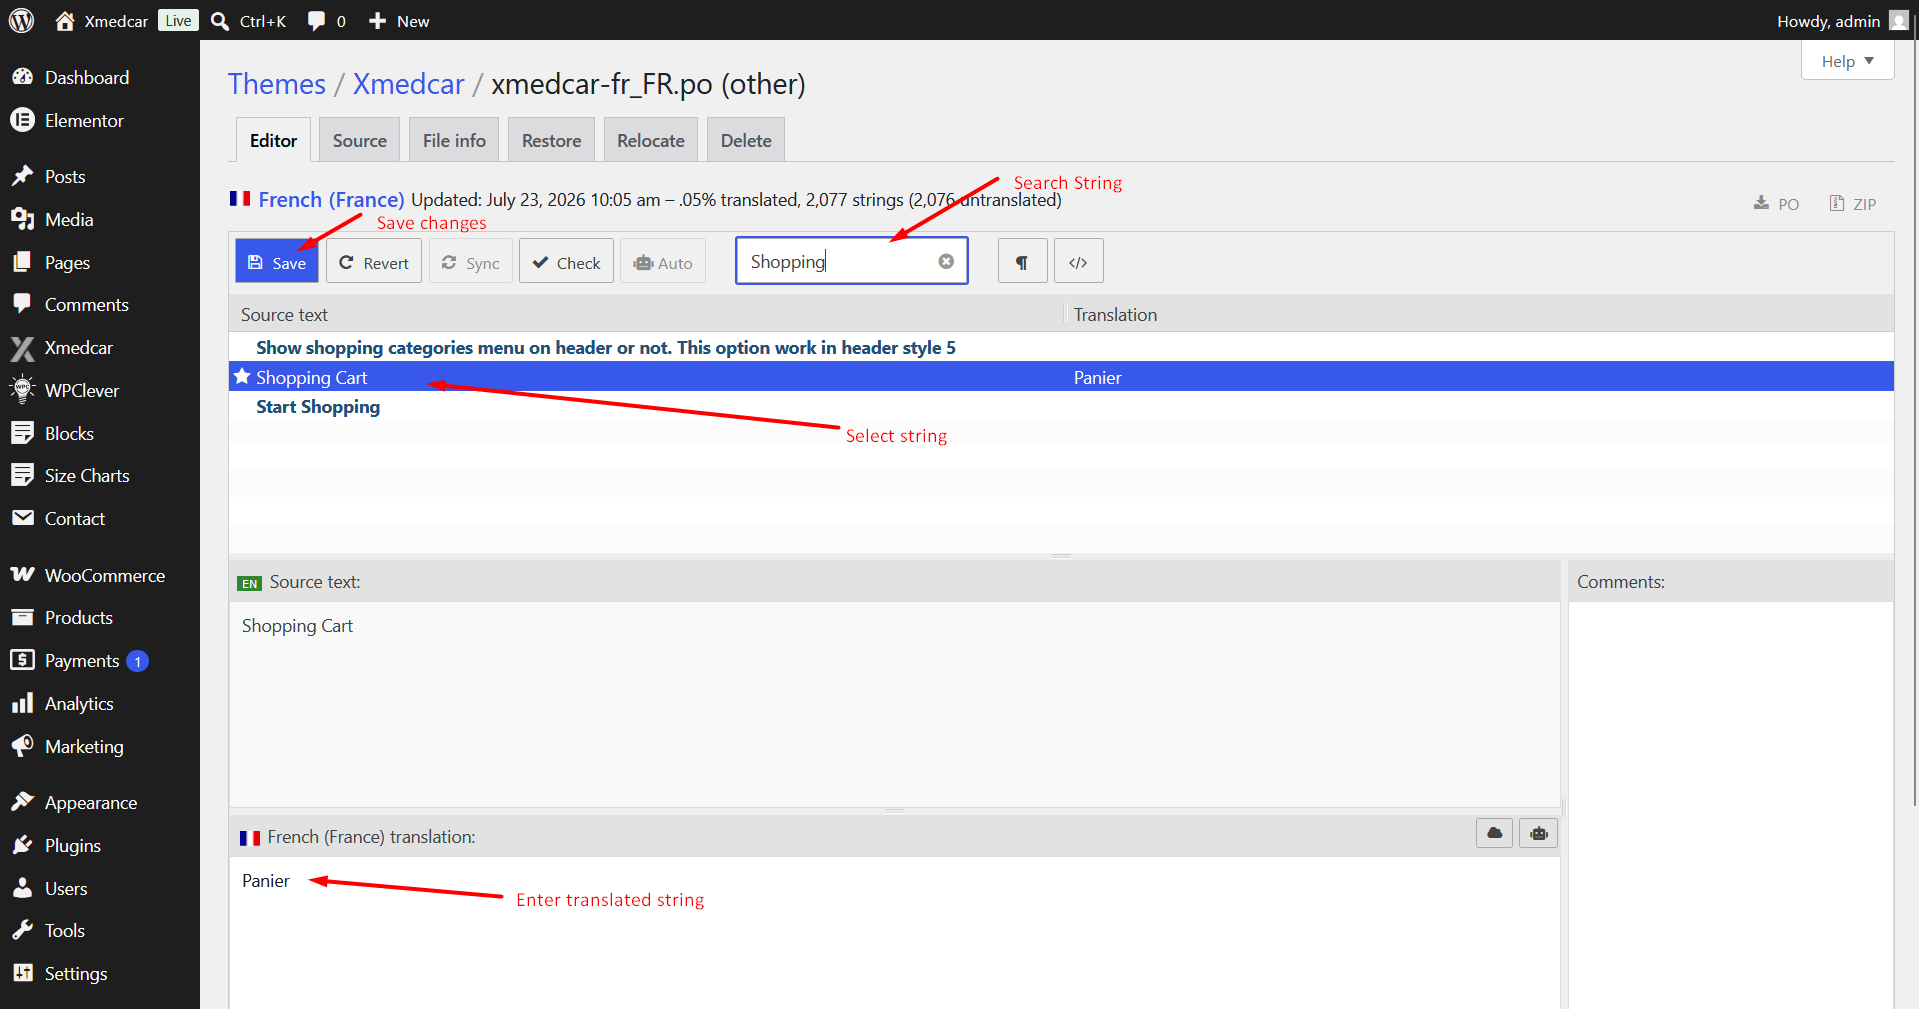
-
Syncing New Strings After Updates:
Whenever you update the theme in the future, open your language file in Loco Translate and click the Sync button to automatically retrieve new strings.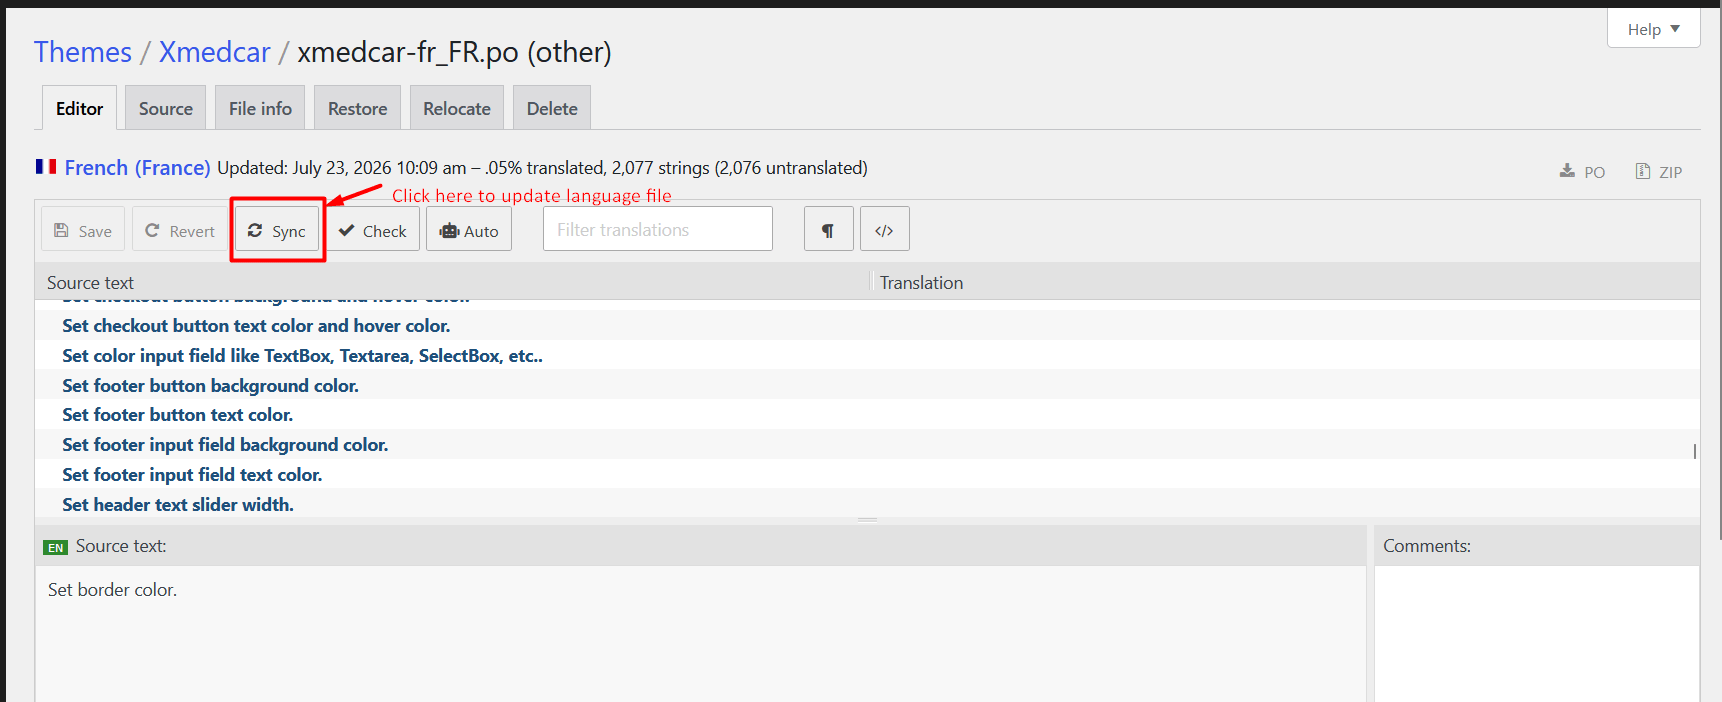
Part 2: Translating the Xmedcar Core Plugin
-
Select Xmedcar Core Plugin:
Navigate to Loco Translate => Plugins and click Xmedcar Core (or Xmedcar Extensions).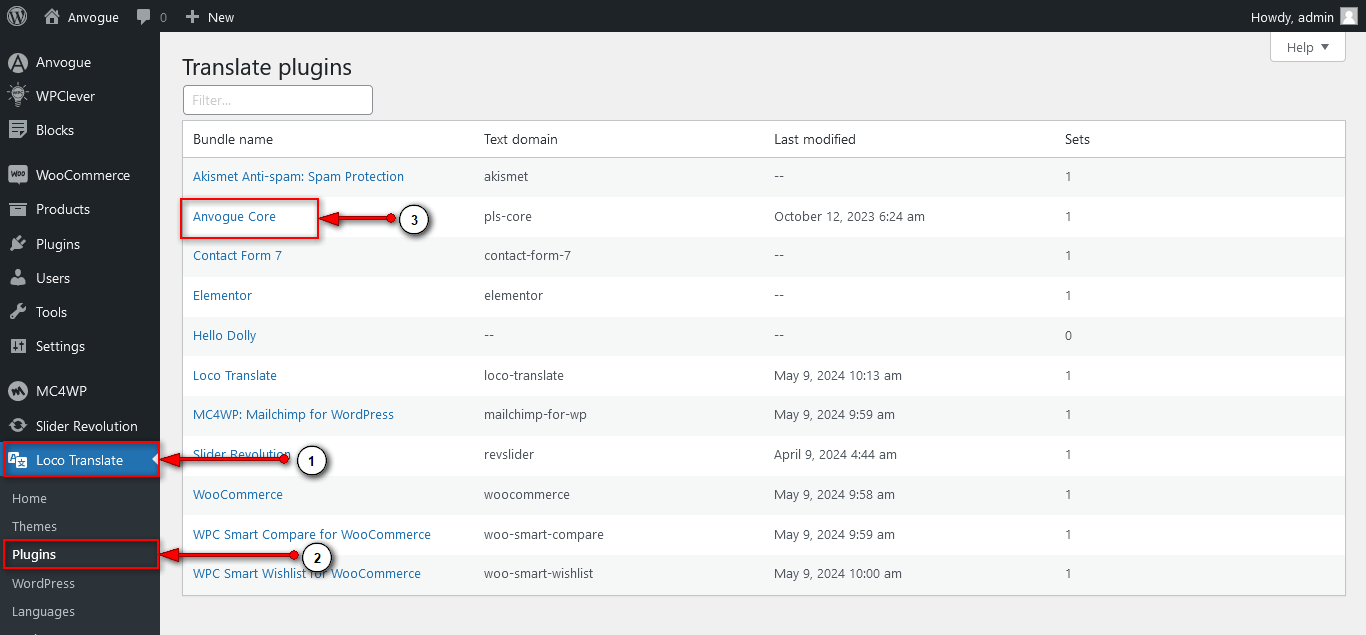
-
Add New Language:
Click the New Language link.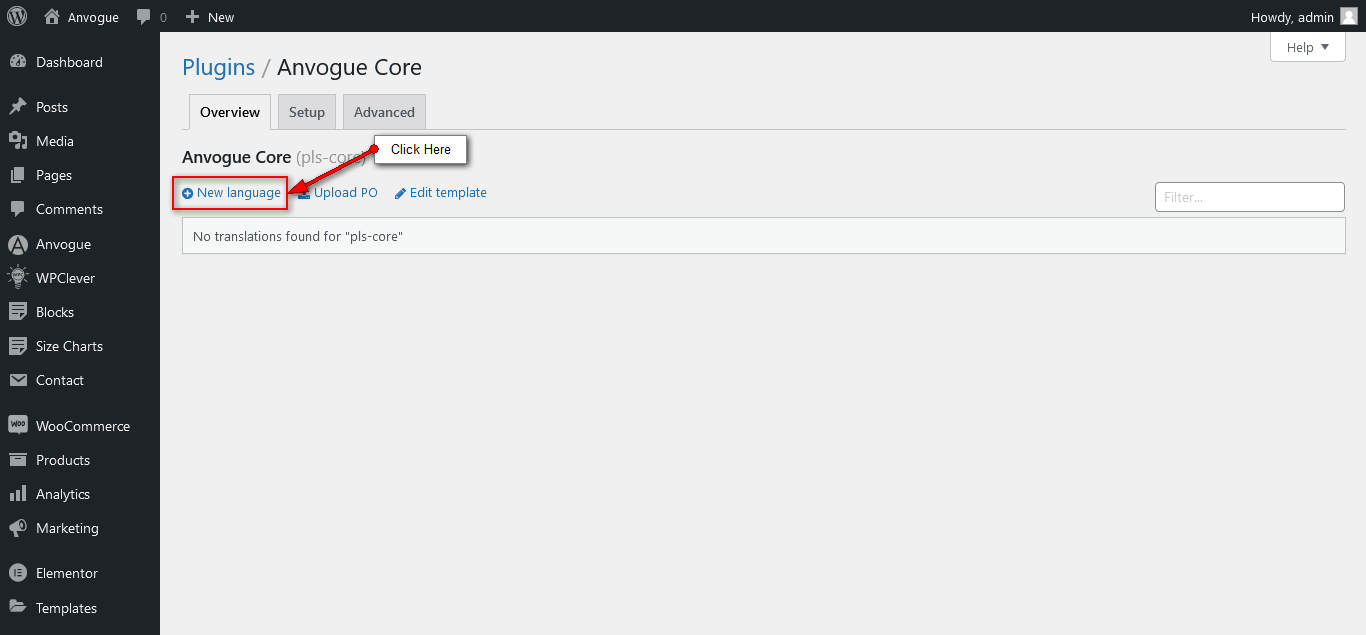
-
Choose Language & Safe Location:
Select your target language, choose System (languages/plugins/) as the location, and click Start Translating.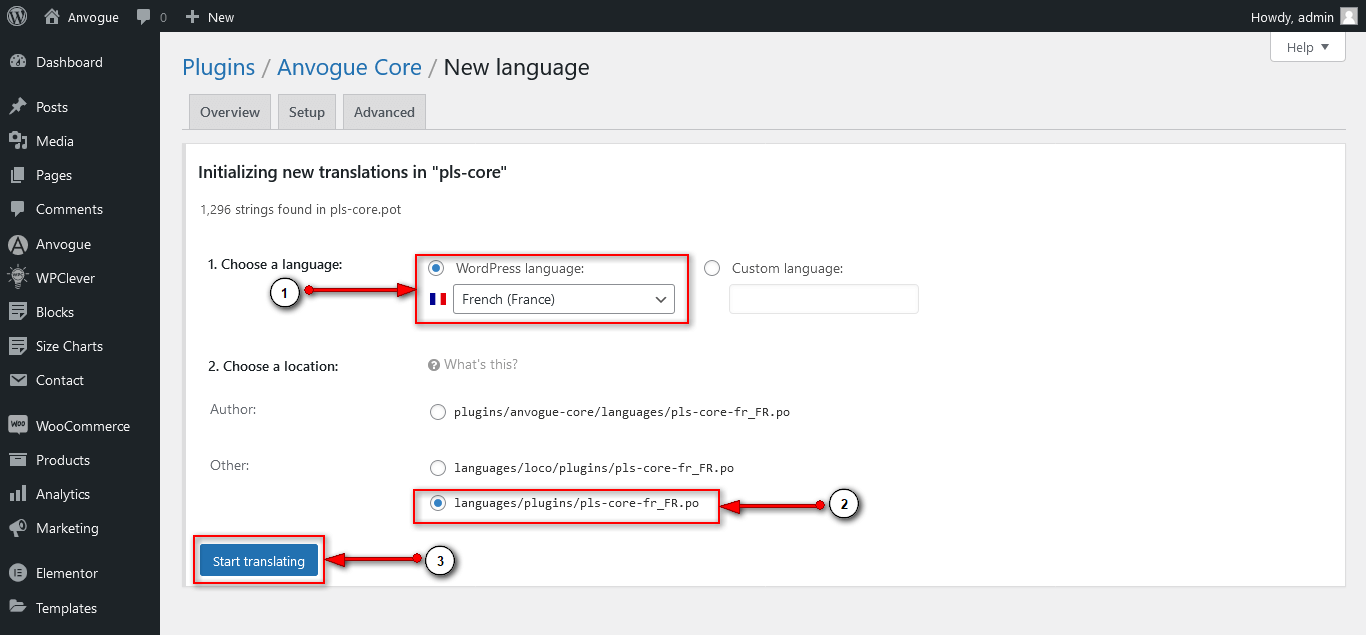
-
Translate Plugin Strings & Save:
Select plugin source strings, type your translated text, and click the Save button.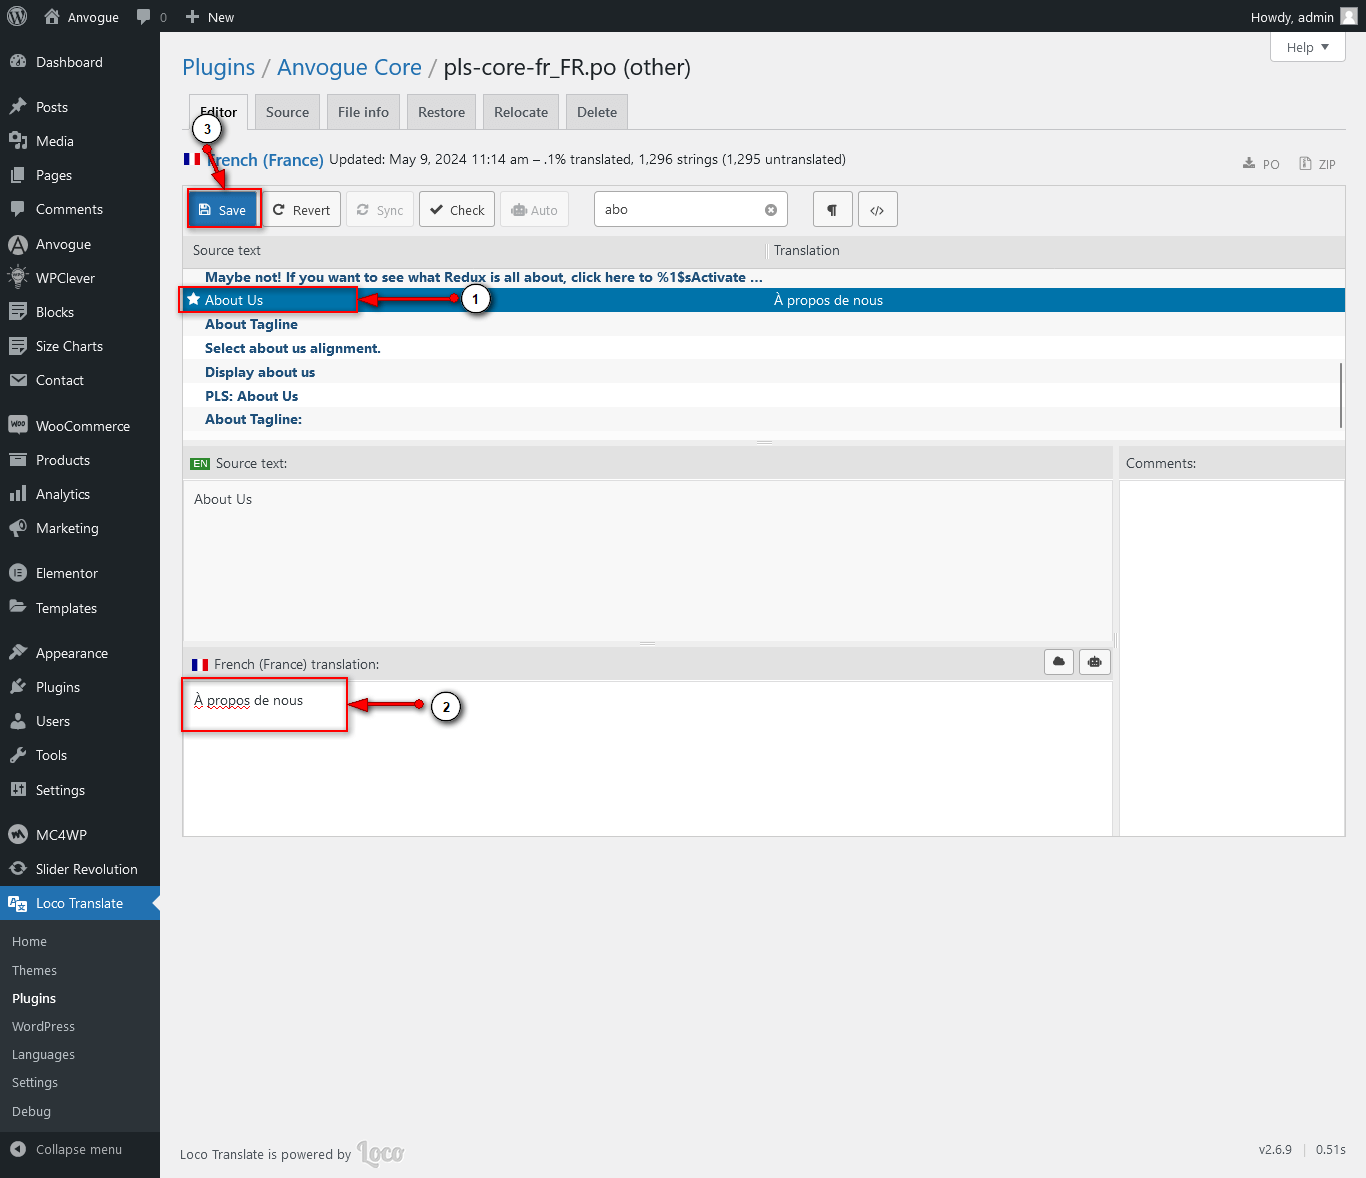
-
Sync Plugin Strings:
Click the Sync button after updating the plugin to update string catalogs automatically.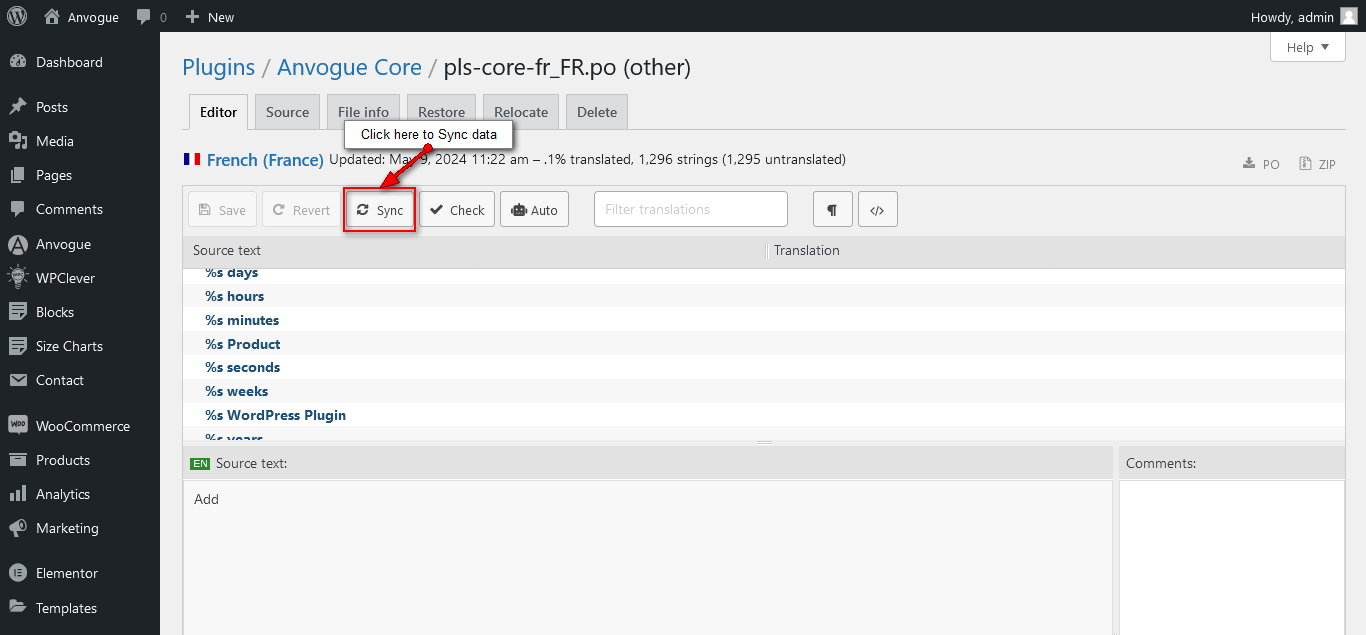
3) Use WPML with Xmedcar
Xmedcar theme is fully compatible with WPML plugin, the most famous plugin for building multilingual websites. Below you will find documentation for using WPML plugin with xmedcar. If you’ve purchased WPML and have any questions or issues, please check the links below.
- WPML Plugin - The highly recommended plugin to manage multi-lingual sites
- WPML Forum Support - If you bought WPML then you get free support from their amazing team
- Translating Widgets -Tutorial recommended by wpml team for translating widgets
Translate With WPML Guide
Xmedcar is 100% certified compatible with WPML (WordPress Multilingual Plugin), the most powerful translation plugin for WordPress and WooCommerce. WPML makes it easy to translate your entire store into multiple languages, support multi-currency checkouts, and manage multilingual SEO.
Part 1: Installing Required WPML Components
To set up WPML with Xmedcar, install and activate the following official WPML plugins via the OTGS Installer or manual plugin upload:
- WPML Multilingual CMS: The core translation engine.
- String Translation: Translates theme options, headers, footers, and widget texts.
- Translation Management: Manages translation jobs, automatic translations, and translators.
- Media Translation: Displays alternate images and media per language.
- WooCommerce Multilingual (WCML): Translates WooCommerce products, categories, checkout pages, and multi-currency pricing.
Part 2: Running the WPML Setup Wizard
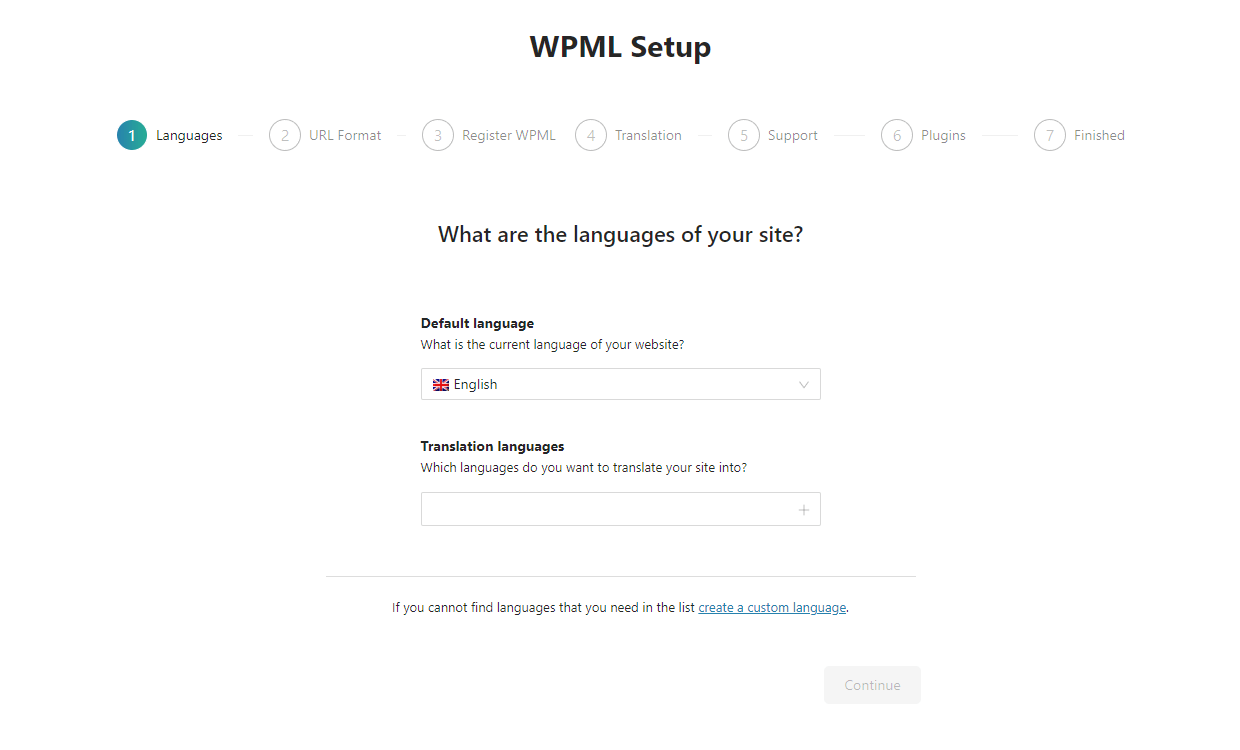
When you activate WPML for the first time, a setup wizard automatically launches to guide you through initial site setup:
-
Choose Site Languages:
Select your website's default language and add additional target languages. -
Select Language URL Format:
Choose how language URLs will be formatted (e.g., subdirectoriesyoursite.com/fr/or parameters). -
Register WPML Key:
Enter your WPML site key to receive automatic plugin updates. -
Select Translation Mode:
Choose between Translate Everything or Translate Some mode.
Part 3: Translation Modes Explained
WPML offers two primary translation modes depending on your workflow:
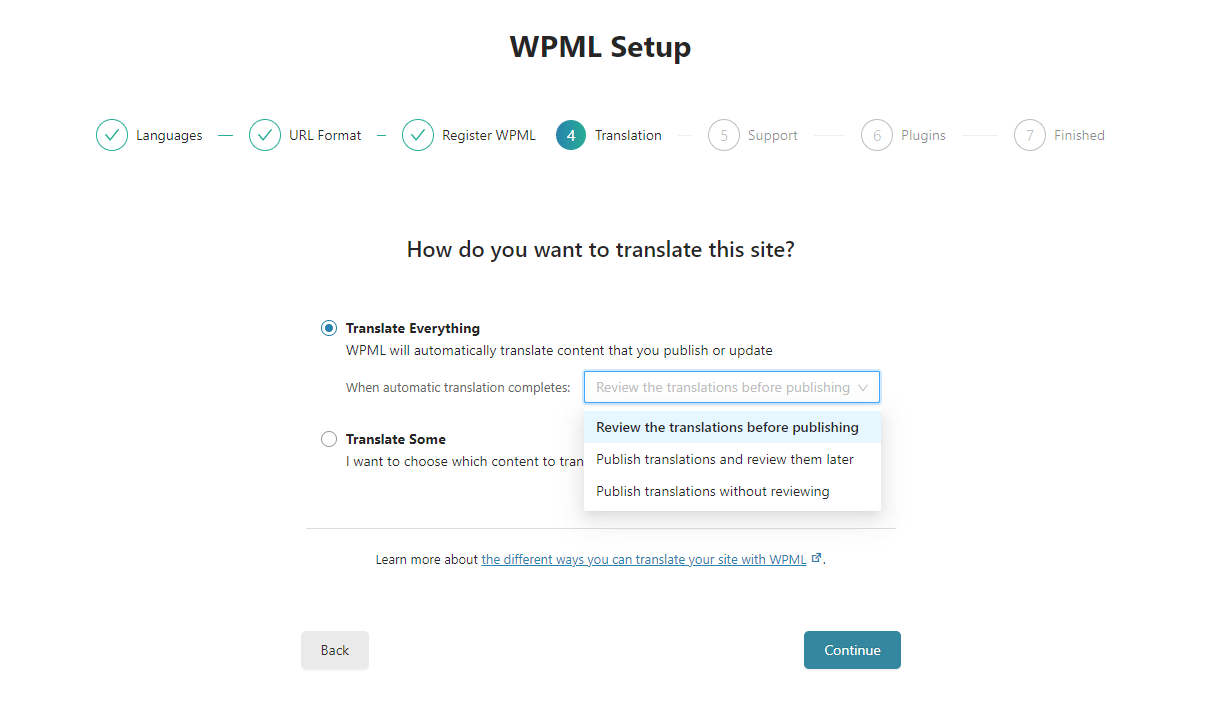
1. Translate Everything (Automatic Translation)
In Translate Everything mode, WPML automatically translates your entire site in minutes using Google or DeepL neural machine translation. As you publish new pages or products, WPML translates them instantly in the background.
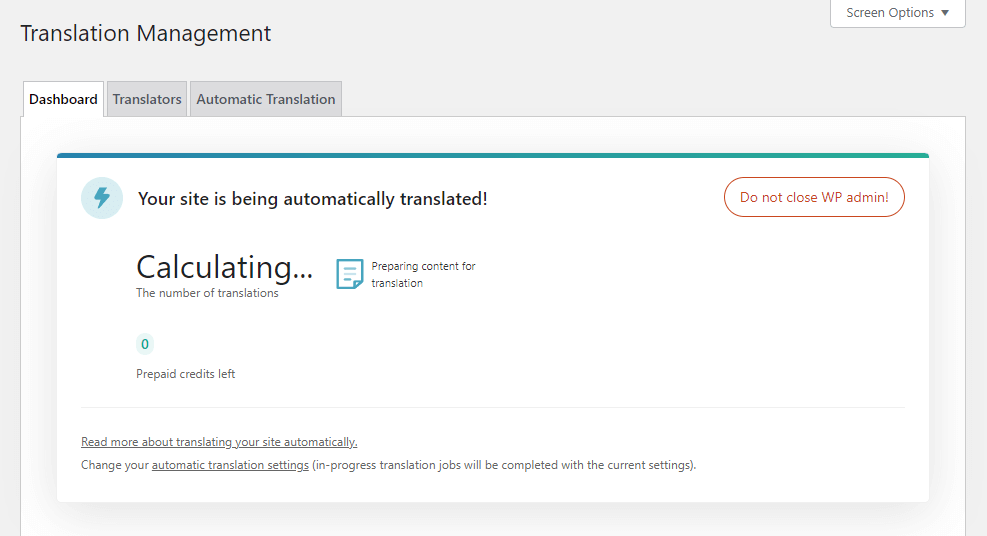
Supported automatic content types include:
- Pages, Posts, and Blog Content
- WooCommerce Products, Categories, and Attributes
- Custom Post Types and Custom Taxonomies
2. Translate Some (Manual / Translator Mode)
If you prefer complete manual control or work with professional translators, choose Translate Some. Navigate to WPML => Translation Management to select specific content for translation.
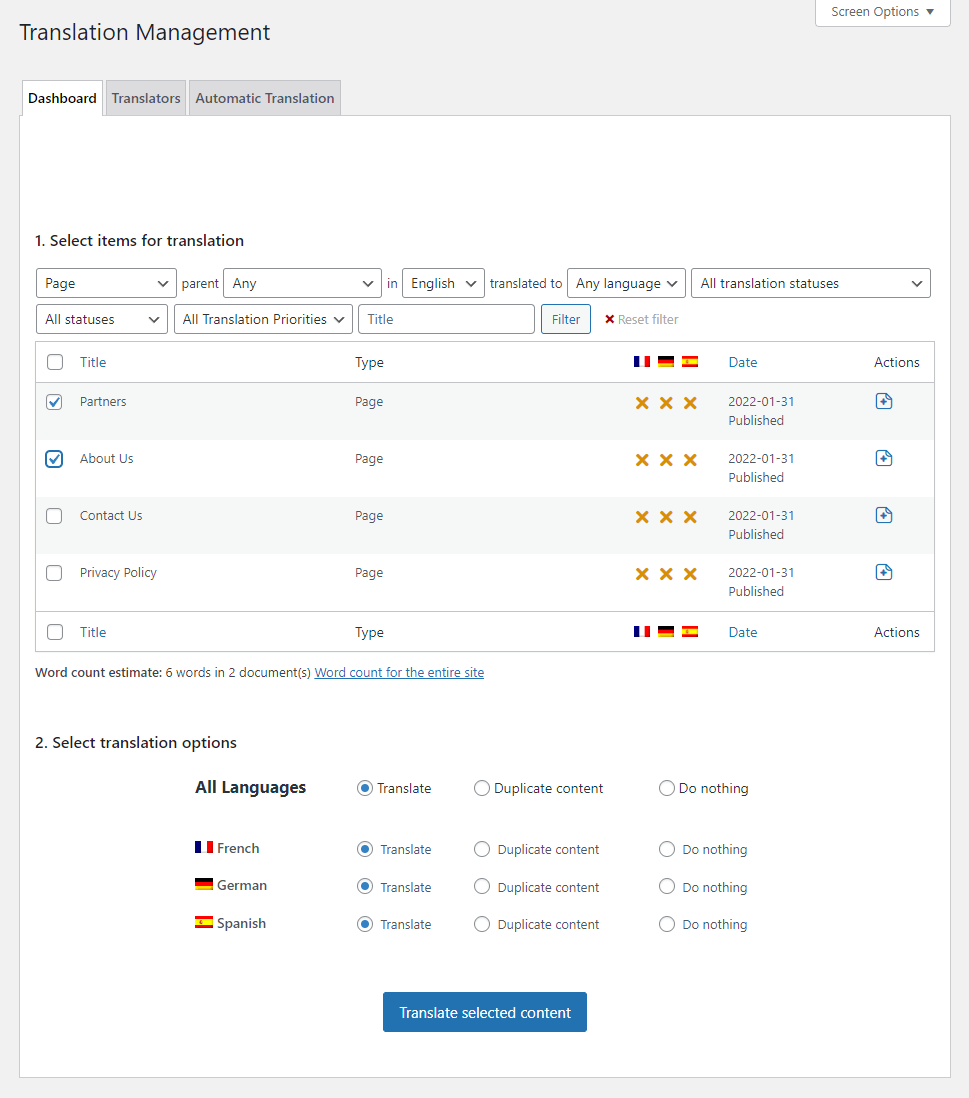
Translating Content Manually
-
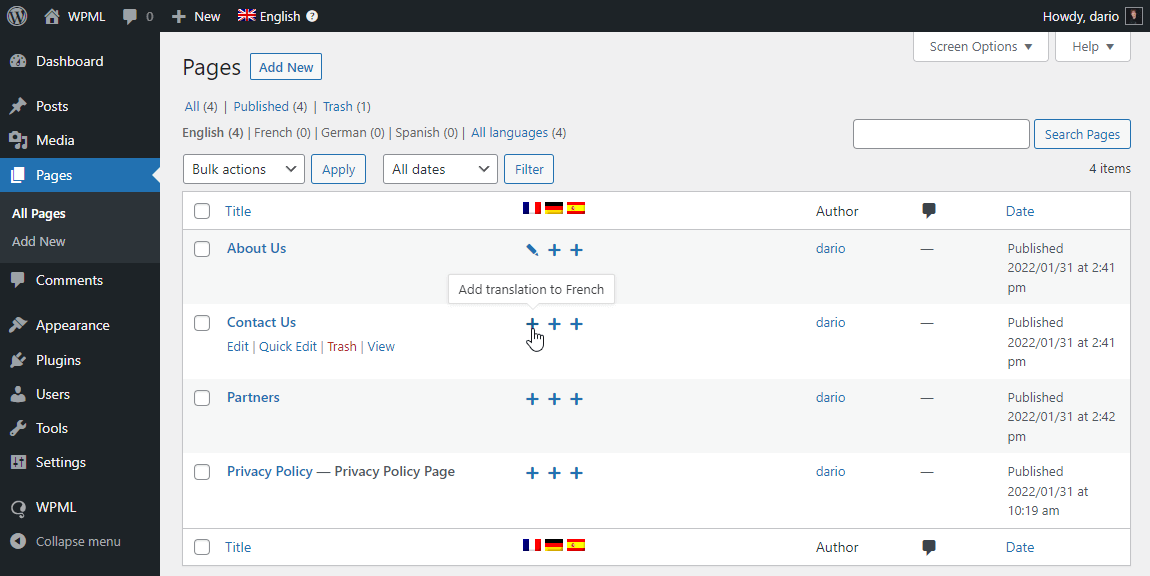
Go to Pages, Posts, or Products and click the Plus (+) icon next to your target language.
-
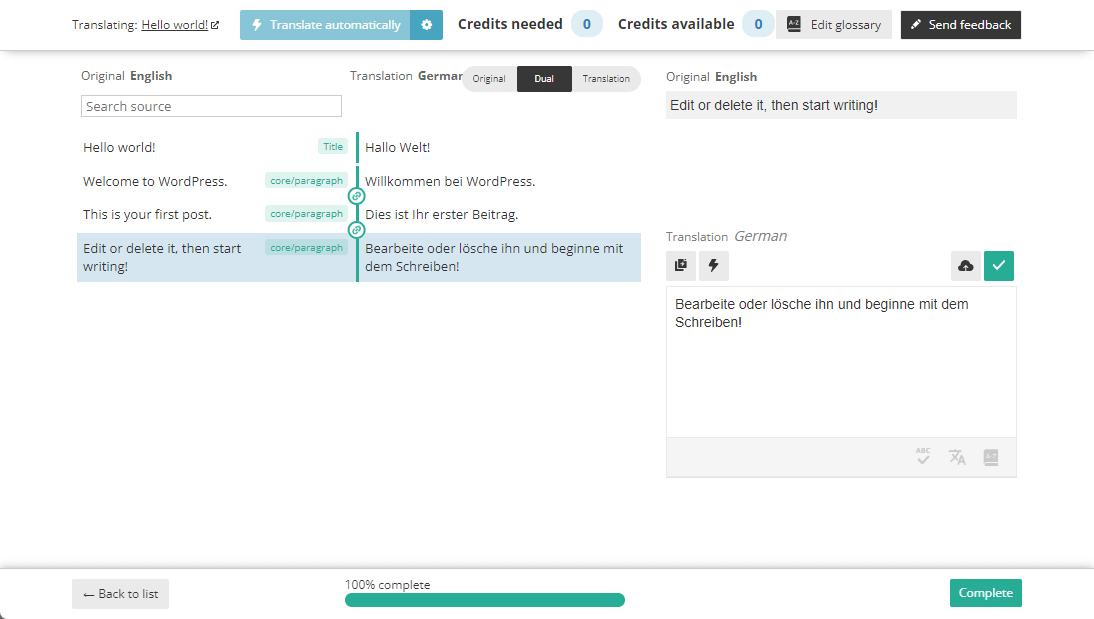
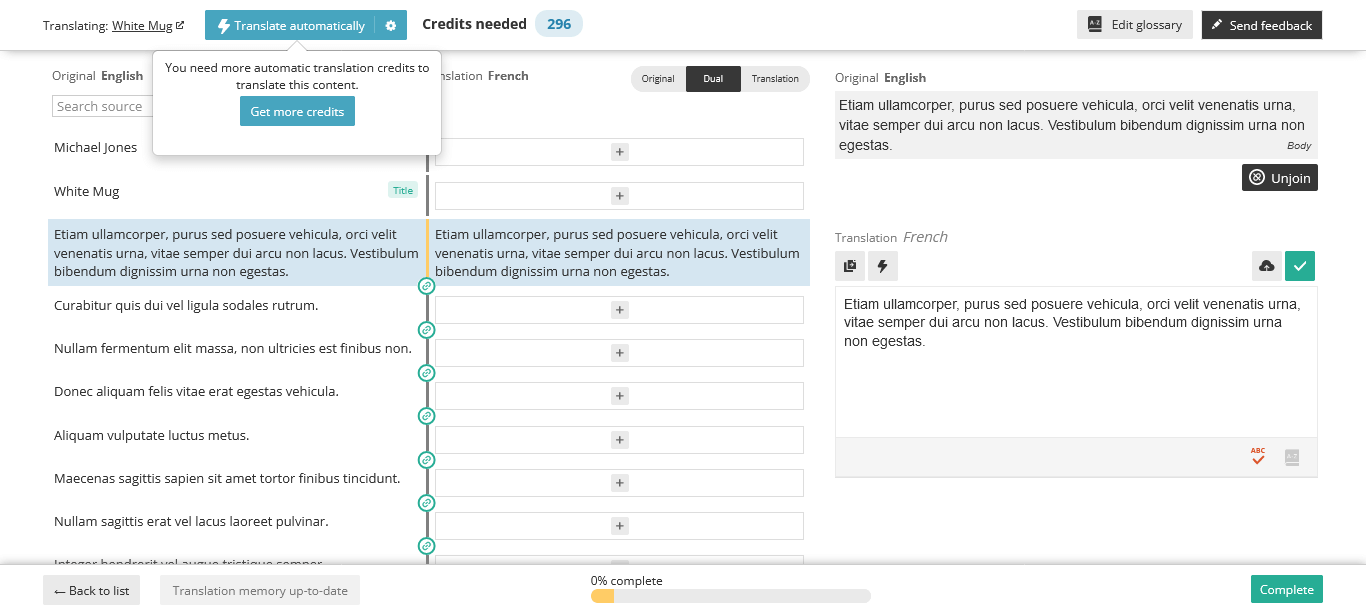
This opens WPML's Advanced Translation Editor featuring side-by-side translation, spell-checking, and automatic translation assistance. Enter your translations and click Complete.
Part 4: Custom Post Types & Taxonomies
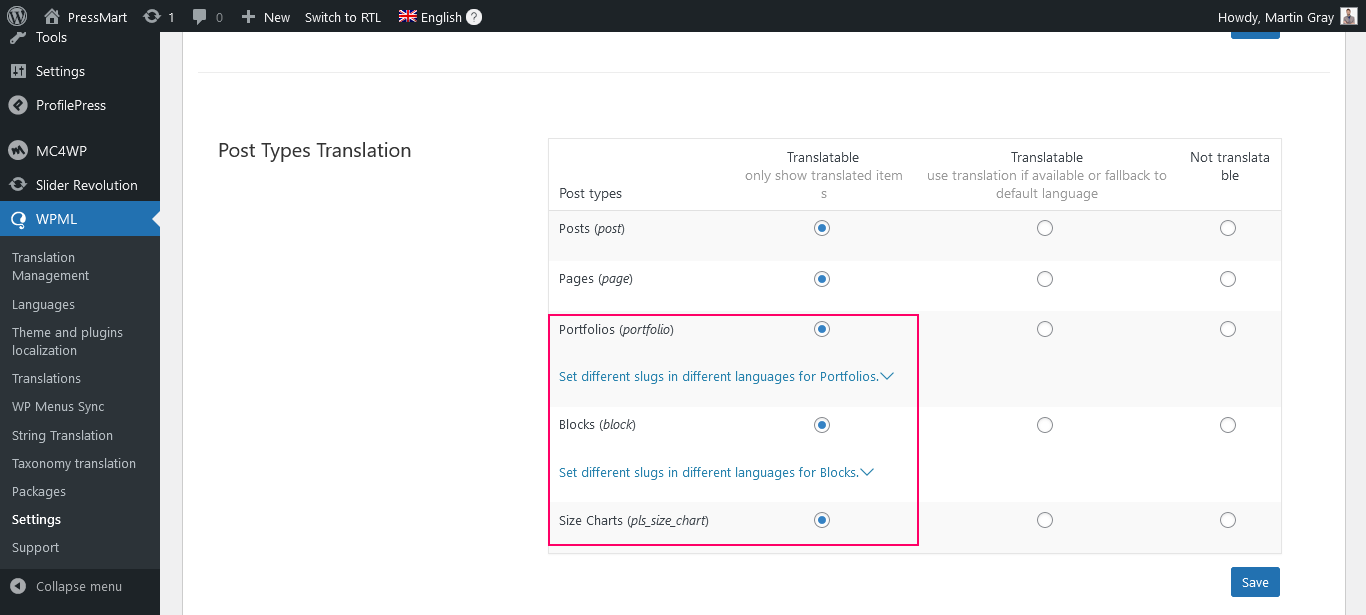
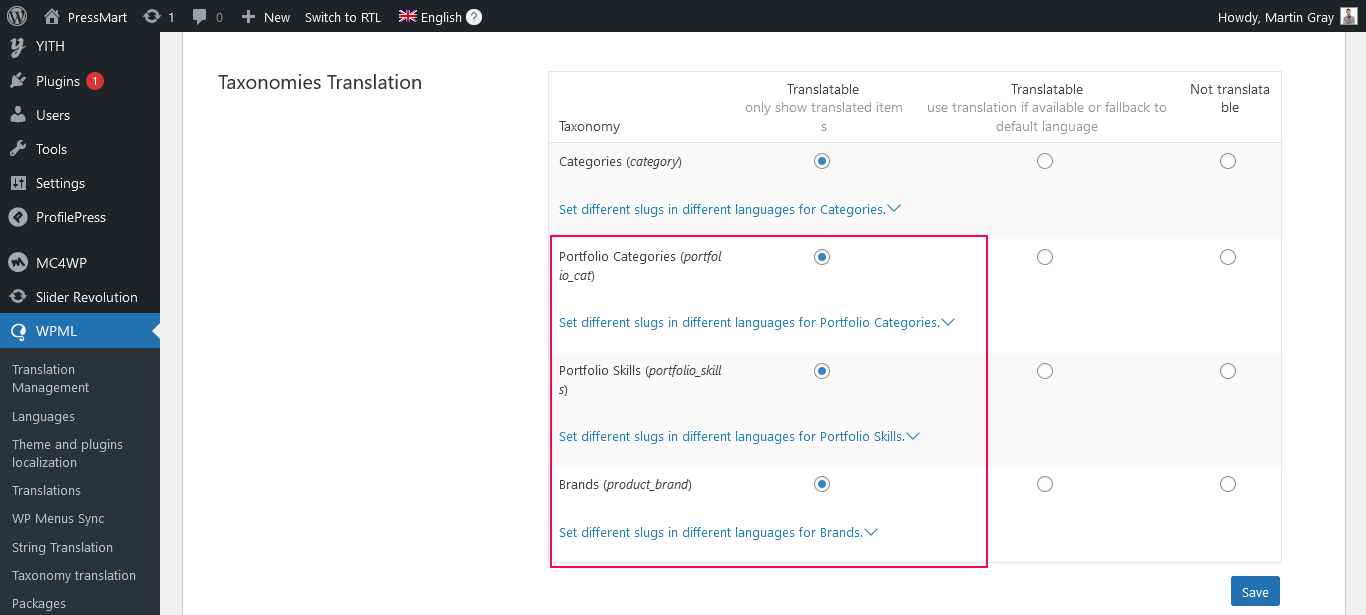
To translate custom post types (such as Header/Footer Blocks or Size Charts) and taxonomies, navigate to WPML => Settings => Multilingual Content Setup and set your post types and taxonomies to Translatable.
- Click the Plus (+) or Pencil (edit) icon next to the item.
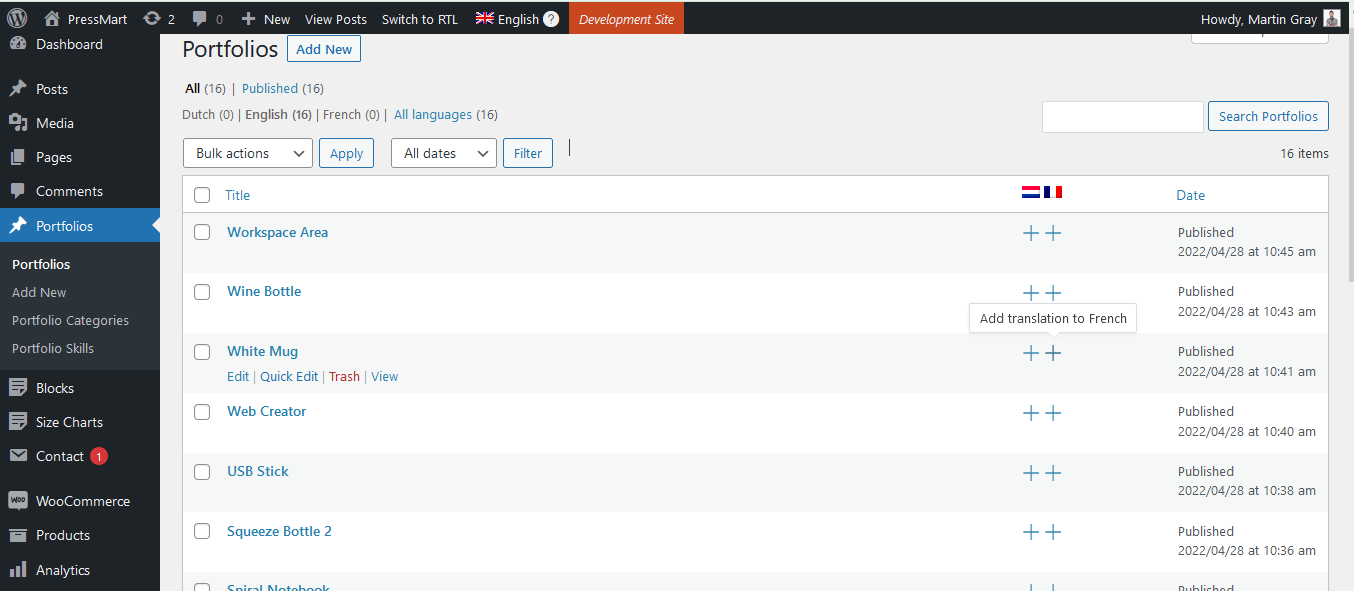
- Add your translated title and content in the translation editor, then save.
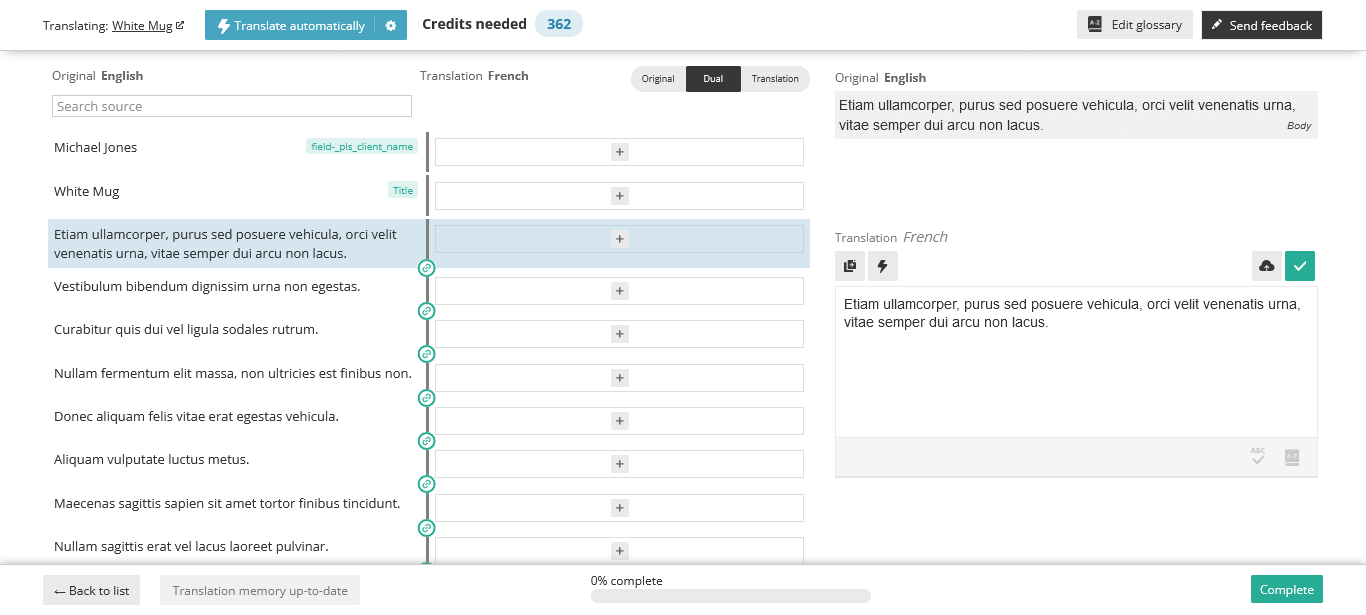
- To automatically translate post types, click Translate Automatically using WPML credits.
Part 5: Translating Theme & Plugin Strings
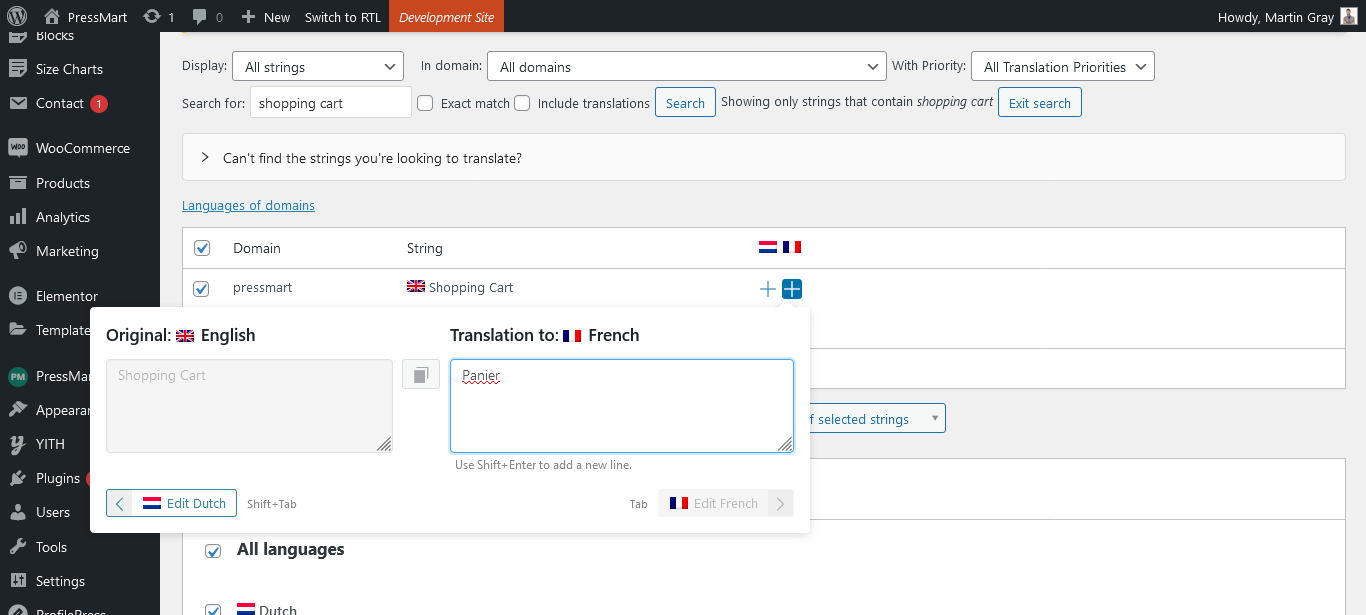
Strings that are not part of regular posts or pages (such as theme headers, footer copyrights, or button text) are translated using WPML String Translation.
-
Go to WPML => String Translation.
-
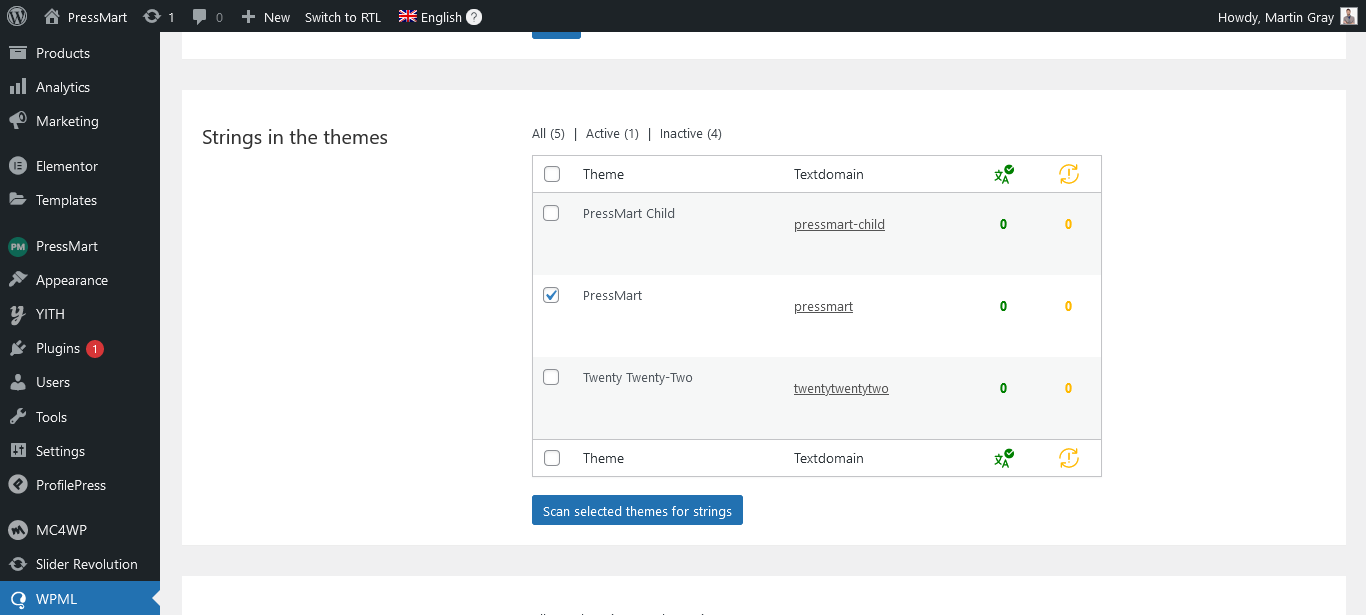
Scanning Theme & Plugin Texts: If a specific string is missing from String Translation, go to WPML => Theme and plugins localization, select Xmedcar Theme or Xmedcar Core Plugin, and click Scan selected themes for strings.
Part 6: Translating Custom Taxonomies, Menus & Widgets
-
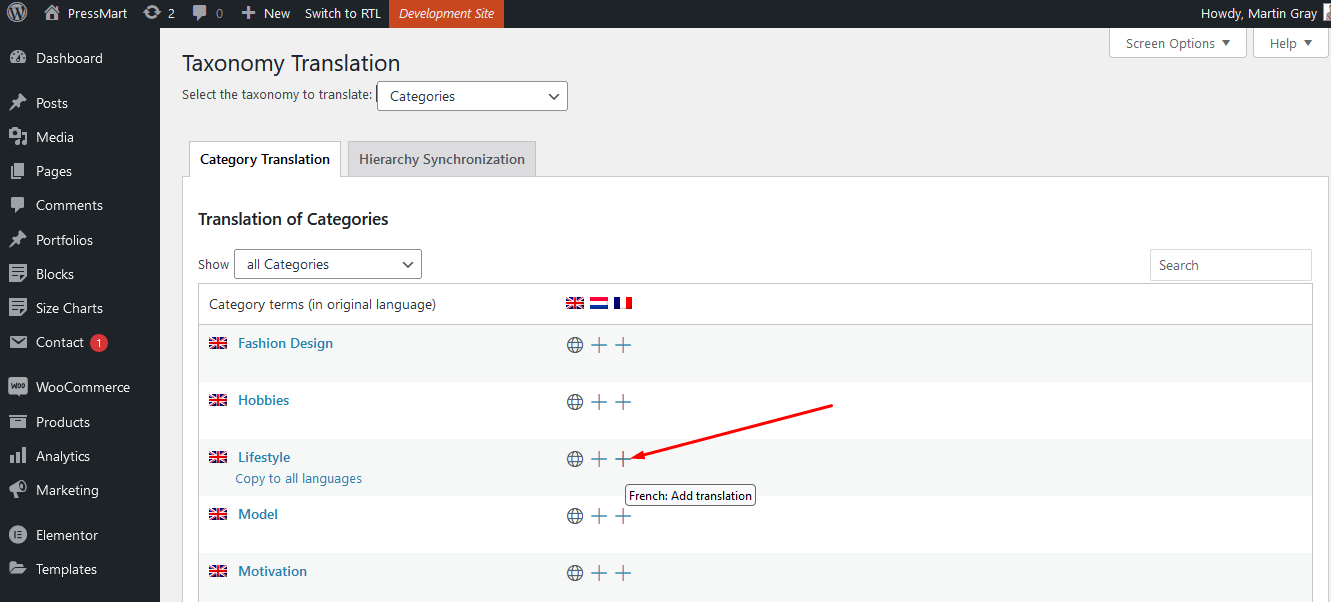
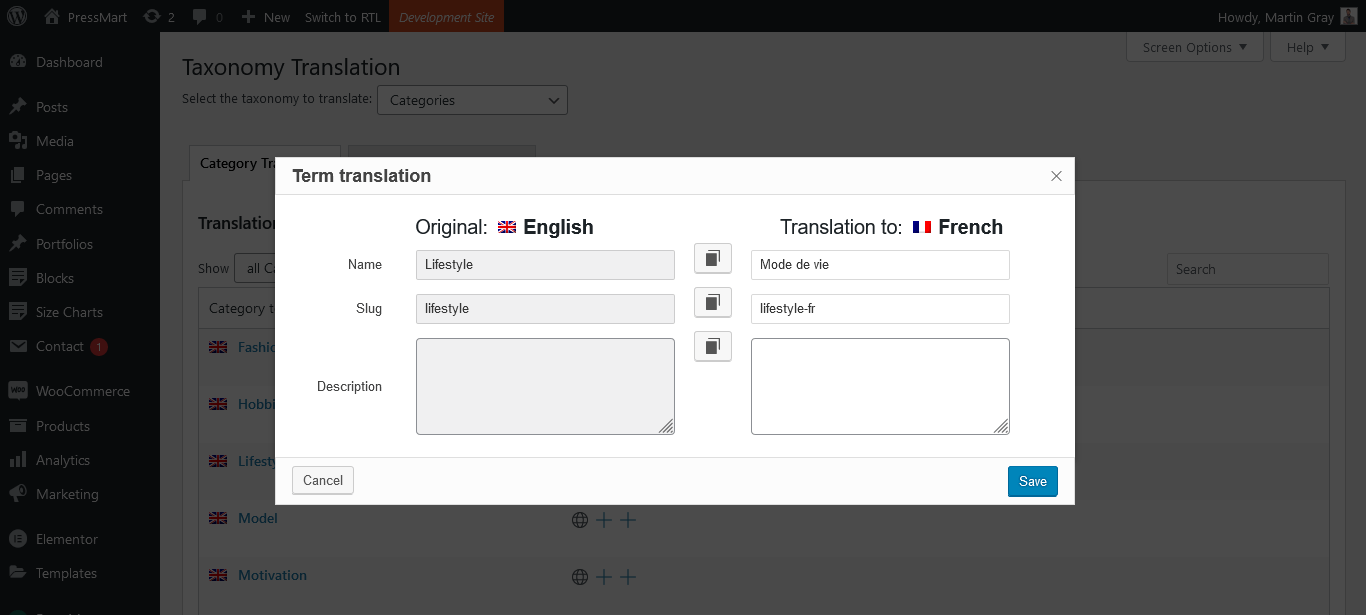
Taxonomy Translation: Go to WPML => Taxonomy Translation, select your product category, brand, or tag, click the Plus (+) icon, and enter language terms.
-
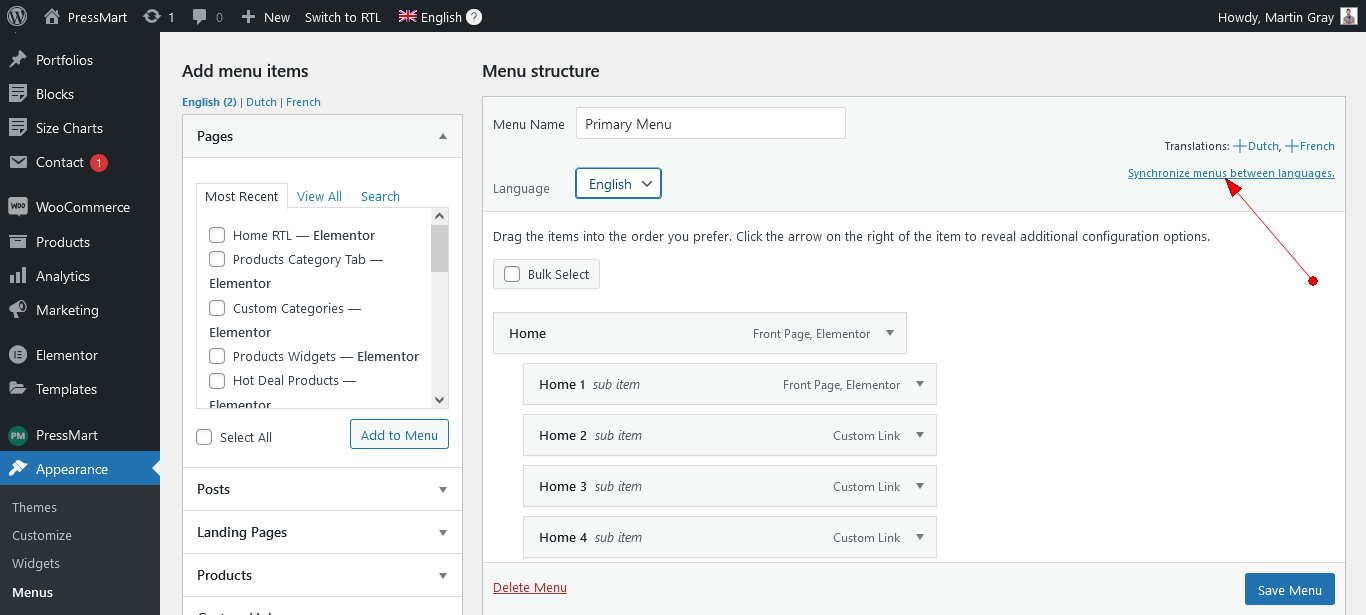
Menu Translation: Go to Appearance => Menus and click the language links at the top to create translated menu versions, or use WPML => WPML Menus Sync to automatically synchronize menu structures across all languages.
-
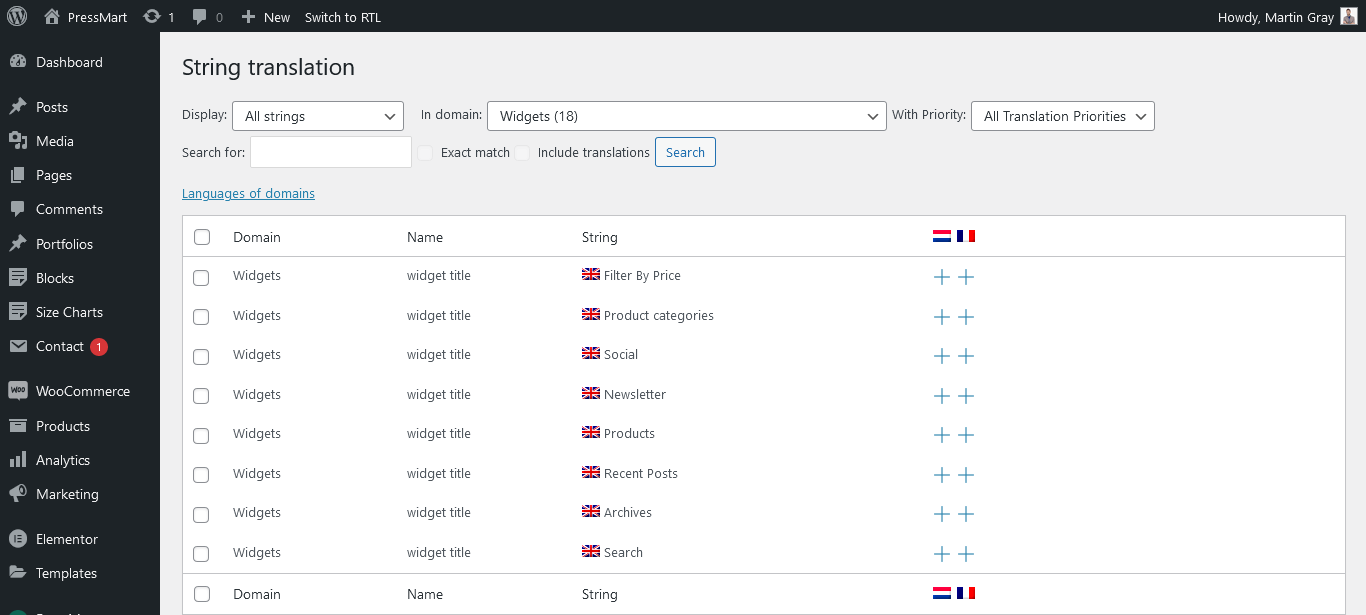
Widget Translation: Go to WPML => String Translation, select Widgets in the domain dropdown, and enter translated widget titles and text.
Part 7: WooCommerce Multilingual & Multi-Currency Setup
WooCommerce Multilingual (WCML) enables multi-currency pricing, localized cart and checkout pages, and translated email notifications.
- Store Settings: Go to WooCommerce => WooCommerce Multilingual to manage product translations and checkout pages.
- Enabling Multiple Currencies: Navigate to the Multi-currency tab in WooCommerce Multilingual to configure secondary currencies, exchange rates, and currency switchers.
Part 8: Translating Slider Revolution
Xmedcar includes Slider Revolution. To translate slides, create duplicate slides per language in Slider Revolution and set language visibility tags, or follow WPML’s Revolution Slider Translation Guide.
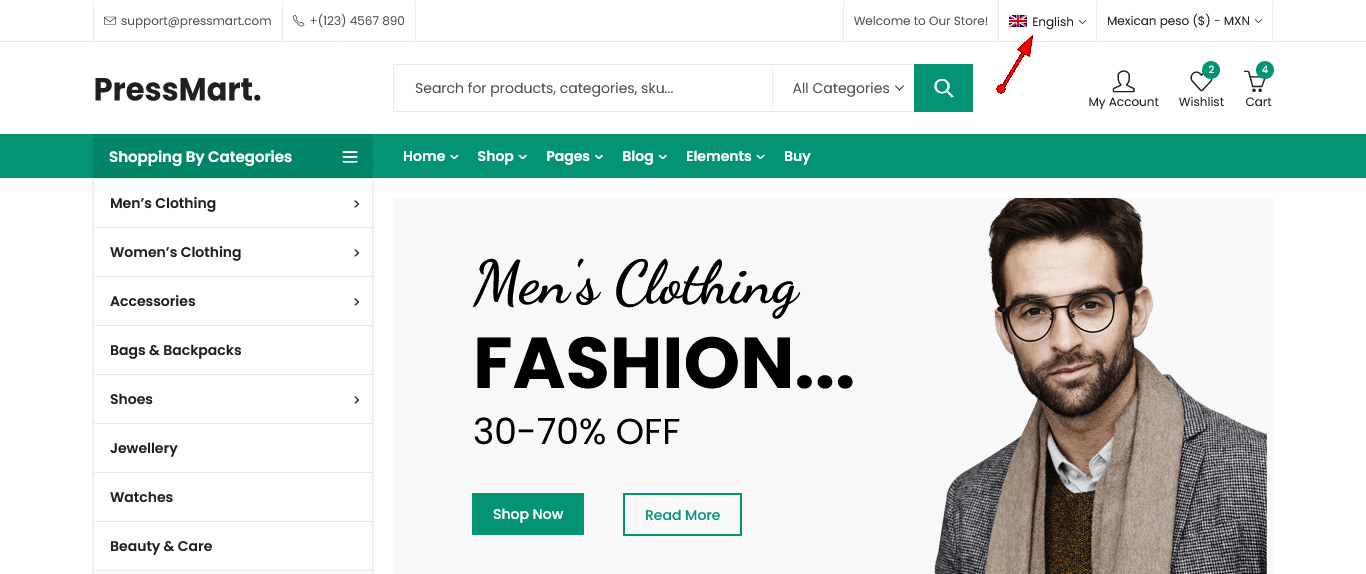
Part 9: Language Switcher in Theme Header
To display a language switcher dropdown in your header:
-
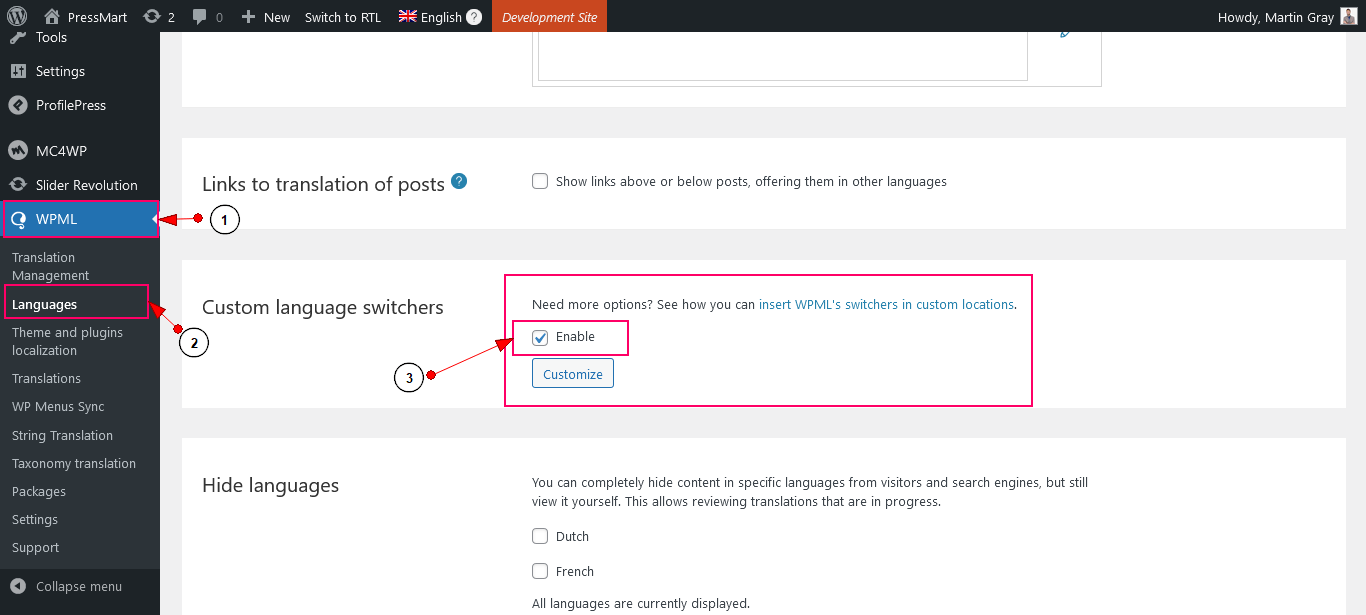
Go to WPML => Languages and enable Custom language switchers.
-
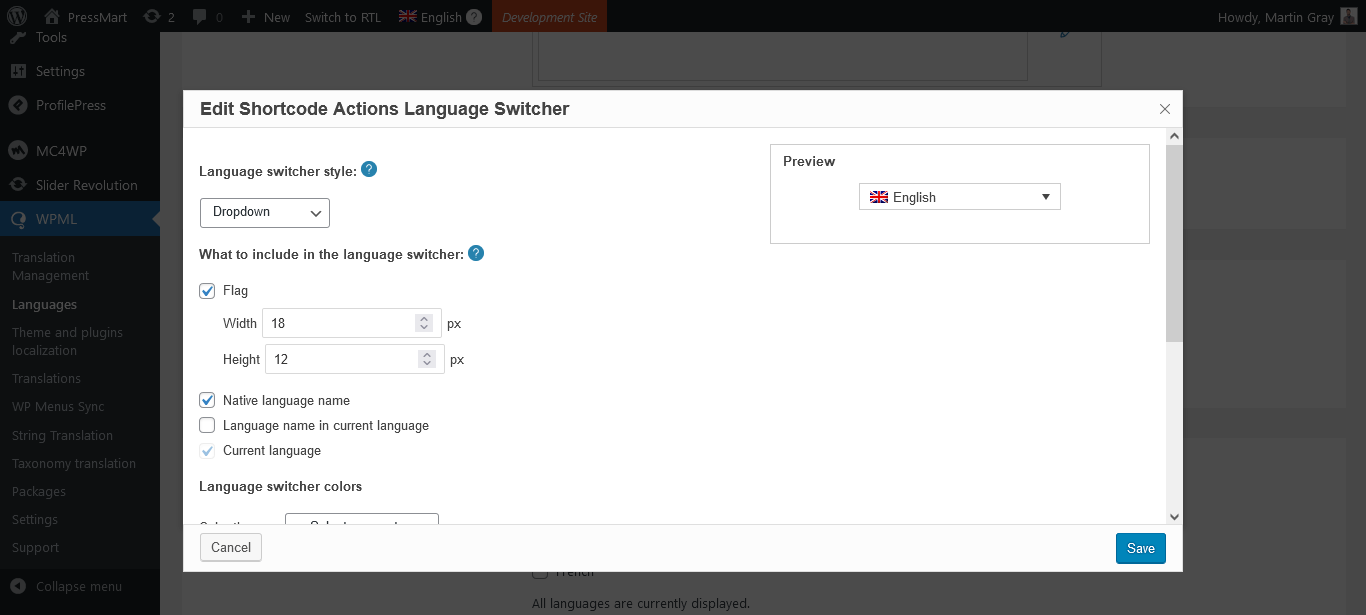
Configure language switcher options (flags, native language names, dropdown style).
-
The language switcher will render in your header:
Part 10: Useful WPML Documentation Links
Updating the Theme
Regularly updating your Xmedcar theme ensures your site stays compatible with the latest WordPress versions, WooCommerce releases, and security updates.
Important Safety Notice: Updating the theme will NOT delete your posts, pages, WooCommerce products, or Theme Options settings stored in your database. However, any direct code modifications made inside the parent theme folder xmedcar/ will be overwritten. Always use a Child Theme for custom code modifications and create a full backup of your website before updating.
You can update the Xmedcar theme using any of the three methods below:
- Method 1: Automatic Updates via Envato Market Plugin (Recommended)
- Method 2: Manual Update via WordPress Dashboard (Easy & Fast)
- Method 3: Manual Update via FTP / cPanel File Manager
Method 1: Automatic Updates via Envato Market Plugin (Recommended)
-
Download & Install Envato Market Plugin:
Download the official Envato Market Plugin and install it via Plugins => Add New => Upload Plugin. -
Generate Envato API Token:
Go to Envato Market on your WordPress admin sidebar and follow the instructions to create a personal API token on ThemeForest. -
One-Click Theme Updates:
Once connected, theme update notifications will automatically appear under Dashboard => Updates or Envato Market => Themes whenever a new update is released. Simply click Update Theme.
Method 2: Manual Update via WordPress Dashboard (Easy)
-
Download Latest Theme Package:
Log in to your ThemeForest account and go to your ThemeForest Downloads page. Download the Installable WordPress file only (xmedcar.zip). -
Go to Themes Section:
Log in to your WordPress Dashboard and navigate to Appearance => Themes. -
Upload New Theme Version:
Click Add New at the top of the page, then click Upload Theme. Select the new xmedcar.zip file and click Install Now. -
Replace Current Theme:
WordPress will detect the installed version and display a comparison screen. Click the Replace current with uploaded button to complete the update.
Method 3: Manual Update via FTP / cPanel File Manager
-
Extract Theme Folder:
Download xmedcar.zip from ThemeForest and extract it on your computer to get thexmedcarfolder. -
Connect via FTP or cPanel:
Connect to your server using an FTP client (FileZilla) or open cPanel File Manager, then navigate to../wp-content/themes/. -
Replace Theme Files:
Delete or rename the oldxmedcarfolder inside../wp-content/themes/and upload the new uncompressedxmedcarfolder in its place.
Post-Update Checklist
-
Update Required Plugins:
Go to Appearance => Install Plugins to update bundled plugins (such as Xmedcar Core or Slider Revolution) if prompted. -
Clear Caches:
Clear your browser cache and your caching plugin cache (e.g., WP Rocket, Autoptimize, or WP Super Cache) to ensure new styles and script updates apply immediately.
Updating Included Plugins
Bundled premium plugins (such as Xmedcar Core and others) included with the theme can easily be updated directly from your WordPress Dashboard.
Important Translation Notice: If you translated plugins and placed custom .mo / .po language files inside wp-content/plugins/plugin-name/languages/, please copy them to wp-content/languages/plugins/ before updating. Otherwise, updating the plugin will replace its folder and overwrite language files located in the plugin directory.
You can update bundled plugins using either of the following two methods:
- Method 1: Update via Theme Plugin Installer (Recommended & Easiest)
- Method 2: Update by Re-installing Plugin
Method 1: Update via Theme Plugin Installer (Recommended)
-
Log in to WordPress Admin:
Log in to your WordPress Dashboard. -
Go to Plugin Installer:
Navigate to Appearance => Install Plugins (or click the Begin updating plugins link in the admin notification banner). -
Select Plugins to Update:
Check the boxes next to the plugins that require updates (e.g., Xmedcar Core, Slider Revolution). -
Bulk Action Update:
Select Update from the Bulk Actions drop-down menu and click Apply. -
Activate Updated Plugins:
Once installation completes, return to the plugin installer screen, select Activate from Bulk Actions, and click Apply.
Method 2: Update by Re-installing Plugin
-
Go to Installed Plugins:
Navigate to Plugins => Installed Plugins in your WordPress Dashboard. -
Deactivate & Delete Plugin:
Locate the plugin you wish to update (e.g., Xmedcar Core), click Deactivate, and then click Delete.
(Note: Deleting the plugin will NOT erase your saved settings, or database content). -
Re-install via Theme Installer:
Navigate to Appearance => Install Plugins. The theme will automatically prompt you to install the latest bundled version of the deleted plugin. -
Install & Activate:
Select the plugin, choose Install from Bulk Actions, click Apply, and then click Activate.
Child Theme Guide
Xmedcar is 100% child theme compatible. A basic child theme package xmedcar-child.zip is included inside your ThemeForest download package. If you plan to make custom code changes, edit CSS styles, or override template files, we highly recommend using the child theme!
1) What is a Child Theme & Why Use It?
A Child Theme is a WordPress theme that inherits all features, styling, templates, and functions of its parent theme (Xmedcar). It allows you to modify or add custom functionality safely.
Important: Never modify core files directly inside the main xmedcar theme directory. When the parent theme is updated to a new version, any modified files inside xmedcar/ will be overwritten and lost. By making edits inside the xmedcar-child theme directory, your custom modifications remain safe and untouched during theme updates.
2) Installing & Activating Child Theme:
-
Ensure Parent Theme is Installed:
Make sure the mainxmedcarparent theme is already installed on your site under Appearance => Themes. -
Locate xmedcar-child.zip:
Extract your ThemeForest All files & documentation package on your computer and locate the xmedcar-child.zip file. -
Upload Child Theme in WordPress Admin:
Go to Appearance => Themes => Add New => Upload Theme in your WordPress Dashboard. -
Choose File & Install:
Click Choose File, select xmedcar-child.zip, and click Install Now. -
Activate Child Theme:
Once uploaded, click Activate to set Xmedcar Child as your active theme.
3) How to Customize Using the Child Theme
-
Adding Custom CSS Styling:
Add custom CSS rules directly insidewp-content/themes/xmedcar-child/style.css. -
Adding Custom PHP Functions:
Add custom WordPress action hooks, filters, and PHP functions directly insidewp-content/themes/xmedcar-child/functions.php. -
Overriding Parent Template Files:
To modify any template file (e.g.,header.php,footer.php, or WooCommerce template files), copy the file from the parent theme folderxmedcar/into the exact same folder path insidexmedcar-child/and edit it there safely.
Speed Optimization Guide
Optimizing your online pharmacy website for fast load times is essential for delivering a seamless customer experience, improving Google SEO rankings, and increasing WooCommerce conversion rates.
Part 1: Key Factors That Affect Website Speed
-
Active Plugins:
Running too many plugins increases server processing overhead. Deactivate and remove any unused plugins. To test plugin speed impacts, temporarily deactivate non-essential plugins one by one and check load speeds. -
Unoptimized Images:
High-resolution, uncompressed image uploads are the #1 cause of slow page rendering. Always scale images to their actual display dimensions and compress them before uploading to WordPress. -
Hosting Infrastructure:
Shared hosting with limited CPU/RAM or low PHP memory limits slows down database queries. Upgrade to high-performance SSD/NVMe WordPress hosting with PHP 8.1+ support. -
CSS & JavaScript Assets:
Multiple un-minified CSS and JS files increase total HTTP network requests. Minifying and combining asset files reduces total payload size.
Part 2: Speed Optimization Guide:
Step 1: Optimize & Compress All Images
Before uploading product photos or banner images to WordPress, compress them using online tools such as TinyPNG or CompressJPEG. Aim to keep image file sizes under 200 KB without sacrificing visual quality.
Step 2: Add GZIP Compression & Browser Caching to .htaccess
If your website runs on an Apache web server, open the .htaccess file in your WordPress root directory and paste the following GZIP compression, browser caching, and HTTP header rules at the end of the file:
AddType application/x-font-woff .woff
AddType application/font-woff2 .woff2
AddType application/vnd.ms-fontobject .eot
<IfModule mod_deflate.c>
  AddOutputFilterByType DEFLATE text/html
  AddOutputFilterByType DEFLATE text/css
  AddOutputFilterByType DEFLATE text/javascript
  AddOutputFilterByType DEFLATE text/xml
  AddOutputFilterByType DEFLATE text/plain
  AddOutputFilterByType DEFLATE image/x-icon
  AddOutputFilterByType DEFLATE image/svg+xml
  AddOutputFilterByType DEFLATE application/rss+xml
  AddOutputFilterByType DEFLATE application/javascript
  AddOutputFilterByType DEFLATE application/x-javascript
  AddOutputFilterByType DEFLATE application/xml
  AddOutputFilterByType DEFLATE application/xhtml+xml
  AddOutputFilterByType DEFLATE application/x-font
  AddOutputFilterByType DEFLATE application/x-font-truetype
  AddOutputFilterByType DEFLATE application/x-font-ttf
  AddOutputFilterByType DEFLATE application/x-font-otf
  AddOutputFilterByType DEFLATE application/x-font-opentype
  AddOutputFilterByType DEFLATE application/x-font-woff
  AddOutputFilterByType DEFLATE application/font-woff2
  AddOutputFilterByType DEFLATE application/vnd.ms-fontobject
  AddOutputFilterByType DEFLATE font/ttf
  AddOutputFilterByType DEFLATE font/otf
  AddOutputFilterByType DEFLATE font/opentype

# For Olders Browsers Which Can't Handle Compression
  BrowserMatch ^Mozilla/4 gzip-only-text/html
  BrowserMatch ^Mozilla/4\.0[678] no-gzip
  BrowserMatch \bMSIE !no-gzip !gzip-only-text/html
</IfModule>

<ifModule mod_gzip.c>
  mod_gzip_on Yes
  mod_gzip_dechunk Yes
  mod_gzip_item_include file \.(html?|txt|css|js|php|pl)$
  mod_gzip_item_include mime ^application/x-javascript.*
  mod_gzip_item_include mime ^text/.*
  mod_gzip_item_exclude rspheader ^Content-Encoding:.*gzip.*
  mod_gzip_item_exclude mime ^image/.*
  mod_gzip_item_include handler ^cgi-script$
</ifModule>

## EXPIRES CACHING ##
<IfModule mod_expires.c>
ExpiresActive On
ExpiresByType application/vnd.ms-fontobject "access plus 1 year"
ExpiresByType application/x-font-ttf "access plus 1 year"
ExpiresByType application/x-font-opentype "access plus 1 year"
ExpiresByType application/x-font-woff "access plus 1 year"
ExpiresByType application/font-woff2 "access plus 1 year"
ExpiresByType image/jpg "access plus 1 year"
ExpiresByType image/jpeg "access plus 1 year"
ExpiresByType image/gif "access plus 1 year"
ExpiresByType image/png "access plus 1 year"
ExpiresByType text/css "access plus 3 month"
ExpiresByType application/pdf "access plus 3 month"
ExpiresByType text/x-javascript "access plus 3 month"
ExpiresByType application/x-shockwave-flash "access plus 3 month"
ExpiresByType image/x-icon "access plus 1 year"
ExpiresDefault "access plus 3 month"
</IfModule>
## EXPIRES CACHING ##
<ifModule mod_headers.c>
    Header set Connection keep-alive
</ifModule>
<IfModule mod_header.c>
  # 3 Month
  <FilesMatch "\.(flv|gif|jpg|jpeg|png|ico|swf)$">
    Header set Cache-Control "max-age=7257600"
  </FilesMatch>
  # 1 Week
  <FilesMatch "\.(js|css|pdf|txt)$">
    Header set Cache-Control "max-age=604800"
  </FilesMatch>
  # 10 Minutes
  <FilesMatch "\.(html|htm)$">
    Header set Cache-Control "max-age=600"
  </FilesMatch>
  # NONE
  <FilesMatch "\.(pl|php|cgi|spl)$">
    Header unset Cache-Control
    Header unset Expires
    Header unset Last-Modified
    FileETag None
    Header unset Pragma
  </FilesMatch>
</IfModule>
# END WordPress
Notice: Always backup your existing .htaccess file before pasting new code snippet rules.
Part 3: Configuring Recommended Caching Plugins
We recommend using one of the following caching plugins to automate minification and page caching:
Option 1: WP Rocket (Premium & Highly Recommended)
- Install and activate the WP Rocket plugin.
-
Enable Minify CSS / JS, Combine Files, and LazyLoad settings.
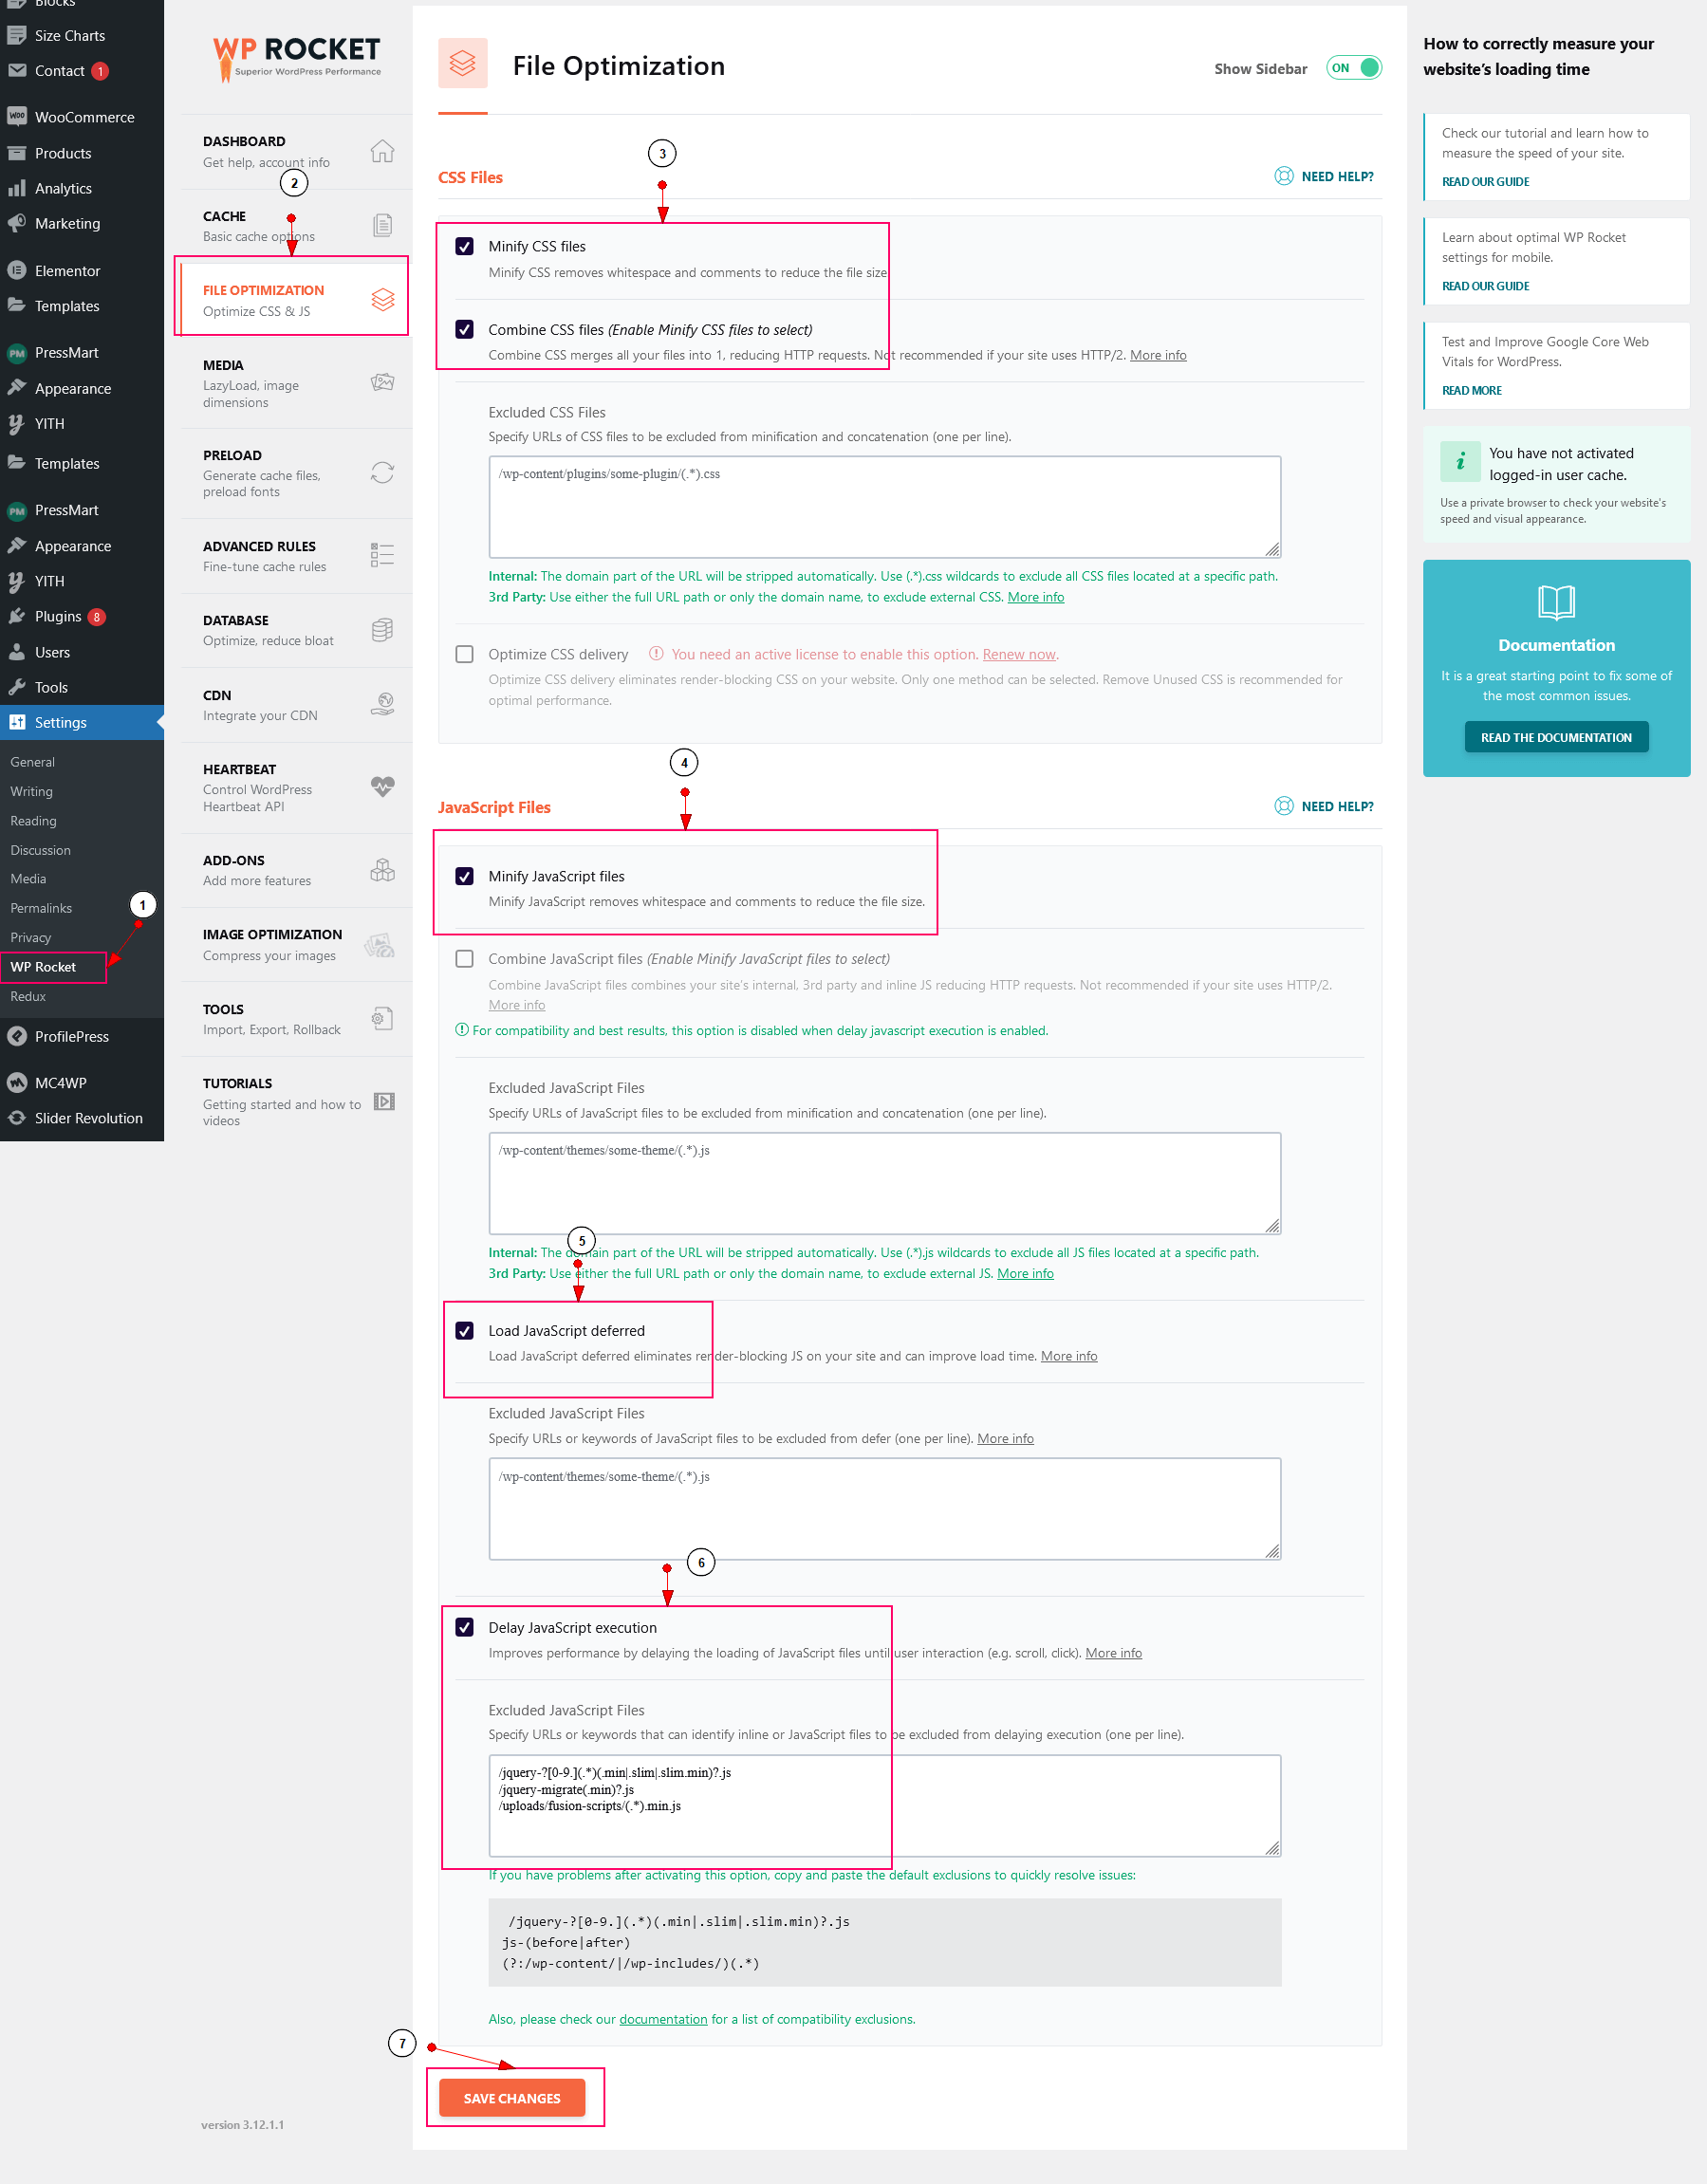
- If using Slider Revolution, review WP Rocket Slider Revolution Exclusions to exclude slider JS files from deferred loading.
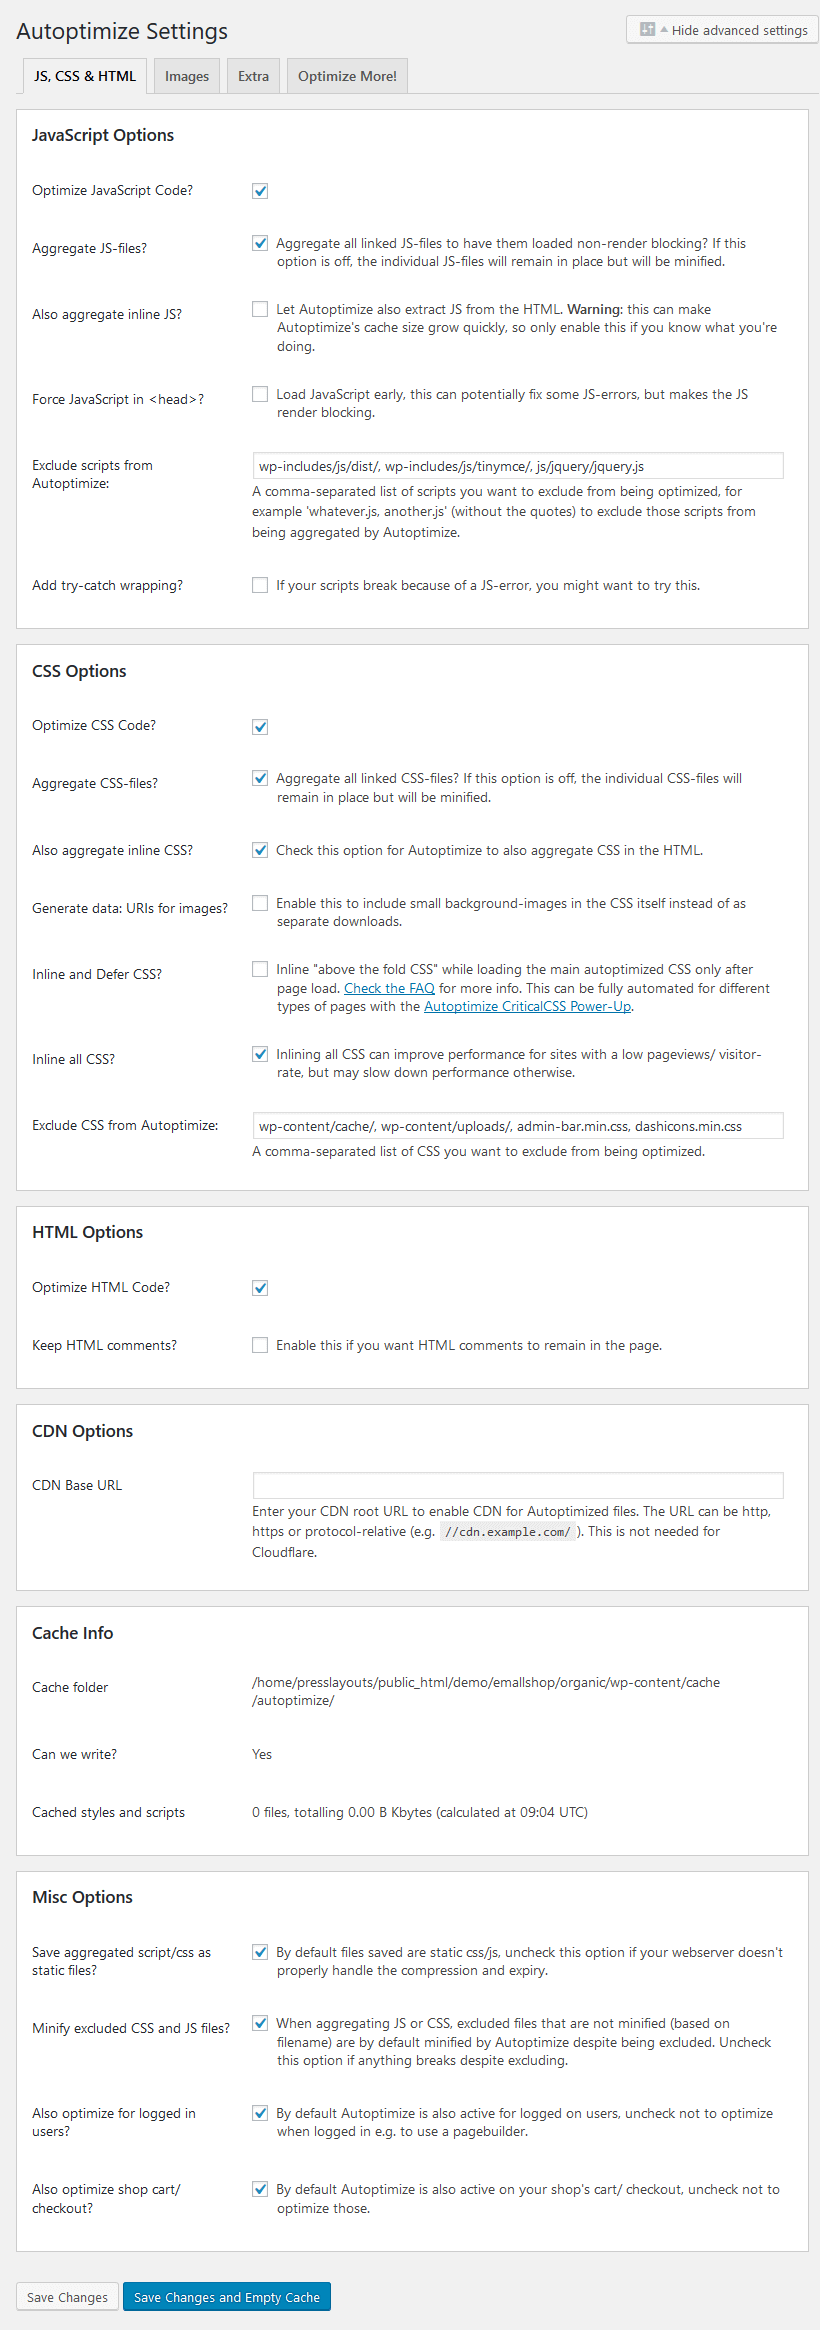
Option 2: Autoptimize (Free Minification)
- Install and activate the free Autoptimize plugin.
-
Go to Settings => Autoptimize, enable Optimize JavaScript Code and Optimize CSS Code, then save.
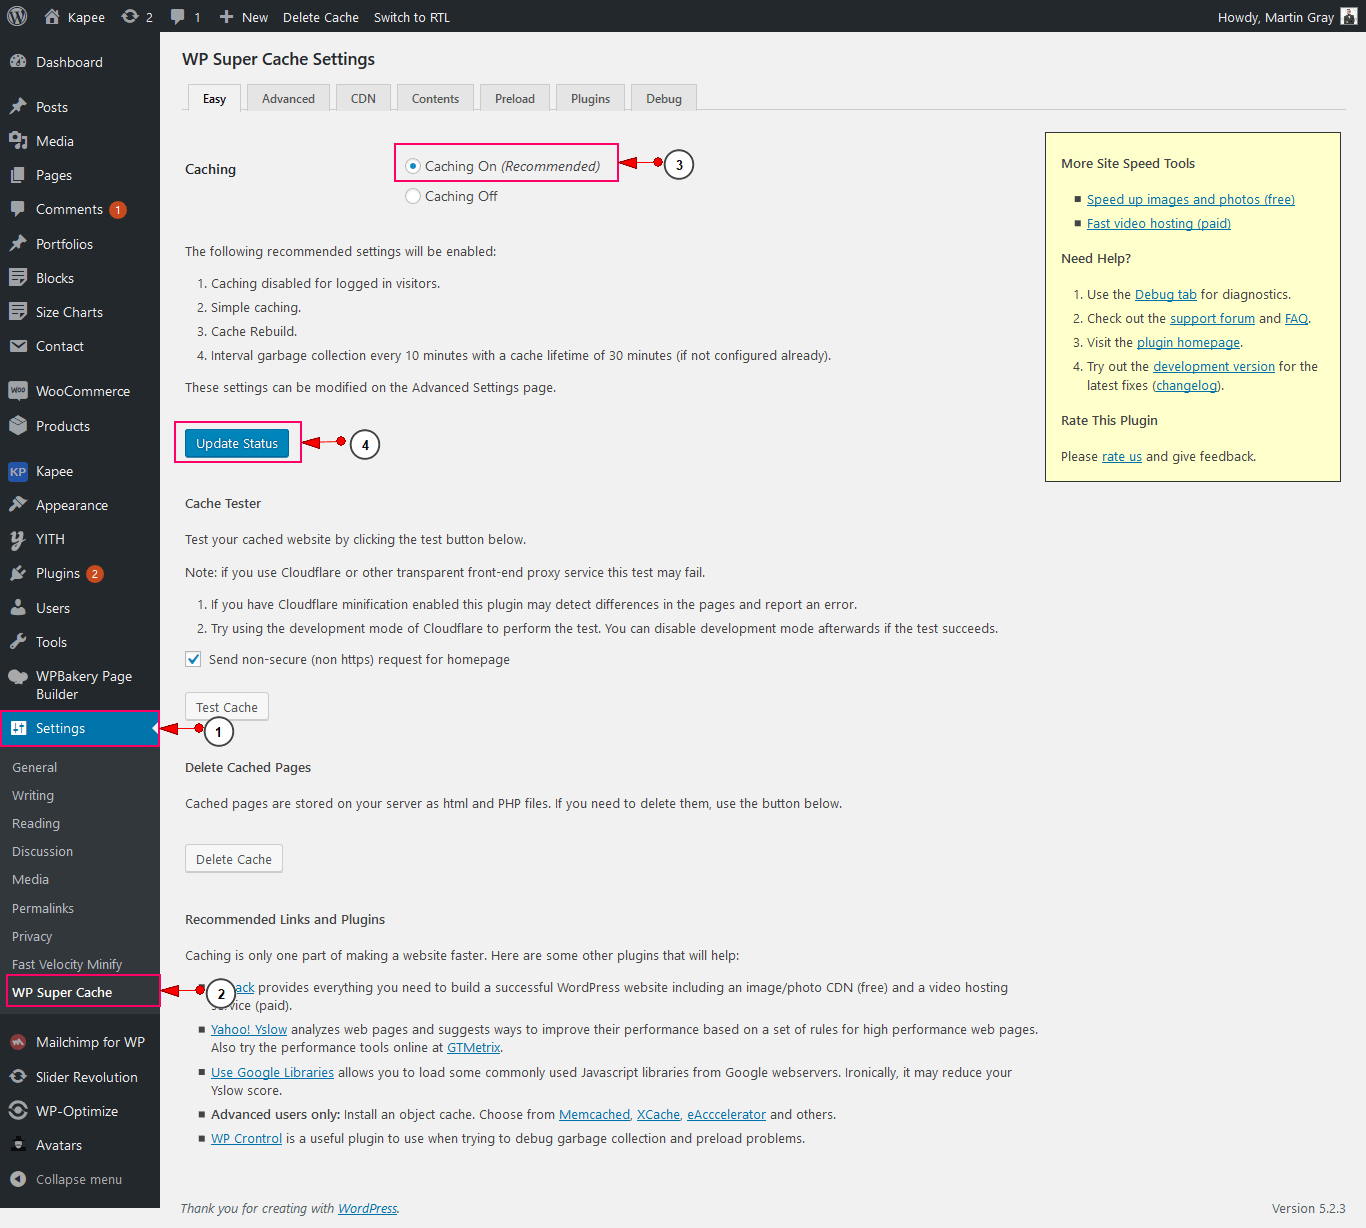
Option 3: WP Super Cache (Free Caching)
- Install and activate the free WP Super Cache plugin.
- Go to Settings => WP Super Cache and enable Caching On.
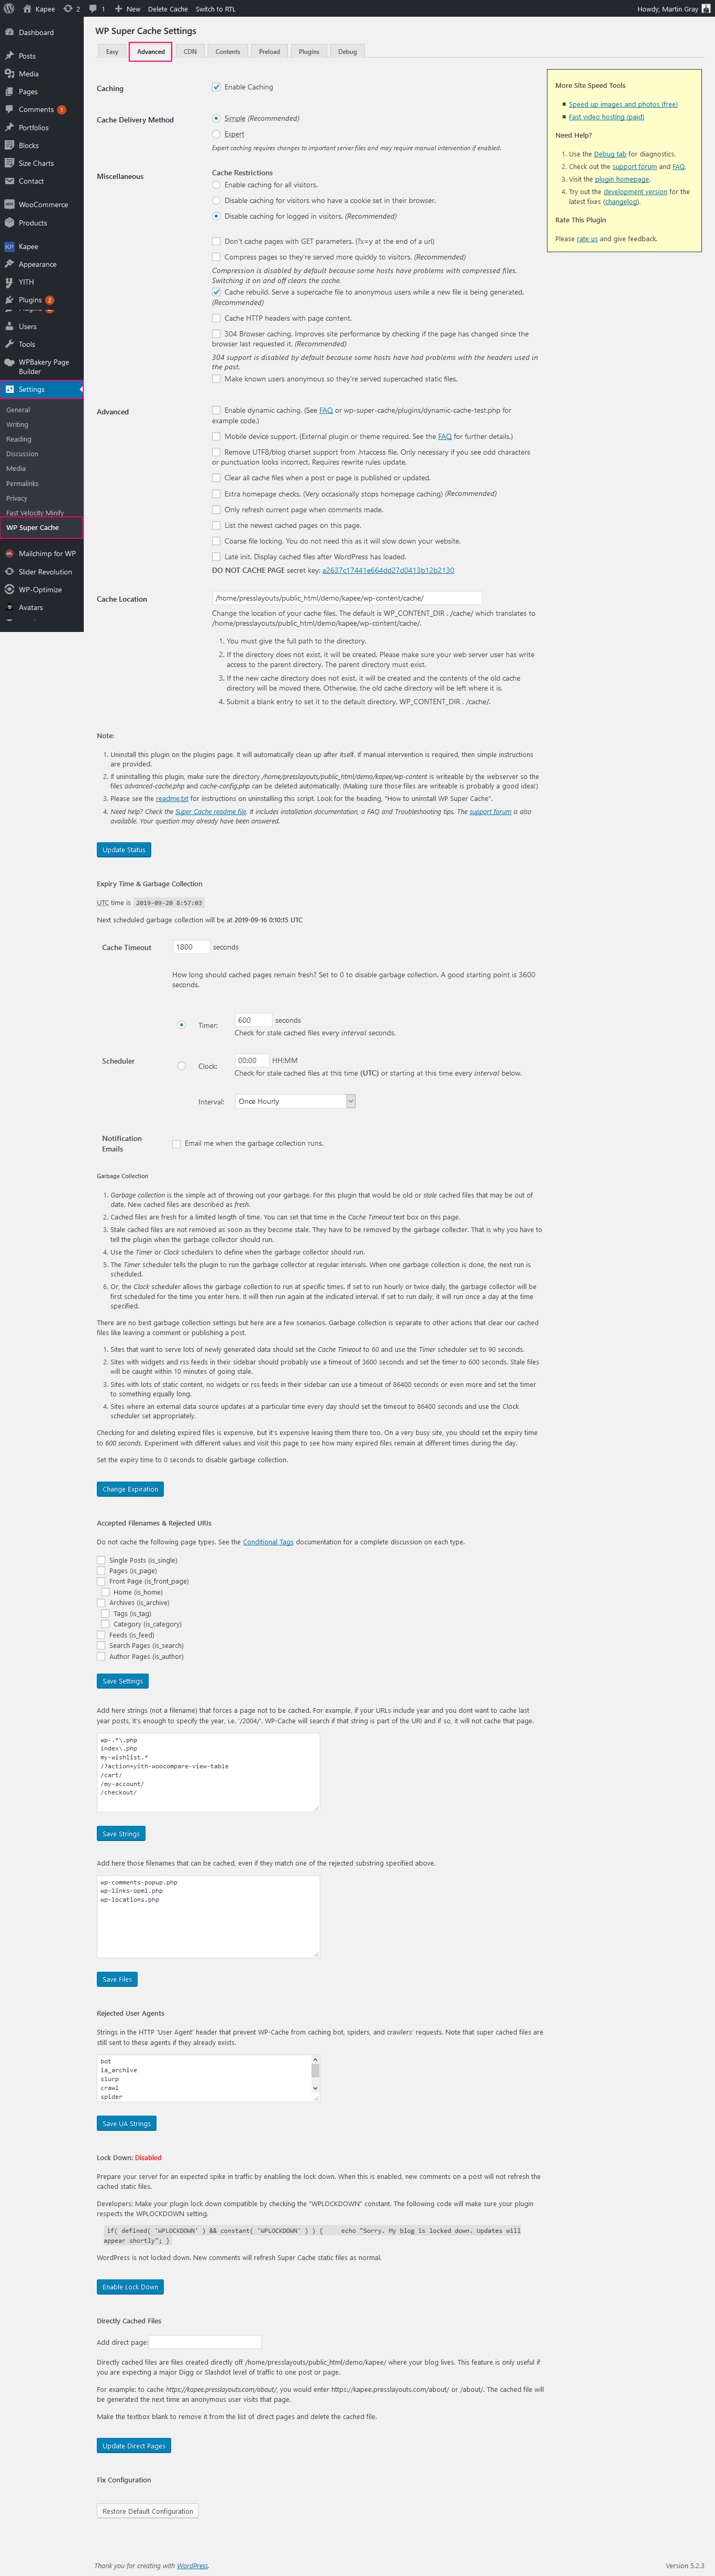
-
Crucial WooCommerce Exclusion: Ensure dynamic WooCommerce pages (Cart, Checkout, My Account, Wishlist) are added to the cache exclusion list to prevent cart session caching errors.
Site Logo Settings
Xmedcar allows you to customize the default site logo, upload alternative logo versions for mobile devices or light/dark headers, and control logo dimensions easily.
Logo Upload Guide:
-
Log in to WordPress Dashboard:
Log in to your WordPress admin panel (e.g.,yoursite.com/wp-admin). -
Navigate to Theme Options:
Go to Xmedcar => Theme Options from the left-hand sidebar menu. -
Access General Settings:
Click on the General tab from the left sidebar of the theme options panel. -
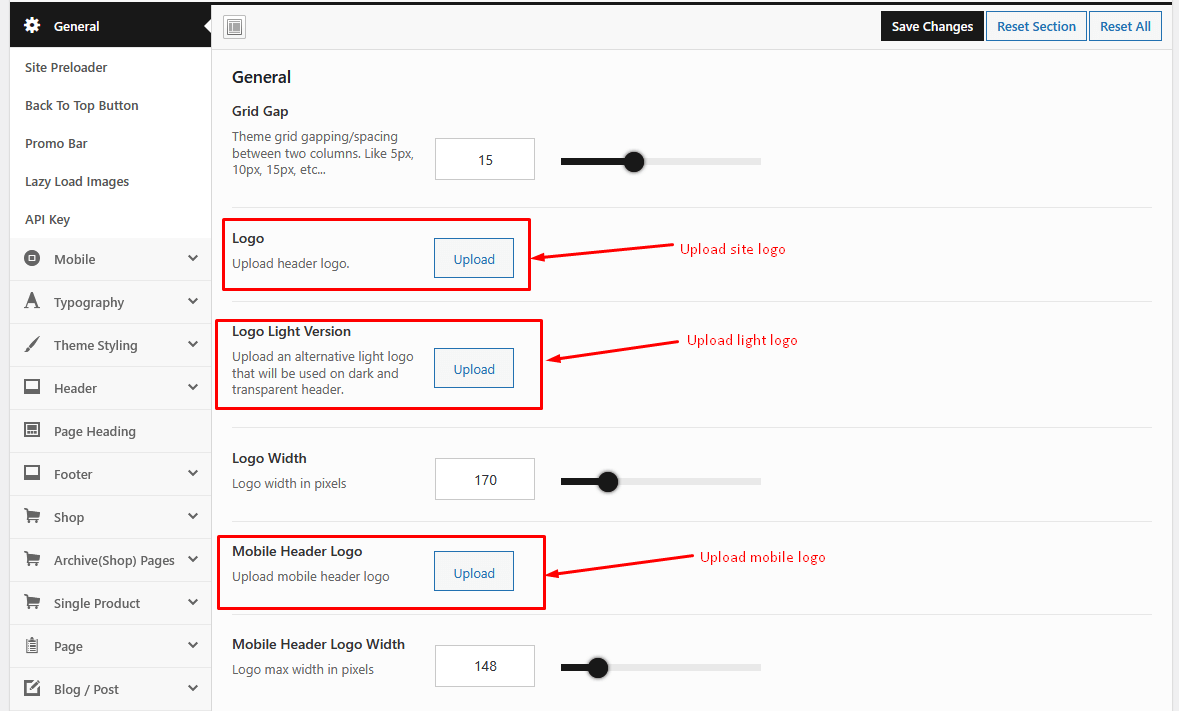
Upload Logo Files:
Upload your logo files to the corresponding fields:- Logo: The default dark logo used on light header styles.
- Logo Light Version: An alternative white/light logo used on dark or transparent header backgrounds.
- Mobile Header Logo: A custom logo version optimized for mobile device screen sizes.
-
Set Logo Dimensions:
Enter your desired logo width (in pixels, e.g.,150px) in the Logo Width and Mobile Header Logo Width fields to prevent visual skewing. -
Save Changes:
Click the Save Changes button at the bottom or top of the Theme Options panel to publish your logos.
Theme Options Logo Upload Settings Panel:
Frontend Header Output Example:

Favicon Settings
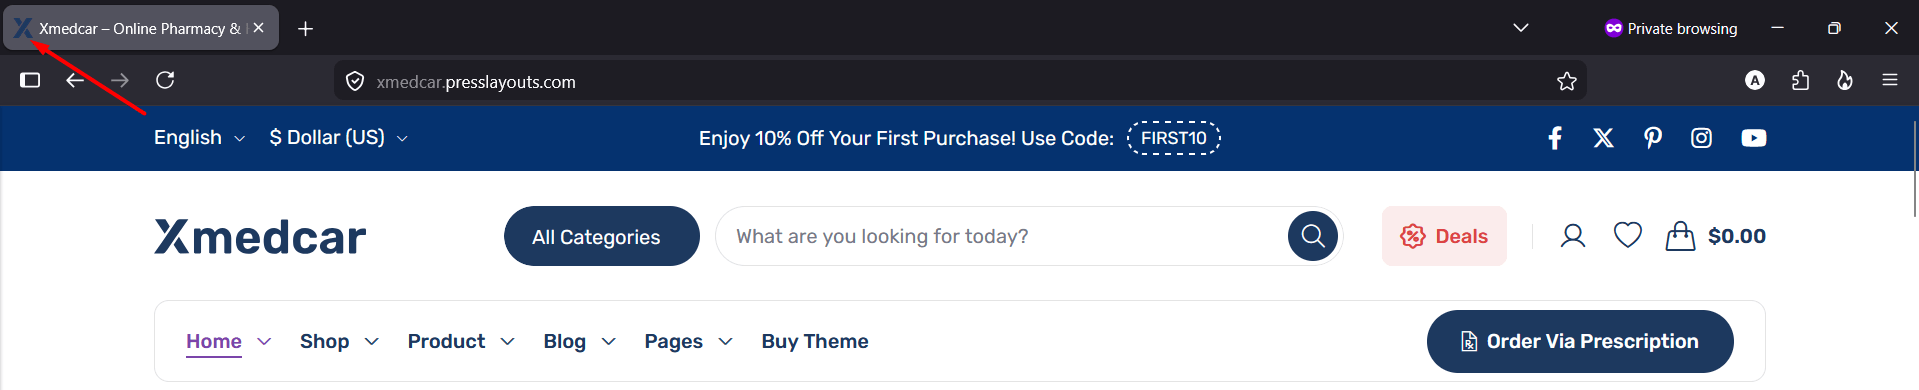
A favicon (or Site Icon) is the small browser icon displayed in browser tabs, bookmark listings, and mobile browser shortcuts. We recommend uploading a square image of at least 512x512 pixels. You can configure your favicon using either of the methods below:
Method 1: Configure via WordPress Customizer (Recommended):
-
Log in to WordPress Dashboard:
Log in to your WordPress admin panel (e.g.,yoursite.com/wp-admin). -
Open Customizer:
Navigate to Appearance => Customize. -
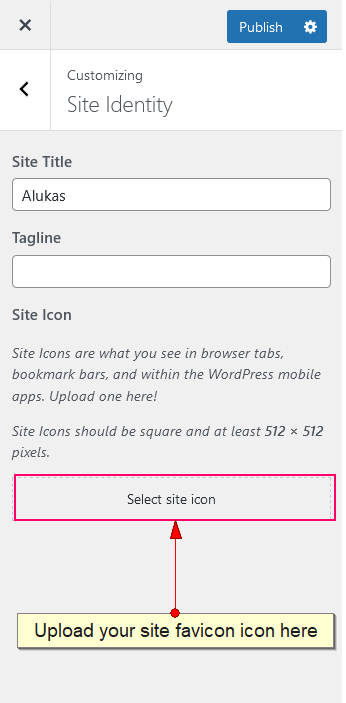
Select Site Identity:
Click on the Site Identity tab in the Customizer panel. -
Upload Site Icon:
Scroll down to the Site Icon section, click Select site icon, and upload your favicon image. -
Publish Changes:
Click the blue Publish button at the top of the Customizer panel to make it live.
Method 2: Configure via General Settings:
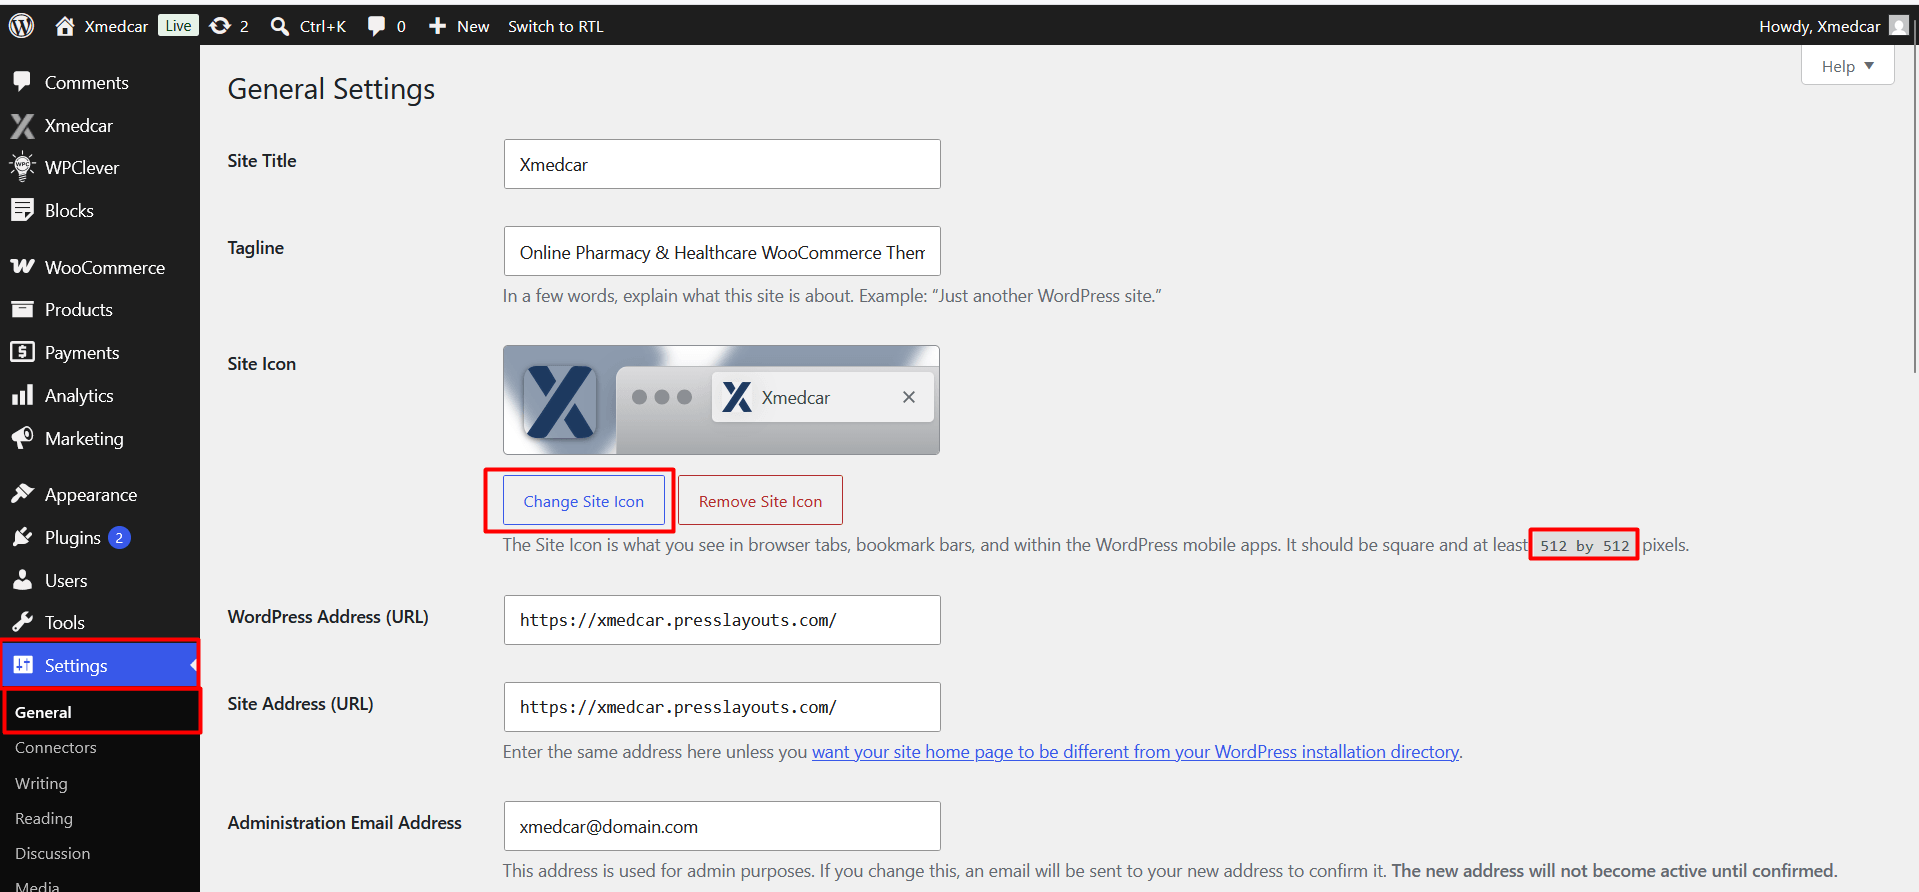
-
Navigate to General Settings:
Go to Settings => General in your dashboard (or the corresponding theme settings page). -
Upload Icon File:
Locate the favicon upload field, click to select or upload your image file. -
Save Settings:
Click the Save Changes button to save the settings.
Browser Tab Display Example:
Language Switcher
To display a language switcher dropdown in your header, you must install and activate a translation plugin. Xmedcar is fully compatible with premium and free multilingual solutions, including WPML, Polylang, and TranslatePress.
Setup & Usage Guide:
-
Install Multilingual Plugin:
Install and activate your preferred translation plugin (e.g., WPML, Polylang, or TranslatePress). -
Configure Site Languages:
Add your target translation languages in the settings panel of your chosen translation plugin. -
Enable Switcher in Theme Options:
Navigate to Xmedcar => Theme Options => Header Settings and ensure the Language Switcher display option is set to Enable. -
Configure Switcher Settings:
Under your plugin configurations (e.g., WPML => Languages => Custom language switchers), customize switcher parameters such as displaying flags, native language names, or shortcode styles.
Frontend Header Language Switcher Preview:

Currency Switcher
To enable customers to check out using multiple currencies, you must install a currency switcher plugin. Xmedcar is fully compatible with popular multi-currency plugins, including WooCommerce Multilingual & Multicurrency with WPML and FOX – Currency Switcher Professional for WooCommerce.
Setup & Usage Guide:
-
Install Currency Plugin:
Install and activate your chosen multi-currency plugin (e.g., WooCommerce Multilingual or FOX). -
Add Secondary Currencies:
Configure your exchange rates, currency symbols, and dynamic conversion options in the plugin settings. -
Enable Switcher in Theme Options:
Navigate to Xmedcar => Theme Options => Header Settings and set the Currency Switcher option to Enable. -
Configure Layout Format:
Configure your switcher style (e.g., currency symbols, names, or codes) in the currency plugin settings.
Frontend Header Currency Switcher Preview:

Shopping By Categories Menu
The vertical "Shopping By Categories Menu" is a prominent navigation panel in the header layout, perfect for categorized online pharmacy inventories. Follow the step-by-step instructions below to create, assign, and customize this menu:
Part 1: Create and Assign the Category Menu
-
Create a New Menu:
Go to Appearance => Menus. Click create a new menu, name it (e.g., Category Menu), and click Create Menu. -
Enable Product Categories:
If Product categories is not visible in the left column list, click Screen Options in the top-right corner of your screen and check the Product categories box. -
Add Category Items:
Select the product categories you wish to feature in this vertical menu, click Add to Menu, and drag-and-drop to arrange their order. -
Select Display Location:
Under Menu Settings at the bottom of the screen, check the Categories(Vertical) Menu box. -
Save:
Click the blue Save Menu button to lock in your categories menu.
Assigning the Menu Display Location:
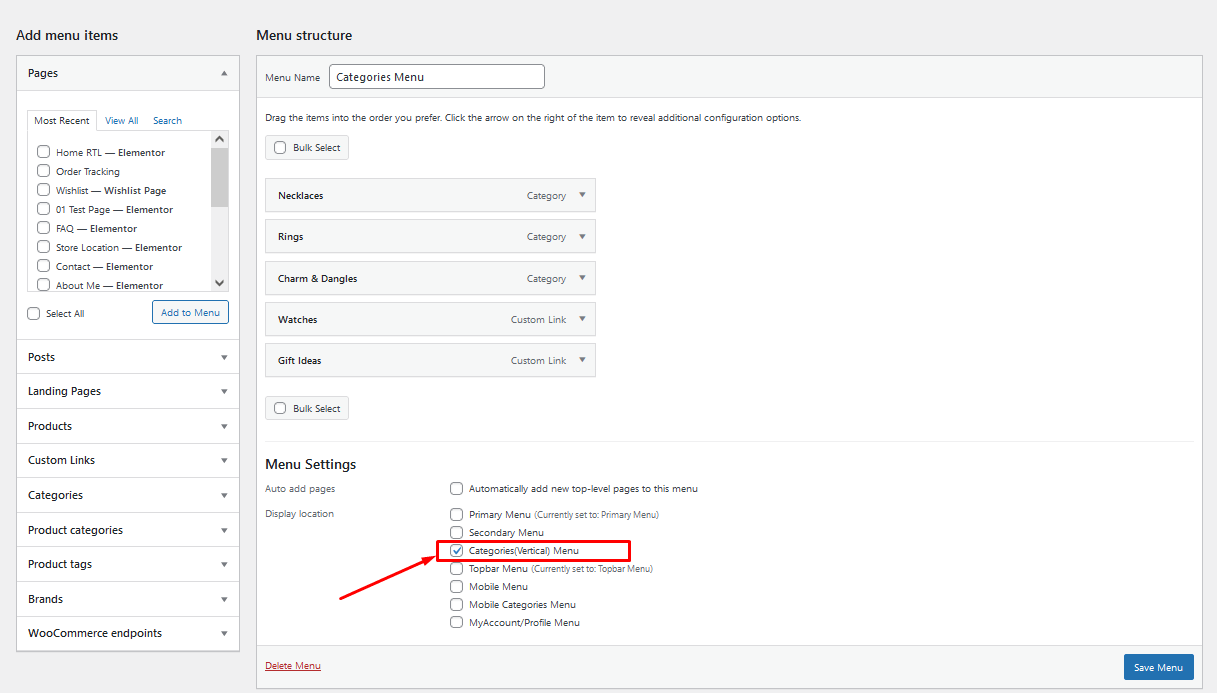
Part 2: Configure Category Menu Settings in Theme Options
-
Open Theme Options:
Go to Xmedcar => Theme Options => Header Settings (or Header). -
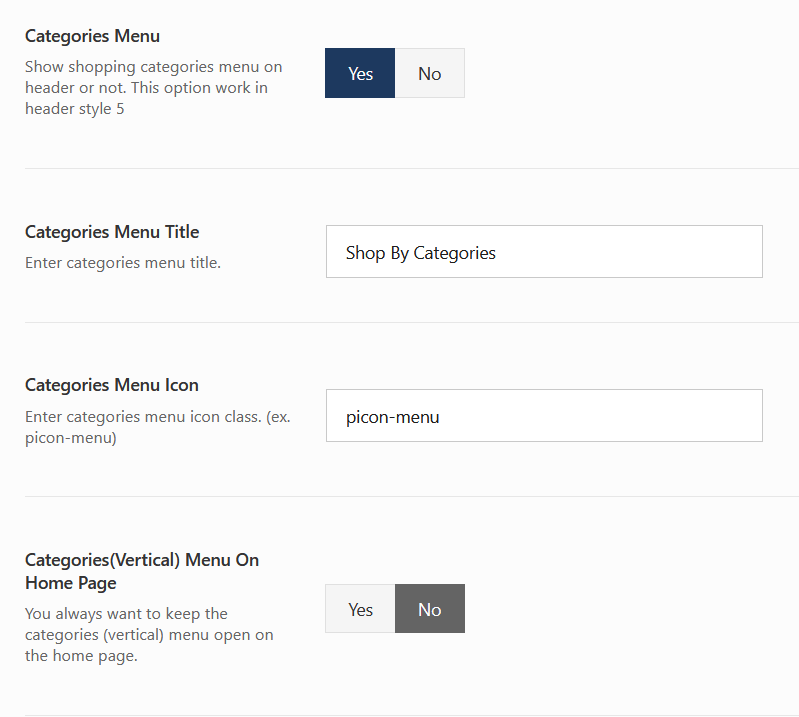
Customize Options:
Configure Category Menu options:- Category Menu Title: Set your custom button text label (e.g., Shop by Categories).
- Show Category Menu: Turn the category list display on or off.
- Open Category Menu by Default: Enable this to keep the categories menu dropdown open by default on your site's Homepage.
-
Save Changes:
Click Save Changes to apply your configurations.
Theme Options Category Menu Configurations:
Frontend Category Menu Preview:
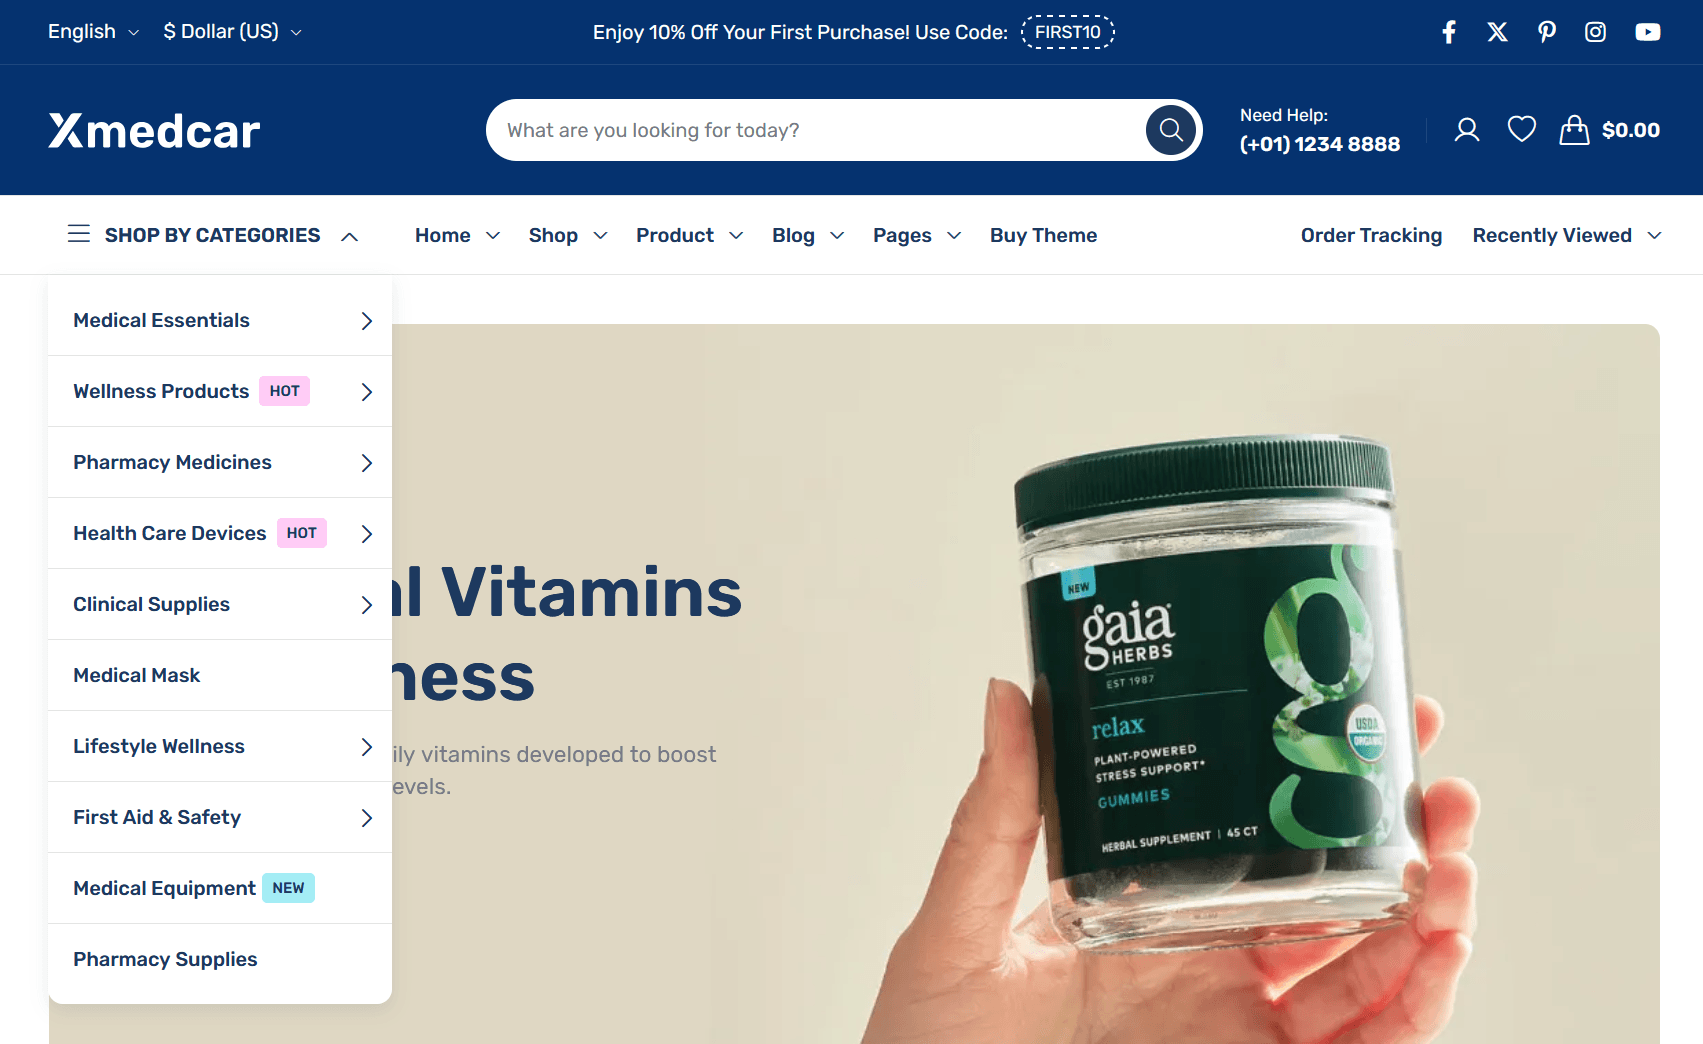
Menu Configuration
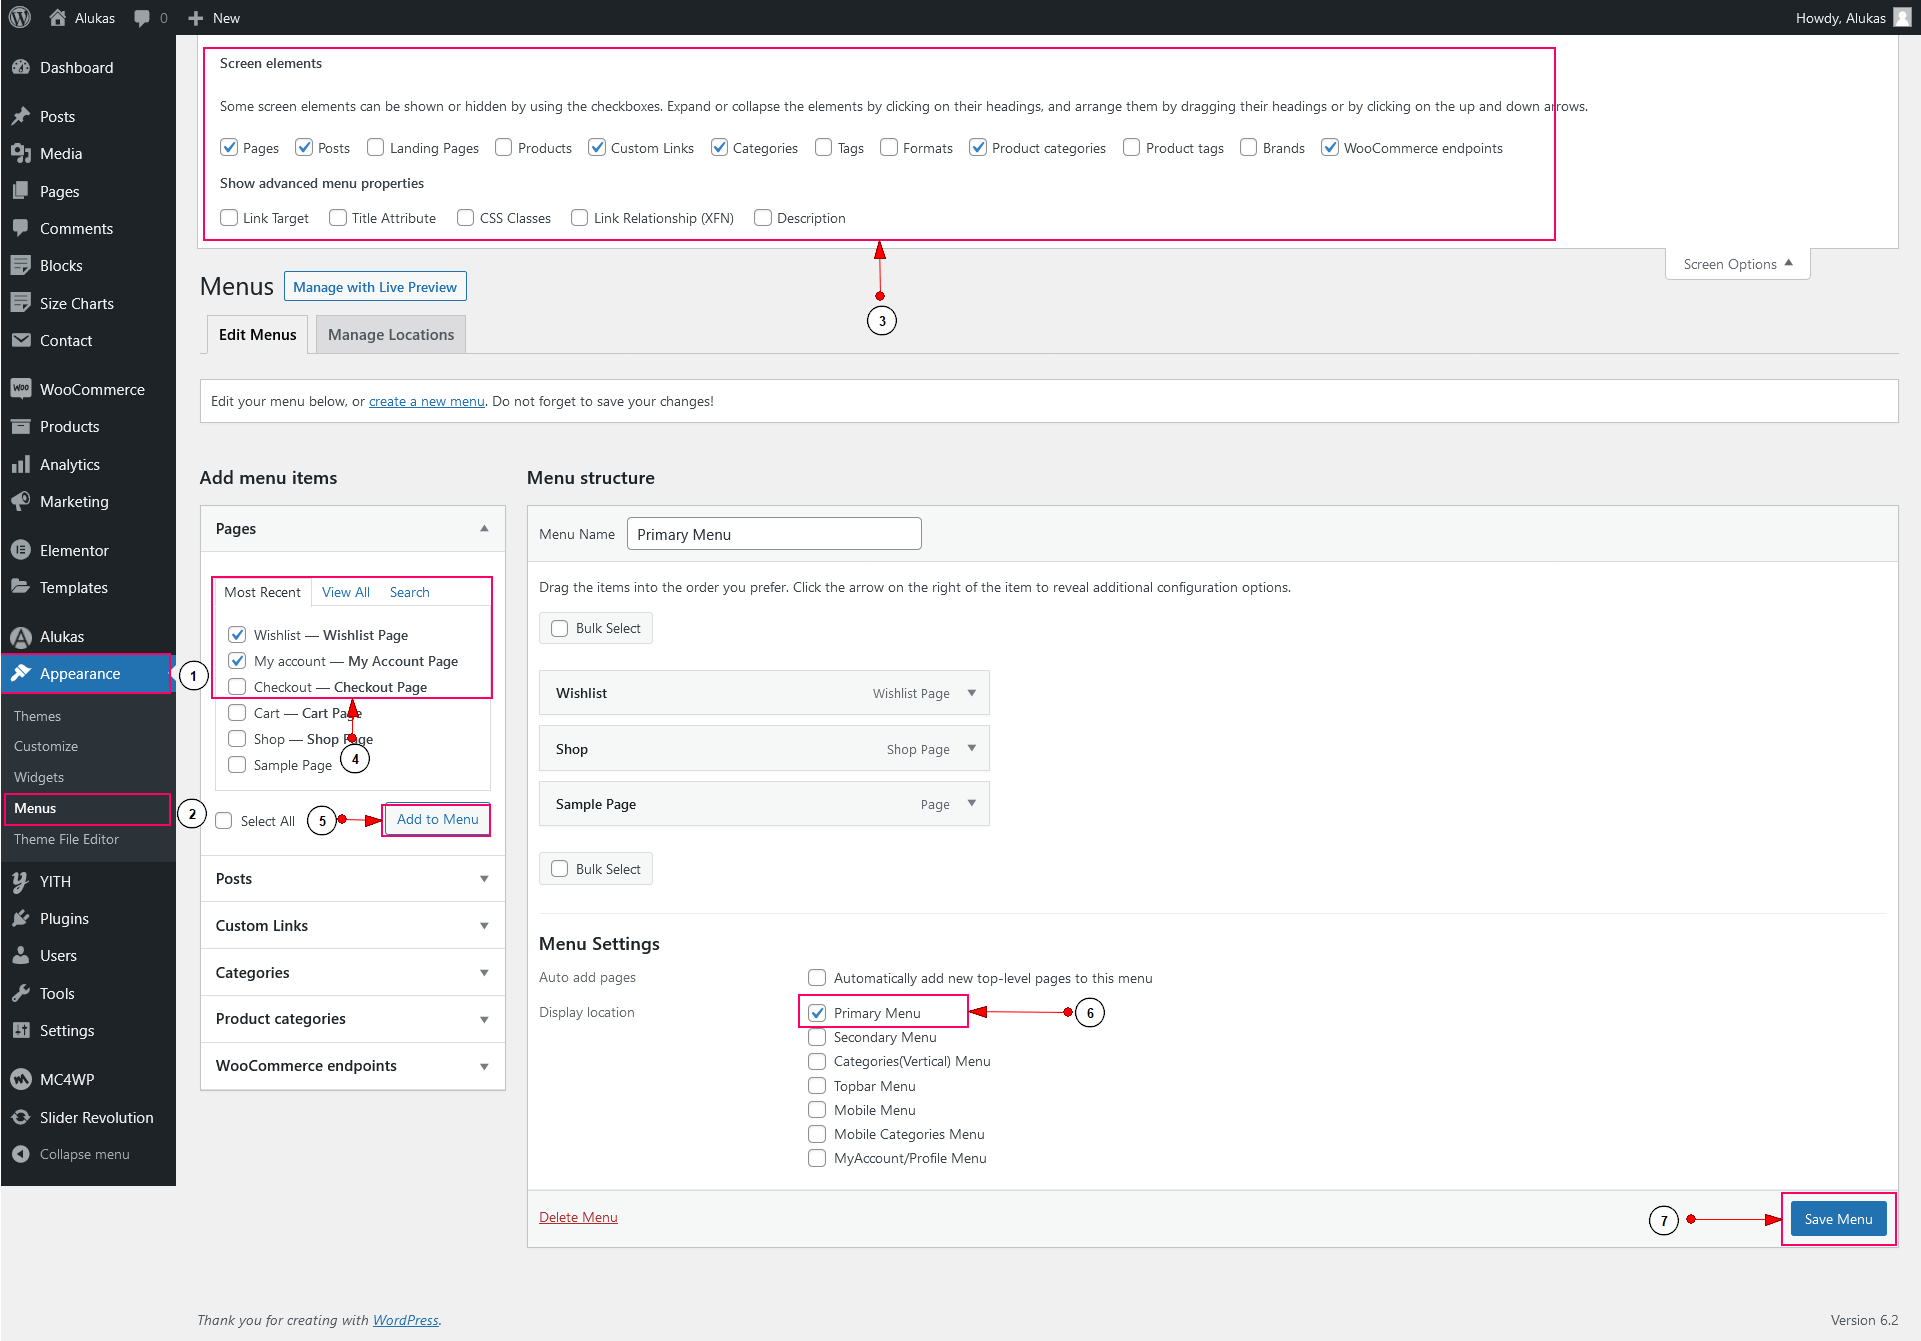
Configure navigation menus for your header, mobile drawer, and footer settings. Below is the step-by-step guide to creating and managing menus:
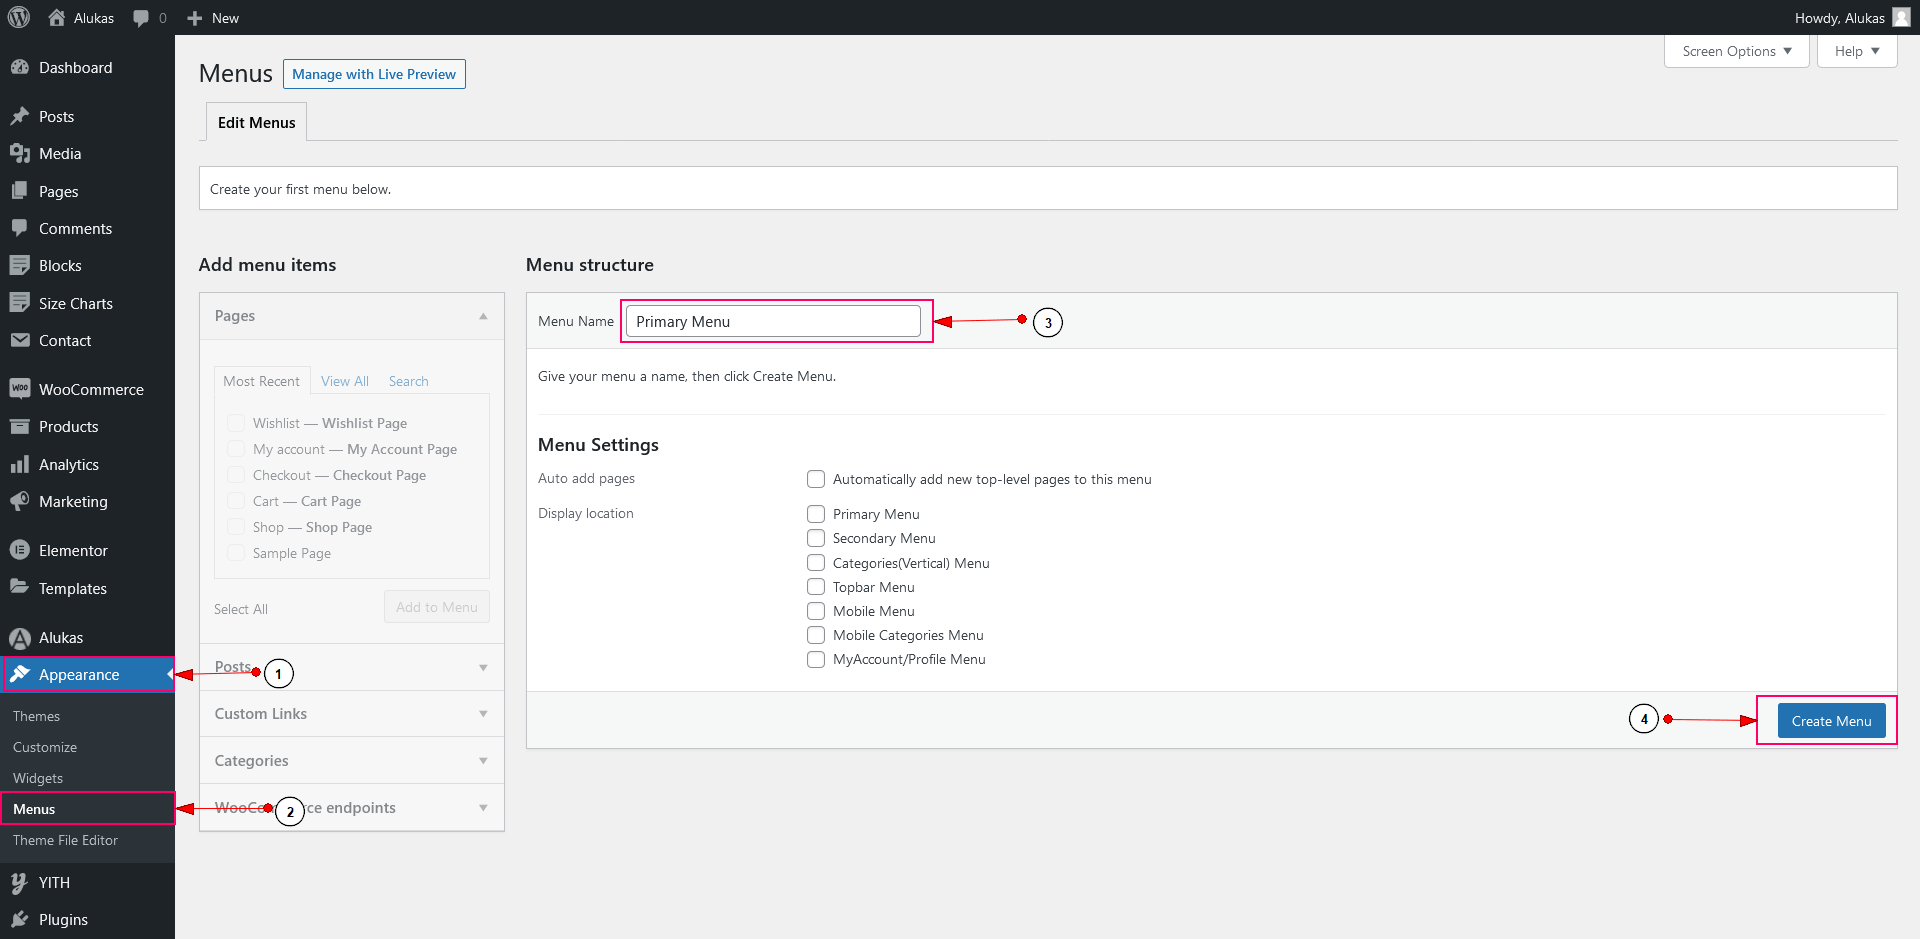
1. Create a New Menu
-
Log in to WordPress Dashboard:
Log in to your WordPress admin panel (e.g.,yoursite.com/wp-admin). -
Navigate to Menus Panel:
Go to Appearance => Menus from the left-hand sidebar. -
Name Your Menu:
Enter a descriptive name (e.g., Main Menu, Primary Navigation) in the Menu Name input field. -
Create the Menu:
Click the Create Menu button. Your new navigation menu structure is now initialized.
2. Add Menu Items & Display Location
-
Navigate to Menus Editor:
Ensure you are on the Appearance => Menus screen. -
Configure Screen Options (Optional):
Click the Screen Options tab in the top-right corner of your screen. Check the boxes next to Product categories, Brands, or custom post types to allow adding them as menu links. -
Choose Your Menu Links:
In the left sidebar panels, check the boxes next to the pages, custom links, or categories you want to include in the menu. -
Add Selected Links:
Click the Add to Menu button to move the selected items to the menu structure on the right.(Tip) Drag and drop items vertically to rearrange their order, or drag them horizontally to create nested dropdown submenus.
-
Select Display Location:
Under Menu Settings at the bottom of the page, check the appropriate display location box (e.g., Primary Menu or Mobile Menu) based on where you want this menu to display. -
Save Your Menu:
Click the blue Save Menu button in the right-hand panel to publish changes.
Mega Menu Settings
Xmedcar utilizes Elementor HTML blocks to create rich, multi-column mega menus. This allows you to display products, promo banners, links, and text columns dynamically inside your dropdown menus.
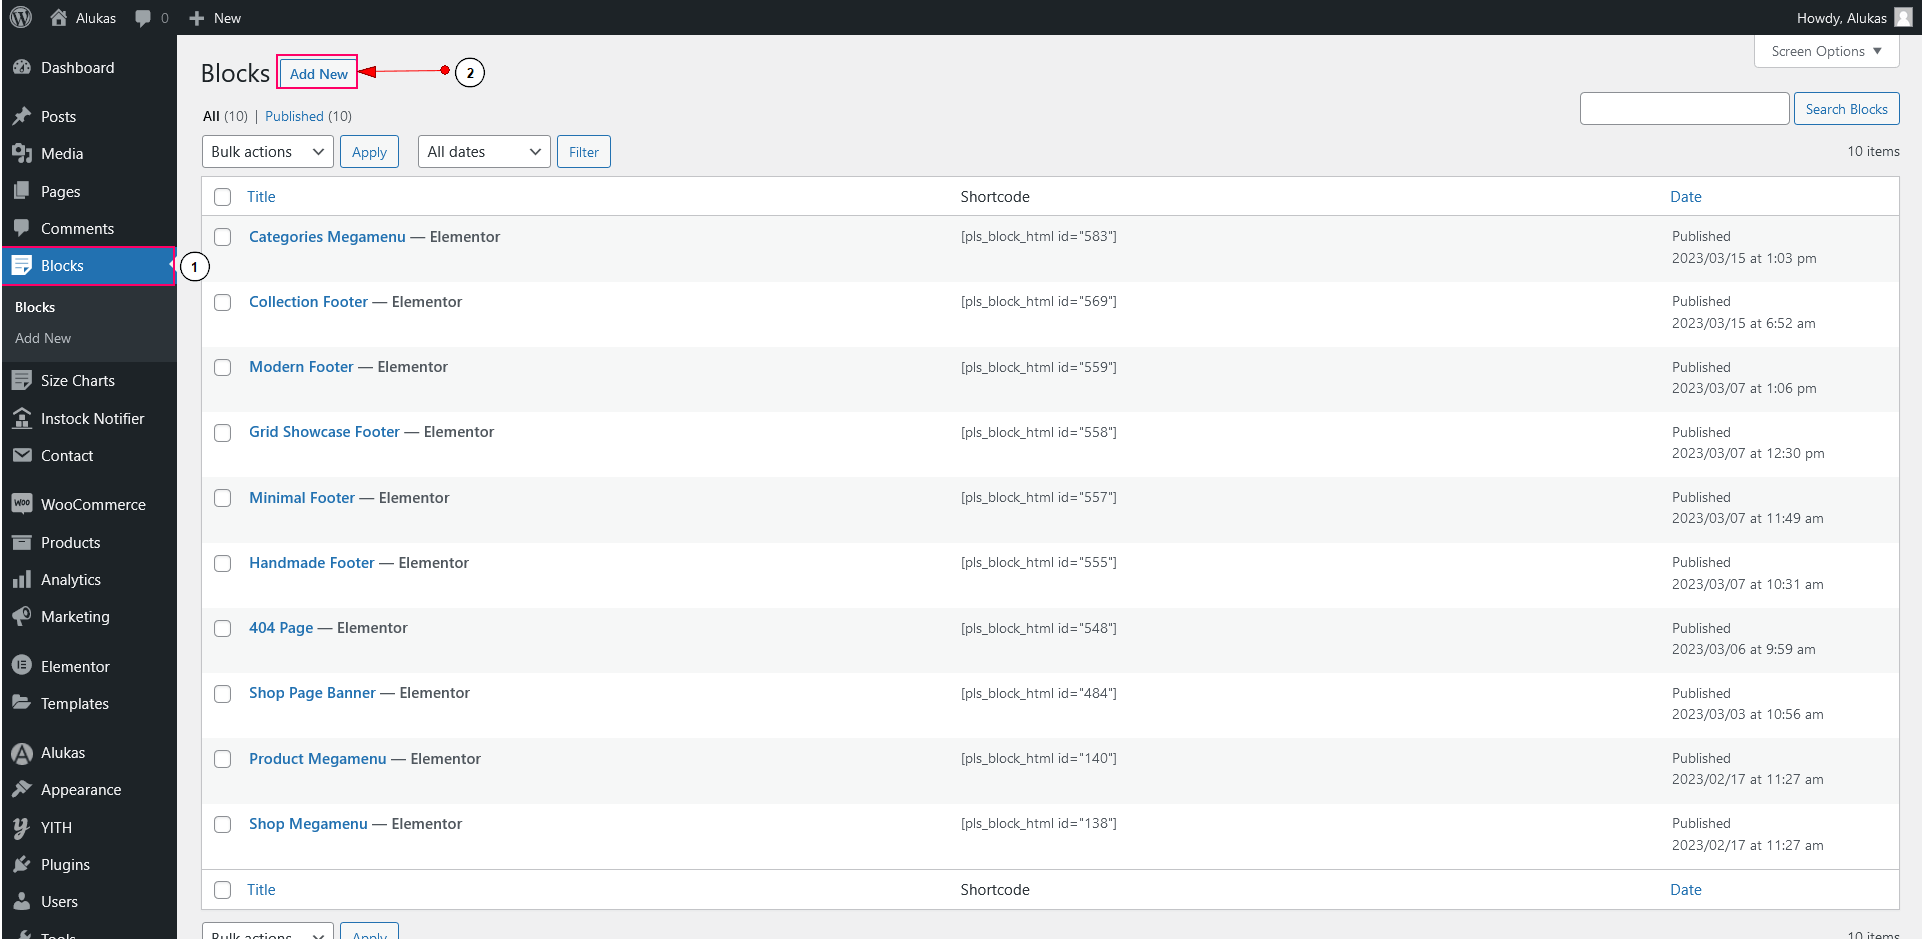
1. Create a Mega Menu Block
-
Log in to WordPress Dashboard:
Log in to your WordPress admin panel (e.g.,yoursite.com/wp-admin). -
Navigate to Blocks:
Go to Blocks => Add New from the left-hand sidebar menu. -
Add New Block:
Enter a title for your mega menu block (e.g., Shop Mega Menu) and click the Publish button. -
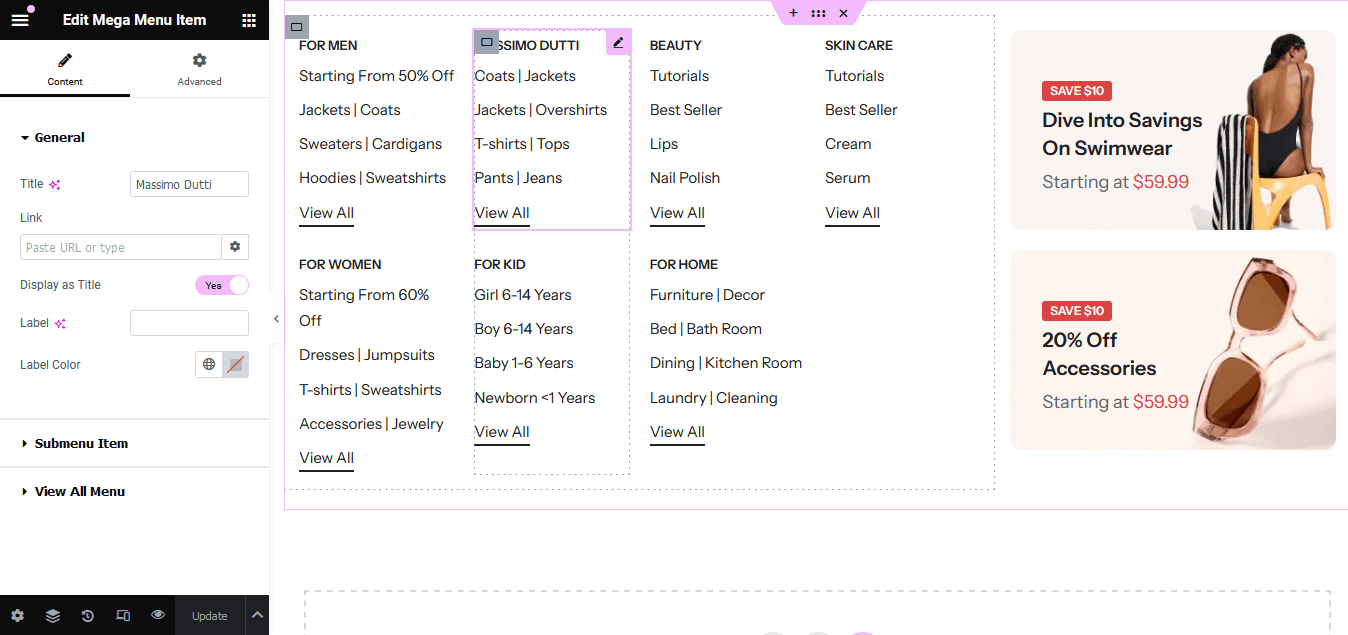
Edit with Elementor:
Click the Edit with Elementor button. Inside the Elementor interface, drag and drop sections, columns, headings, menus, products, or banner widgets to design your custom dropdown layout.
2. Assign the Block to a Menu Item
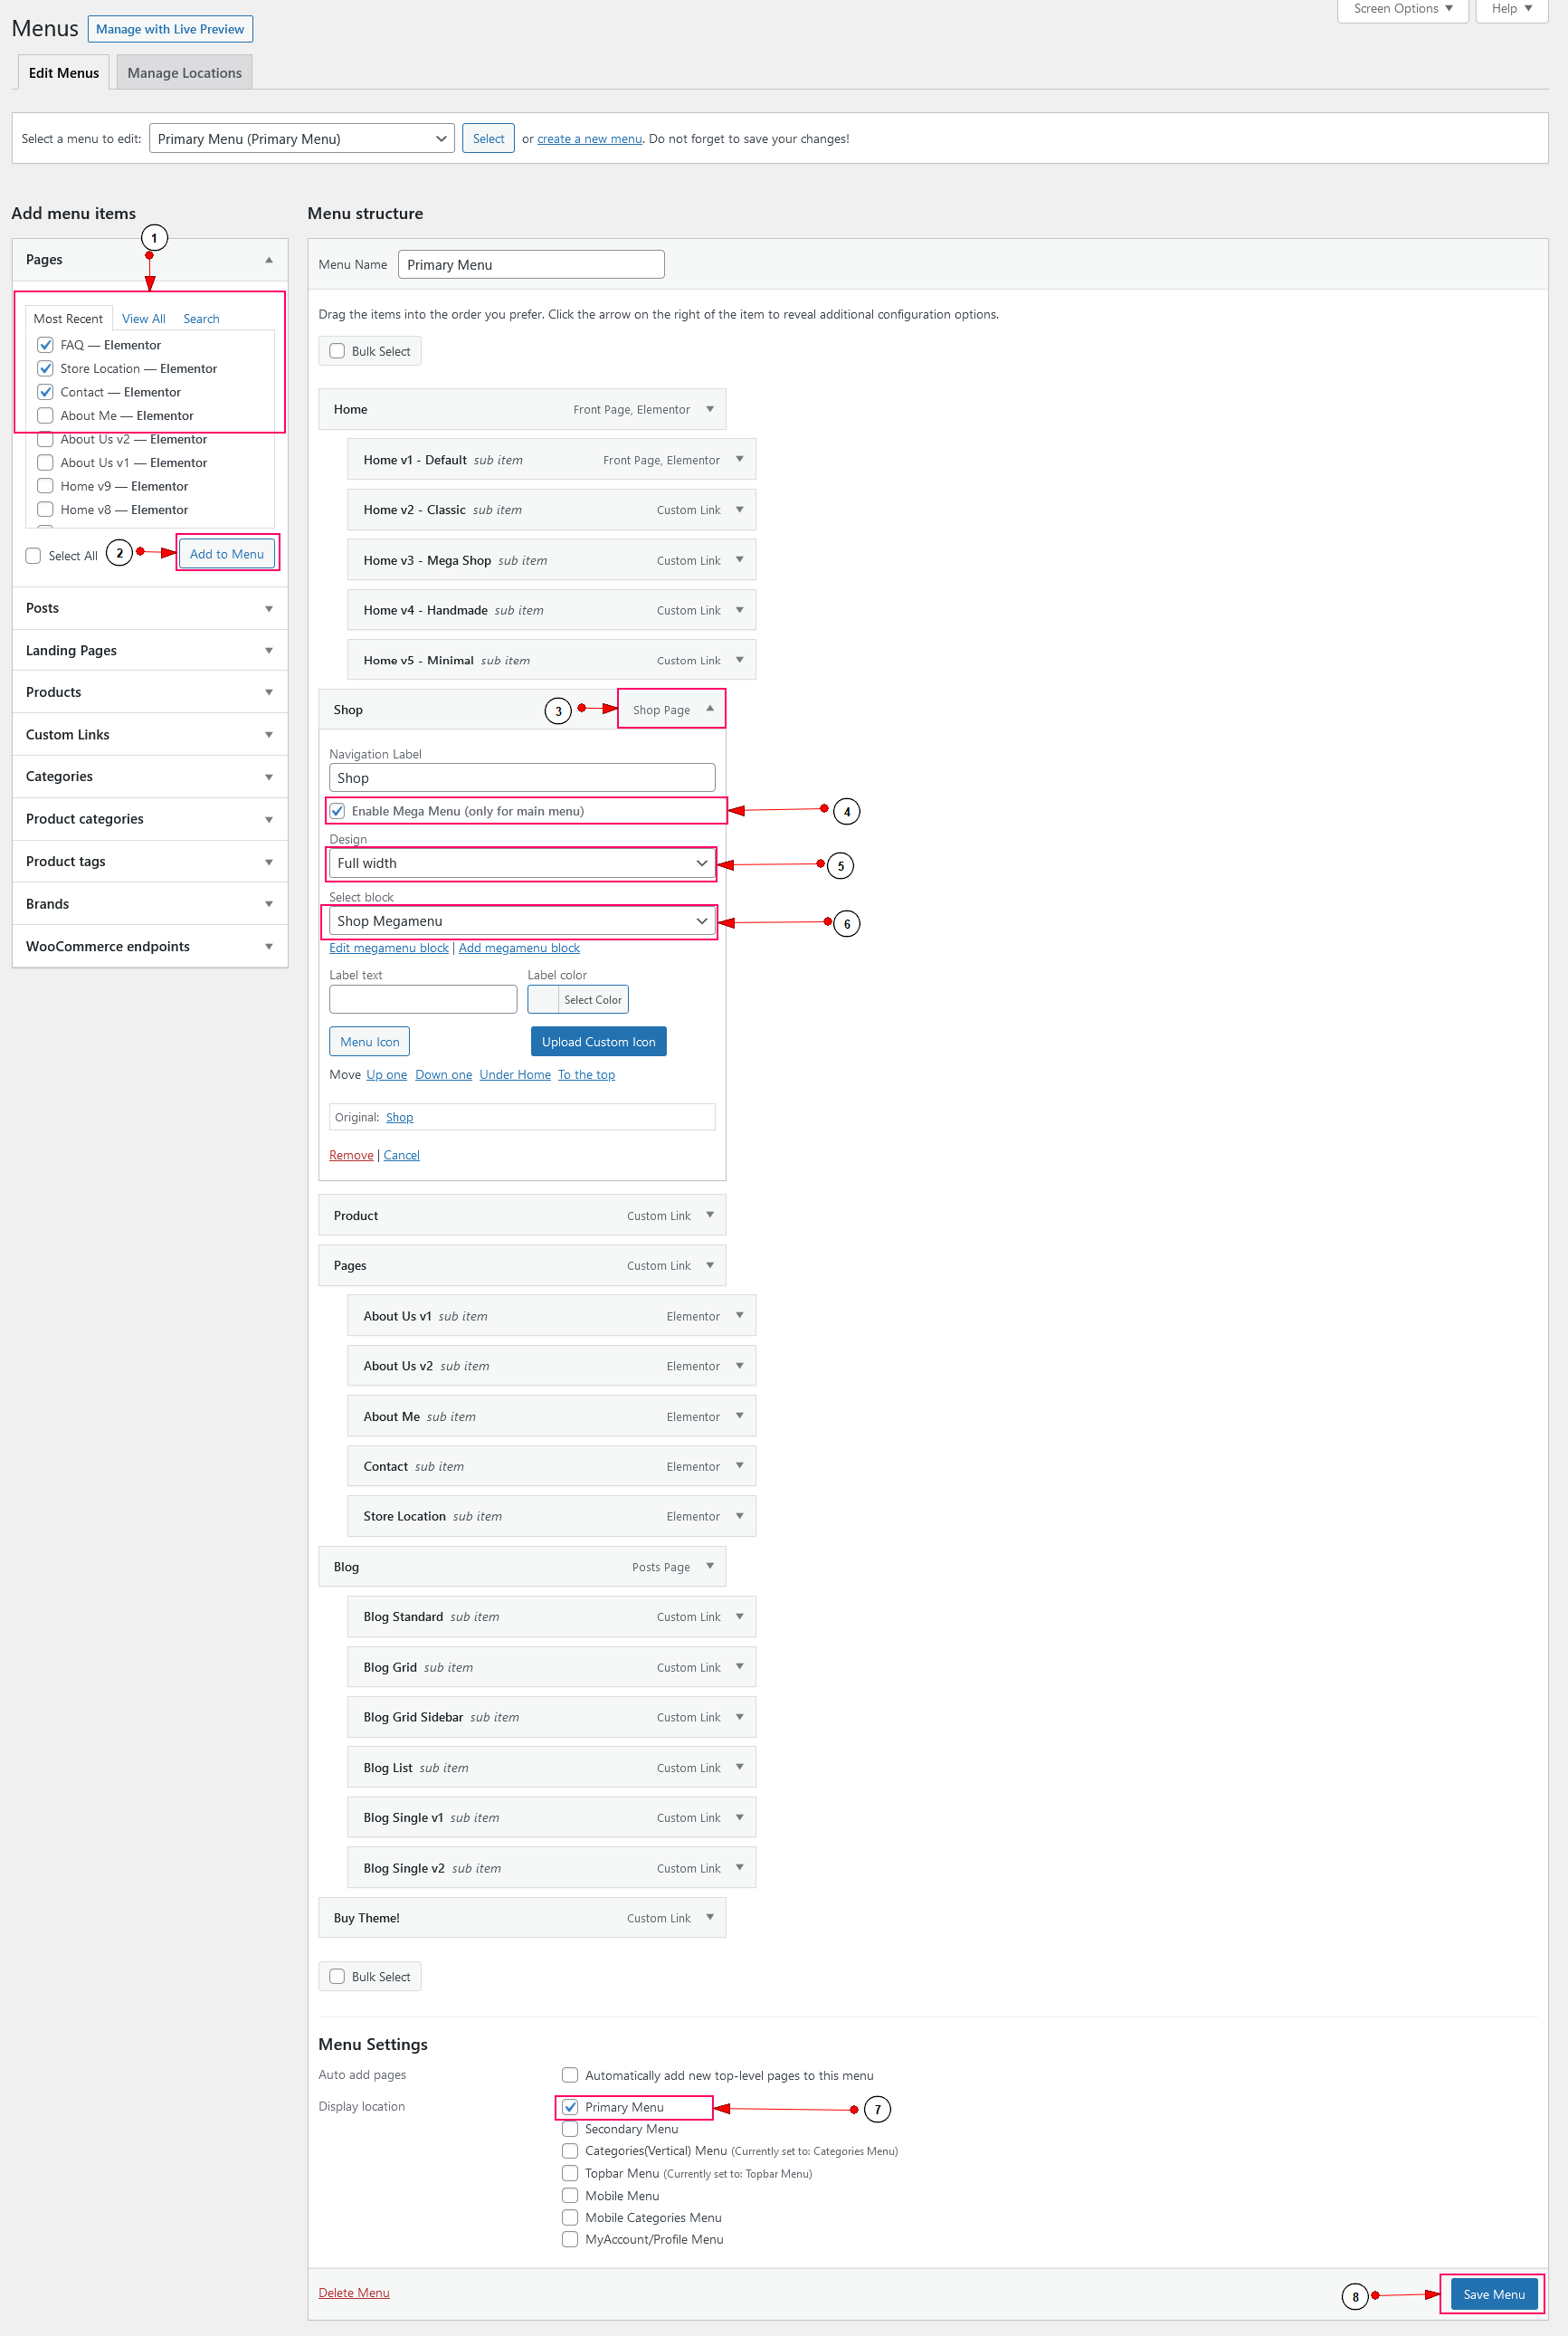
-
Open Menus Screen:
Go to Appearance => Menus. -
Choose the Menu Item:
Locate the parent menu item (e.g., Shop) where you want to add the mega menu and click the small dropdown arrow next to its title. -
Enable Mega Menu:
Check the Enable Mega Menu checkbox option. -
Select Design & Width:
Choose the layout size option under the dropdown (e.g., Full Width or Custom Sizes). -
Select Your Mega Menu Block:
Select the Elementor block you created in the first step from the block dropdown menu list. -
Save Settings:
Click the Save Menu button to publish your changes.
Footer Style
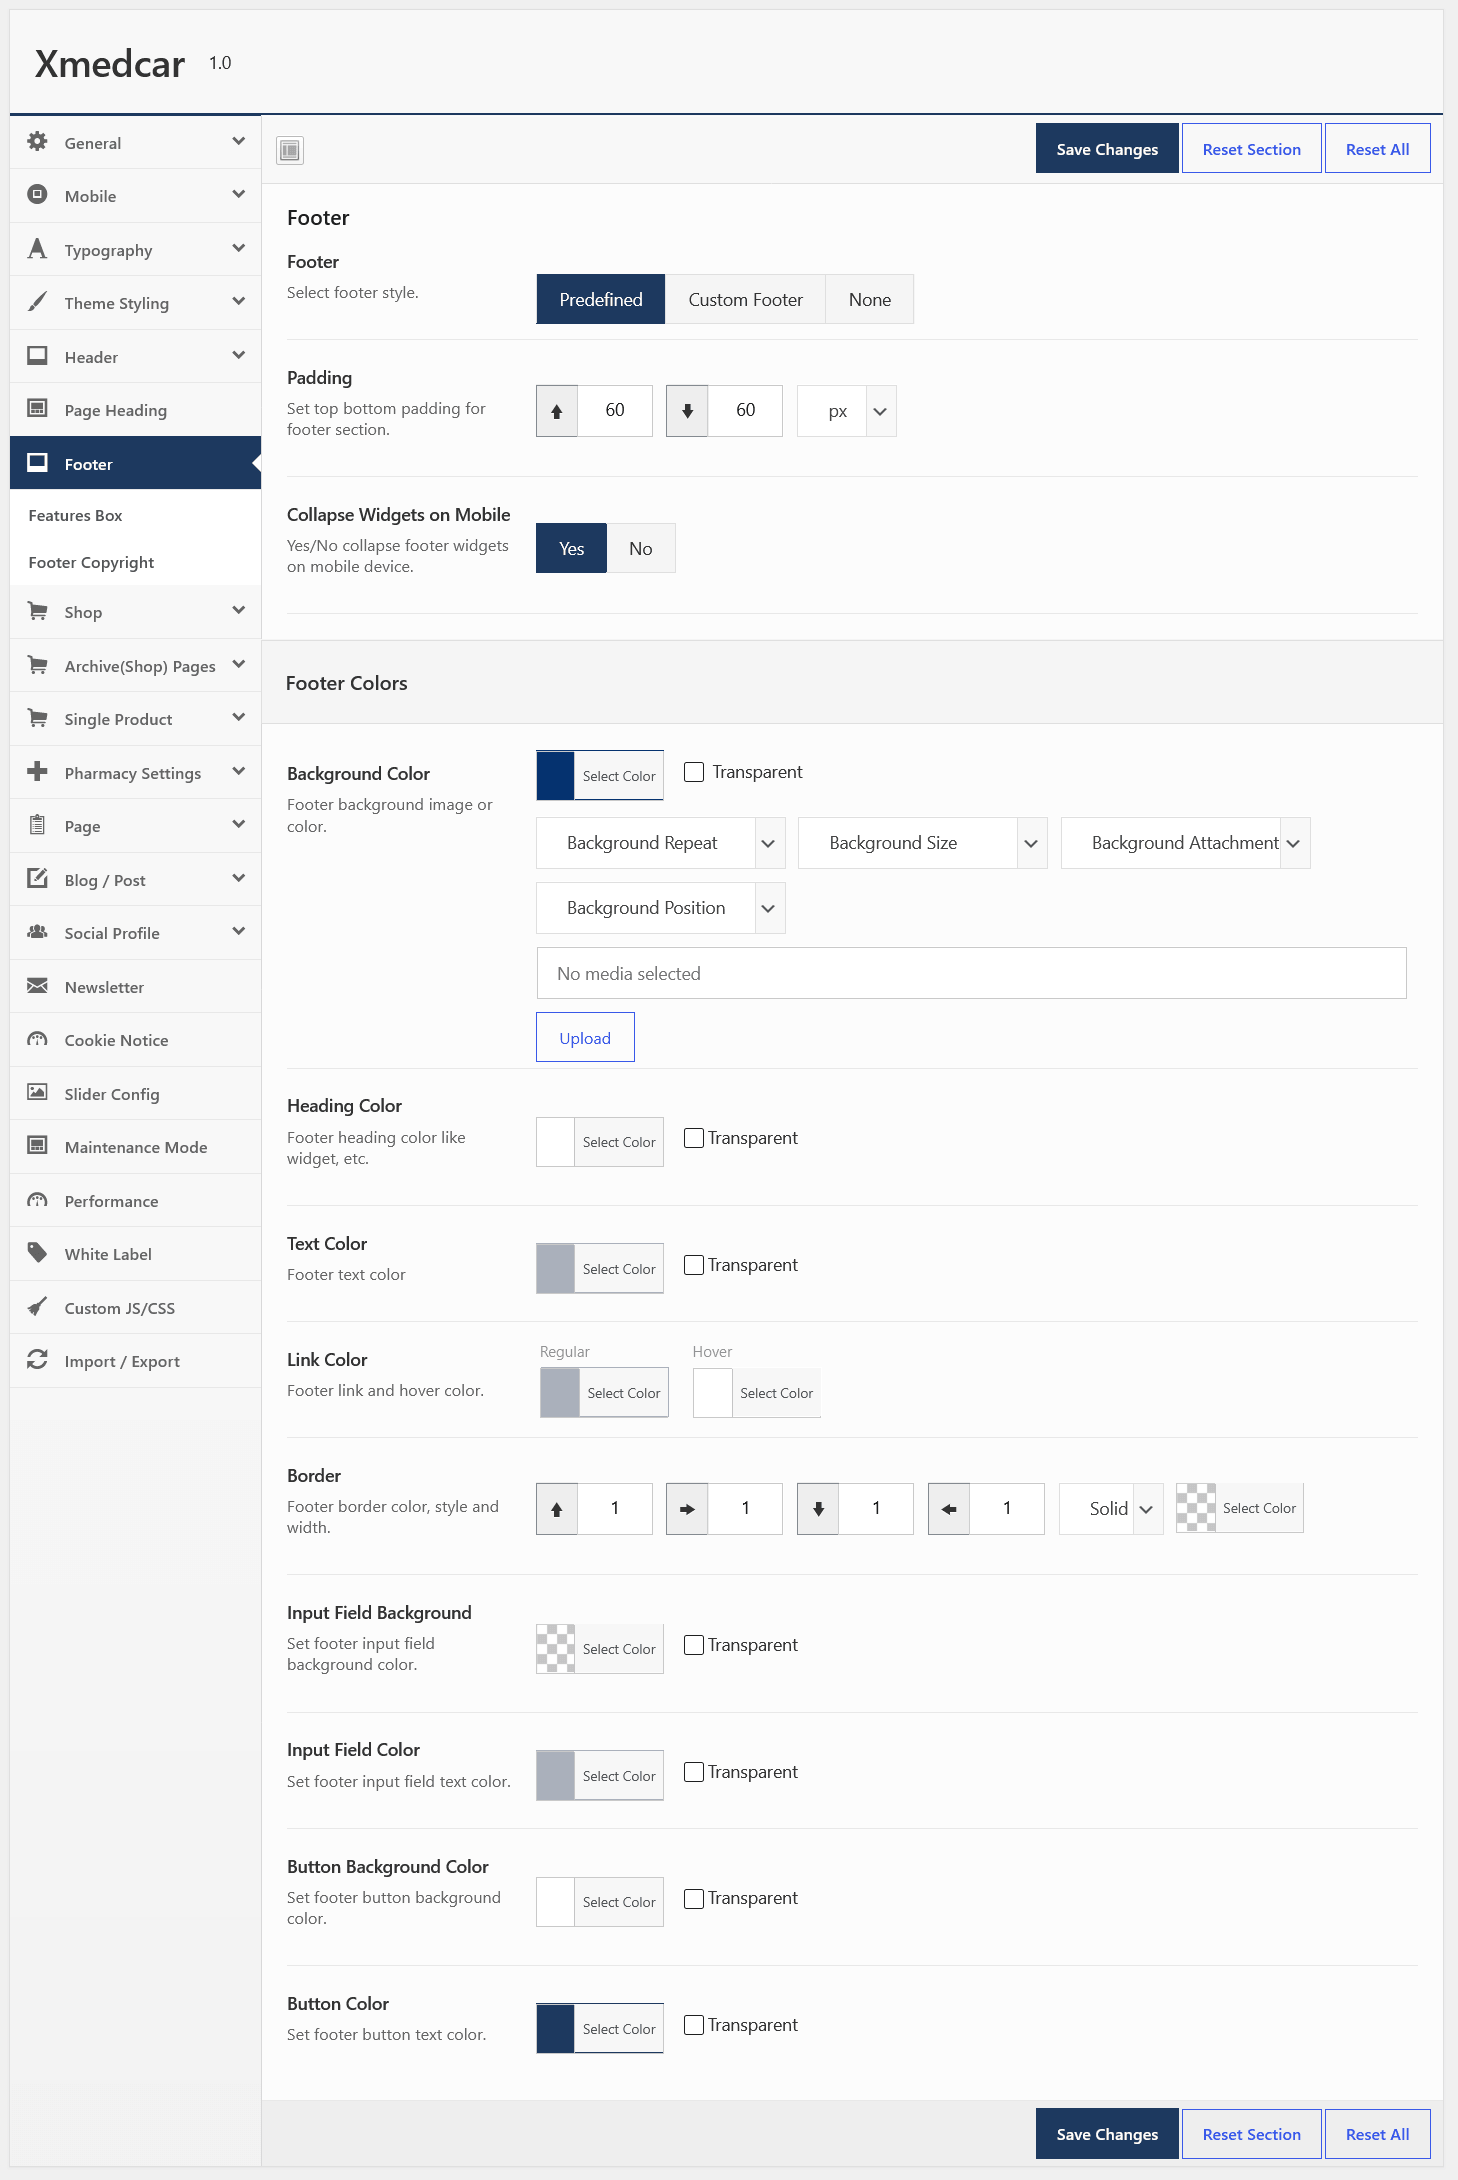
Xmedcar provides global options to control your website's footer layout, toggle widget areas, customize colors, and enable copyright sections easily. Follow the steps below to configure your footer styling:
Setup & Usage Guide:
-
Log in to WordPress Dashboard:
Log in to your WordPress admin panel (e.g.,yoursite.com/wp-admin). -
Navigate to Theme Options:
Go to Xmedcar => Theme Options from the left sidebar. -
Access Footer Settings:
Click on the Footer tab from the options panel menu. -
Configure Layout & Styles:
Adjust the settings as needed:- Footer Style: Choose between the predefine(widget-based) footer or custom block footer.
- Footer Background & Text Colors: Set custom colors for background, text, headings, and link states.
- Copyright Settings: Toggle the bottom copyright bar and enter your custom copyright text.
-
Save Options:
Click the Save Changes button to apply the style.
Theme Options Footer Settings Panel:
Footer Widgets
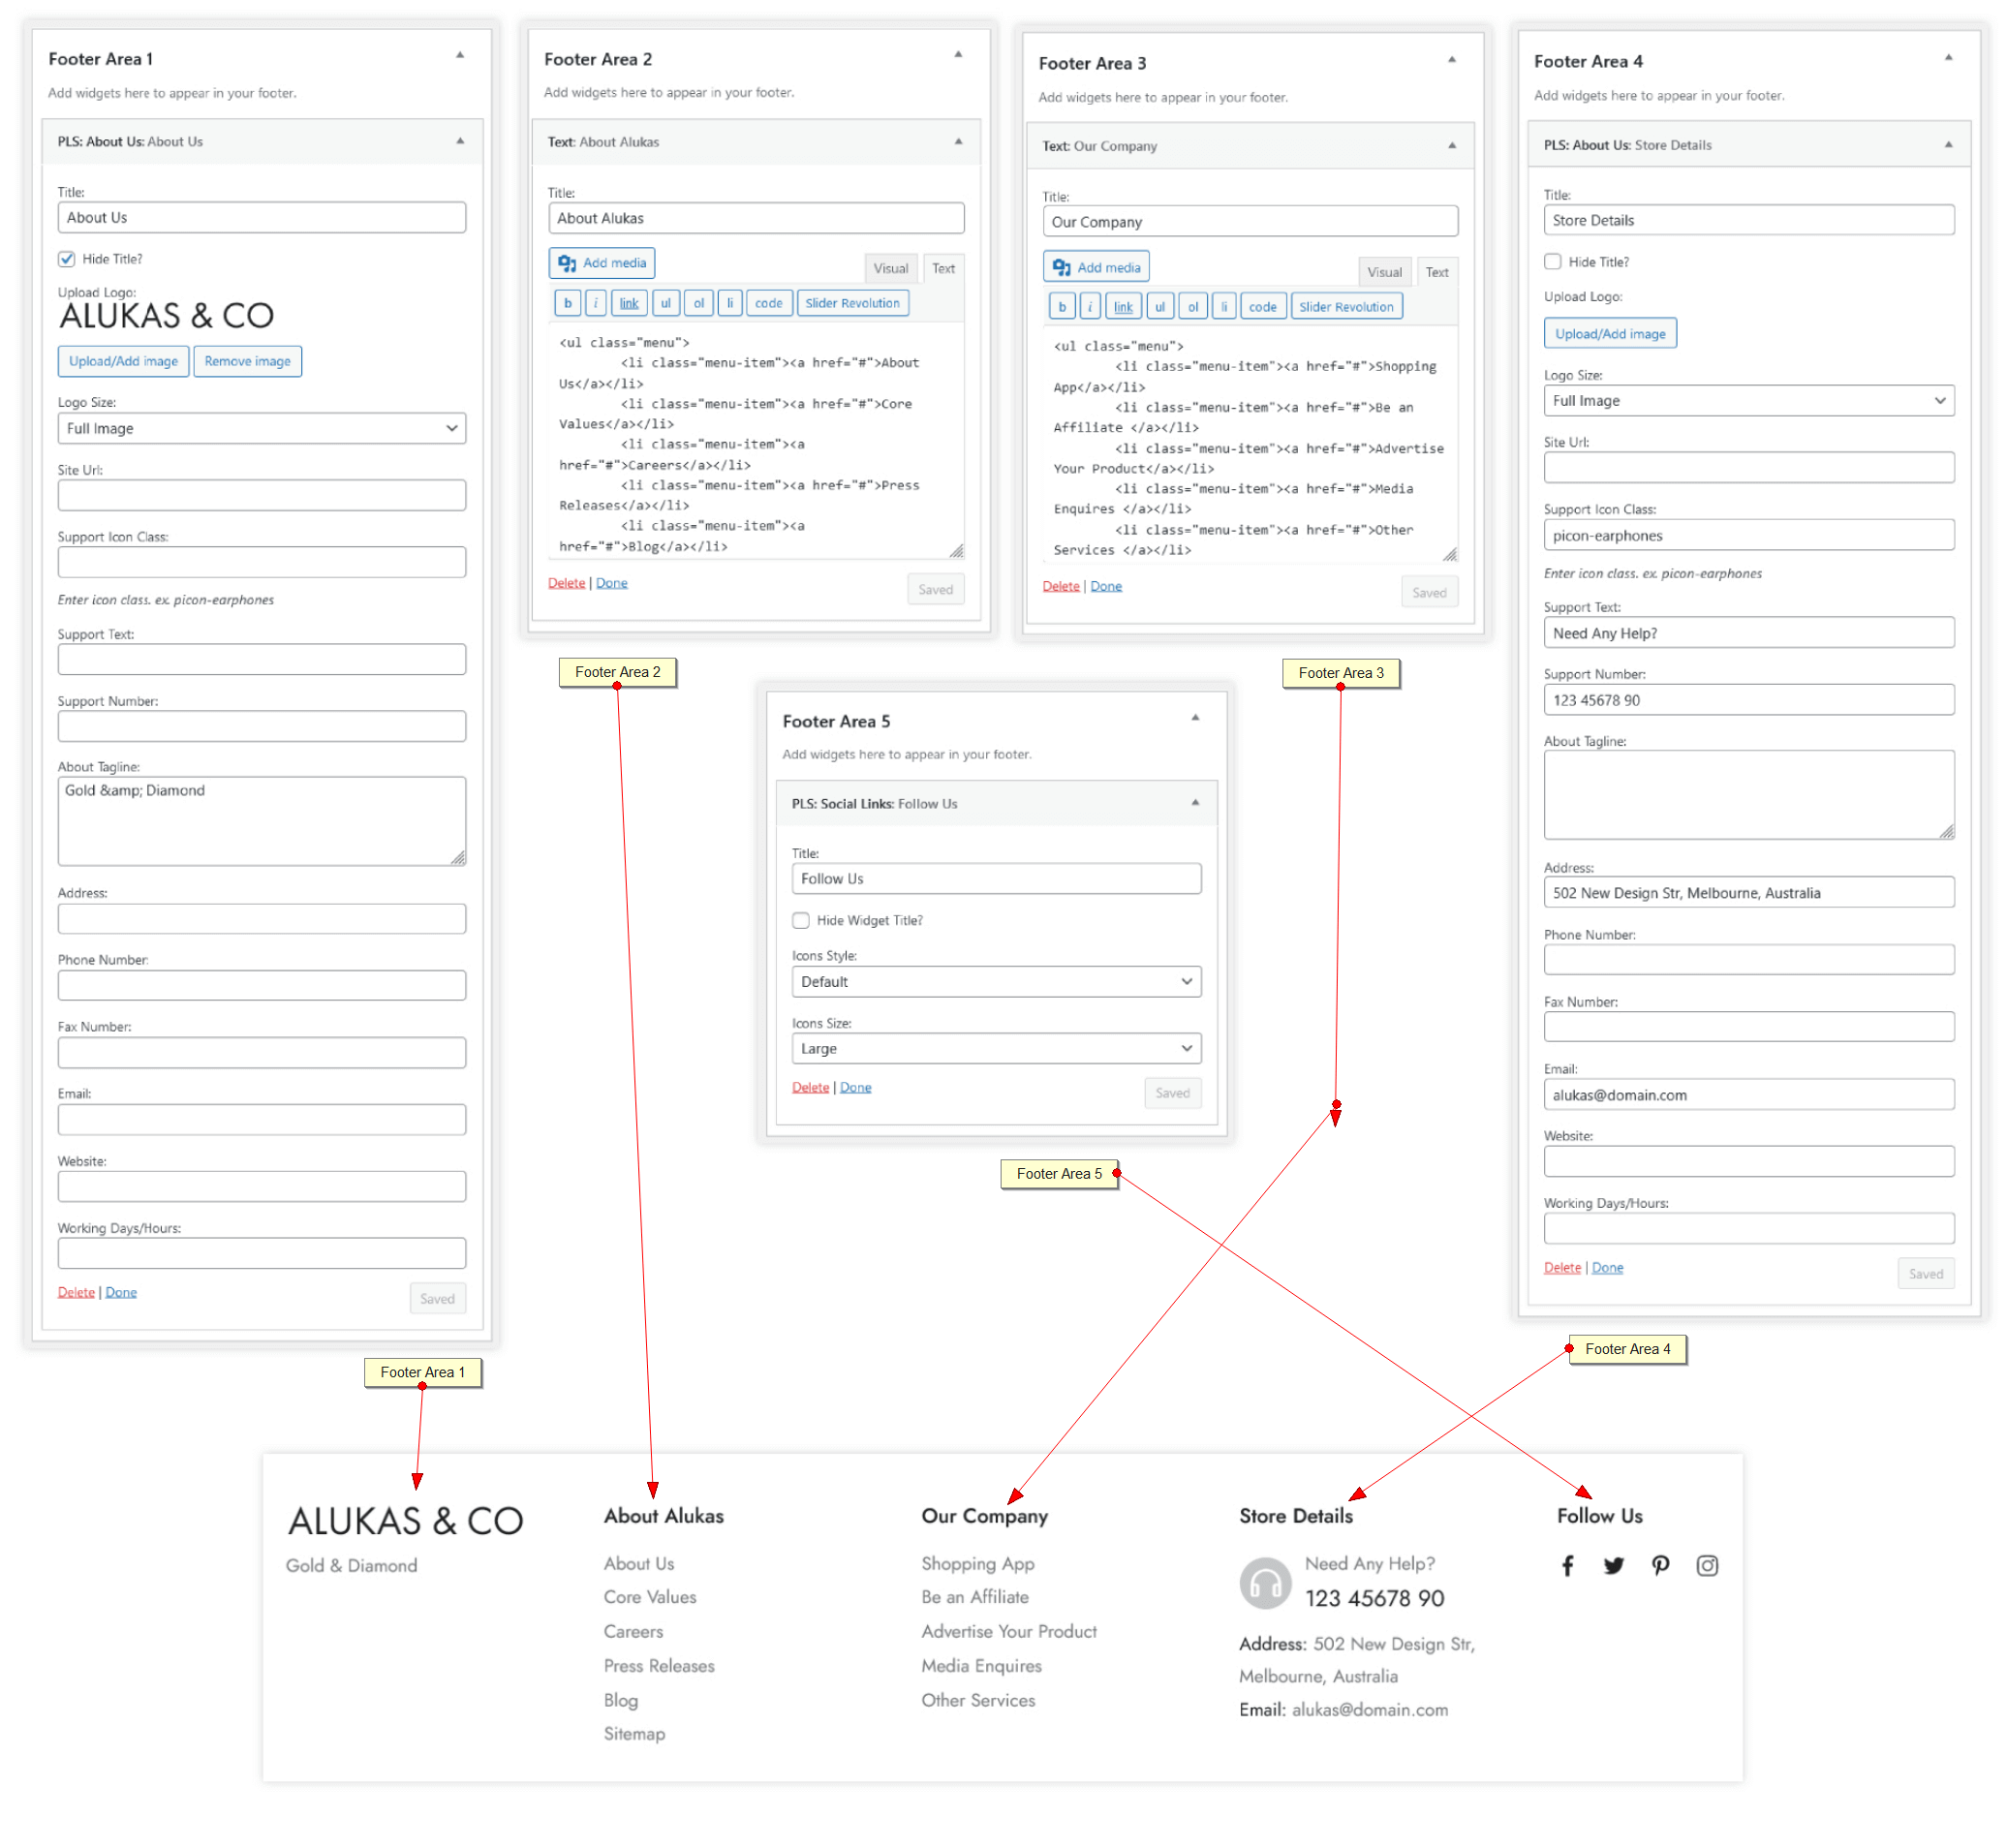
Xmedcar features up to 4 widget columns in the footer. You can easily populate these columns with custom blocks, lists, social links, contacts, or newsletter subscription forms using WordPress widgets.
Setup & Usage Guide:
-
Log in to WordPress Dashboard:
Log in to your WordPress admin panel (e.g.,yoursite.com/wp-admin). -
Navigate to Widgets:
Go to Appearance => Widgets from the left-hand sidebar menu. -
Locate Footer Widget Areas:
On the right side of the page, locate the containers labeled:- Footer Area 1: Renders inside the first footer column.
- Footer Area 2: Renders inside the second footer column.
- Footer Area 3: Renders inside the third footer column.
- Footer Area 4: Renders inside the fourth footer column.
-
Save Changes:
Configure options inside each added widget block and click Update in the top-right corner to save all widget changes.
Frontend Footer Widgets Presentation Example:
Custom Footer
In addition to widget-based layouts, Xmedcar lets you design custom footers using the Elementor page builder. This allows for rich column structures, maps, newsletter modules, and payment badge arrangements.
Part 1: Create the Custom Footer Block
-
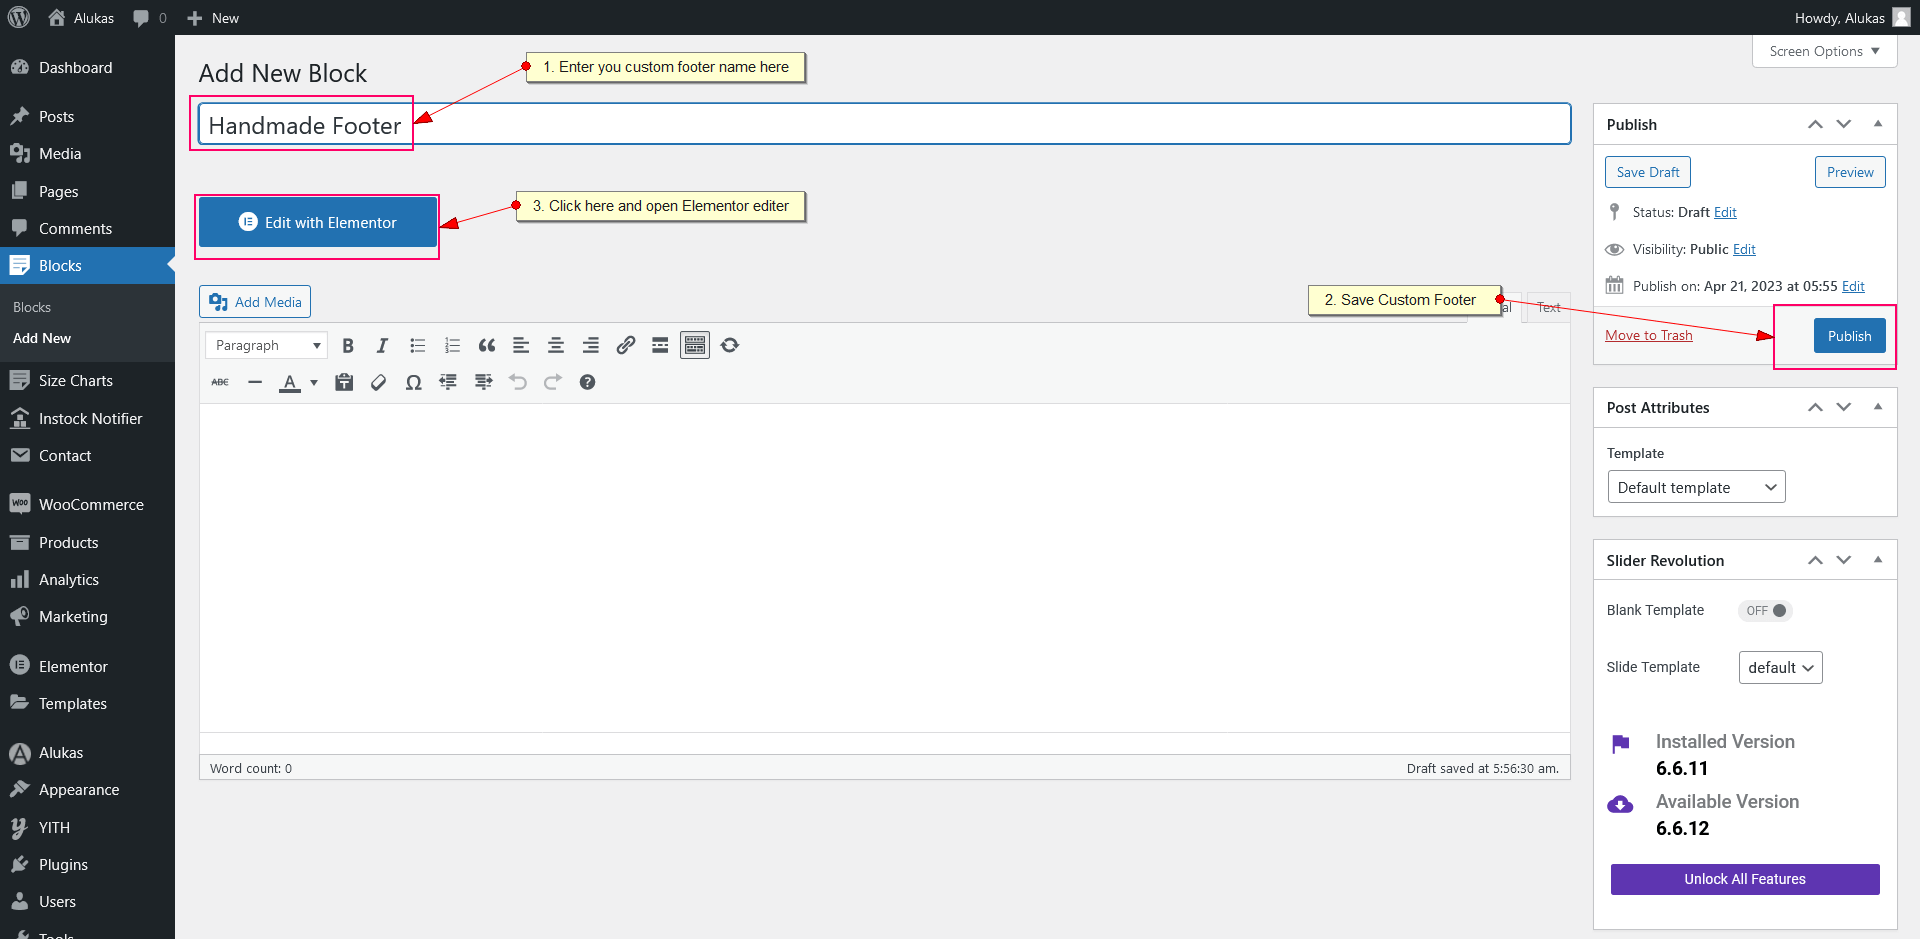
Create a New Block:
Navigate to Blocks => Add New in your WordPress admin menu. -
Publish the Block:
Name your block (e.g., Global Site Footer) and click the Publish button. -
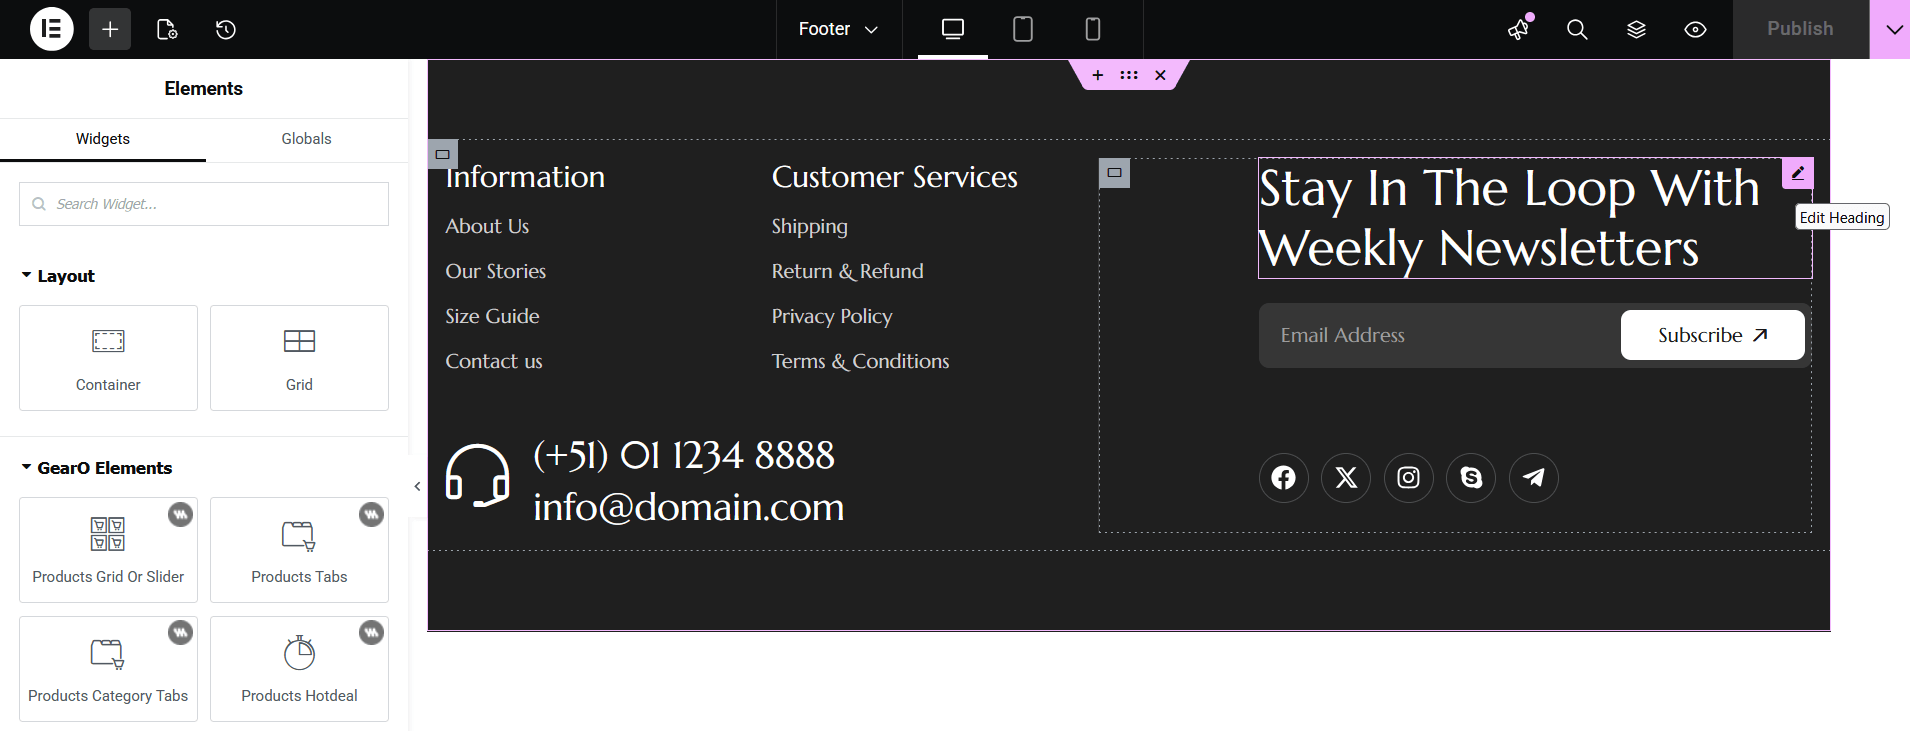
Design inside Elementor:
Click Edit with Elementor. Design your custom layout by dragging and dropping sections, menus, forms, logos, and custom columns. Save your design once complete.
Creating a Custom Block:
Designing Footer Layout in Elementor:
Part 2: Assign the Block in Theme Options
-
Navigate to Theme Options:
Go to Xmedcar => Theme Options => Footer. -
Enable Custom Block Mode:
Under Footer Style, select the Custom Block option from the dropdown menu. -
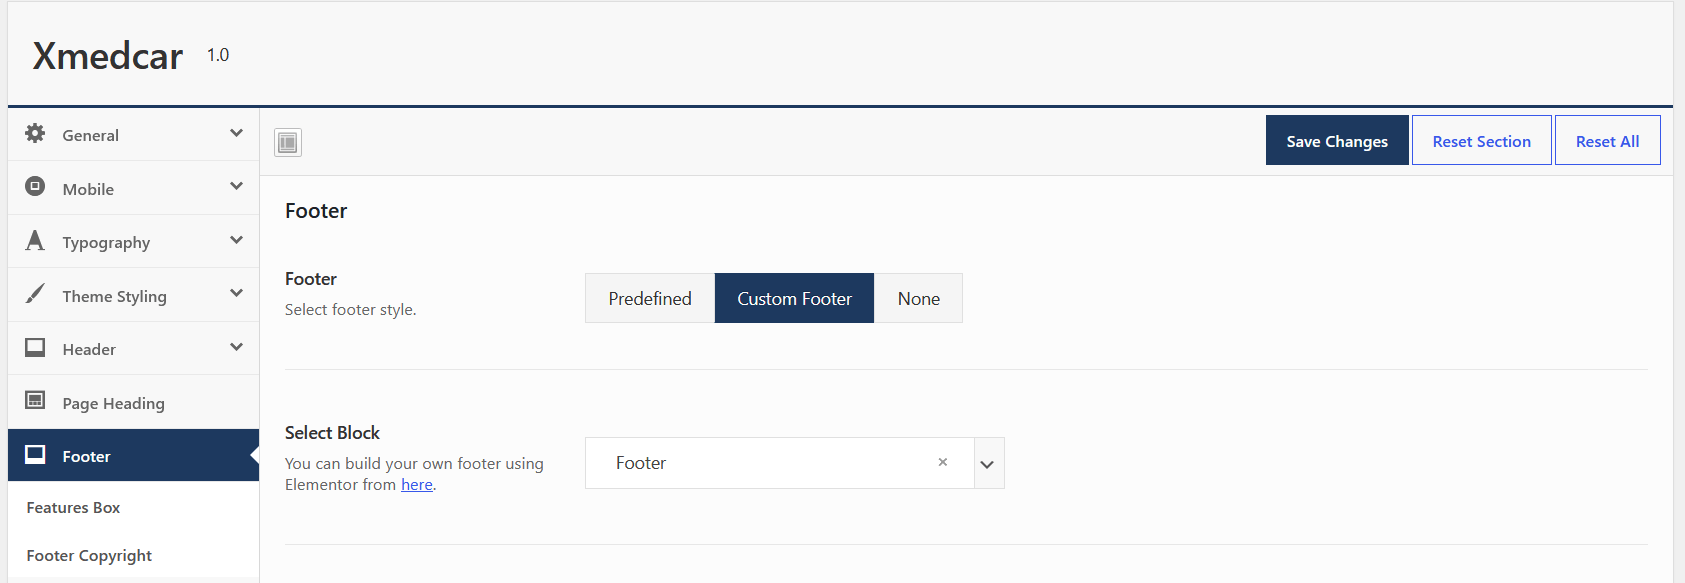
Select Your Block:
From the block list dropdown that appears, select the custom footer block you created in Part 1. -
Save Changes:
Click the Save Changes button to activate your new custom footer layout.
Theme Options Custom Footer Selection:
Home Page Setting
By default, WordPress displays your latest blog posts on the homepage. To set up one of the pre-built pharmacy homepage layouts (imported from the demo content) as your website's main landing page, follow the steps below:
Homepage Setup Guide:
-
Log in to WordPress Dashboard:
Log in to your WordPress admin panel (e.g.,yoursite.com/wp-admin). -
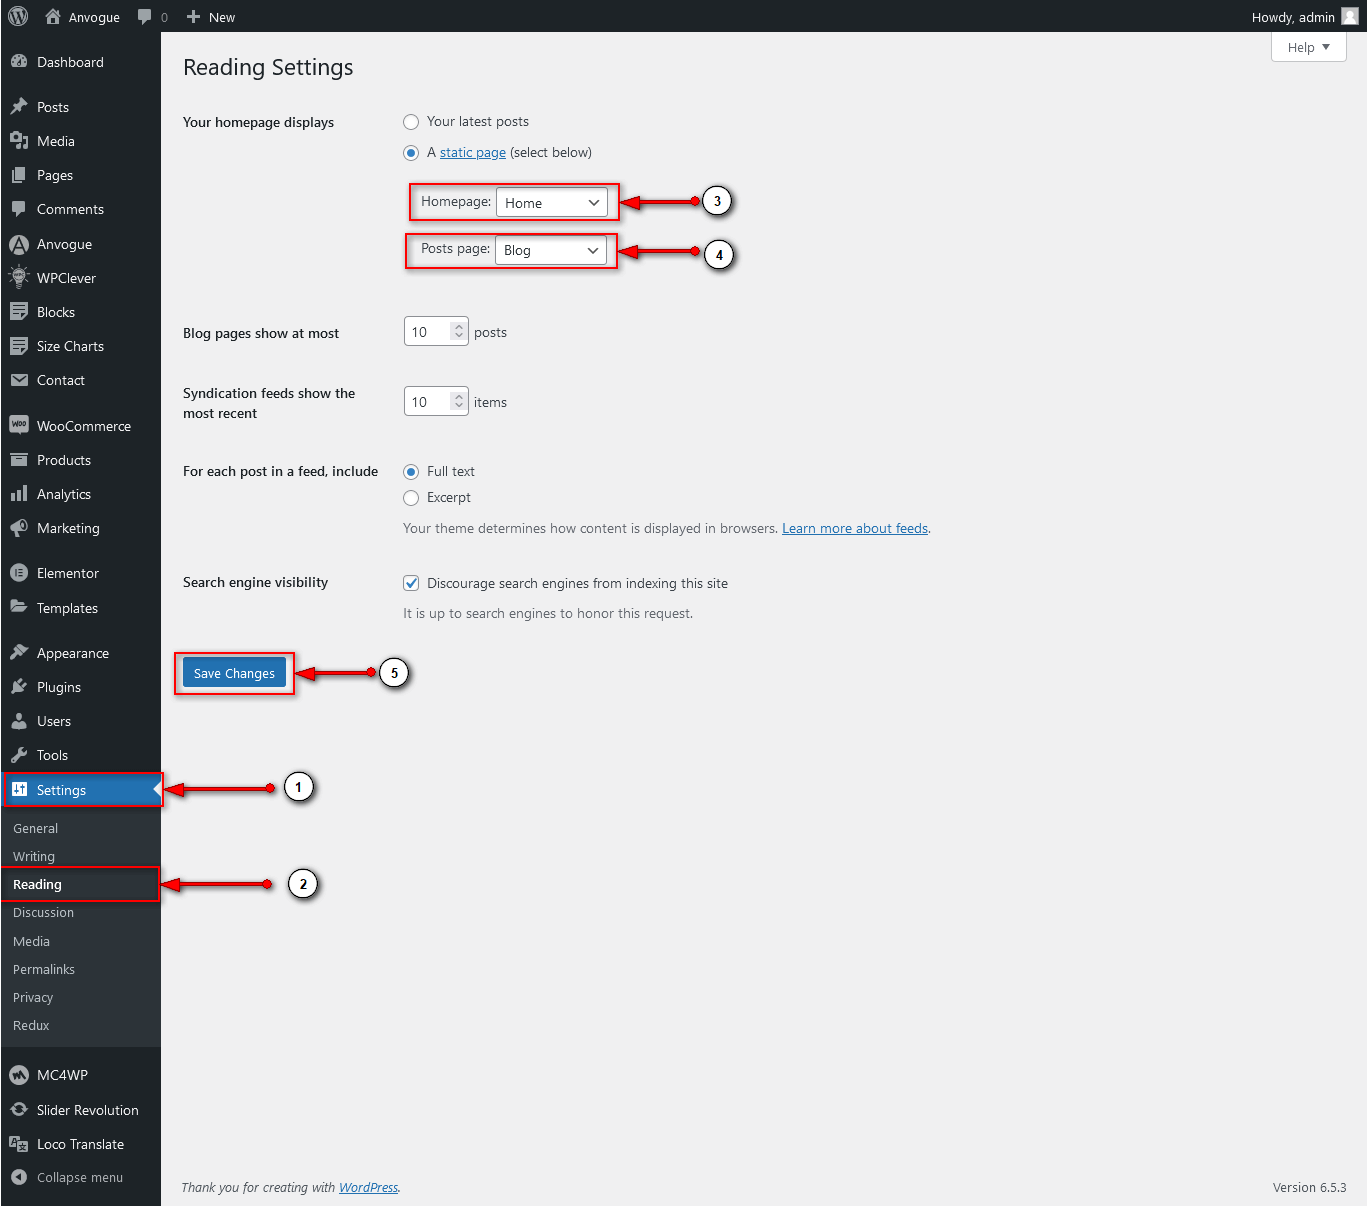
Navigate to Reading Settings:
Go to Settings => Reading from the left-hand sidebar menu. -
Choose Static Page Option:
For the Your homepage displays setting, select the A static page (select below) radio button option. -
Select Your Homepage:
Click the Homepage dropdown list and select your desired homepage (e.g., Home or Home v1).(Optional) If you want a blog page, click the Posts page dropdown list and select Blog.
-
Save Settings:
Scroll to the bottom of the page and click the Save Changes button to apply the new settings.
Create Page
Creating pages in WordPress using the Xmedcar theme is simple. You can create standard pages (like About Us, Contact, etc.) and then customize their layouts or edit them using Elementor. Follow the steps below to create a page:
Page Creation Guide:
-
Log in to WordPress Dashboard:
Log in to your WordPress admin panel (e.g.,yoursite.com/wp-admin). -
Navigate to Add New Page:
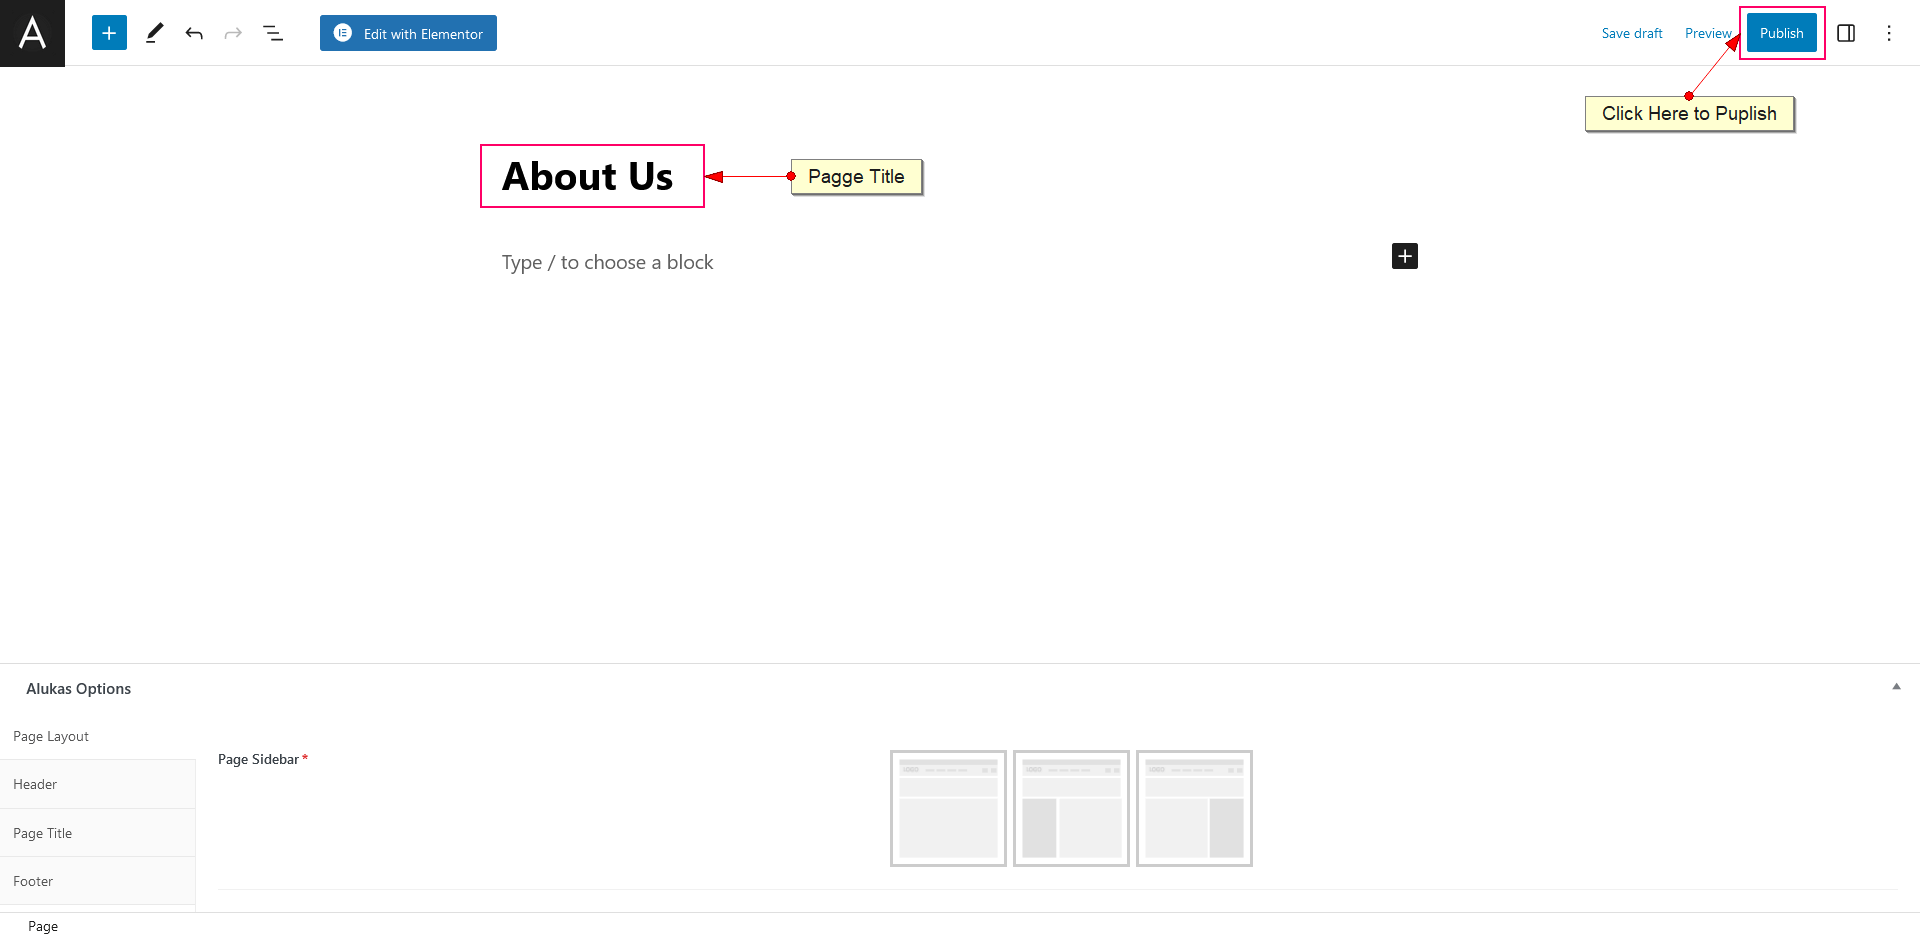
Go to Pages => Add New Page from the left-hand sidebar menu. -
Enter Page Title:
Type your page name (e.g., About Us, Contact Us) in the main title input field. -
Choose Page Layout & Options:
In the page meta options, select your preferred page layout (e.g., Full Page (No Sidebar), Left Sidebar, or Right Sidebar). -
Publish the Page:
Click the blue Publish button at the top-right corner of the editor to make your page live. Once published, you can click the Edit with Elementor button to customize the layout.
Edit Page with Elementor
Xmedcar is built with Elementor page builder integration, allowing you to design and customize your page layout and content dynamically in real-time. Follow the steps below to edit any page using Elementor:
Elementor Editing Guide:
-
Log in to WordPress Dashboard:
Log in to your WordPress admin panel (e.g.,yoursite.com/wp-admin). -
Go to Pages List:
Click on Pages in the left admin sidebar to view your list of pages. -
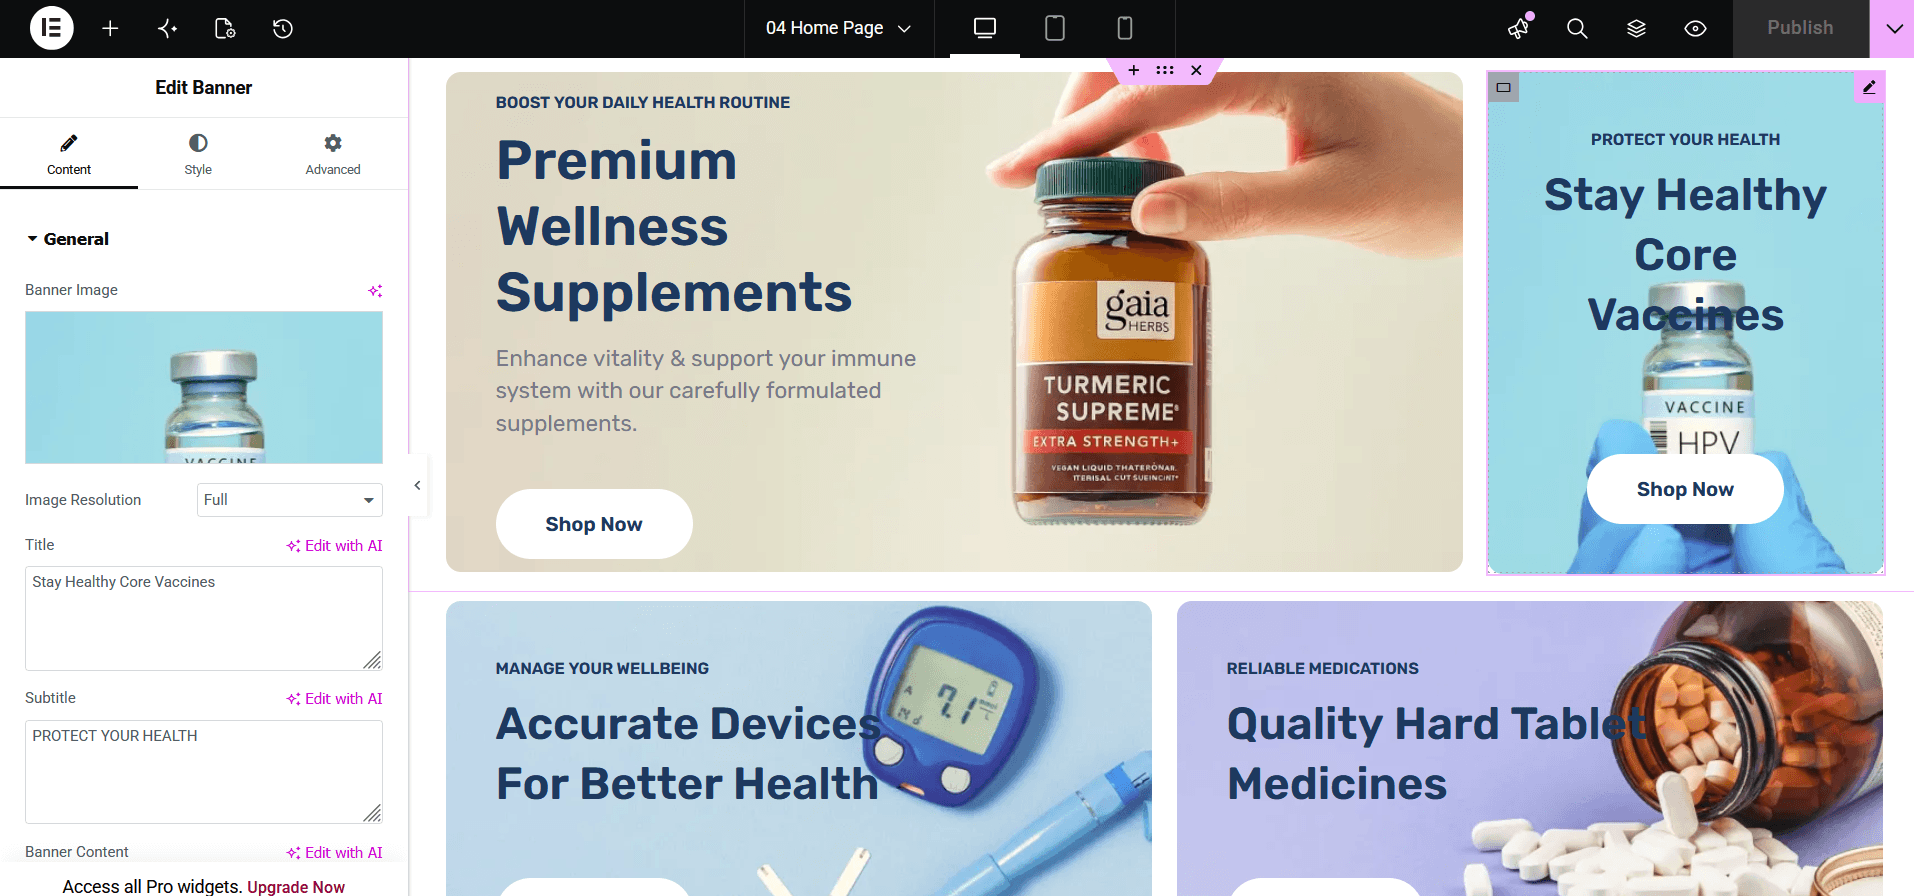
Launch Elementor Editor:
Hover your mouse cursor over the page you want to edit and click the Edit with Elementor link.Alternatively, click the page title to open the standard editor, then click the large Edit with Elementor button at the top.
-
Design & Edit Content:
The Elementor builder will open. Drag and drop theme widgets from the left panel, edit text, swap photos, adjust margins, and configure custom page sections. -
Save Changes:
Once you are finished editing, click the green Update button at the bottom of the Elementor panel to save your changes.
Page Title Background Image
You can customize the header background image or color displayed behind the page title for individual pages. Follow the steps below to configure your page title background:
Page Title Background Guide:
-
Log in to WordPress Dashboard:
Log in to your WordPress admin panel (e.g.,yoursite.com/wp-admin). -
Edit Your Desired Page:
Go to Pages in the left admin sidebar, hover over the page you want to customize, and click the Edit link. -
Open Xmedcar Options:
Scroll down below the main page editor content area to locate the Xmedcar Options settings panel. -
Go to Page Title Tab:
Click on the Page Title tab from the left sidebar of the options panel.(Optional) View Settings Tab Screenshot
-
Configure Background Image or Color:
Upload your desired background image or select a background color under the corresponding settings.(Optional) View Configuration Options Screenshot
-
Save Changes:
Scroll back to the top of the editor page and click the Update or Publish button to save your changes.
Create Post
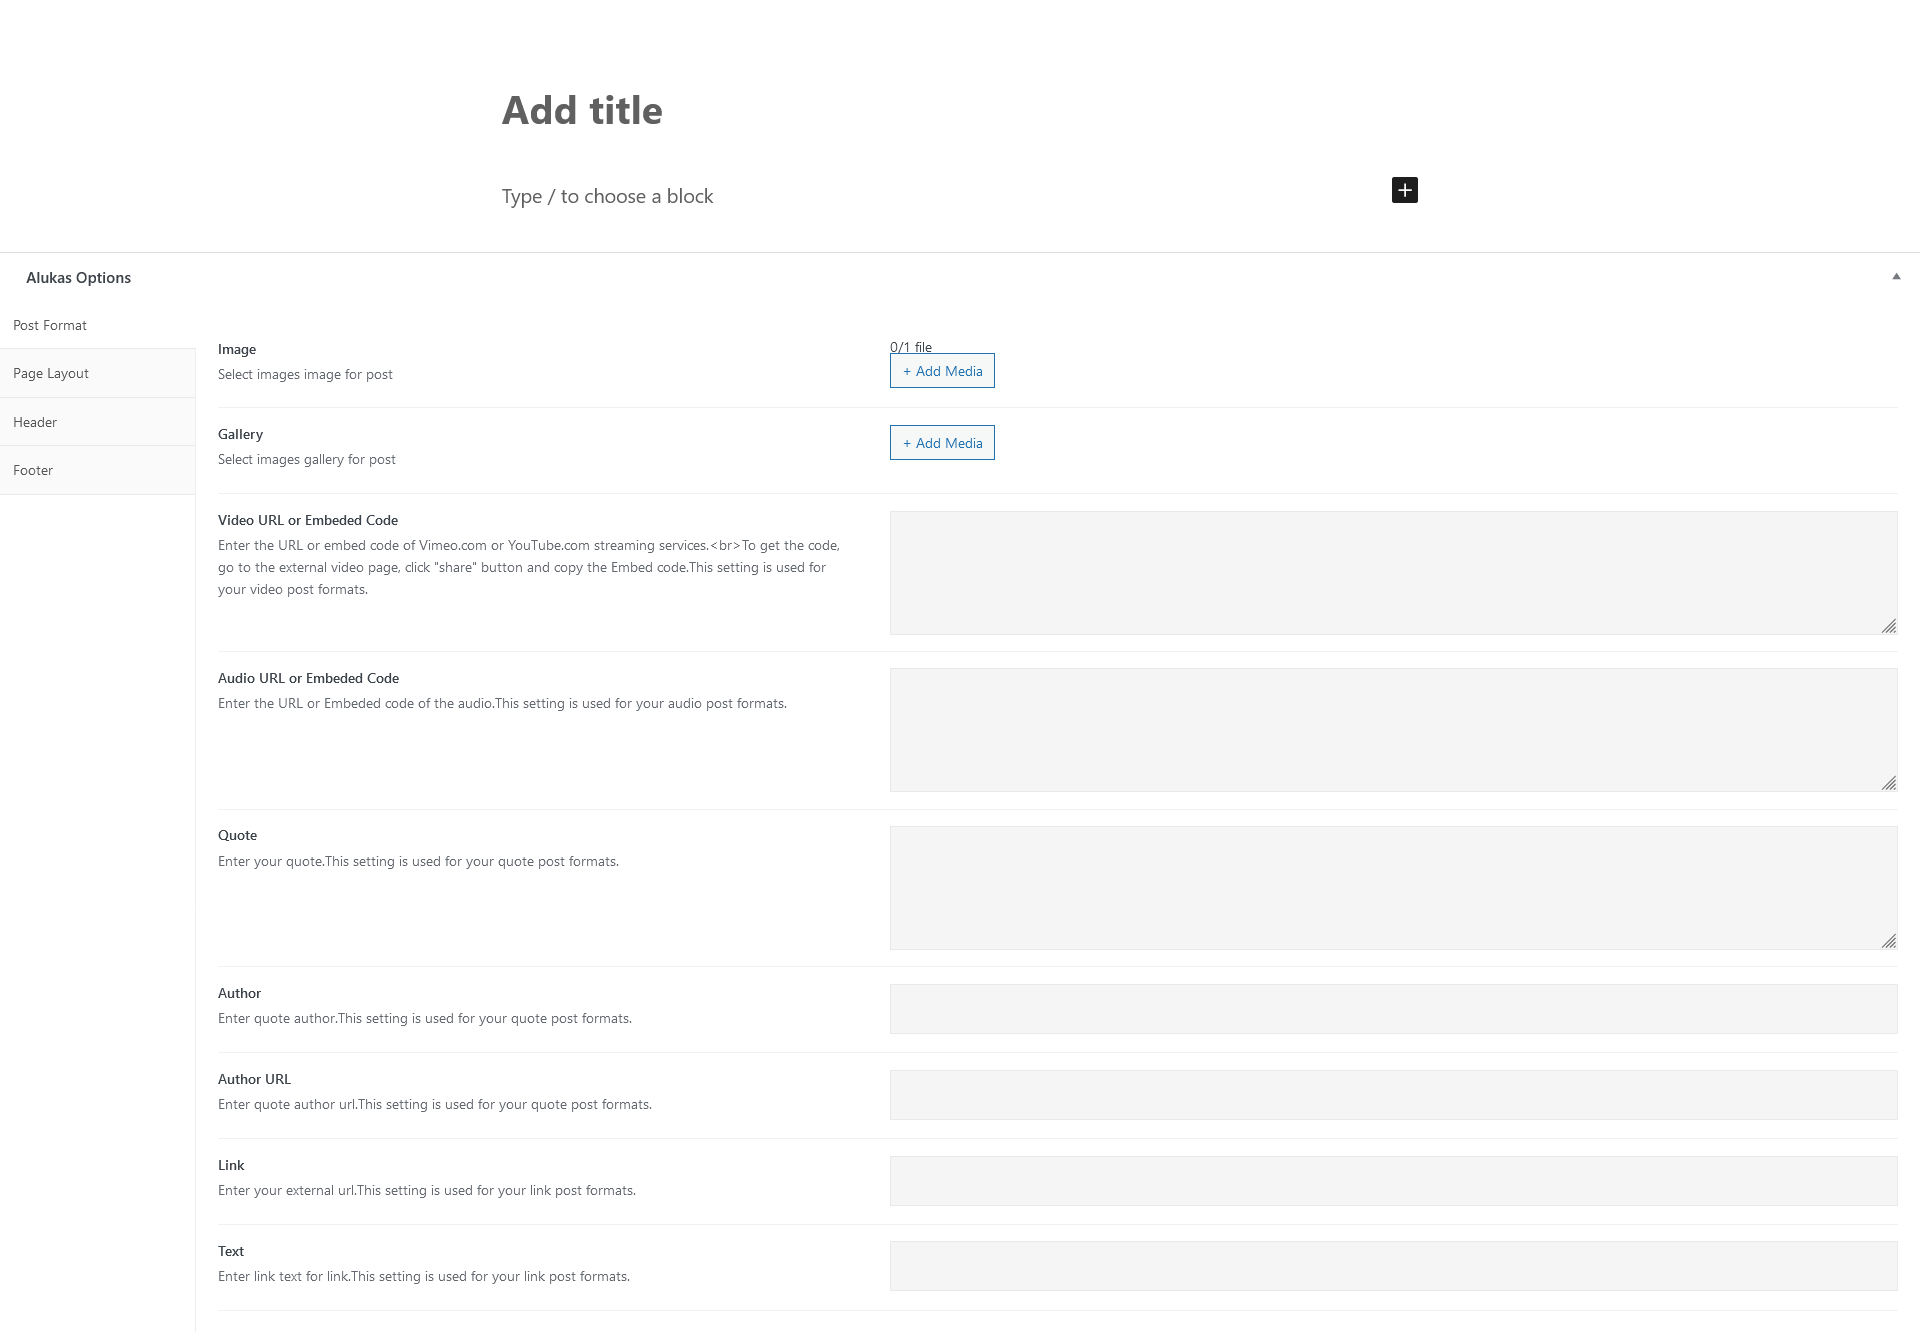
Please go through the following points to learn how to create post:
- Login to your wp-admin and navigate to posts.
- Go to add new post.
- Enter post title.
- Select post format.
- Select post categories.
- Insert post tag.
- Upload post feature image.
- Select post meta options.
- Enter post experts.
- Click on publish to publish post.
Sidebars
Xmedcar comes with pre-configured default sidebars and includes a custom sidebar generator that lets you create and assign unique widget areas to specific posts or pages.
1. Theme's Pre-Configured Sidebars
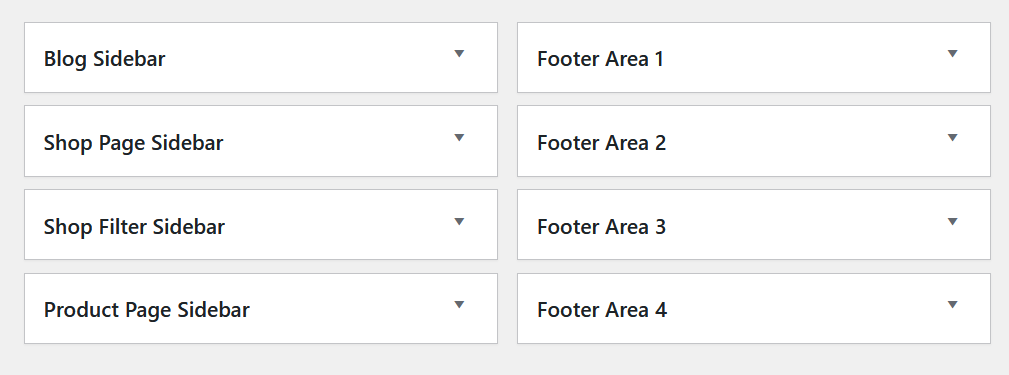
Below is a summary of the default widget areas pre-configured in the theme:
- Blog Sidebar: Displays on the main blog index, post categories, tag archives, and single post pages.
- Shop Page Sidebar: Displays on the shop archive, product categories, and product tag pages.
- Shop Filter Sidebar: A specialized slide-down or top filter widget area on shop pages, visible when the Top Filter options are active in Theme Options.
- Product Page Sidebar: Displays on the right or left side of single product detail pages.
- Footer Areas 1 - 4: Manage widget contents rendered inside the respective columns of the footer.
Default Theme Sidebars List:
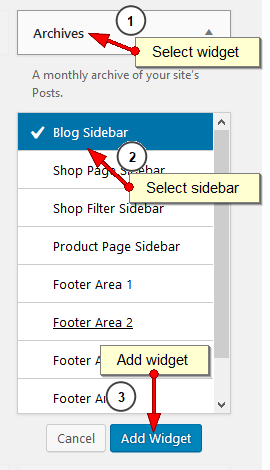
Add Widgets To Sidebar
- Login to the WordPress Dashboard.
- Navigate Appearance > Widgets.
Widgets List
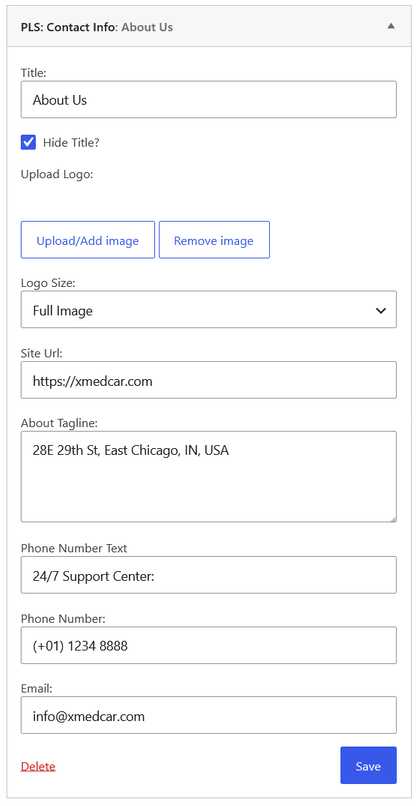
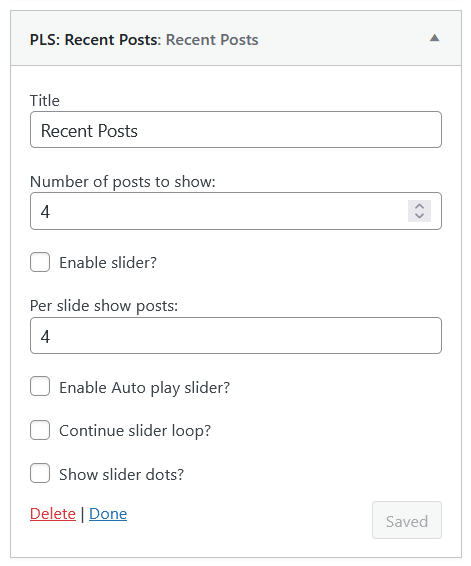
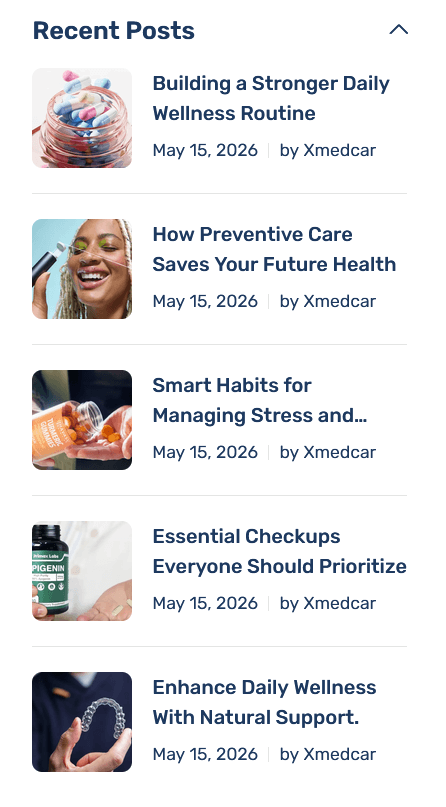
Xmedcar comes with some custom widgets. See below list of widgets.
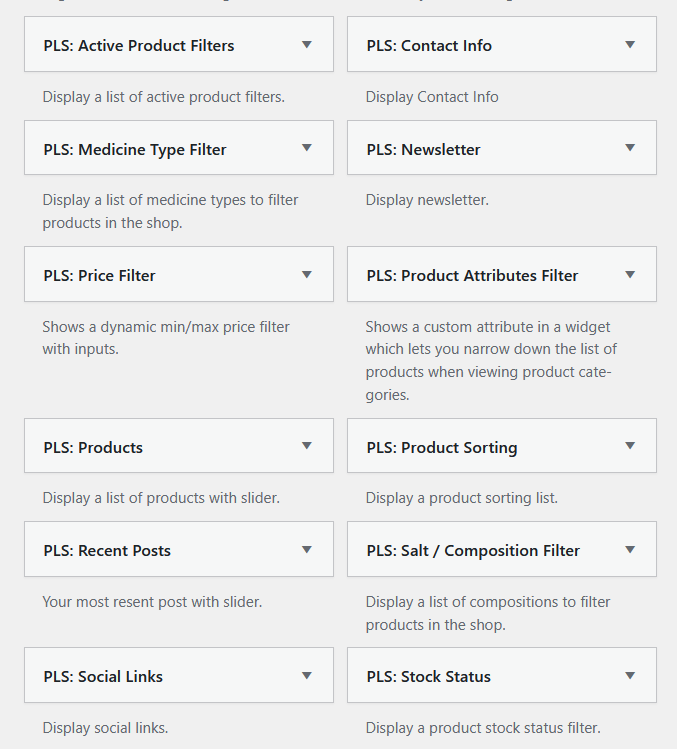
Contact Info
This widget display contact information on your site.

Recent Posts
This widget allows you to display recent posts.
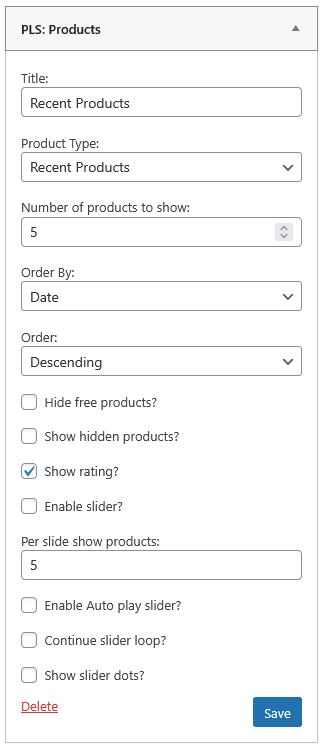
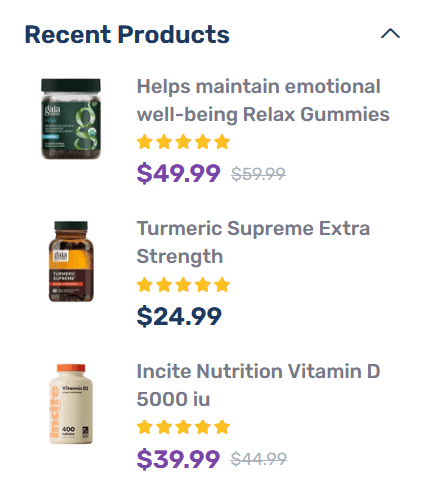
Products
This widget allows you to display products.
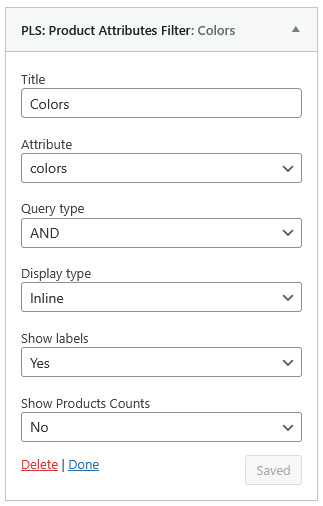
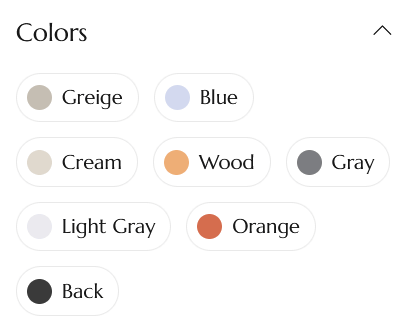
Attributes Filter
This widget allows you to display product attributes.
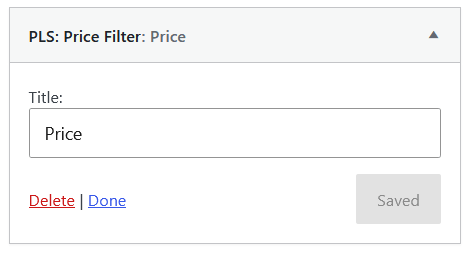
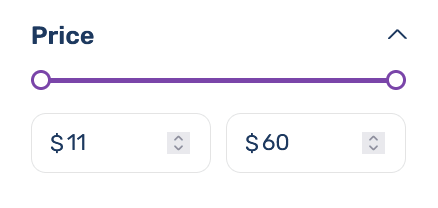
Price Filter List
This widget allows you to display price filters.
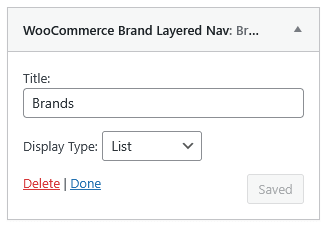
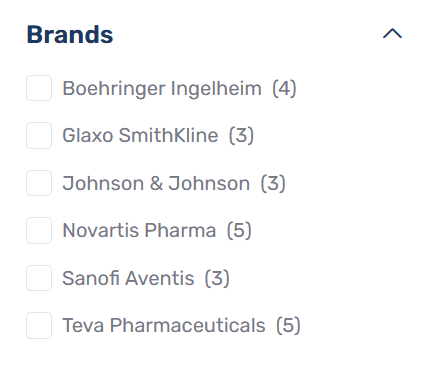
Products Brand
This widget allows you to display products brand.
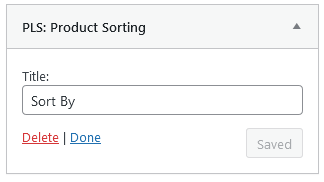
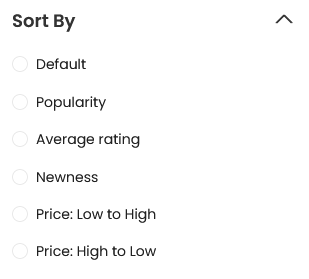
Product Sorting
This widget allows you to display product sorting options.
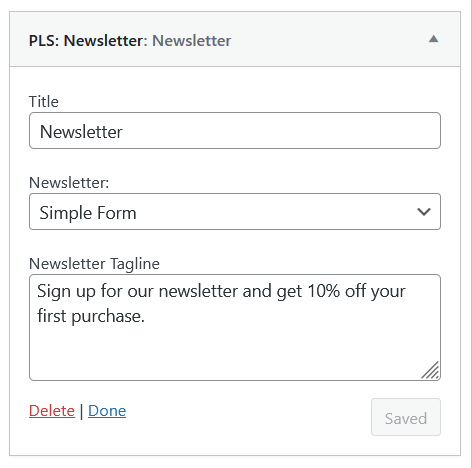
Newsletter
This widget allows you to display newsletter form.

Theme Options
Theme Options located in WP Dashboard → Xmedcar → Theme Options includes all global options that affect your entire website. These options can be overwritten by page options of any custom page.
General
This section contain the following options:
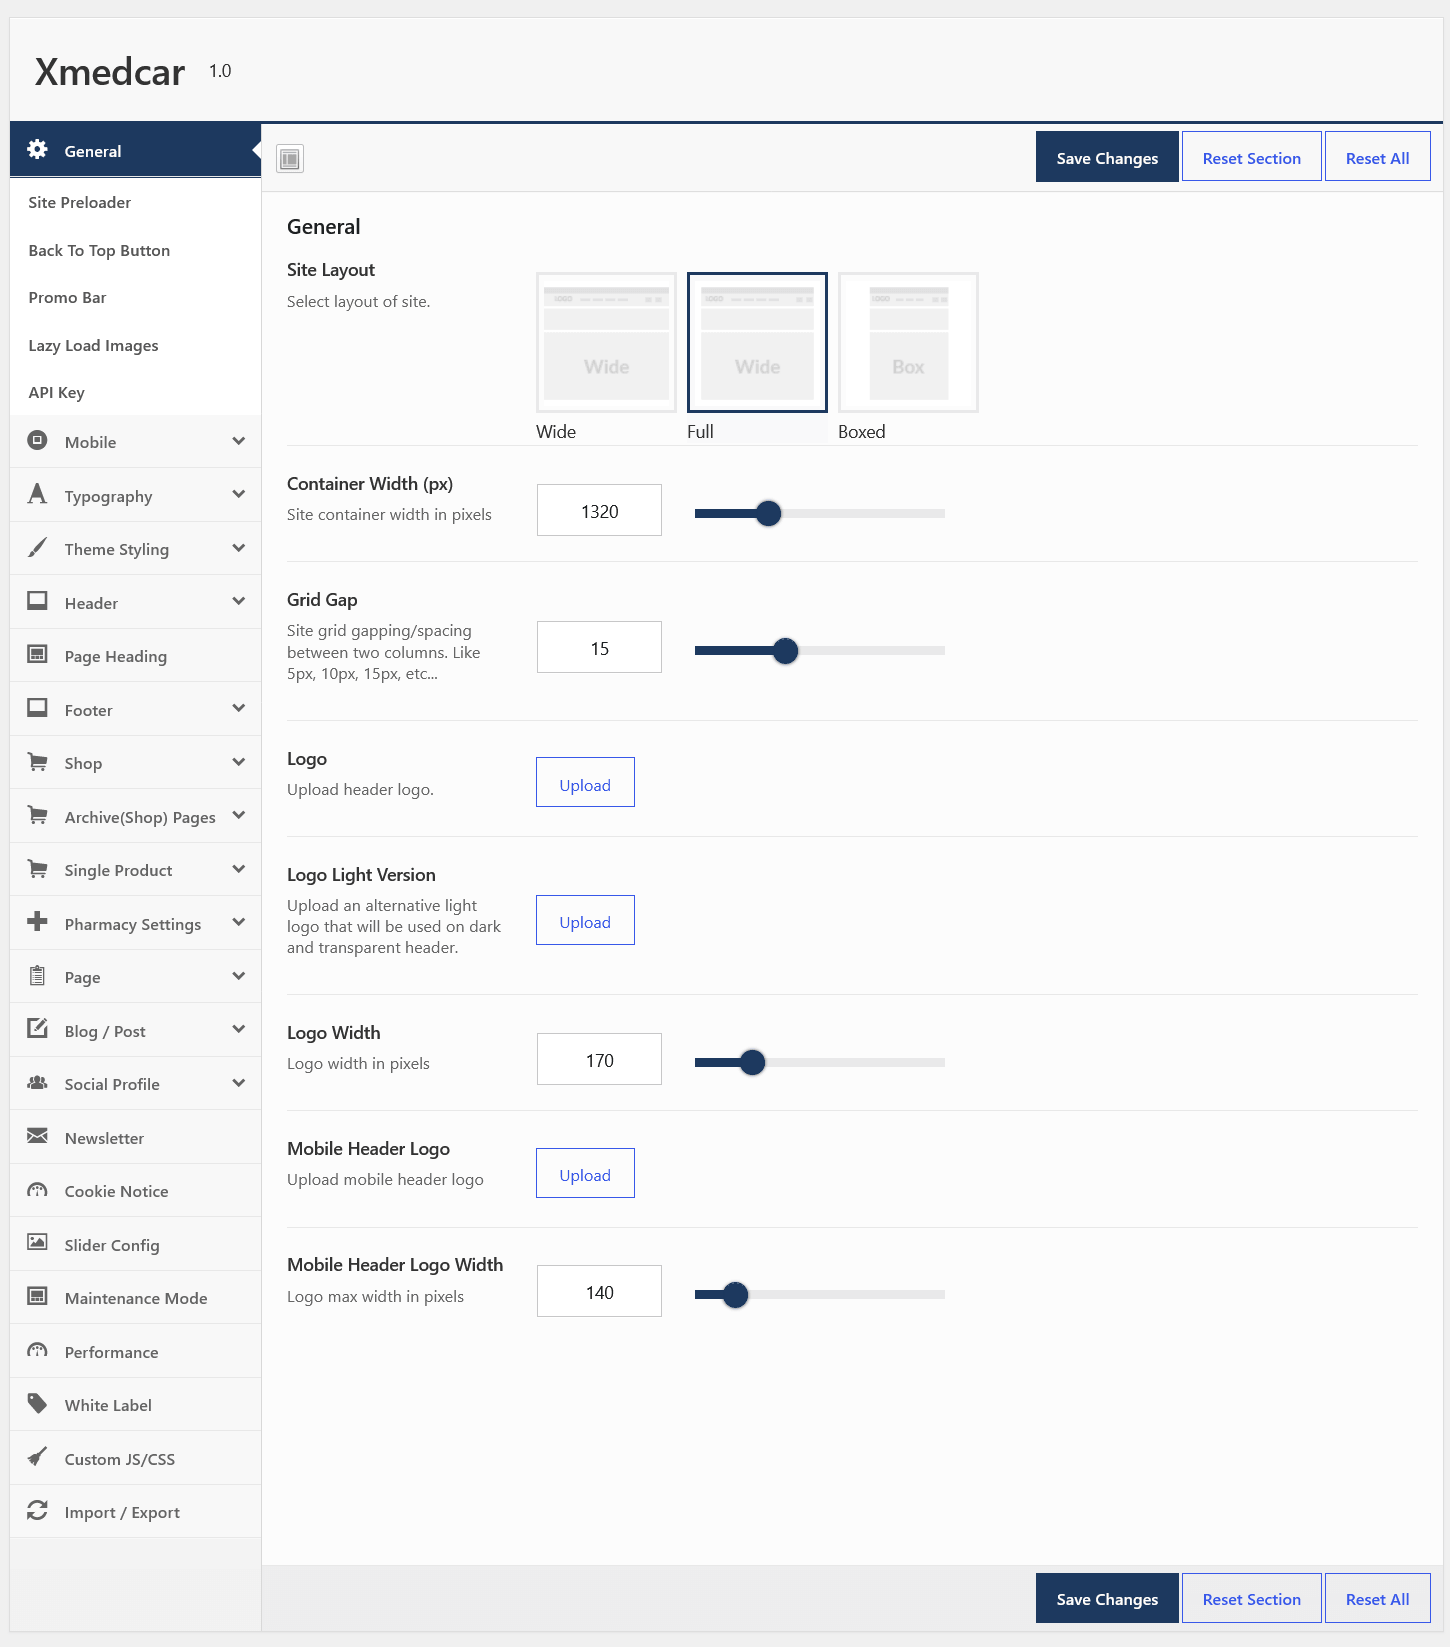
- Theme Layout : Select your site layout wide, full or box.
- Container Width : Enter site container width.
- Grid Gap : Select Grid gap here.
- Logo : Upload your site logo.
- Logo Light Version : Upload an alternative light logo that will be used on dark and transparent header.
- Logo Width : Set your logo width.
- Mobile Header Logo : Upload mobile header logo.
- Mobile Header Logo Width : set mobile logo width.
Site Preloader
This section contain the following options:
- Site Preloader : Enable/disable preloader on your website.
- Preloader Background : Set preloader background color.
- Preloader Image : Set preloader type as per your need.
- Choose Preloader Style : Choose preloader style.At this moment we have 5 styles.
- Upload Preloader Image : Upload preloader image.It will be show when you select preloader image as custom option.
Back To Top Button
This section contain the following options:
- Button : Enable/disable back to top button.
- Button In Mobile : Enable/disable back to top button in mobile device.
Promo Bar
This section contain the following options:
- Promo Bar : Enable/disable Promo Bar.
- Height : Set promo bar height.
- Position : Select location for promo bar.
- Position Type : Select position type for promo bar.
- Message : Enter promo message.
- Button : Enable link button in promo bar.
- Button Text : The text of the more info button.
- Enter Url : The text of the more info button.
- Open link in New Tab : Select the link target for more info page.
- Close Button : Enable close button.
- Promo Bar Dismissing : Enable/Disable promo bar dismissing on button close.
Lazy Load Images
This section contain the following options:
- Lazy Load Images : Enables lazy load to reduce page requests.
API Key
How to generate Instagram Acccess Token
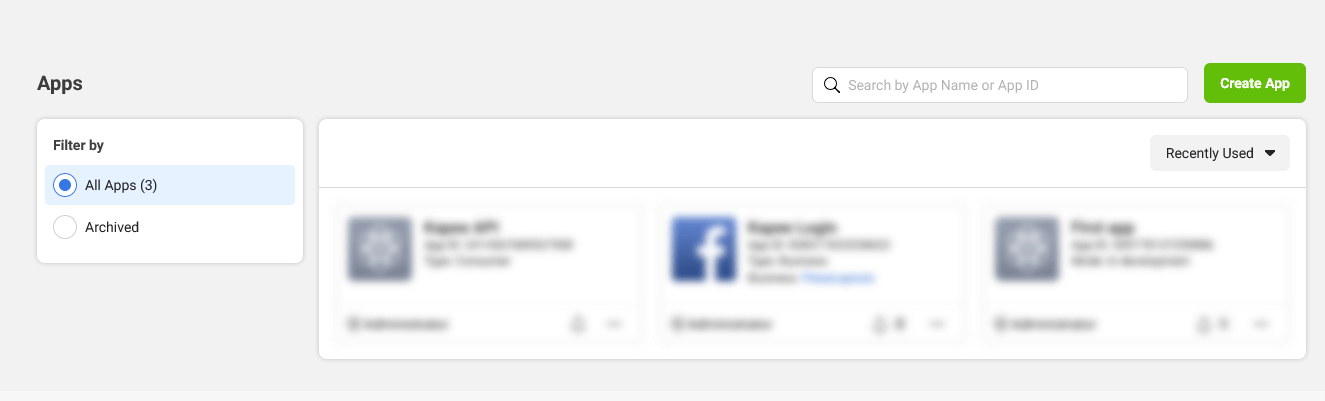
1) First go to Facebook Developers Account and login with your own facebook credencials. Then clikc on create App button.
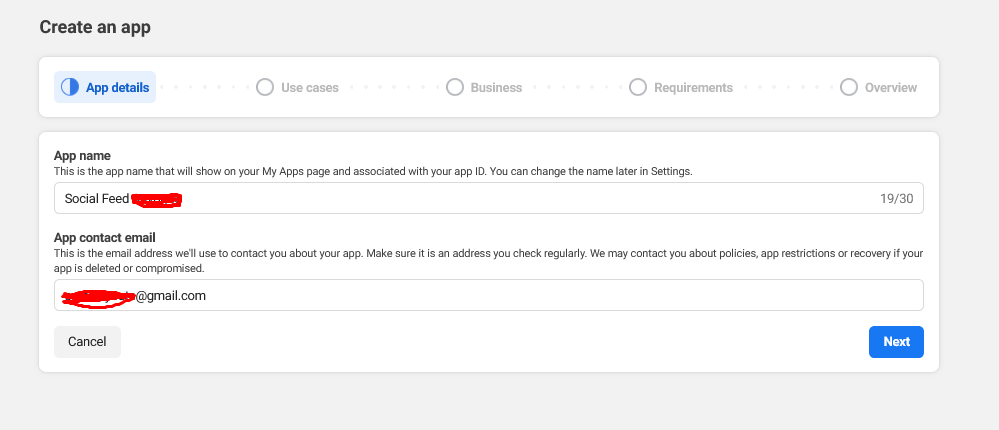
2) Enter app details and press next button.
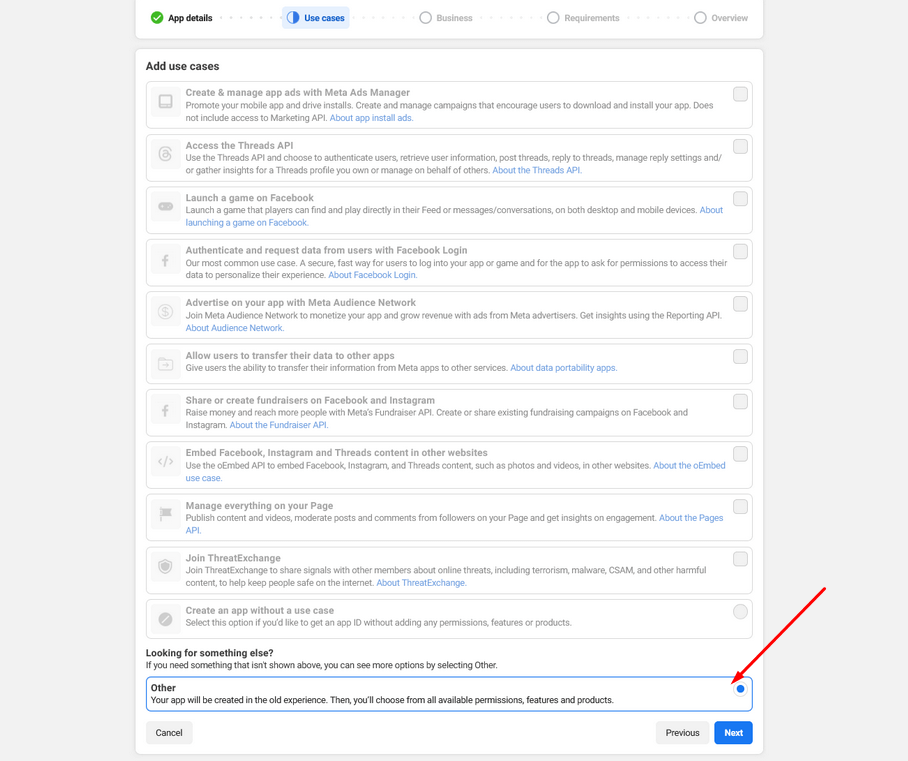
3) Select Other Options and press next button.
4) Select Business Options and press next button.
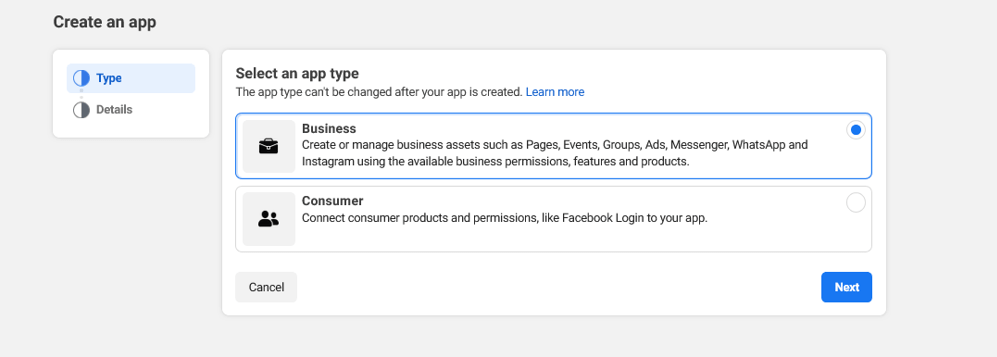
5) Here, Entere you App Display Name, App Contact email and choose business account if you have one. And hit Create app button.
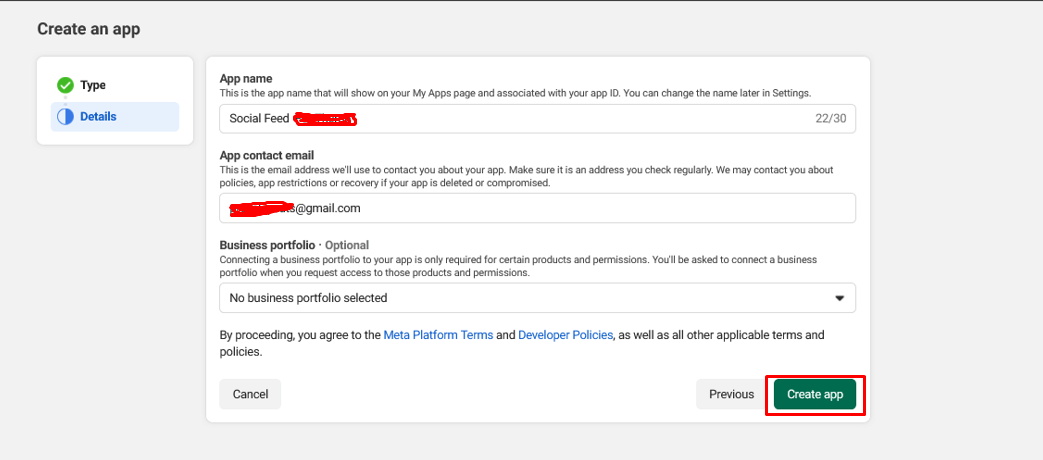
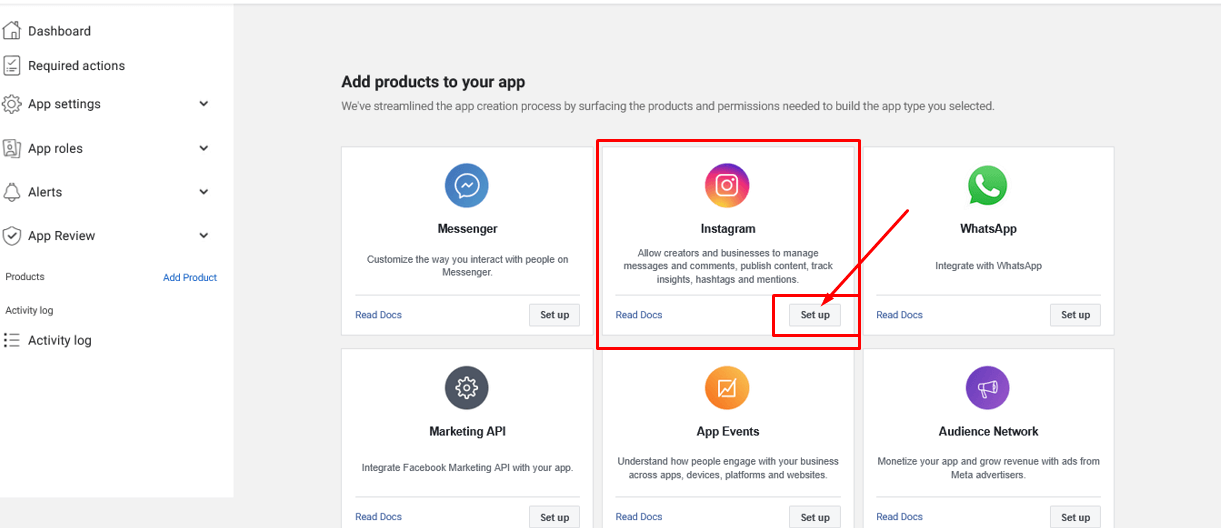
6) Now choose isntsagram app and click on Set up button.
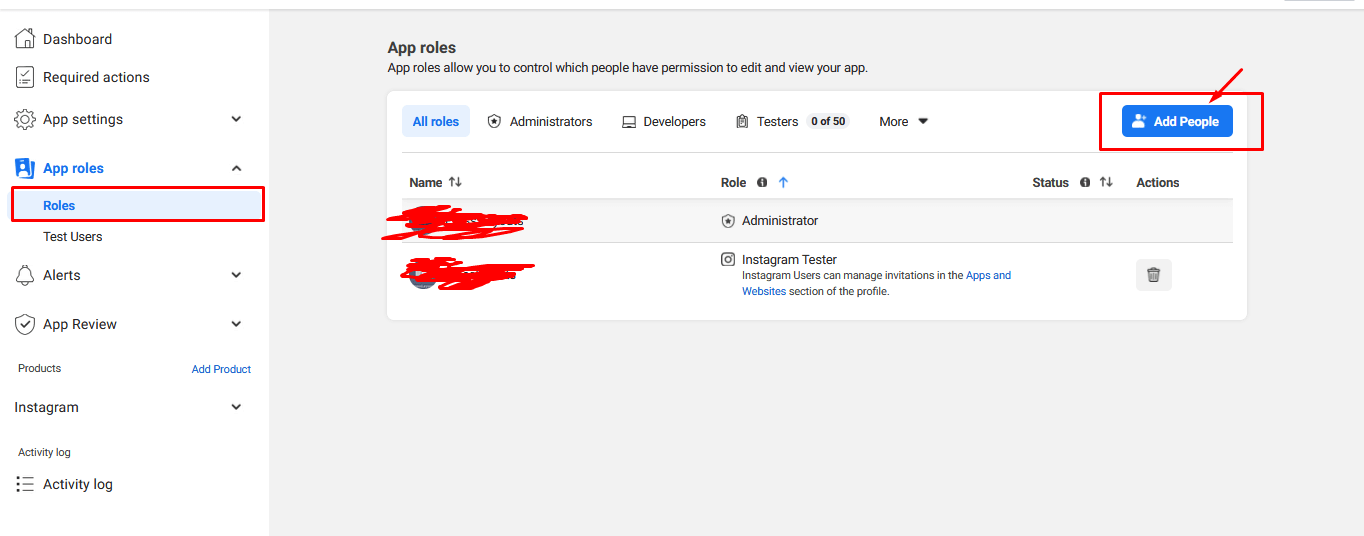
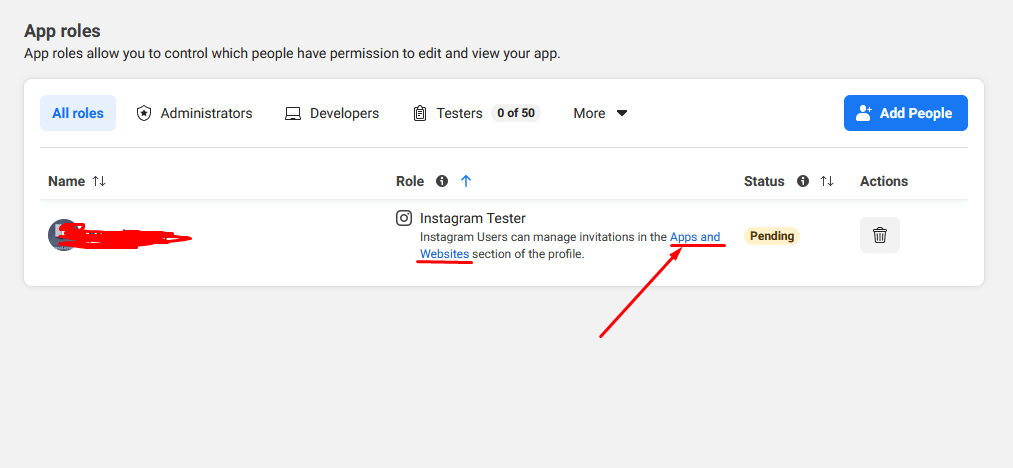
7) Go to App Roles and click on Add People button.
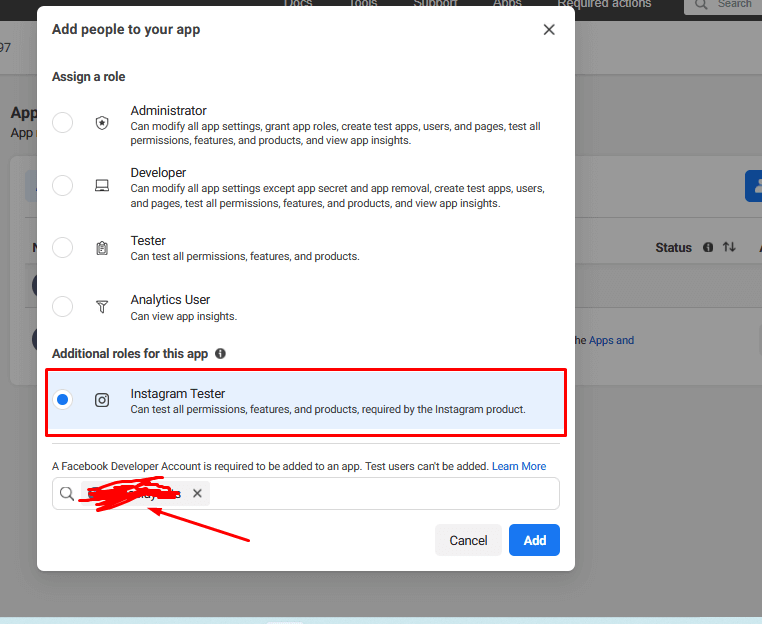
8) Select Instagram Tester and Enter instagram user name which you want to fetch media.
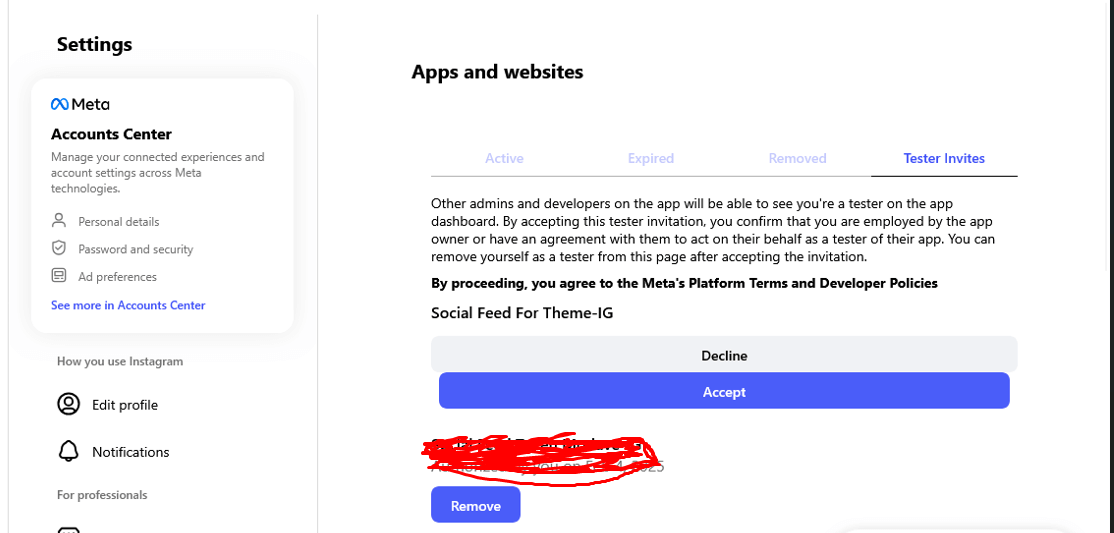
9) Click on Apps and Website link and goes to instagram.
10) There accept Tester Invites request.
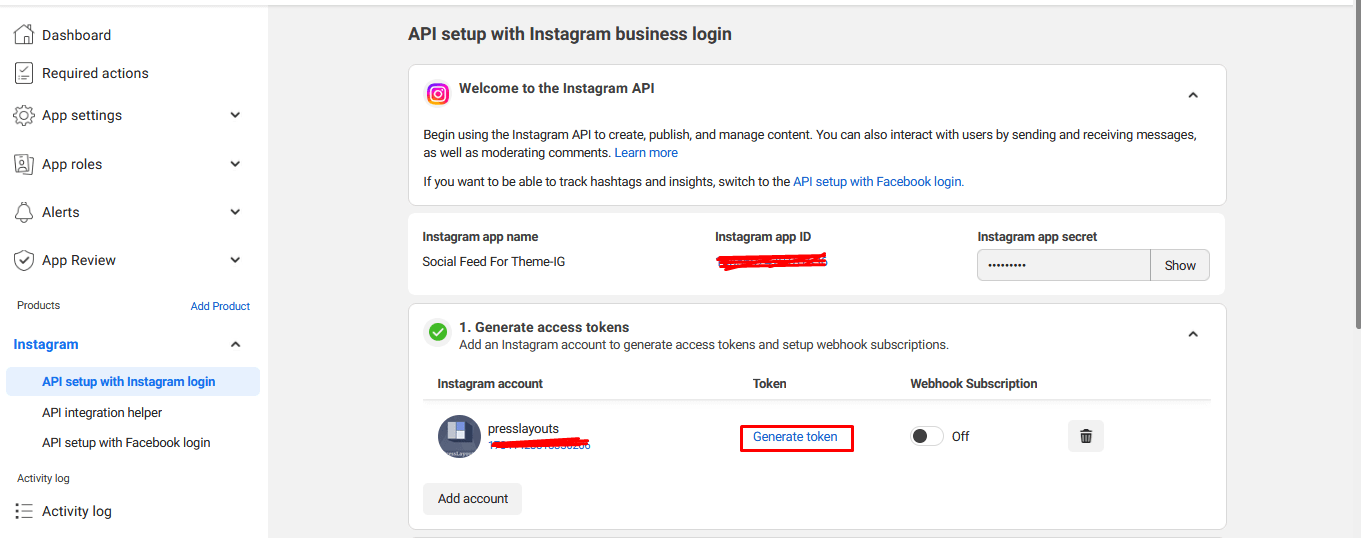
11) Now go to Instagram => API setup with Instagram business login and clikc on Generate Token link.
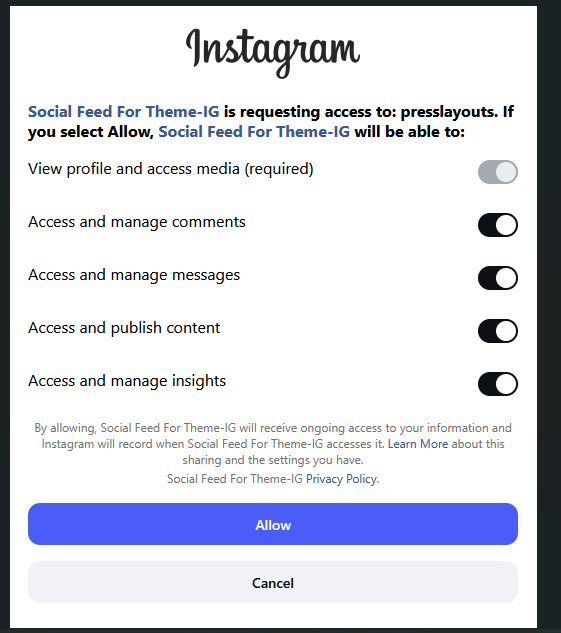
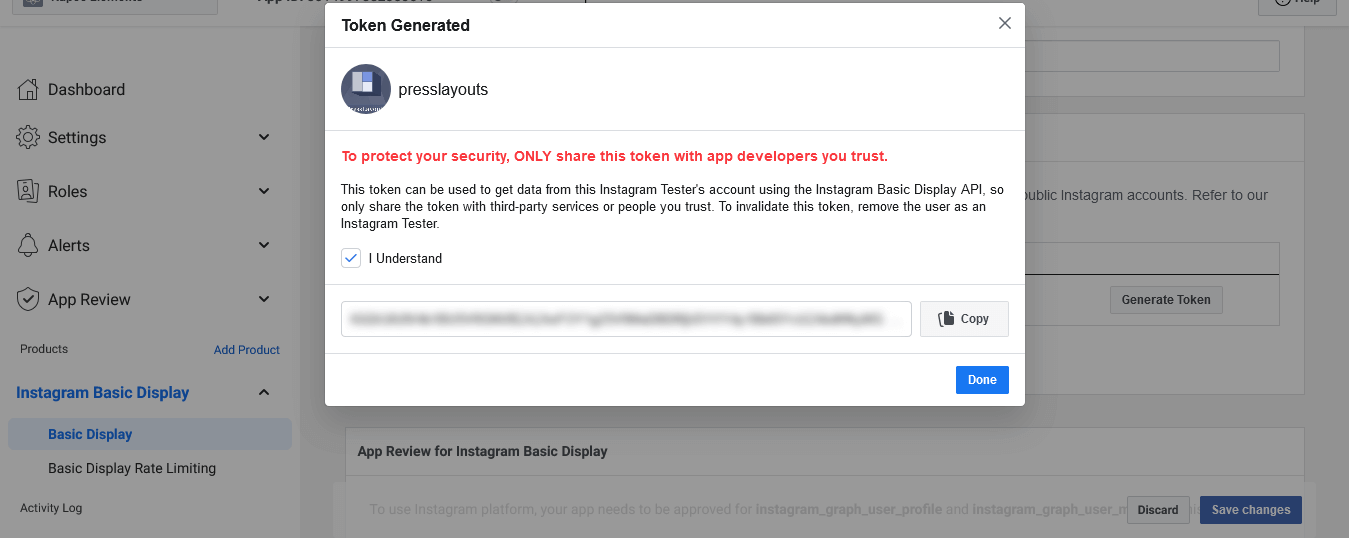
12) Now your instagram token is generated.
13) Copy the generated token and put it to Instagram Access Token option. See ScreenShot
14) In instagram widget, Select image data source as API. See ScreenShot
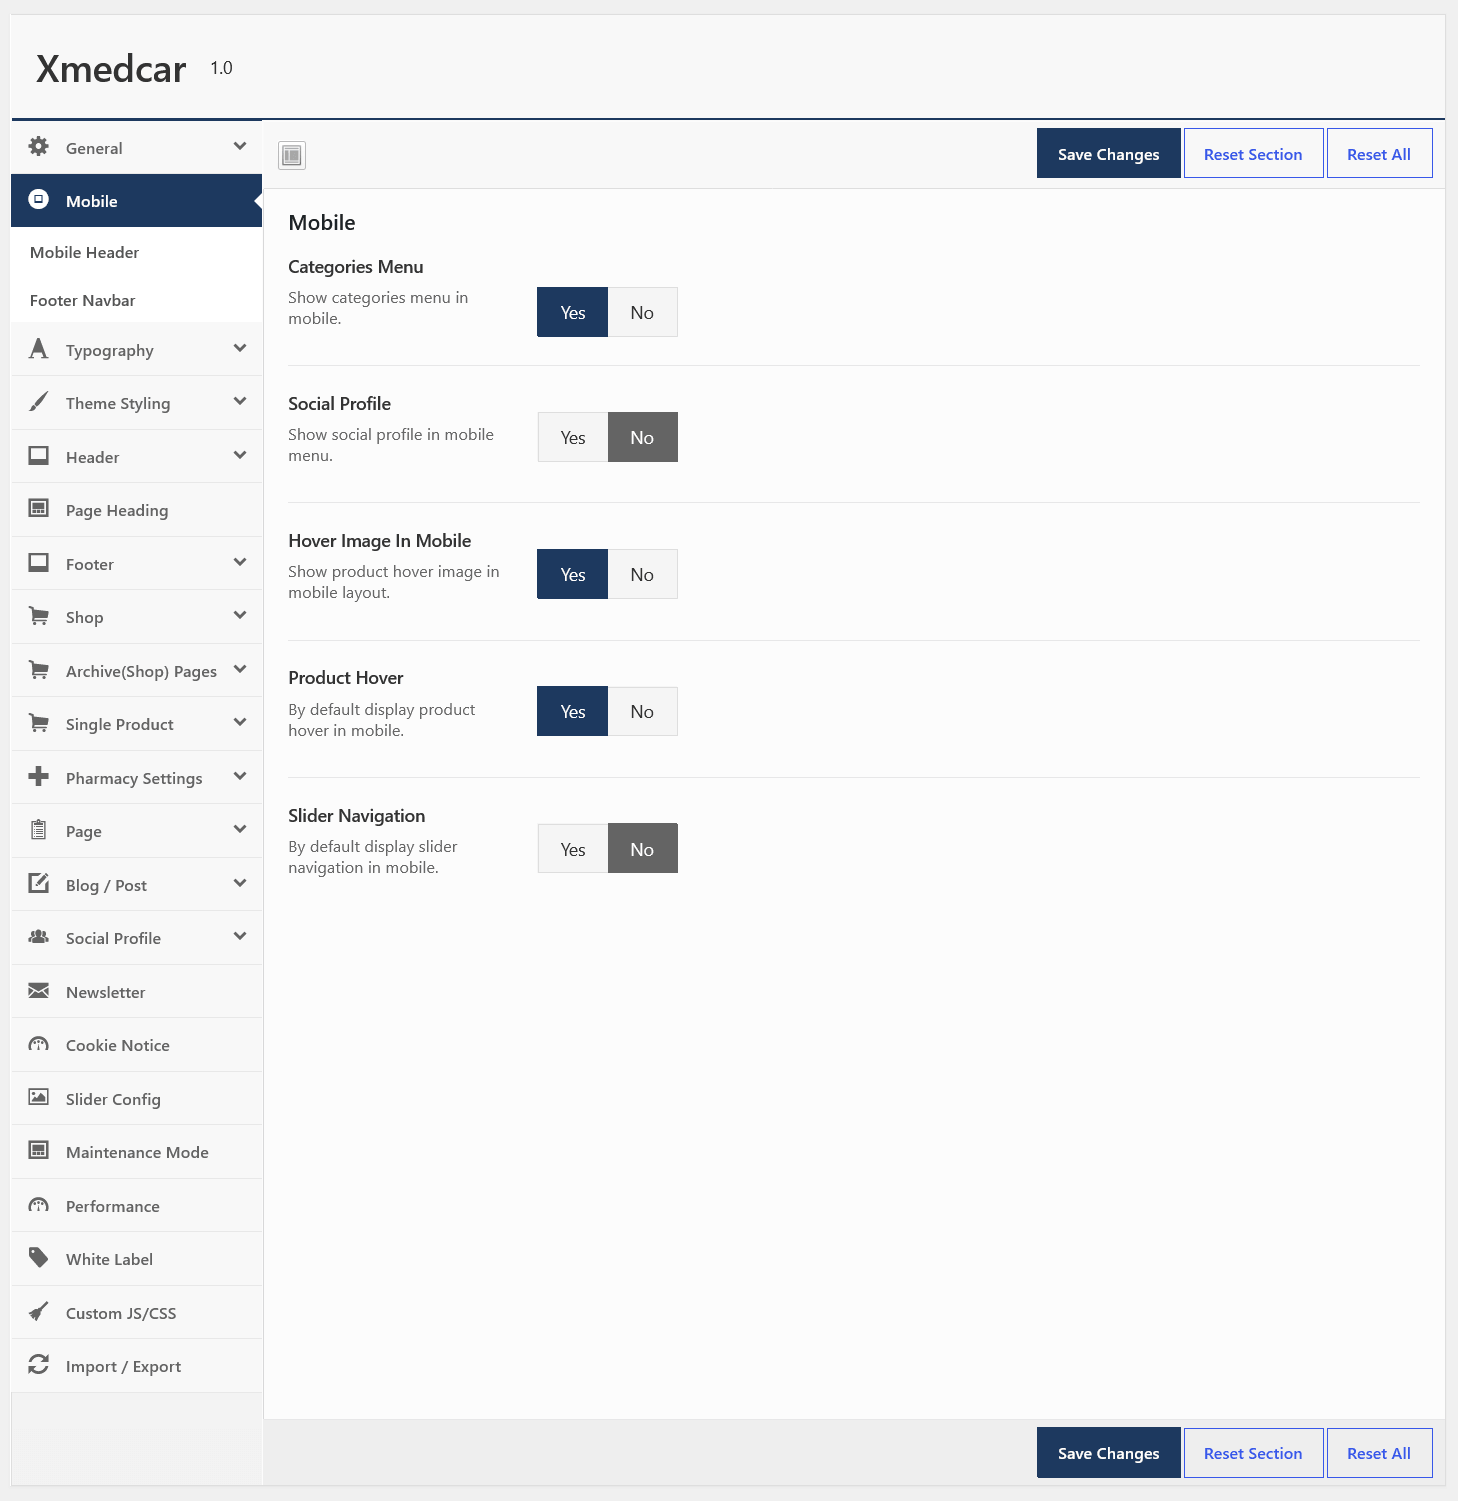
Mobile
You can mange mobile option here. Like mobile menu bg color, Mobile bottom navbar etc.
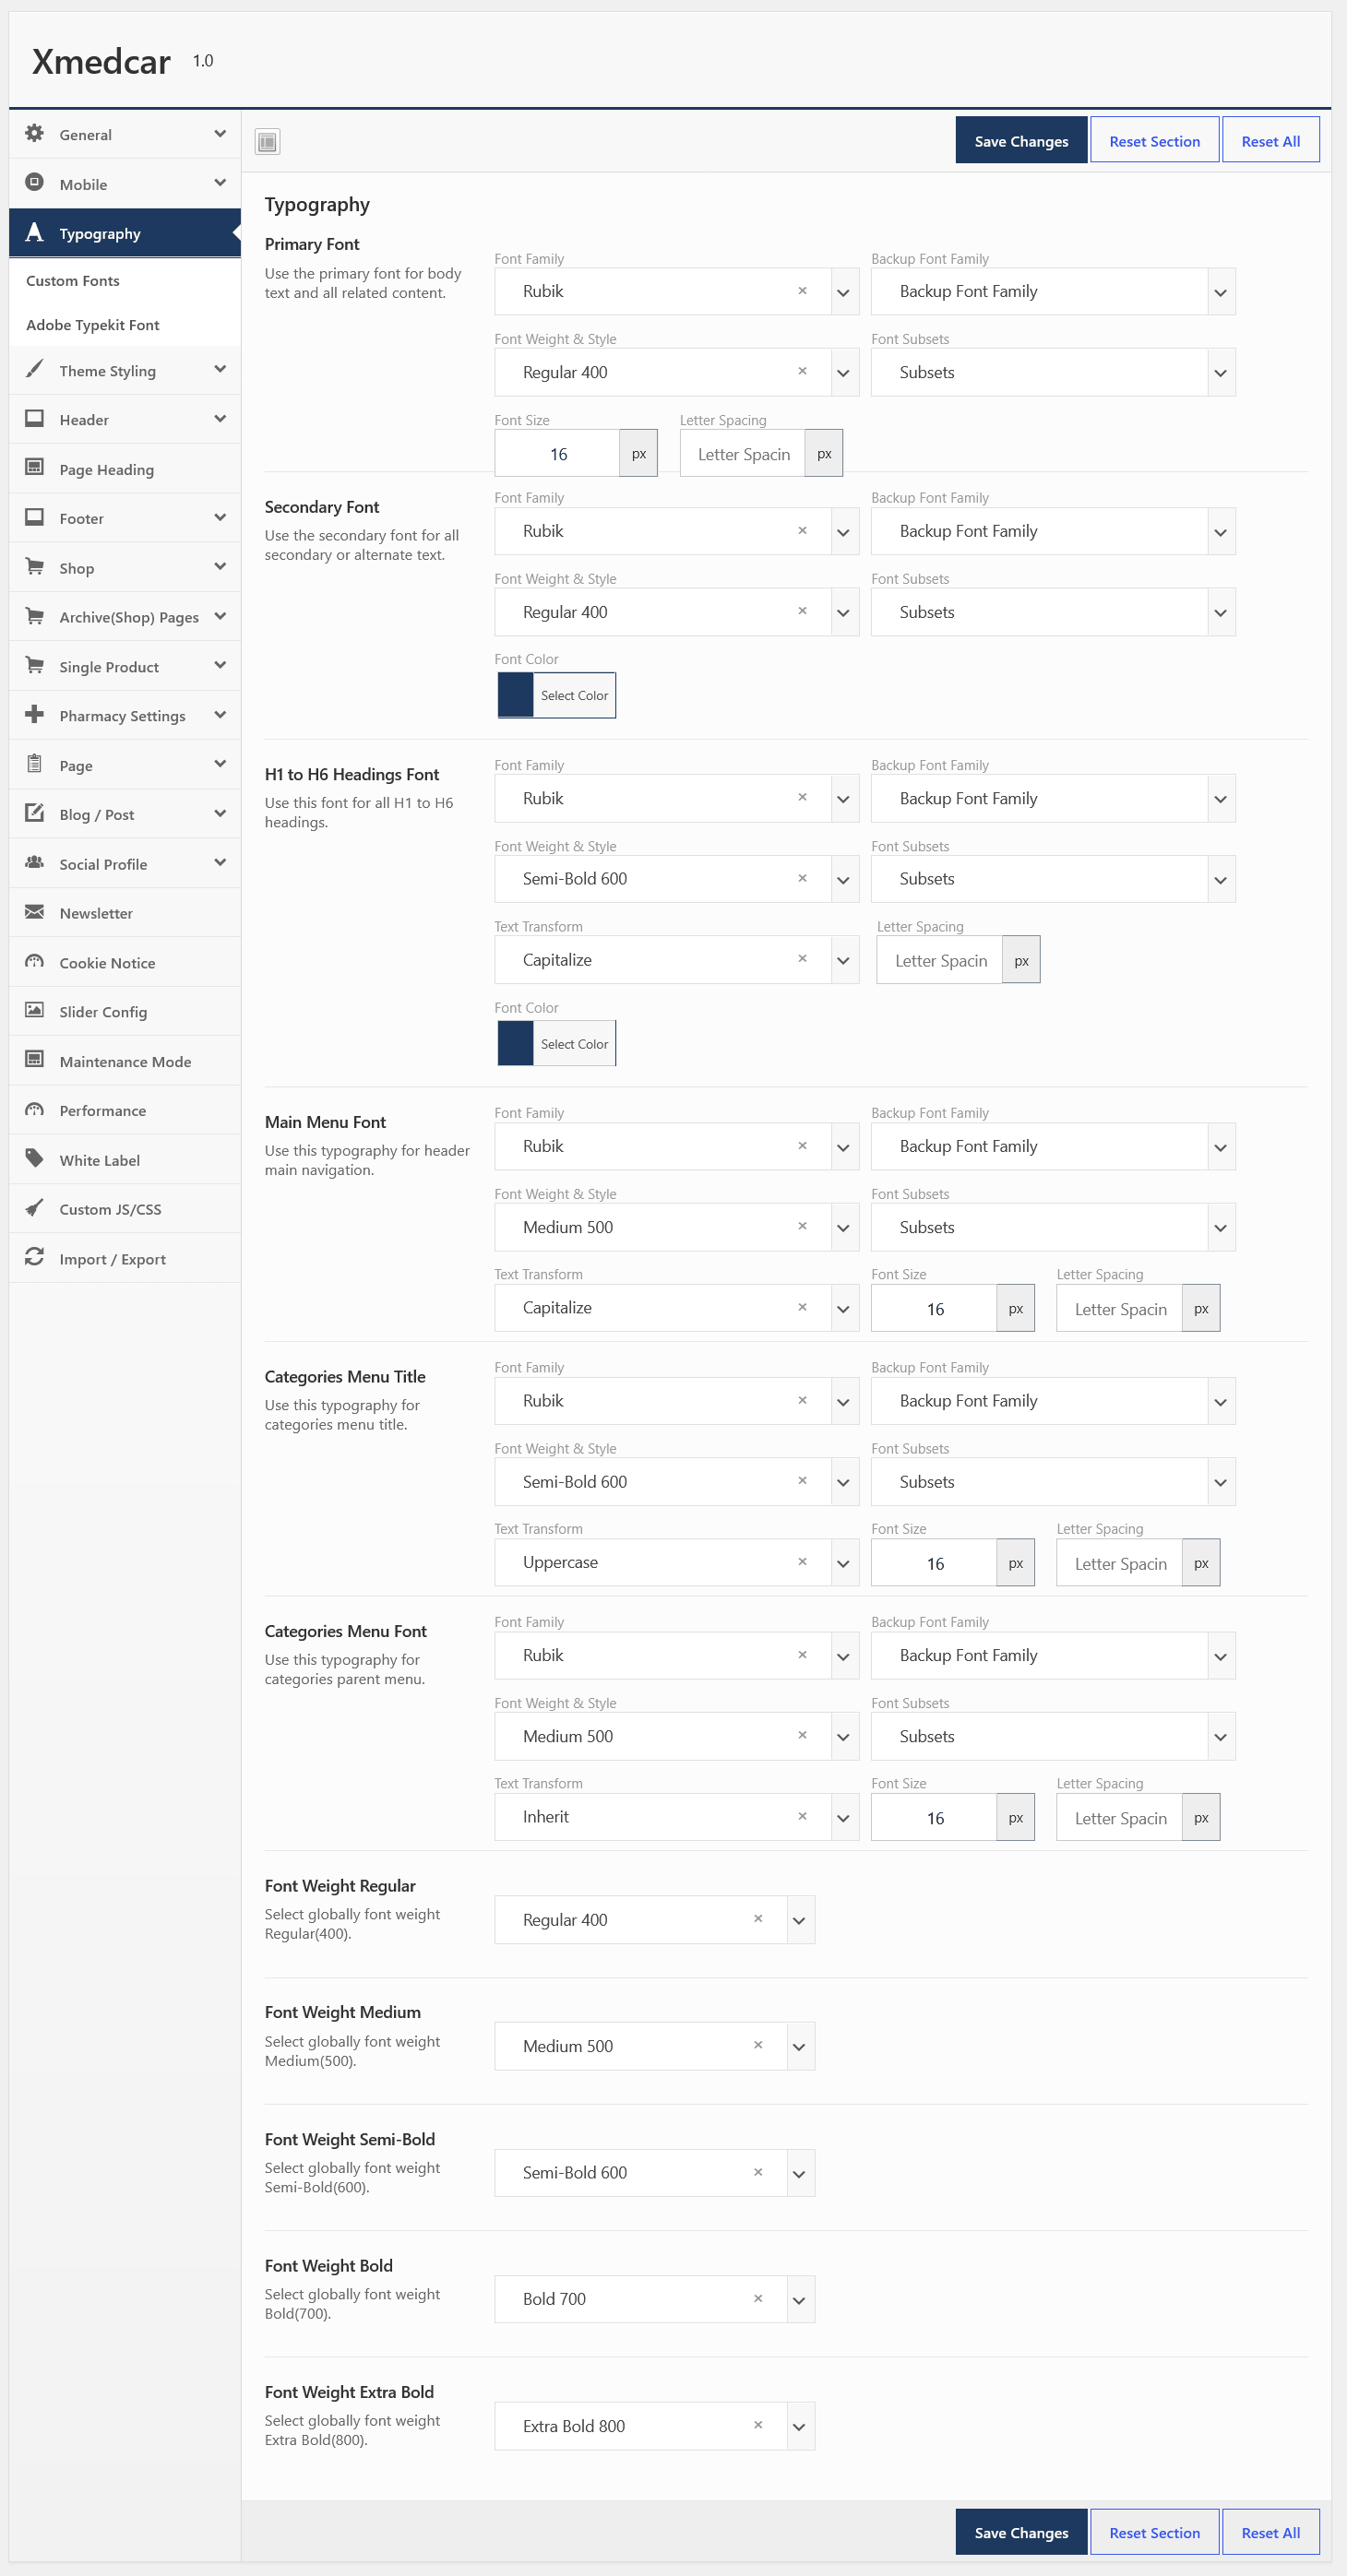
Typography
You can select font family, font size, font weight, line height etc..
Custom Fonts
This section you can enable custom font and upload font library.
Adobe Typekit Font
This section you can enable adobe typekit font.After enable typekit font you need to enter typekit id and list of font family name(every font family separated by comma) you want to include in site.
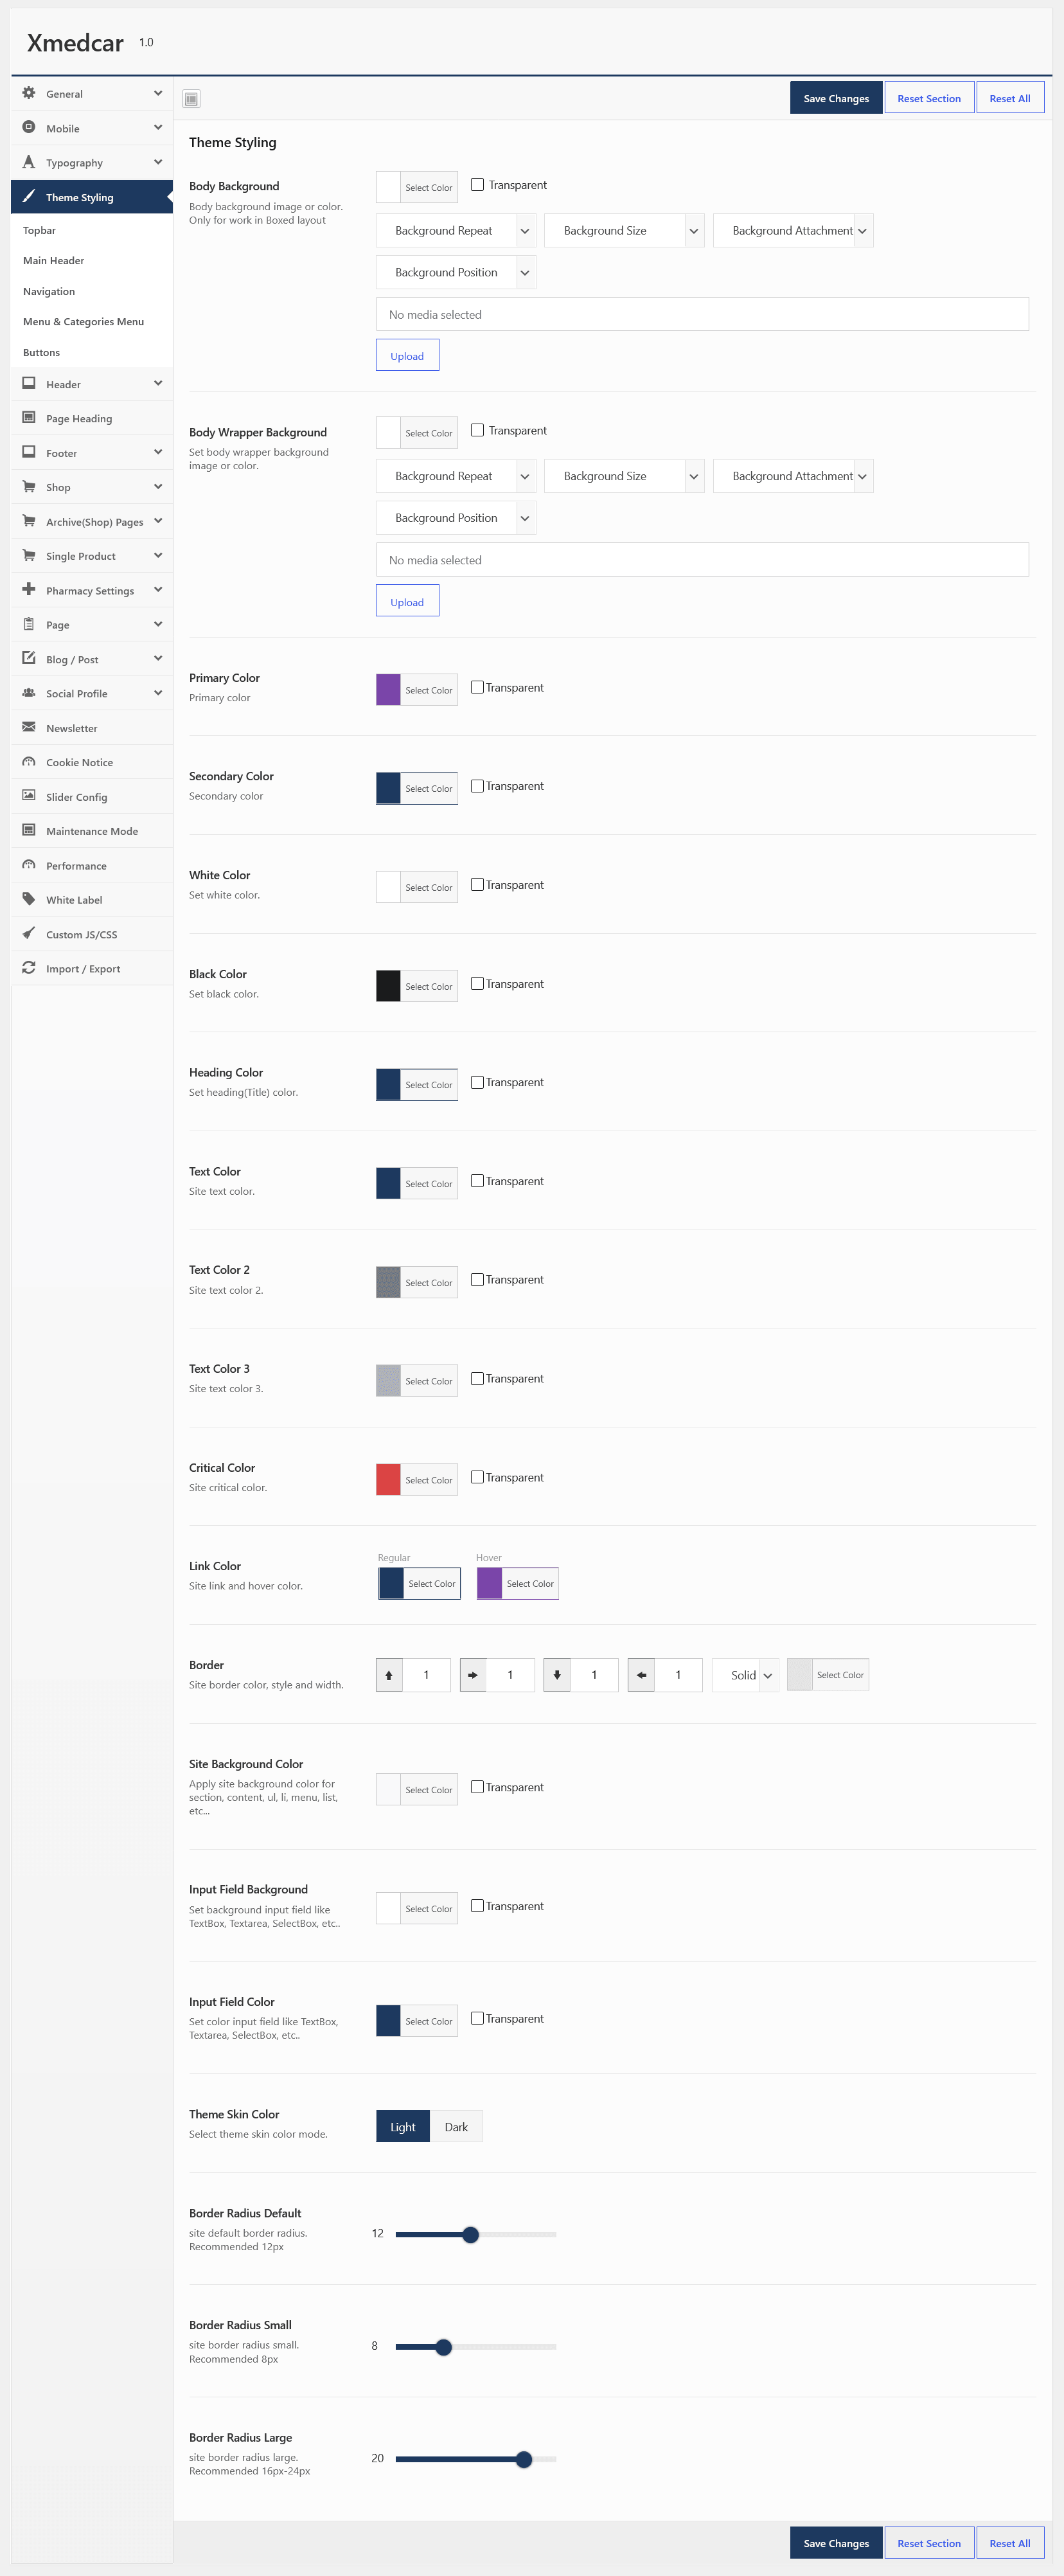
Style And Colors
This section you can manage all color options like font color,background color,link color,hover color etc.
Header
This section you can manage following options.
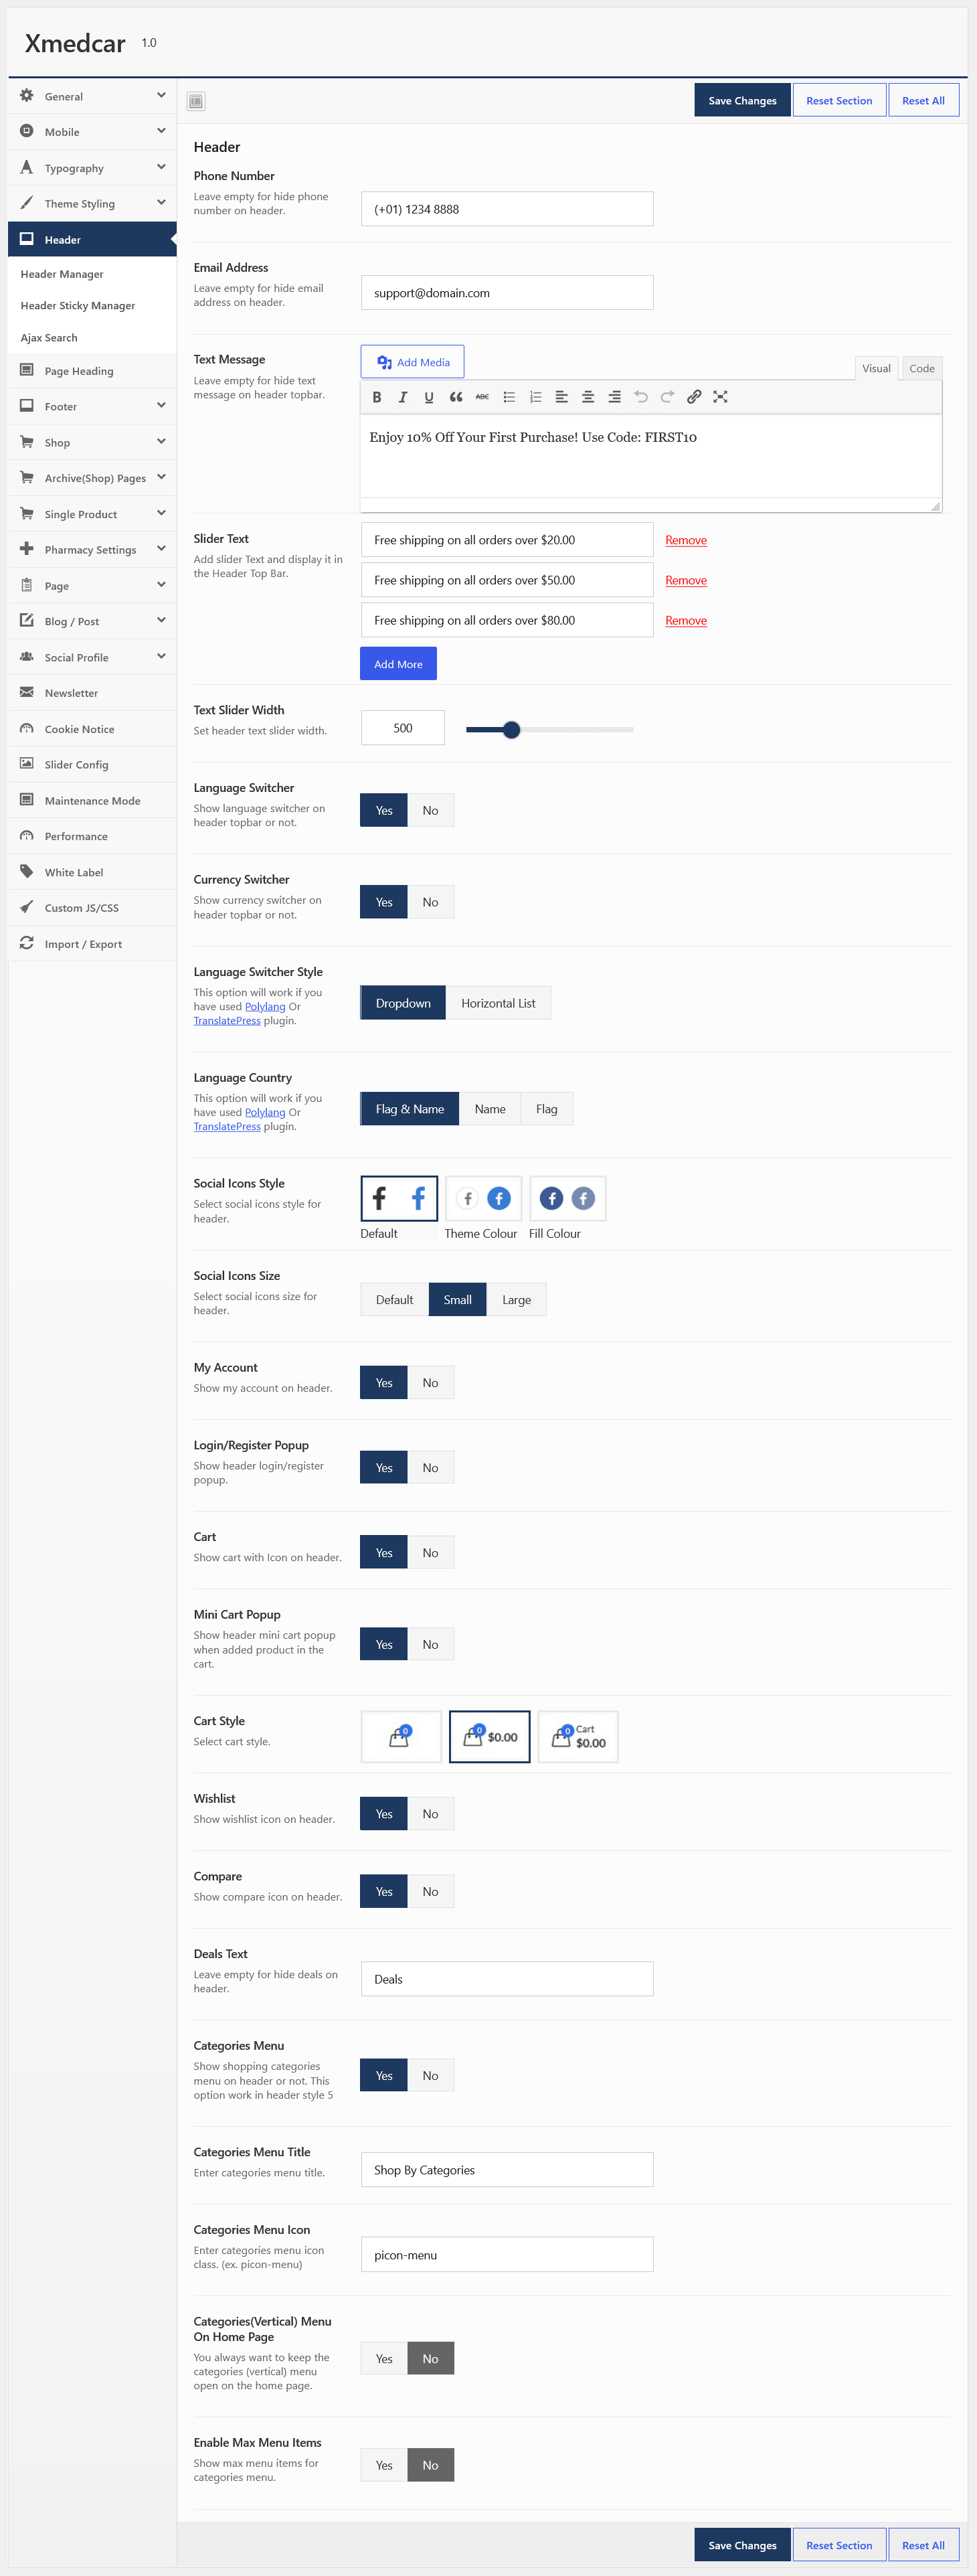
- Phone Number : Enter phone number.
- Email Address : Enter email address.
- Store Location : Enter store location.
- Store Location Page : Select store location page.
- Welcome Message : Enter welcome message.
- Newsletter : Enter newsletter button text.
- Language Switcher : Enable/Disable language switcher.
- Currency Switcher : Enable/Disable Currency switcher.
- Language Switcher Style : Select language switcher style. This option will work if you use Polylang plugin.
- Language Country : Select language country option. This option will work if you use Polylang plugin.
- My Account : Enable/disable my account option.
- Login/Register Popup : Enable/disable header login/register popup.
- Mini Cart Popup : Enable/disable header minicart popup.
- Cart Style : Select cart style.
- Wishlist Icon : Show/Hide wishlist icon.
- Compare Icon : Show/Hide wishlist icon.
- Icon Text : Show/Hide icon text.
- Categories Menu : Show/Hide category menu.
- Categories Menu Title : Enter shop by categories menu title.
- Open Categories(Vertical) Menu In Front Page : Categories(Vertical) menu open in front page.On other page open with hover.
Page Heading
This section you can manage following options.
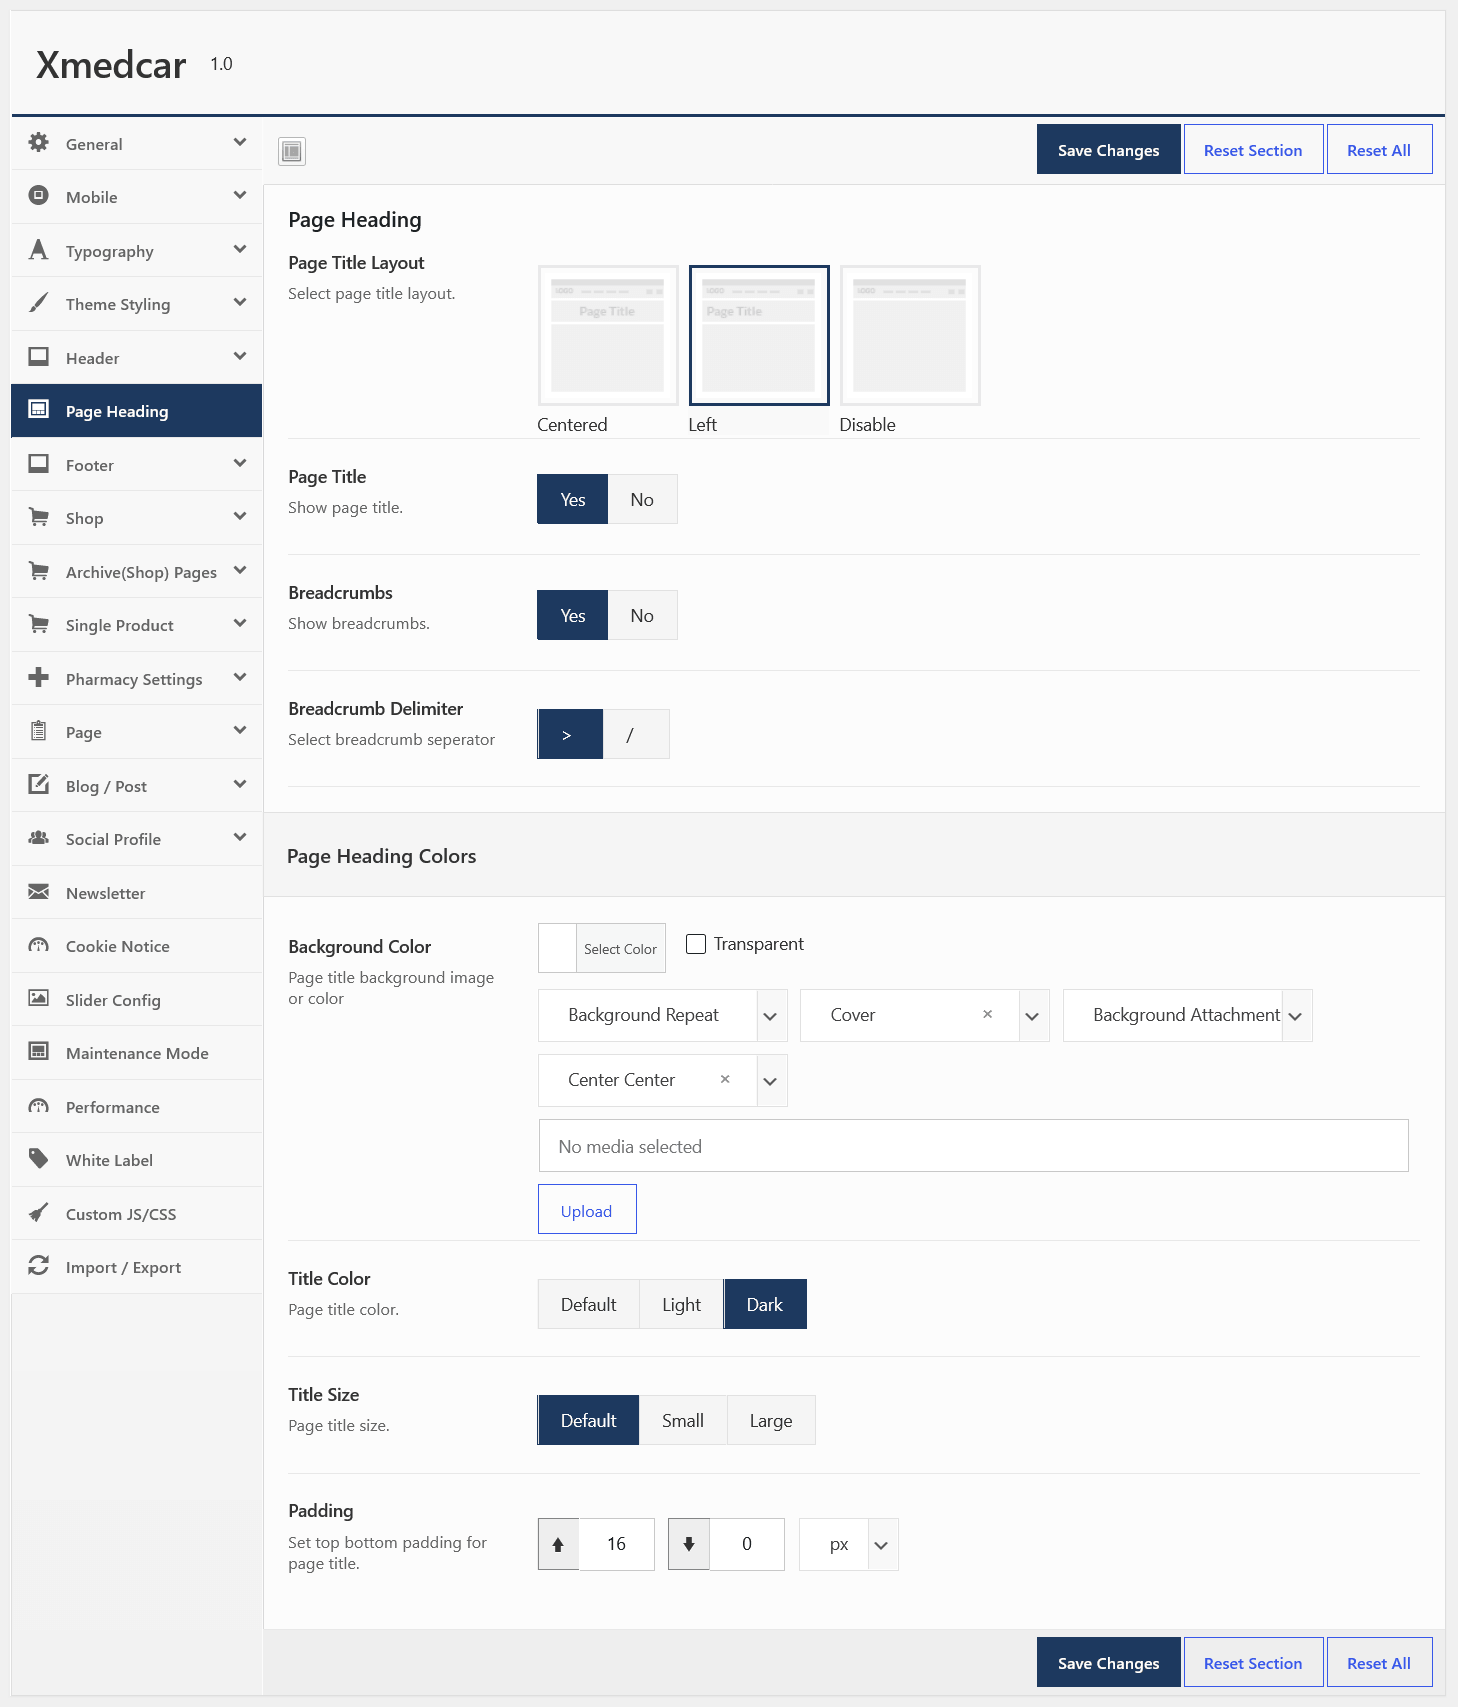
- Page Heading Layout : Select page heading layout.Disable for hide heading area.
- Page Title : Select if you want to show or hide page heading.
- Breadcrumbs : Select if you want to show or hide the breadcrumbs.
- Breadcrumbs Delimiter : Select breadcrumb separator
Footer
This section you can manage following options.
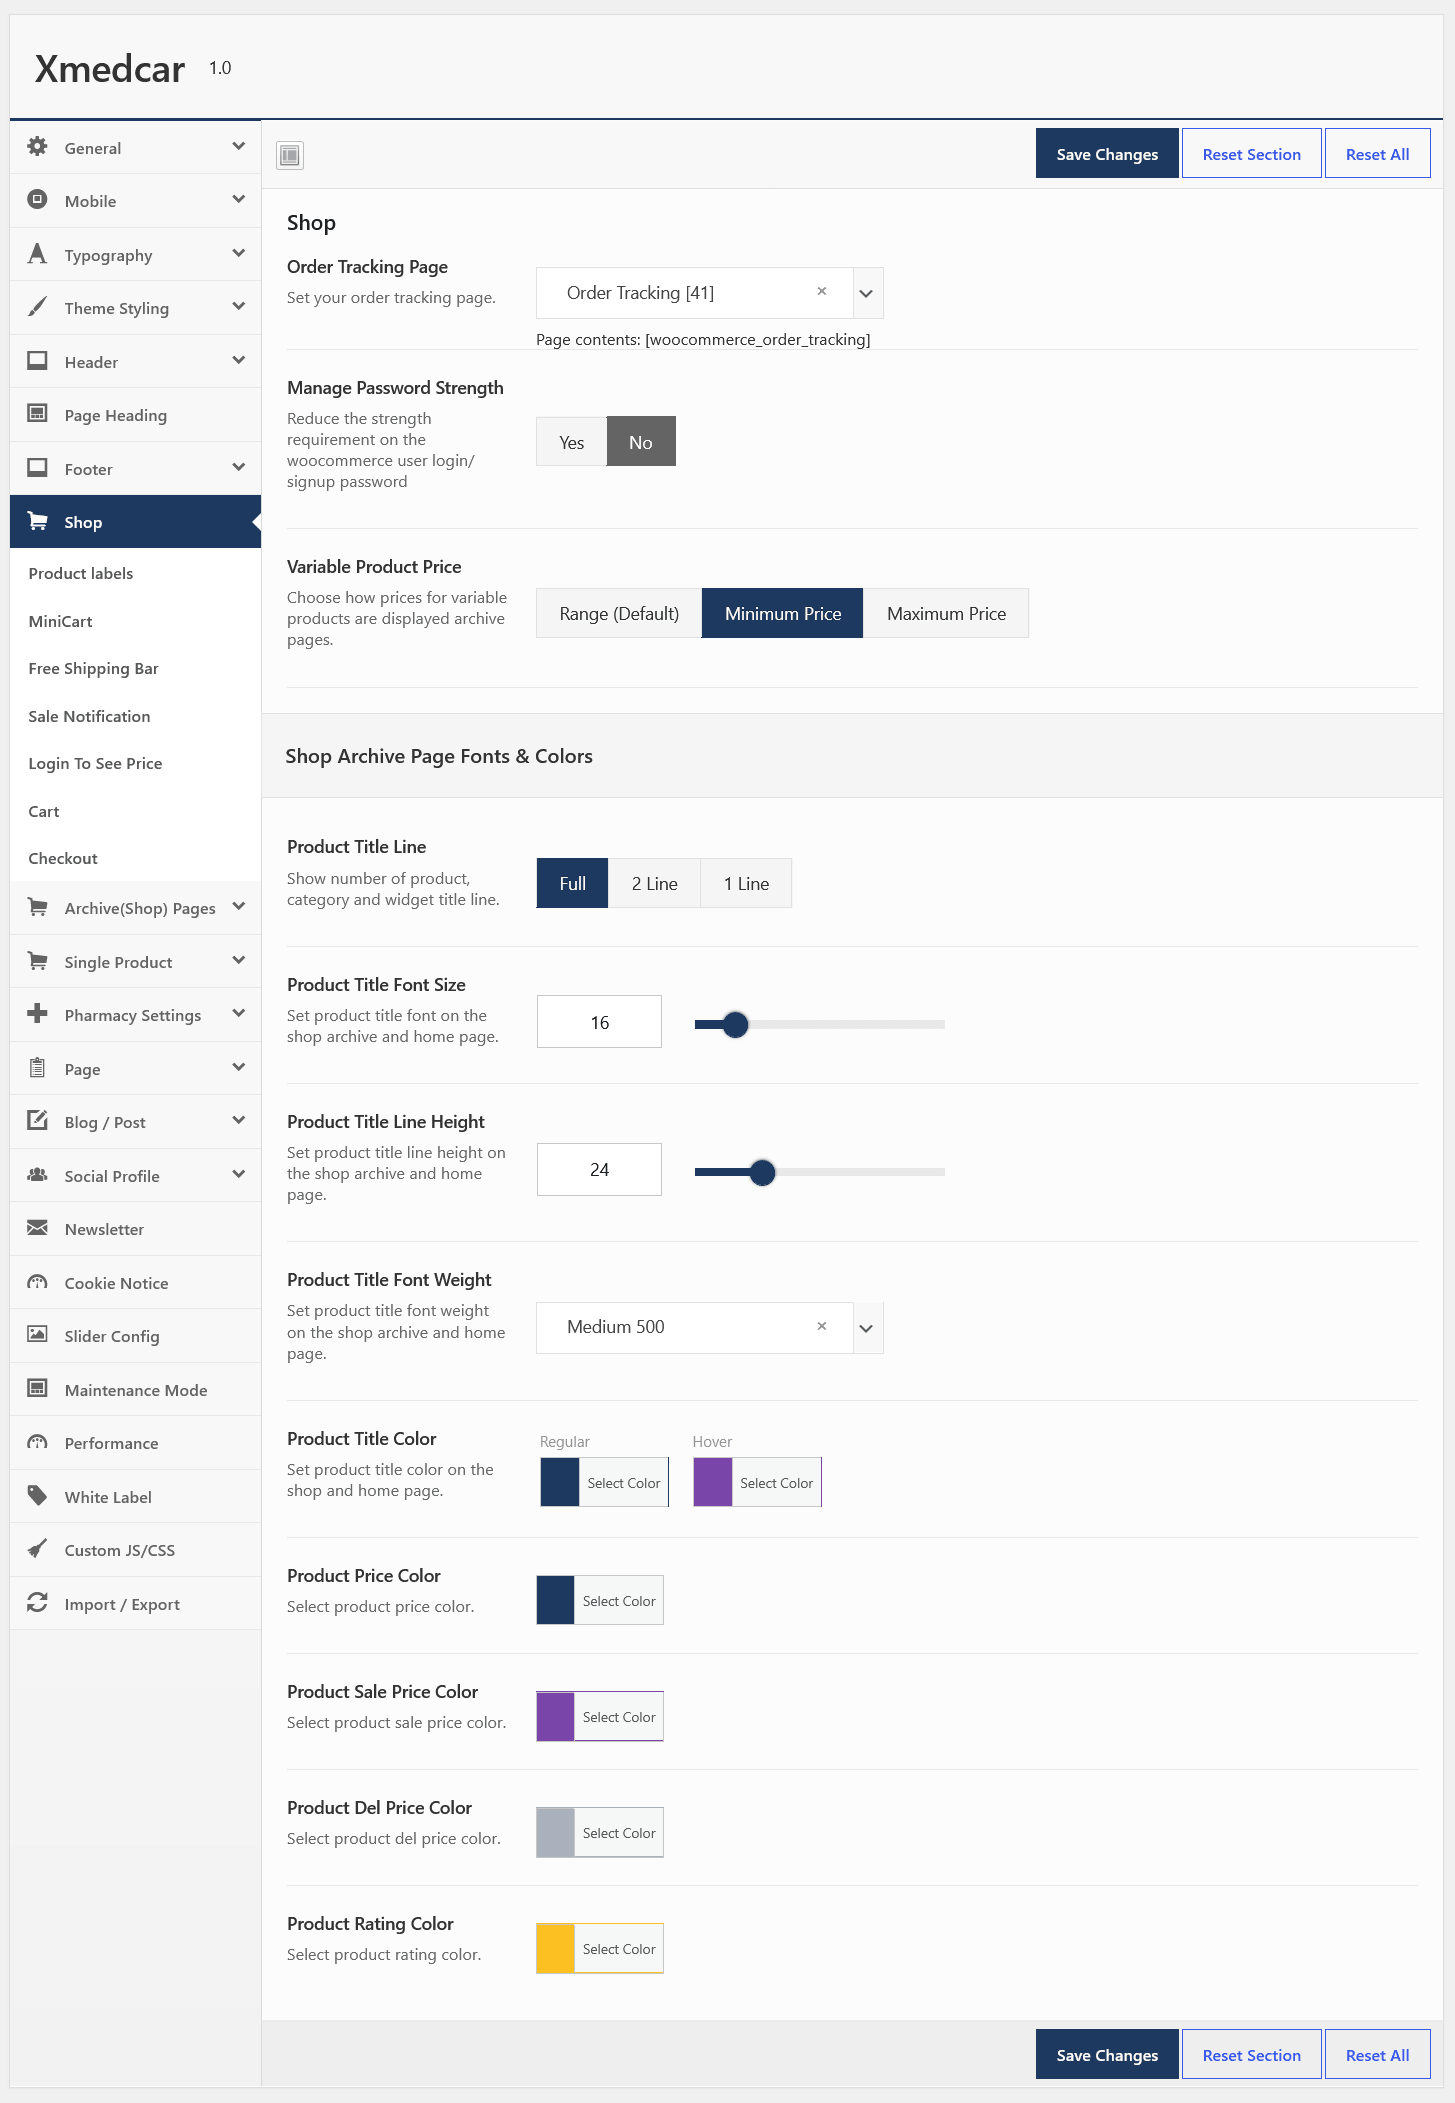
Shop
This section you can manage following options.
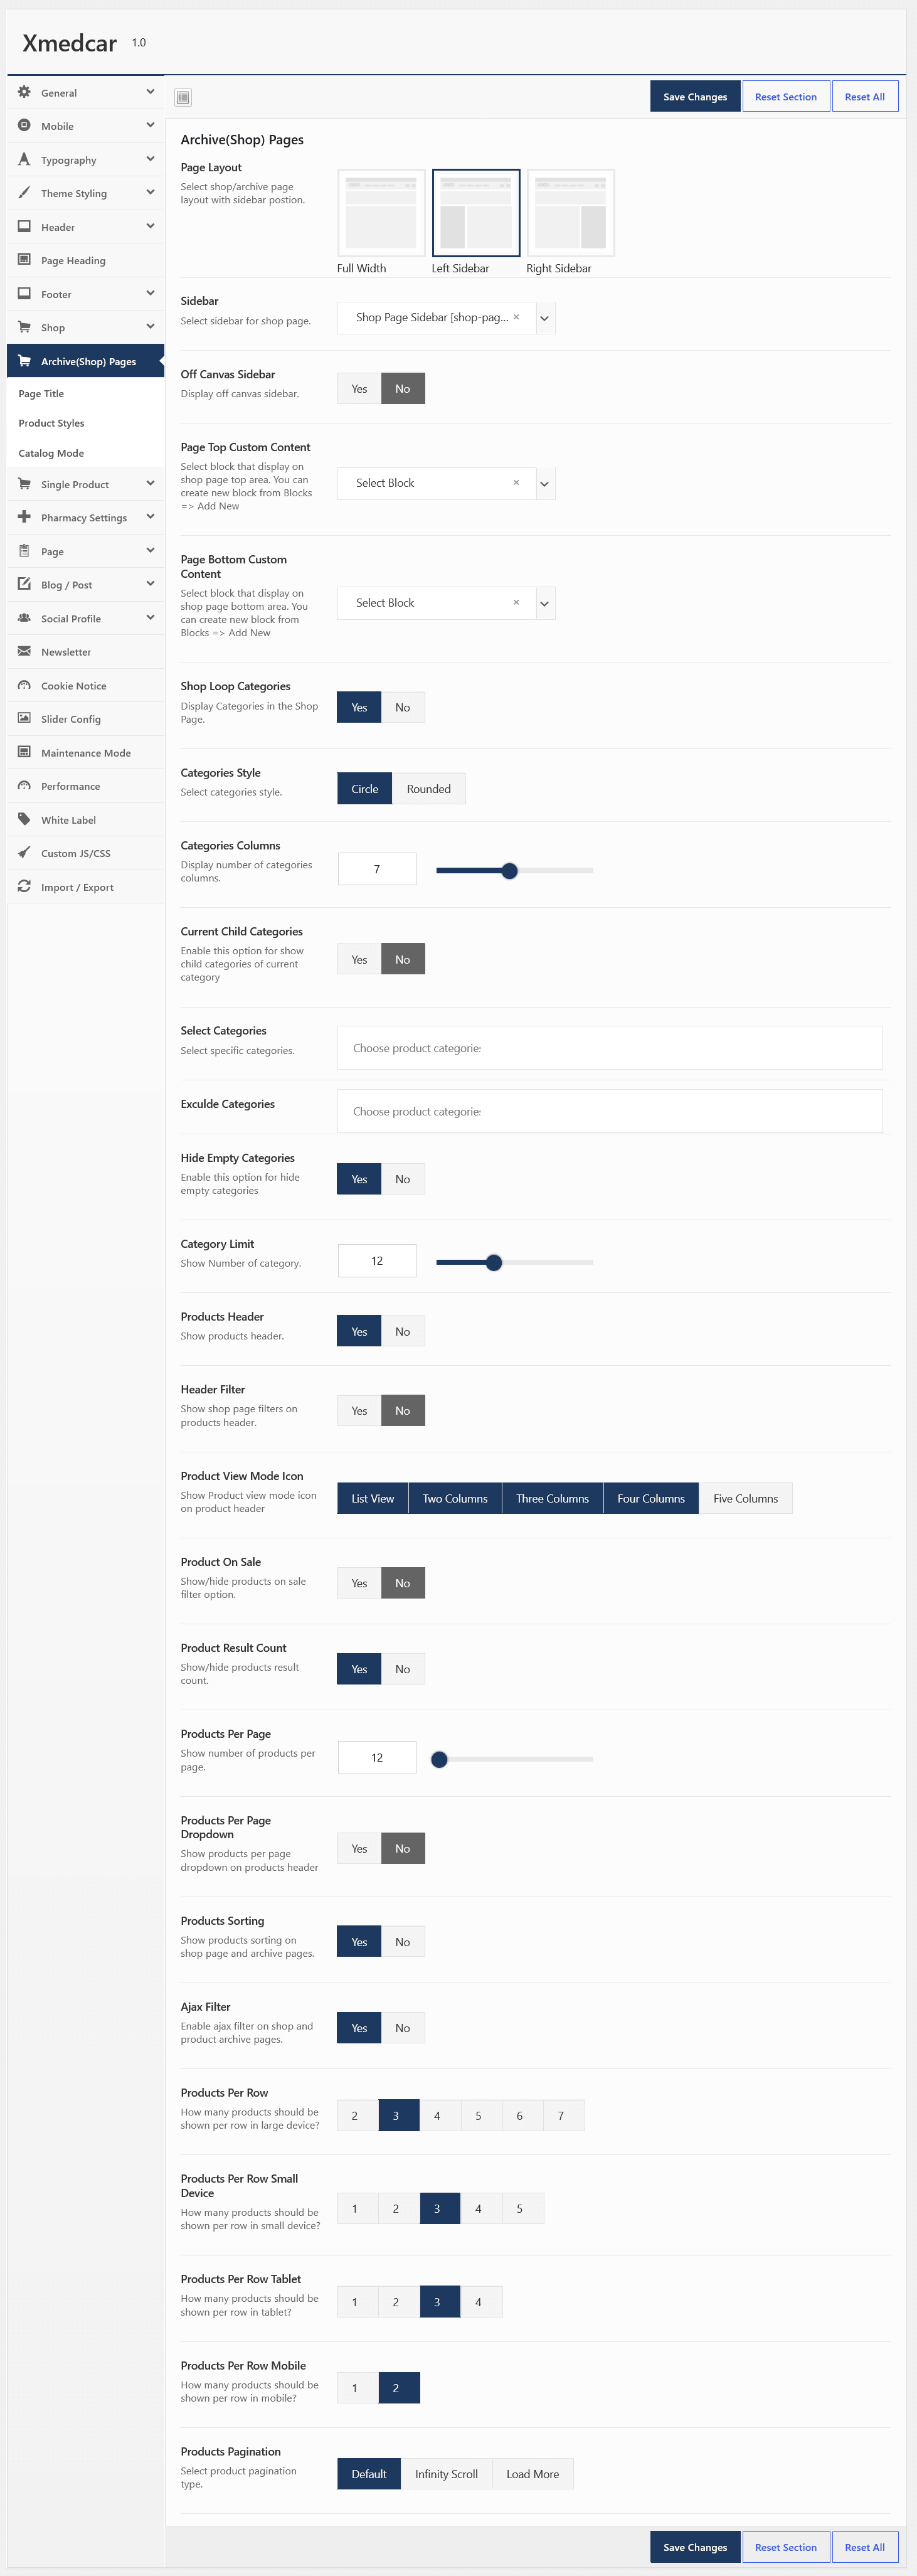
Archive(Shop) Pages
This section you can manage following options.
Single Product
This section you can manage following options.
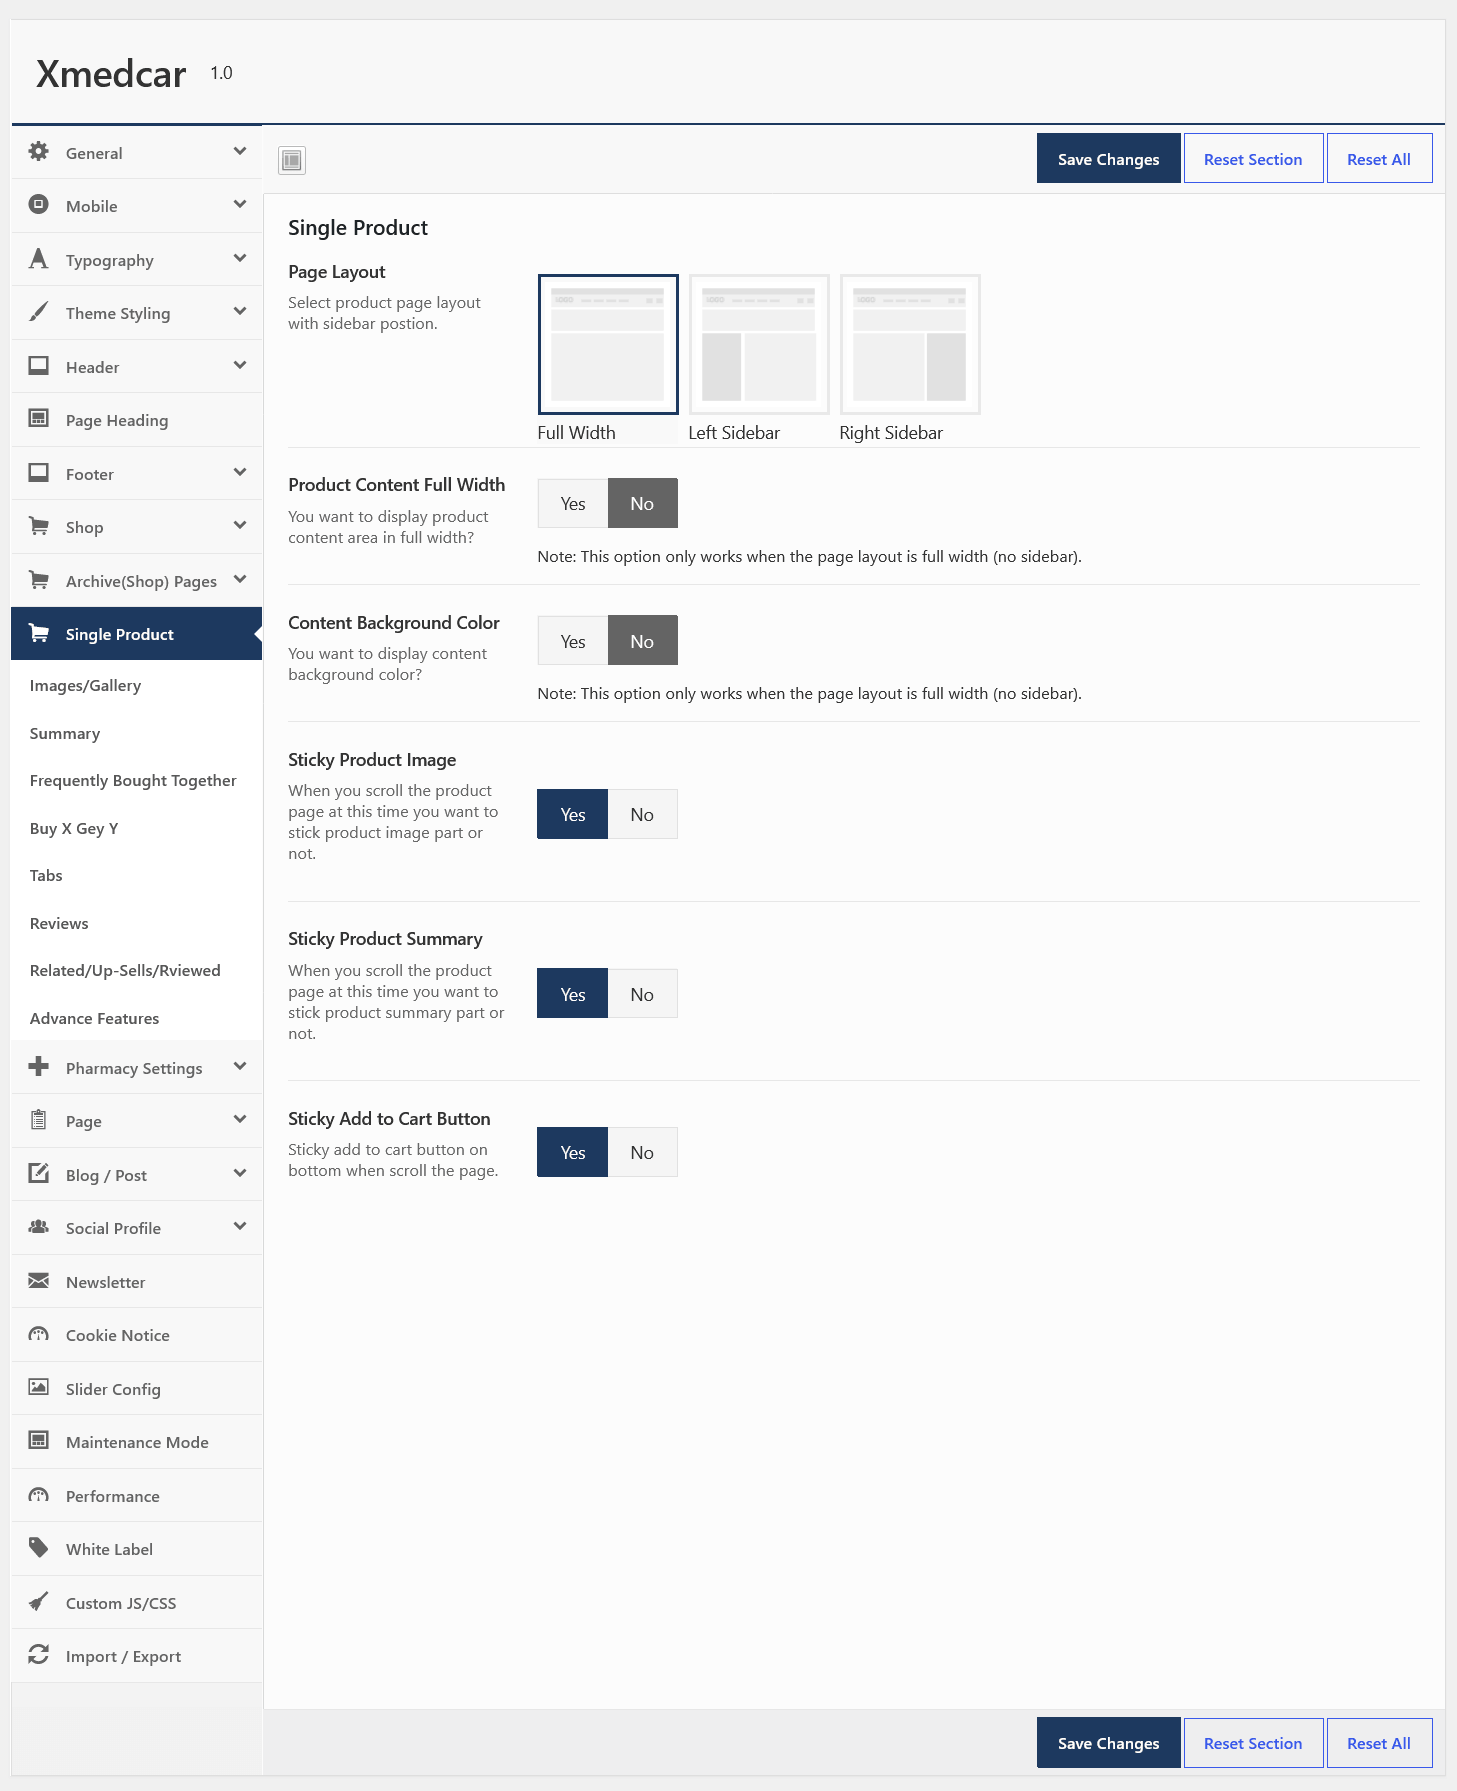
Pages
This section you can manage following options.
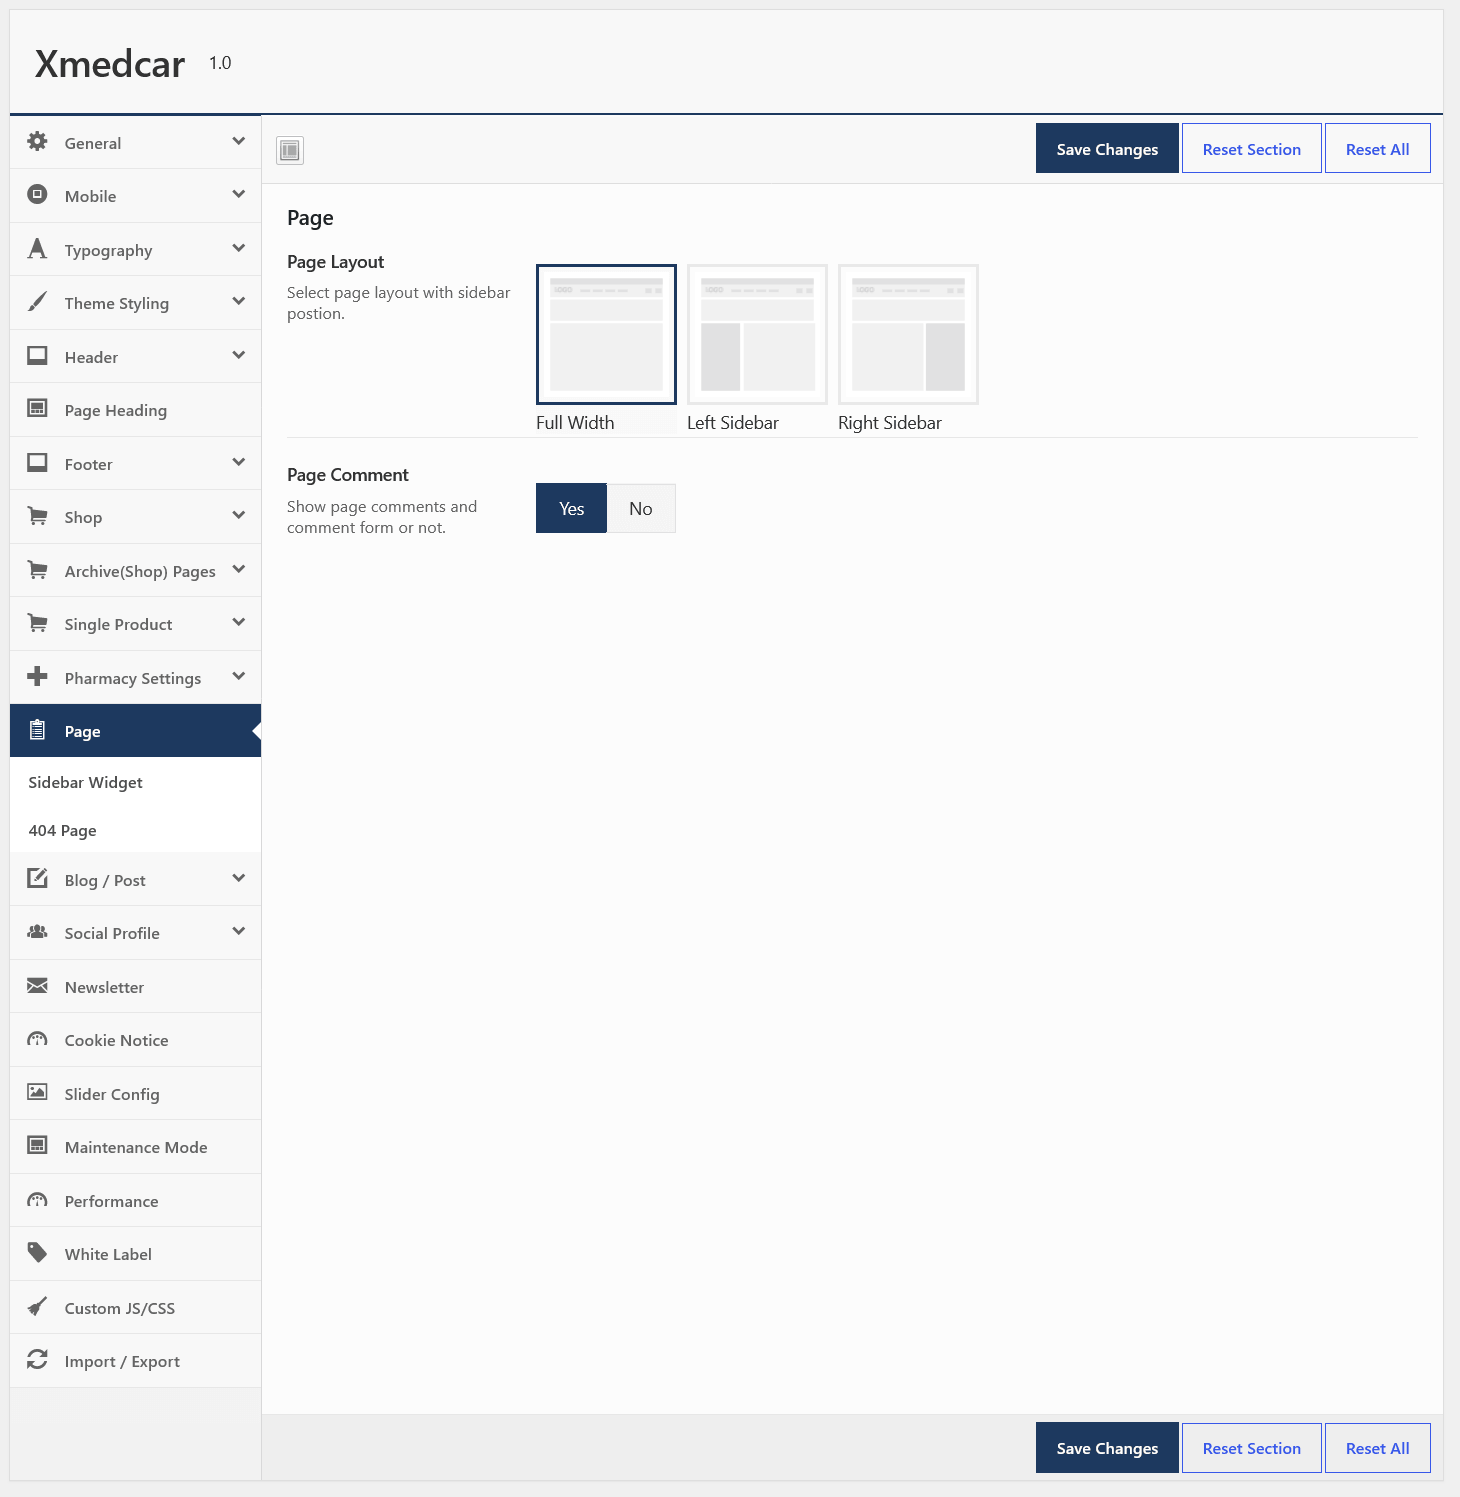
- Page Layout : Select page layout with sidebar position.
- Sidebar Width : Select sidebar width. It will be hide if page layout is "Full Width"
- Sidebar Widget Area : Select sidebar which display on shop page.It will be hide if page layout is "Full Width"
- Page Comments : Show/Hide the page comment.
Blog / Post
This section you can manage following options.
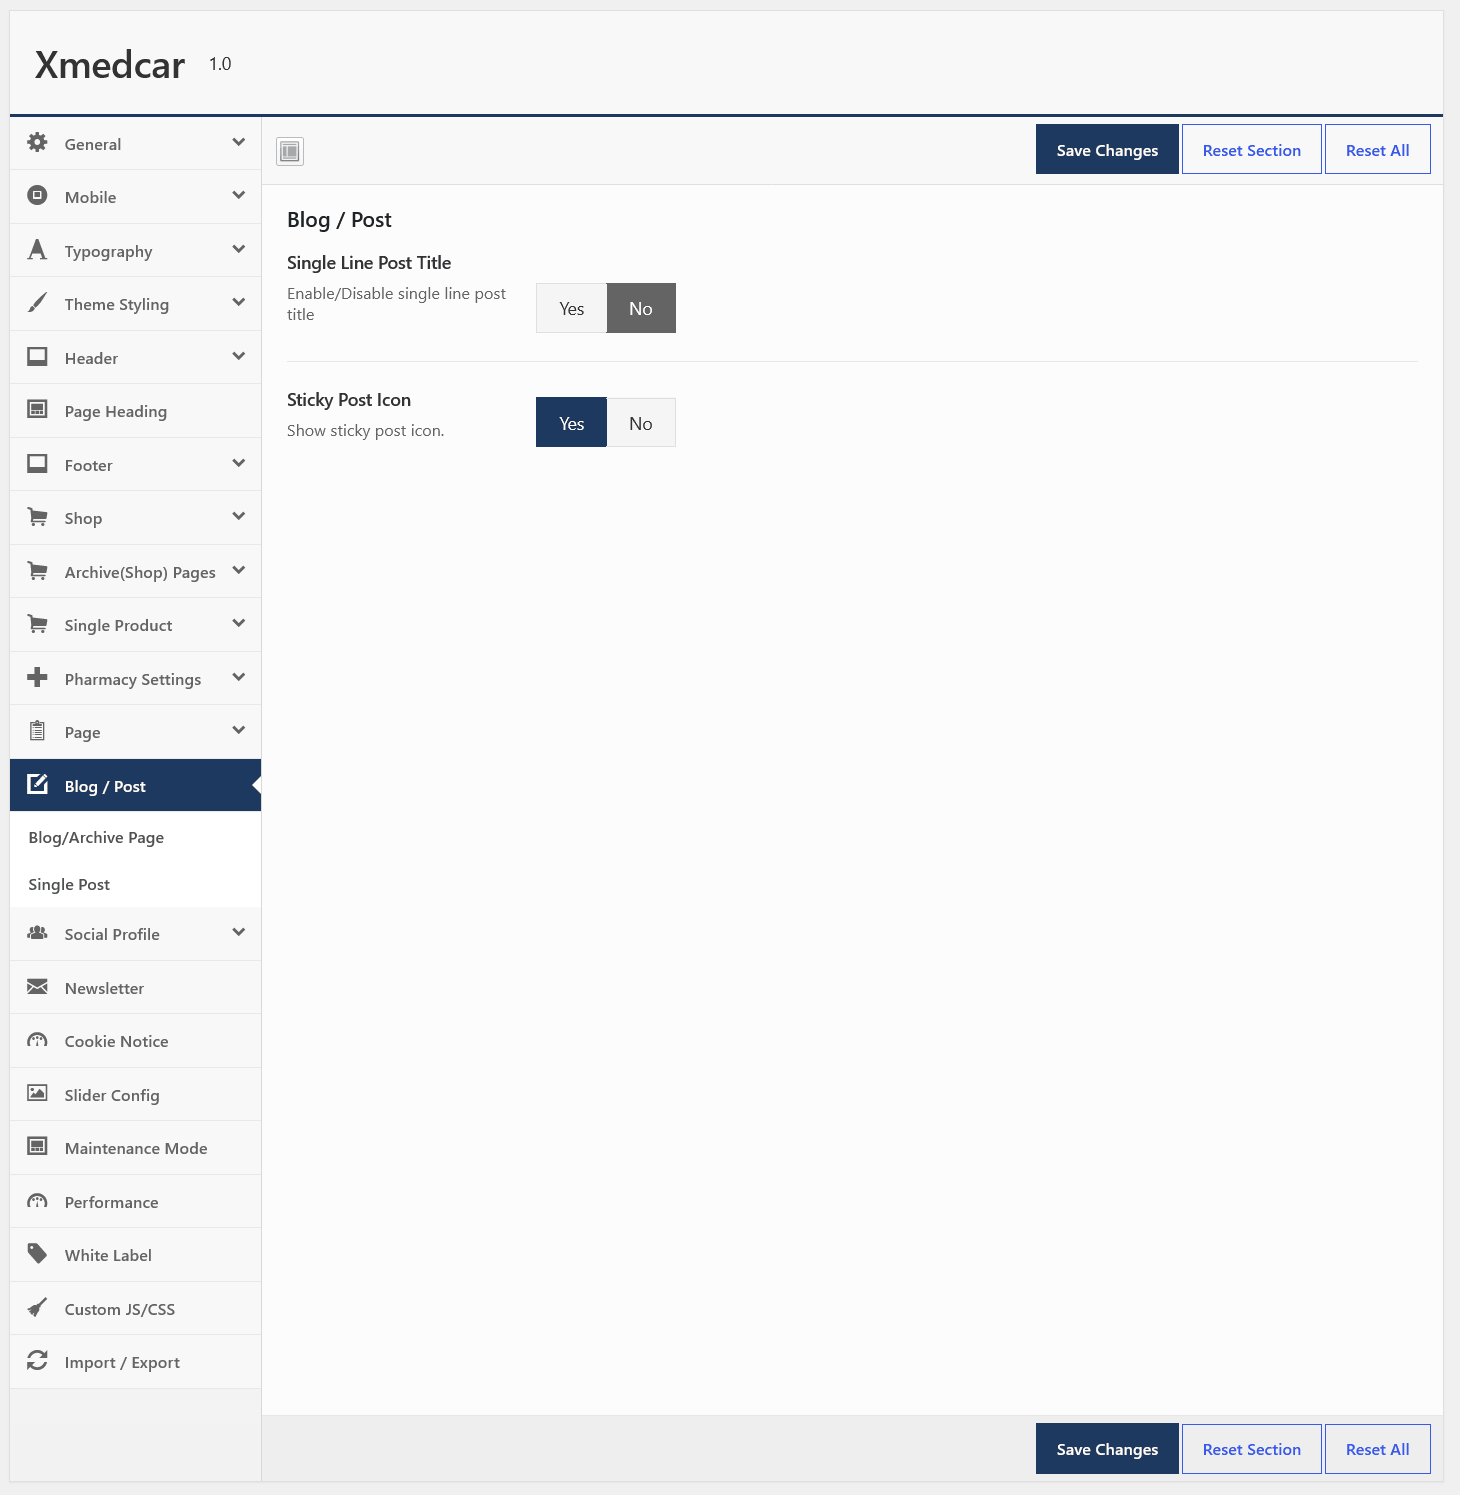
Social
This section you can manage following options.
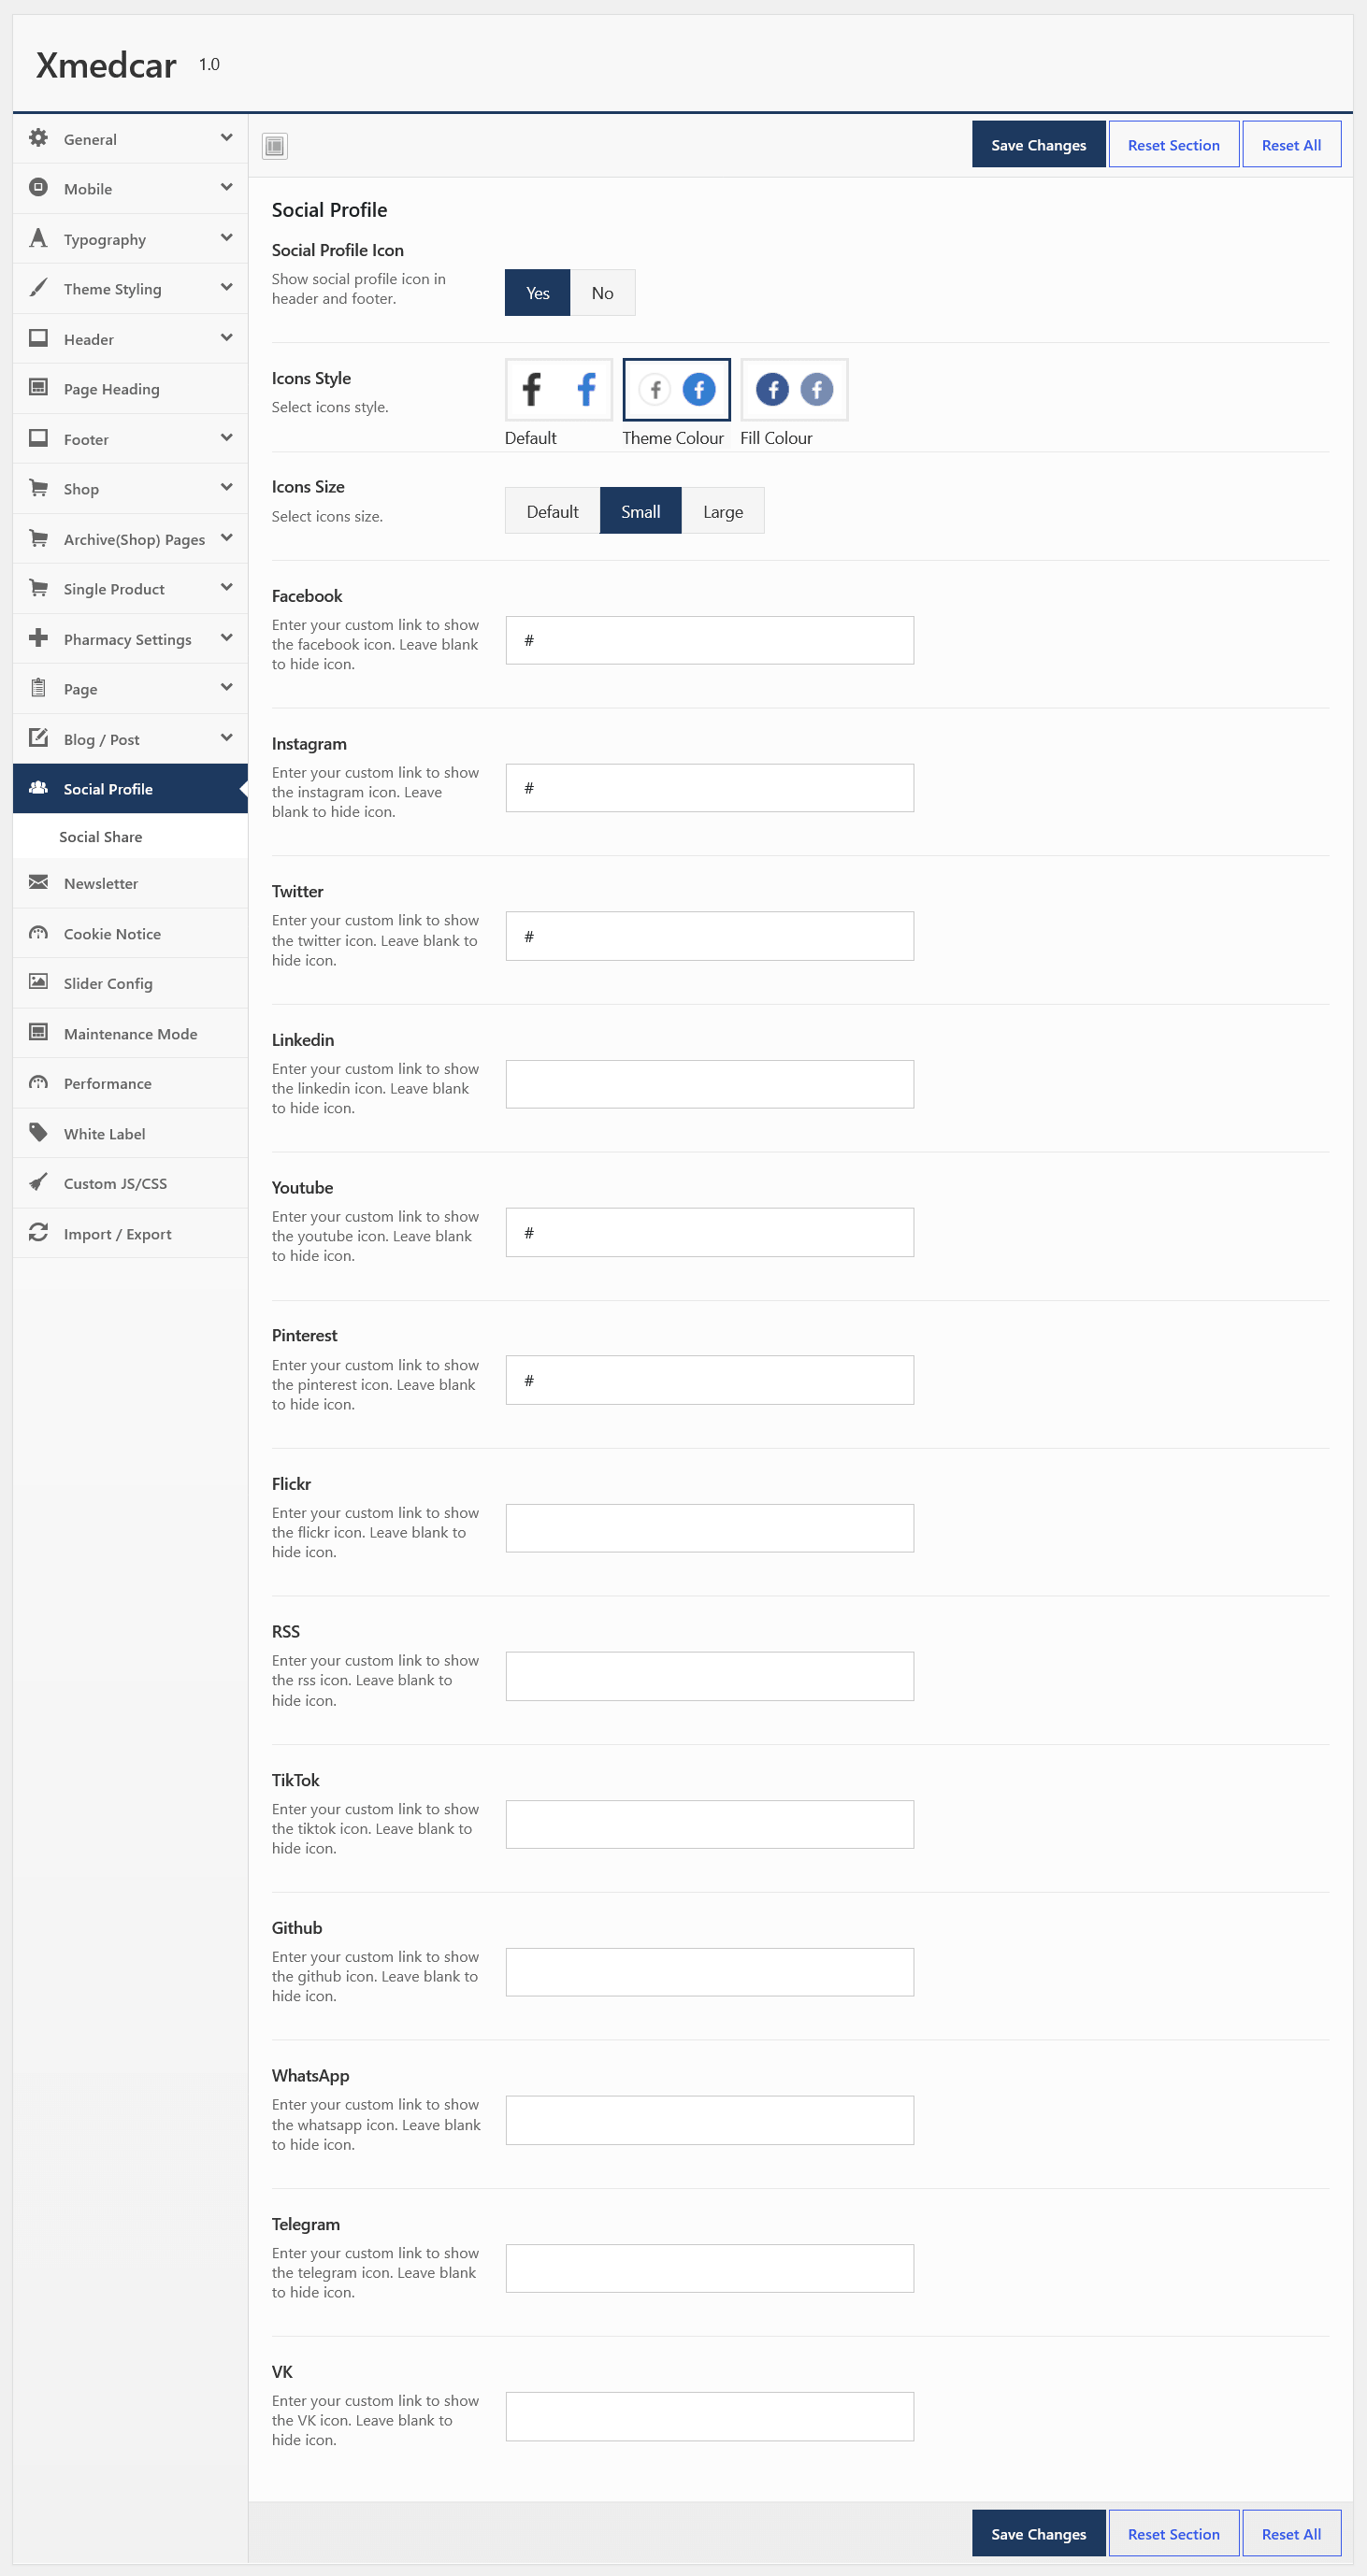
Slider Config
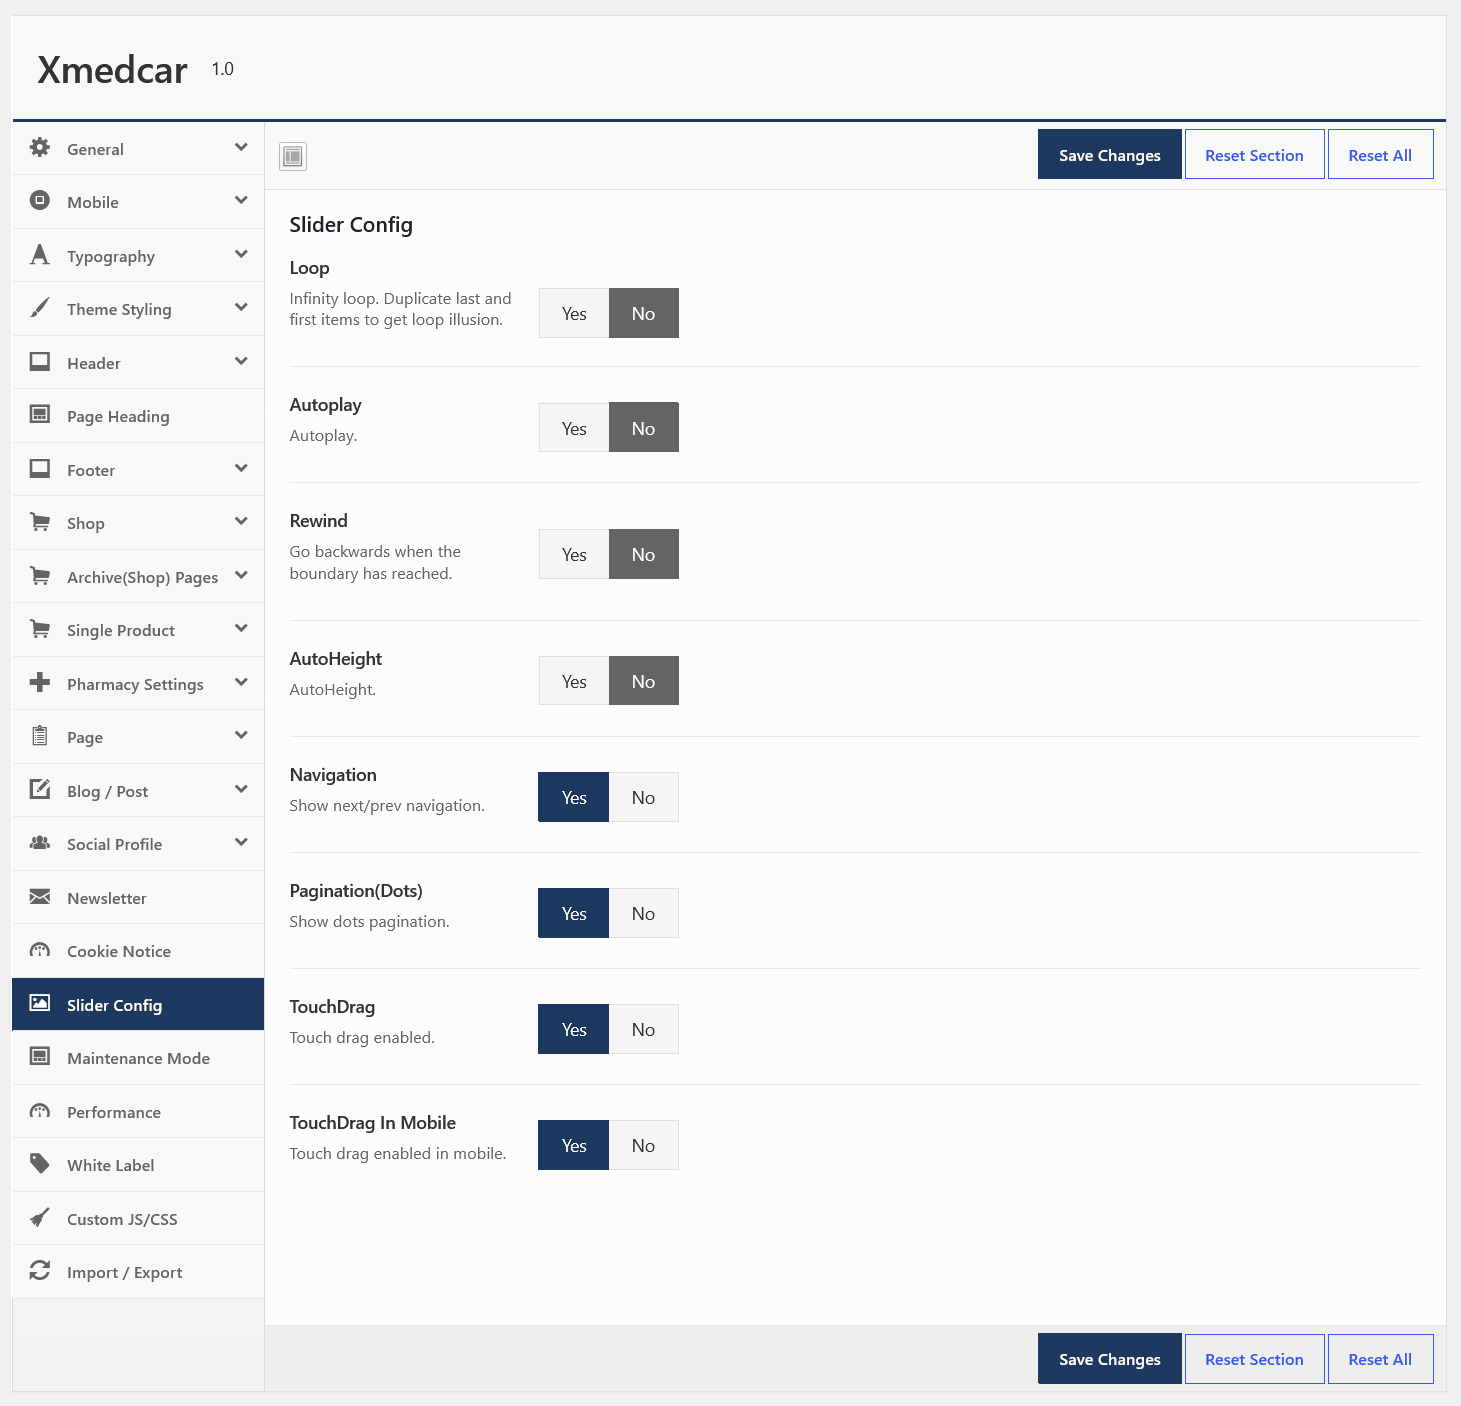
Newsletter
This section you can manage following options.
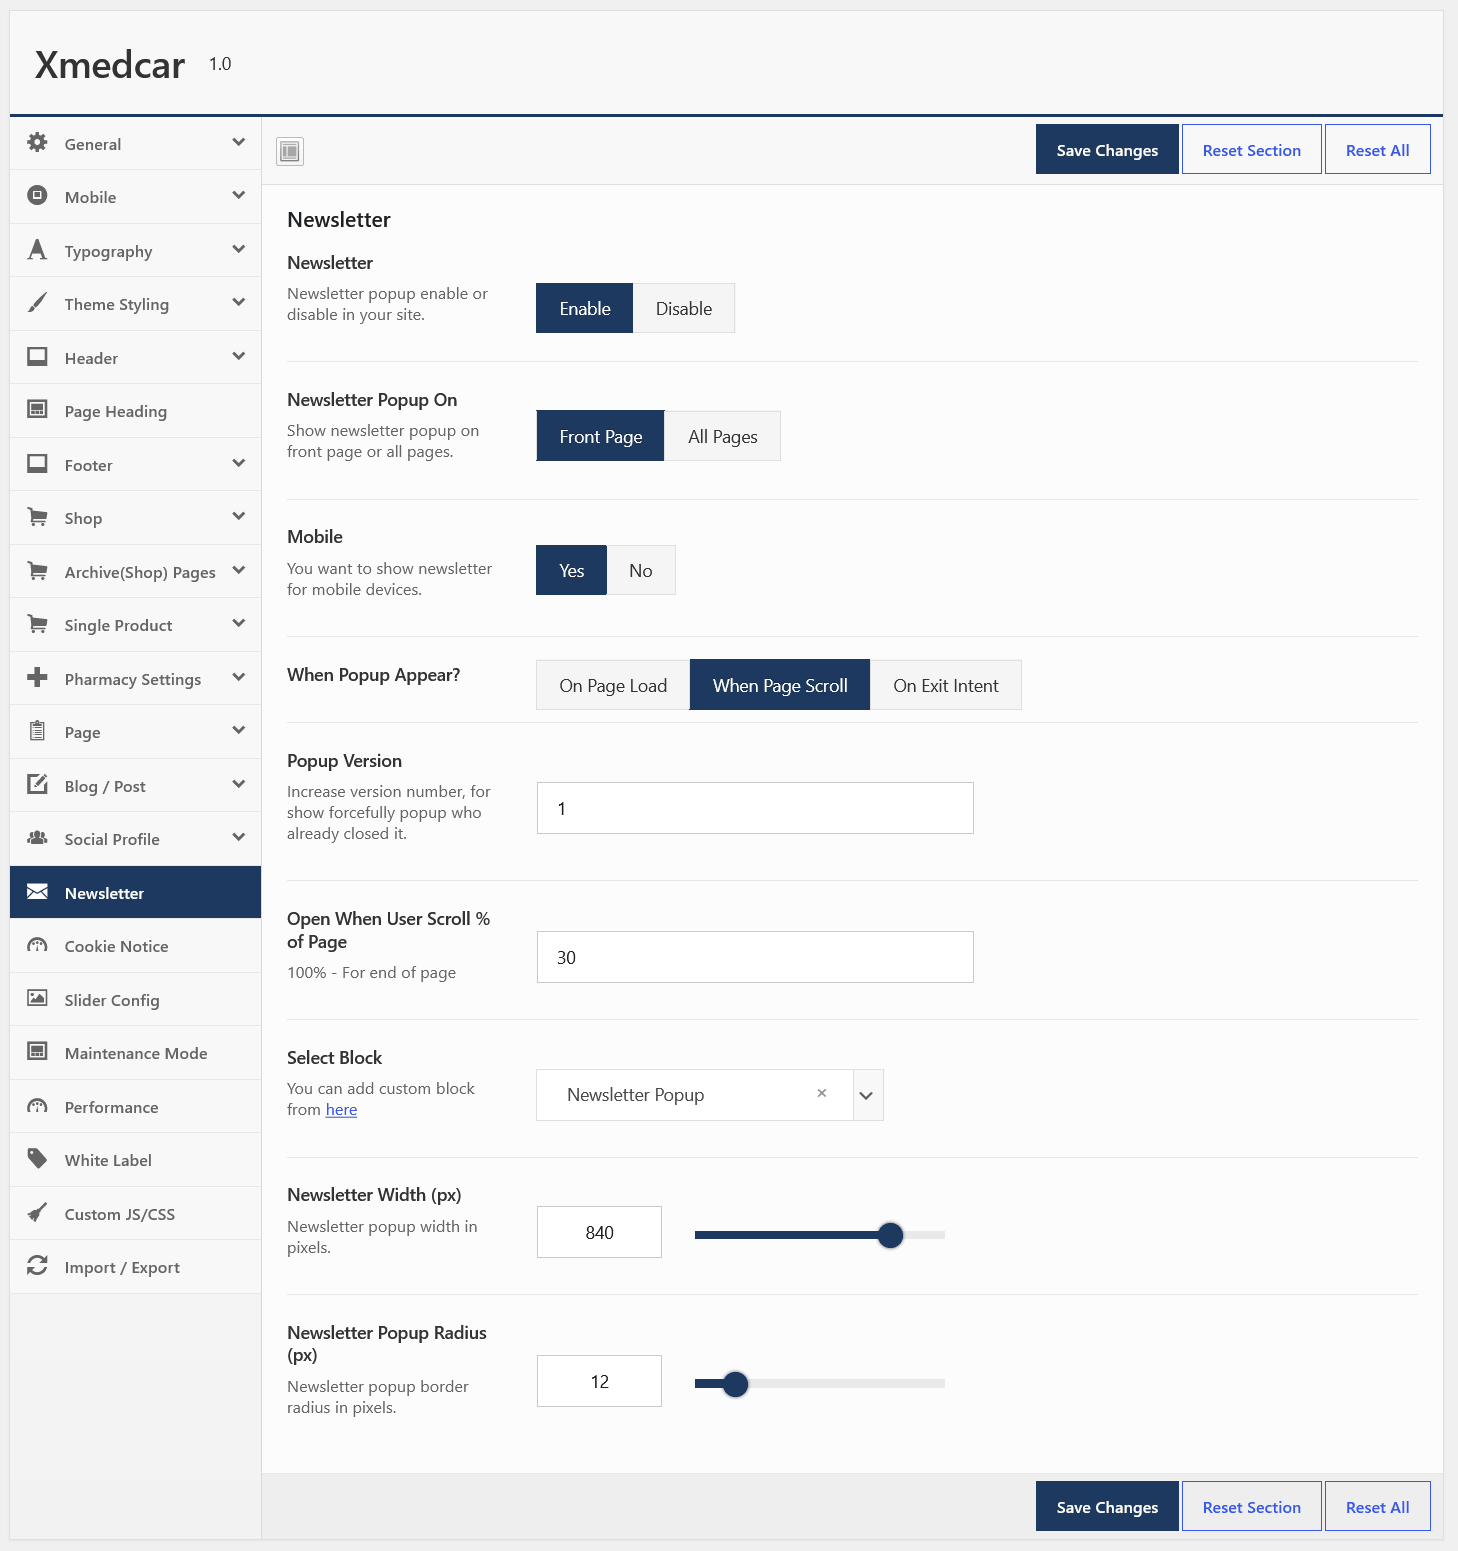
- Newsletter : Enable/Disable Newsletter popup on your site.
- Newsletter Popup On ? : Select options Where load popup.
- Mobile : Show/Hide in mobile.
- When Popup Appear? : Select options when load popup.
- Popup Delay : Enter no of second to open popup after page load.
- Open when user scroll % of page : Enter number when show popup.100% - For end of page.IT will be show if you select popup appear type "When Page Scroll".
- Popup Version : Change popup version when want show forcefully popup again.
- Select Block : Select block for popup.
If you want to enable don't show this popup again, then please put below
shortcode in your block and check.
[pls_newsletter_dontshow_message message="Don't show this again"]
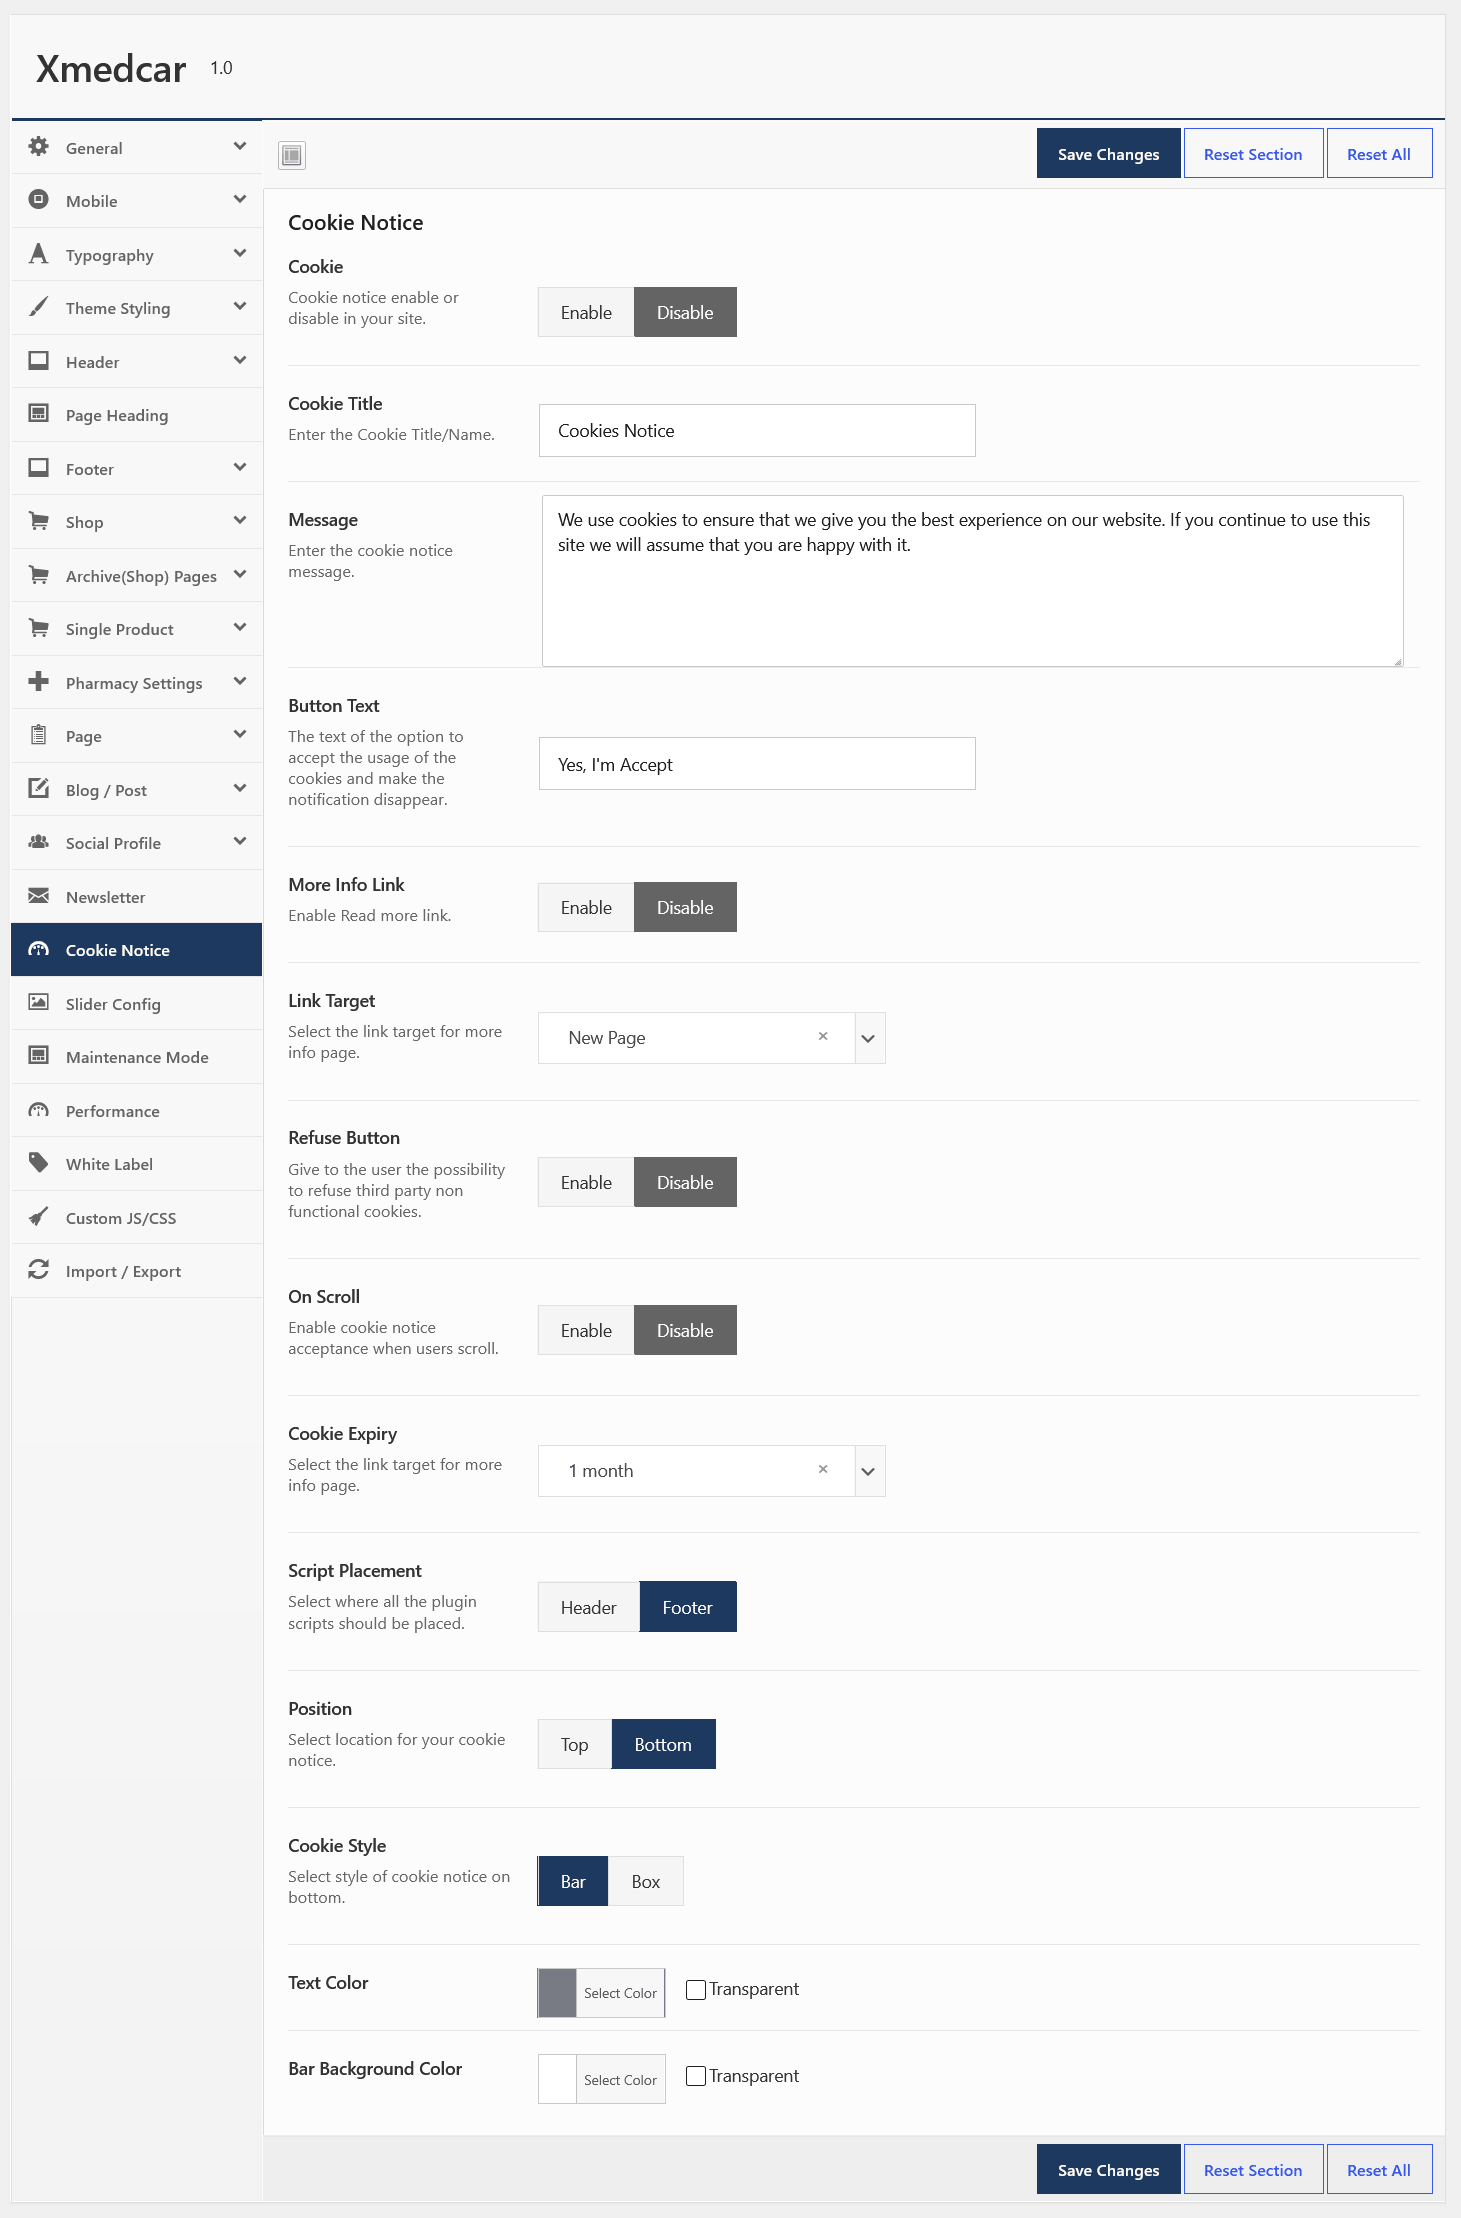
Cookie Notice
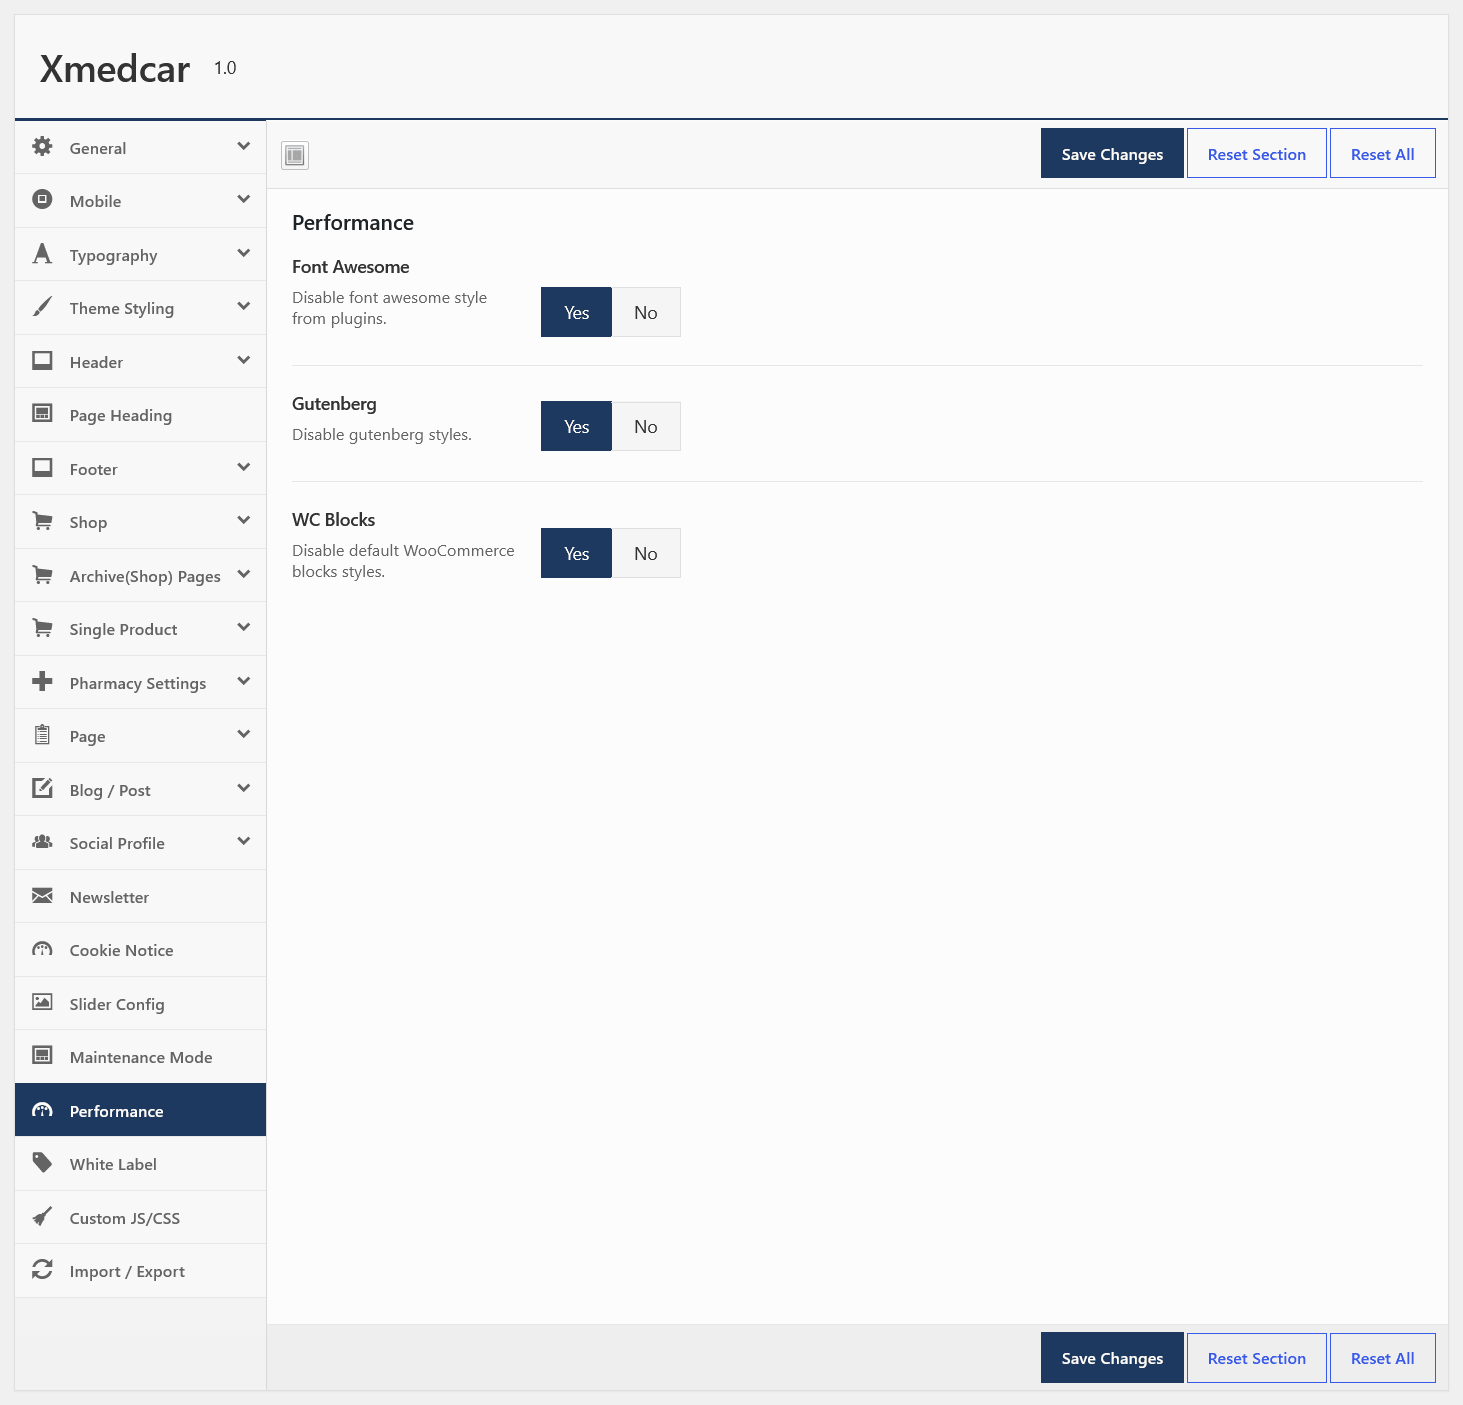
Optimize(Performance)
Maintenance Mode
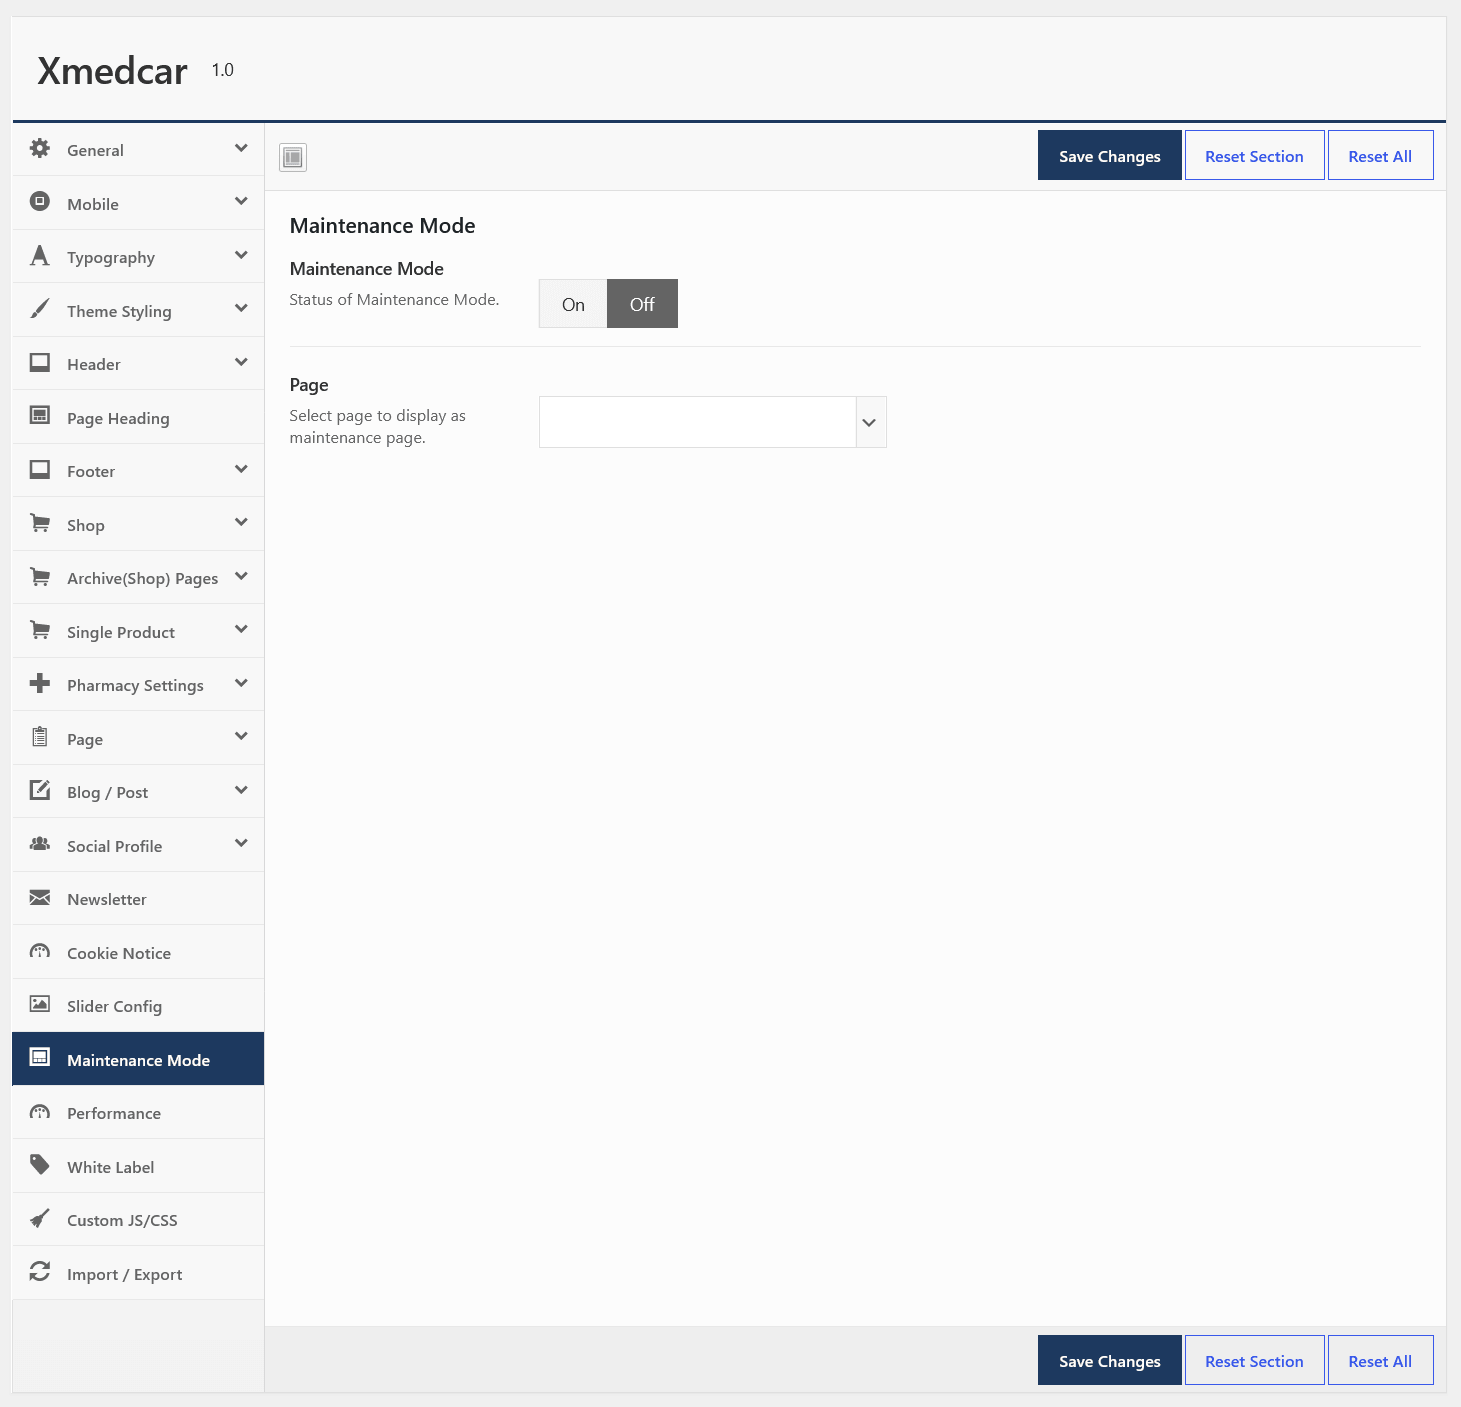
- Maintenance Mode : Status of maintenance mode On/Off
- Page : Select page to display as maintenance page. If you don't want to display header and footer in maintenance then select page template as "Maintenance".
Custom Css/Js
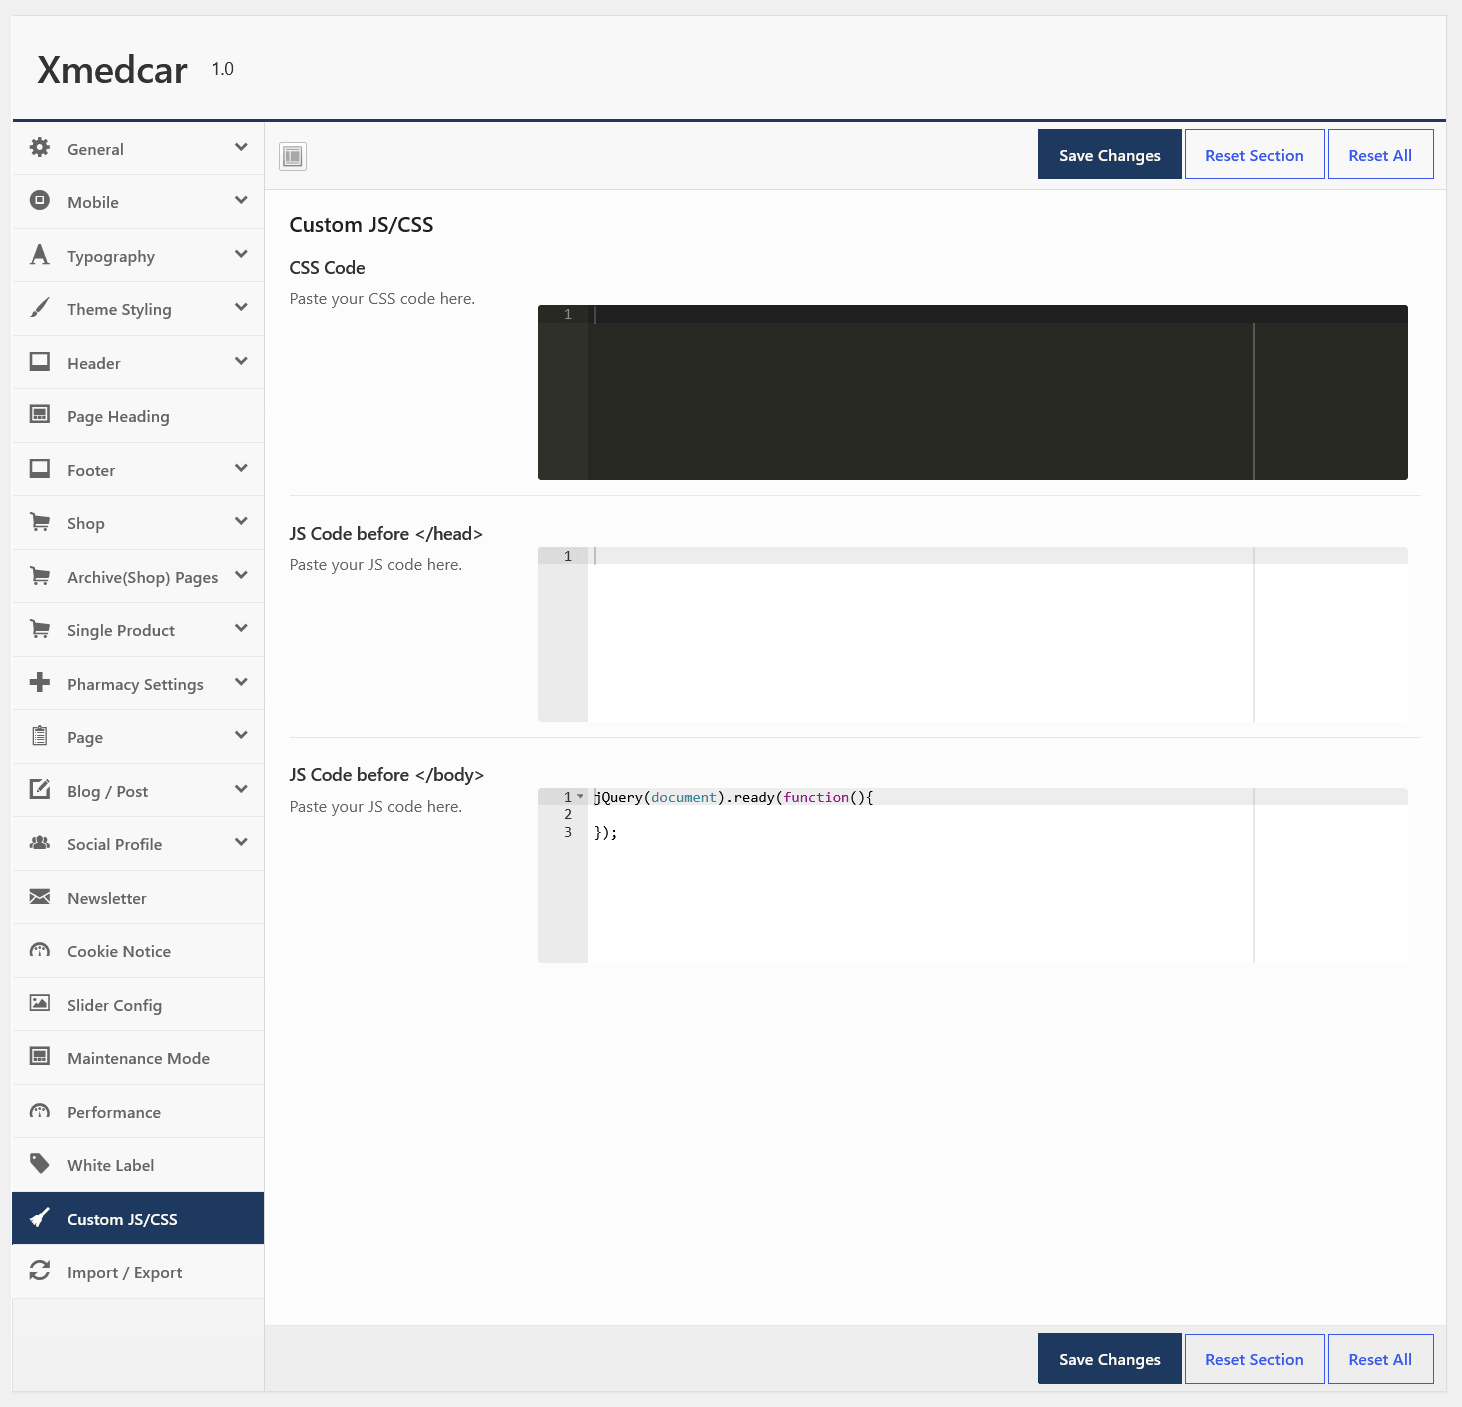
- CSS Code : Custom css code here.
- JS Code before head: Paste your custom JS code here.That will be load before head.
- JS Code before body: Paste your custom JS code here. That will be load before body.
Product Attributes/Swatches
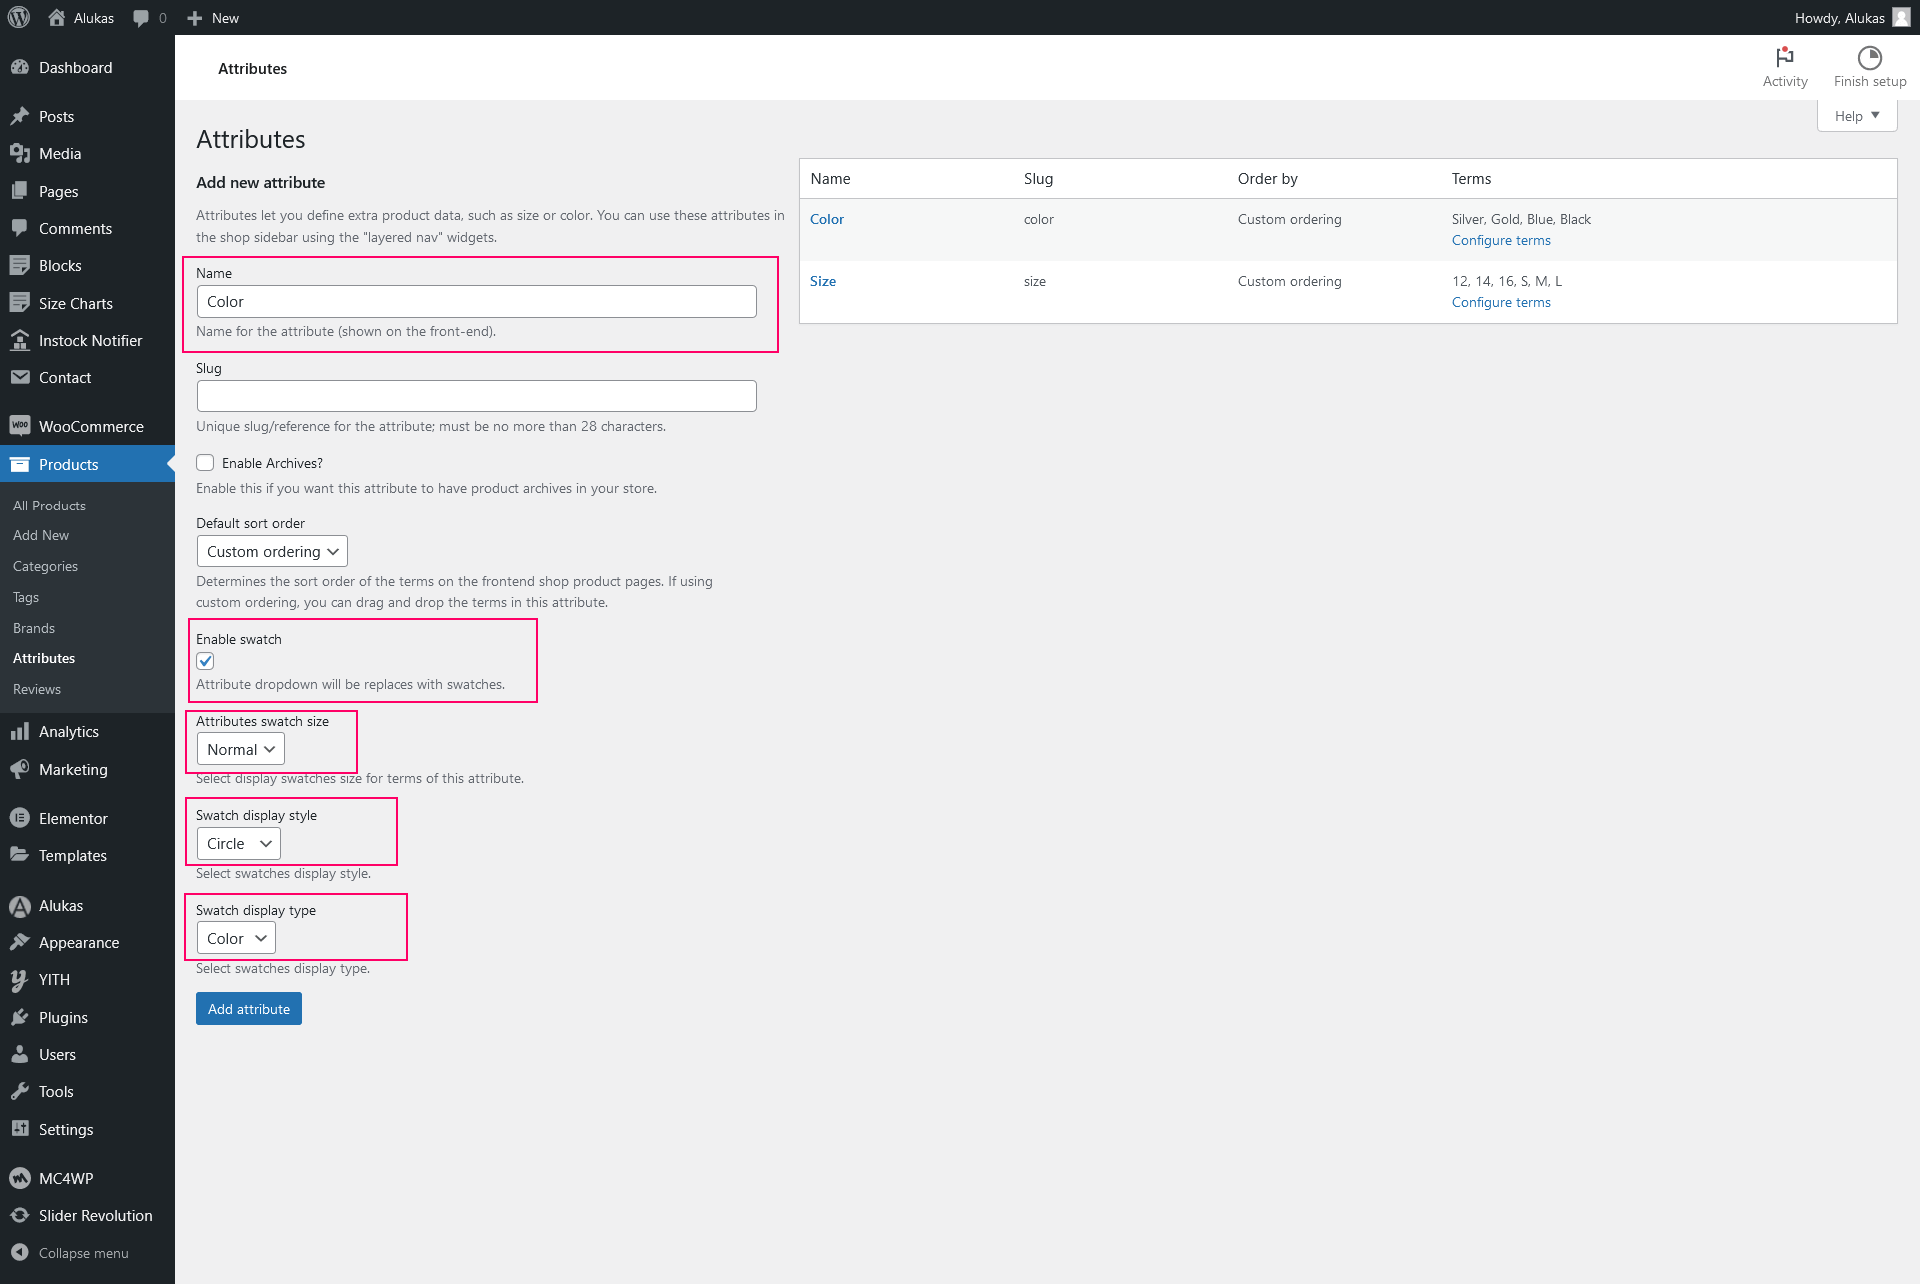
WooCommerce attributes allow you to define product variations (such as Size, Color, or Material) and display them as visual color swatches, image swatches, or text buttons on the shop catalog and product details page. Configuring variable products and swatches consists of three main parts:
Part 1: Create Global Attributes
-
Go to Attributes Screen:
Log in to your WordPress dashboard and navigate to Products => Attributes. -
Register a New Attribute:
Enter a name (e.g., Color or Size) in the Name field. -
Select Attribute Type (Swatches):
Choose the display type from the Type dropdown menu (e.g., Color, Image, or Label). -
Save:
Click the Add Attribute button.
Registering Global Attributes:
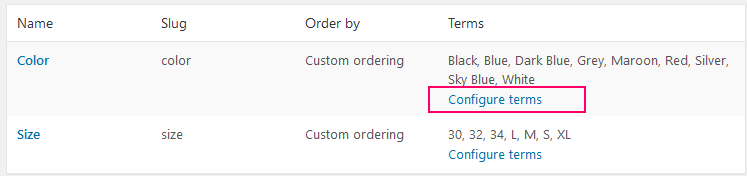
Part 2: Configure Attribute Terms (Values)
-
Open Term List:
In the right-hand attributes table, click the Configure terms link next to the attribute you just created (e.g., Color). -
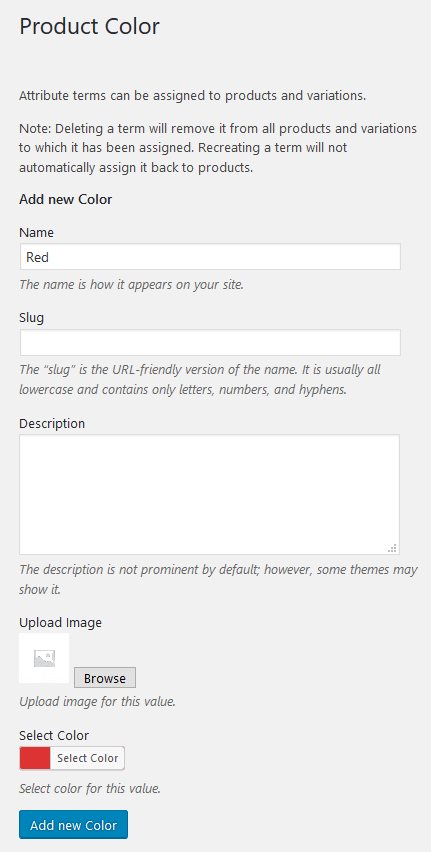
Add New Terms:
Add values (e.g., Blue, Red, or Green) one by one in the Name field. -
Select Swatch Values:
If you selected a visual type like Color in Part 1, click the color picker to select the exact HEX color value. If you selected Image, upload the thumbnail image. -
Save Term:
Click Add New [Attribute Name] to save each term.
Opening Configure Terms Screen:
Adding and Defining Swatch Values:
Part 3: Apply Attributes and Create Variations on Products
Once your global attributes and terms are created, you must apply them to variable products to generate swatches on the frontend:
-
Edit or Create a Product:
Navigate to Products => Add New (or edit an existing product). -
Change Product Type:
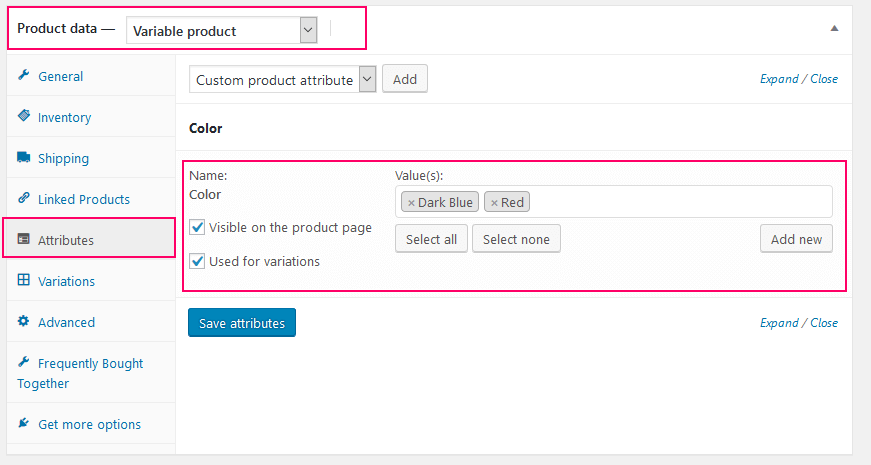
Scroll down to the Product Data panel and change the dropdown from Simple product to Variable product. -
Assign Attributes:
Go to the Attributes tab. Select your global attribute (e.g., Color) from the custom attributes dropdown list and click Add. -
Select Terms and Enable Variations:
Click Select all (or manually search and choose terms). Check the box next to Used for variations, then click Save attributes. -
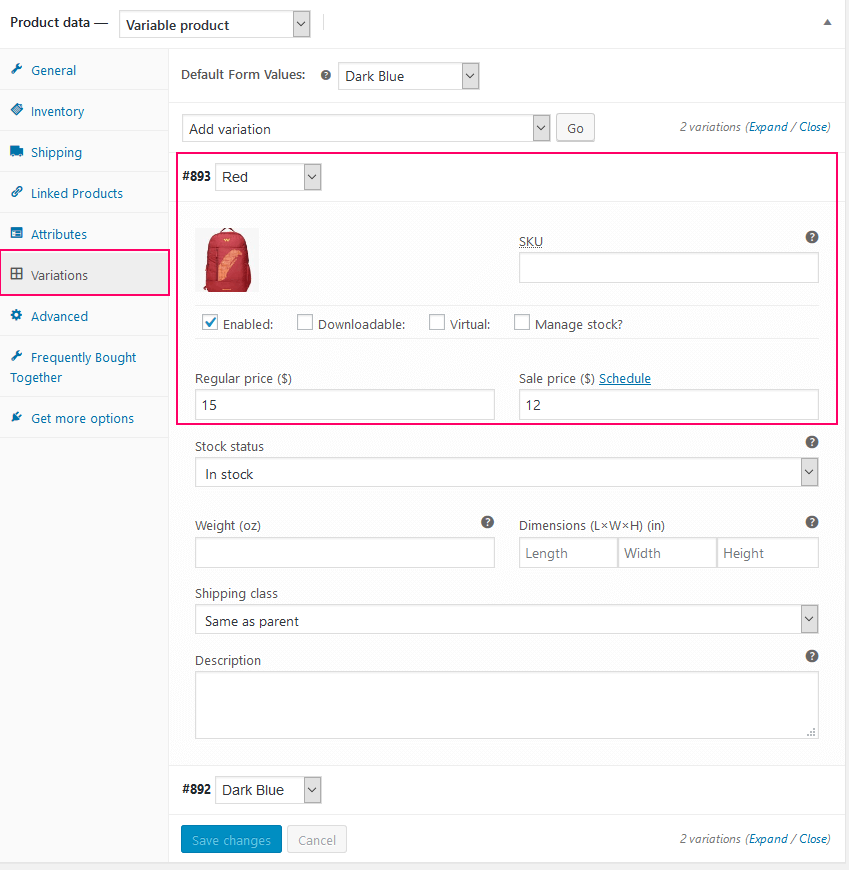
Generate Variations:
Go to the Variations tab. Select Create variations from all attributes from the dropdown menu and click Go. WooCommerce will generate a unique variation card for each term combination. -
Configure Variation Settings:
Click to expand each variation card to enter individual prices, upload distinct variation gallery images, and define stock statuses. Click Save changes.
Adding Attributes to the Product:
Configuring Variable Prices and Images:
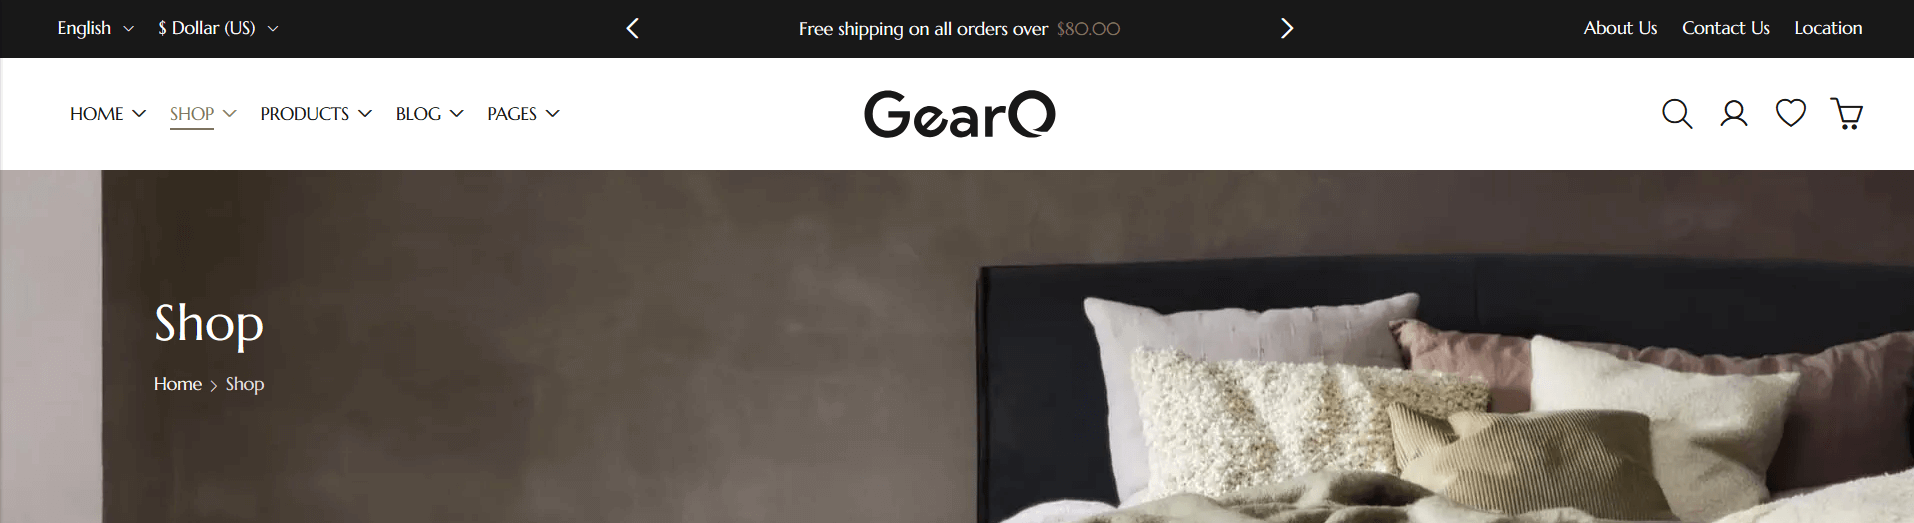
Shop Page Title Background Image
You can customize the header background image, title styling, and color overlay displayed behind the main page title for your WooCommerce Shop catalog and category archives.
Setup & Usage Guide:
-
Log in to WordPress Dashboard:
Log in to your WordPress admin panel (e.g.,yoursite.com/wp-admin). -
Navigate to Theme Options:
Go to Xmedcar => Theme Options from the left sidebar. -
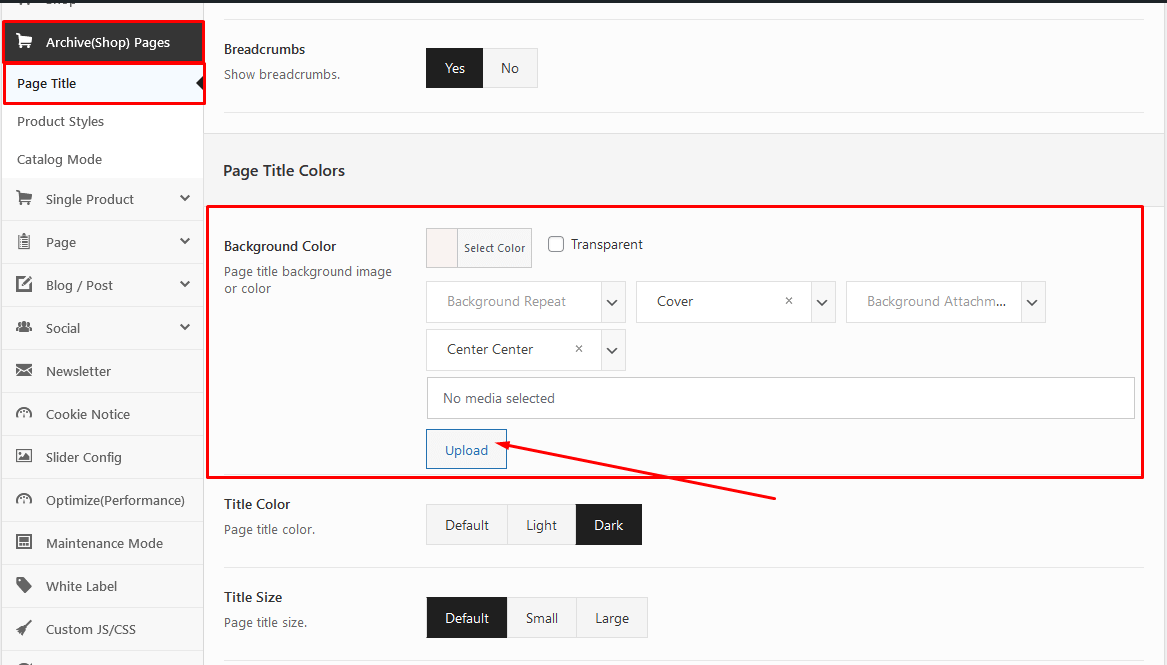
Access Page Title Settings:
Navigate to the Archive(Shop) Pages => Page Title tab from the sidebar of the Options panel. -
Upload Background Image:
Locate the Page Title Background Image field and upload/select your header image. -
Customize Options:
Configure additional options as needed, such as background overlay color opacity, title text color, alignment, and top/bottom padding sizes. -
Save Options:
Click the Save Changes button to publish your shop banner.
Theme Options Shop Page Title Configurations:
Frontend Shop Page Title Output Example:
Product Options
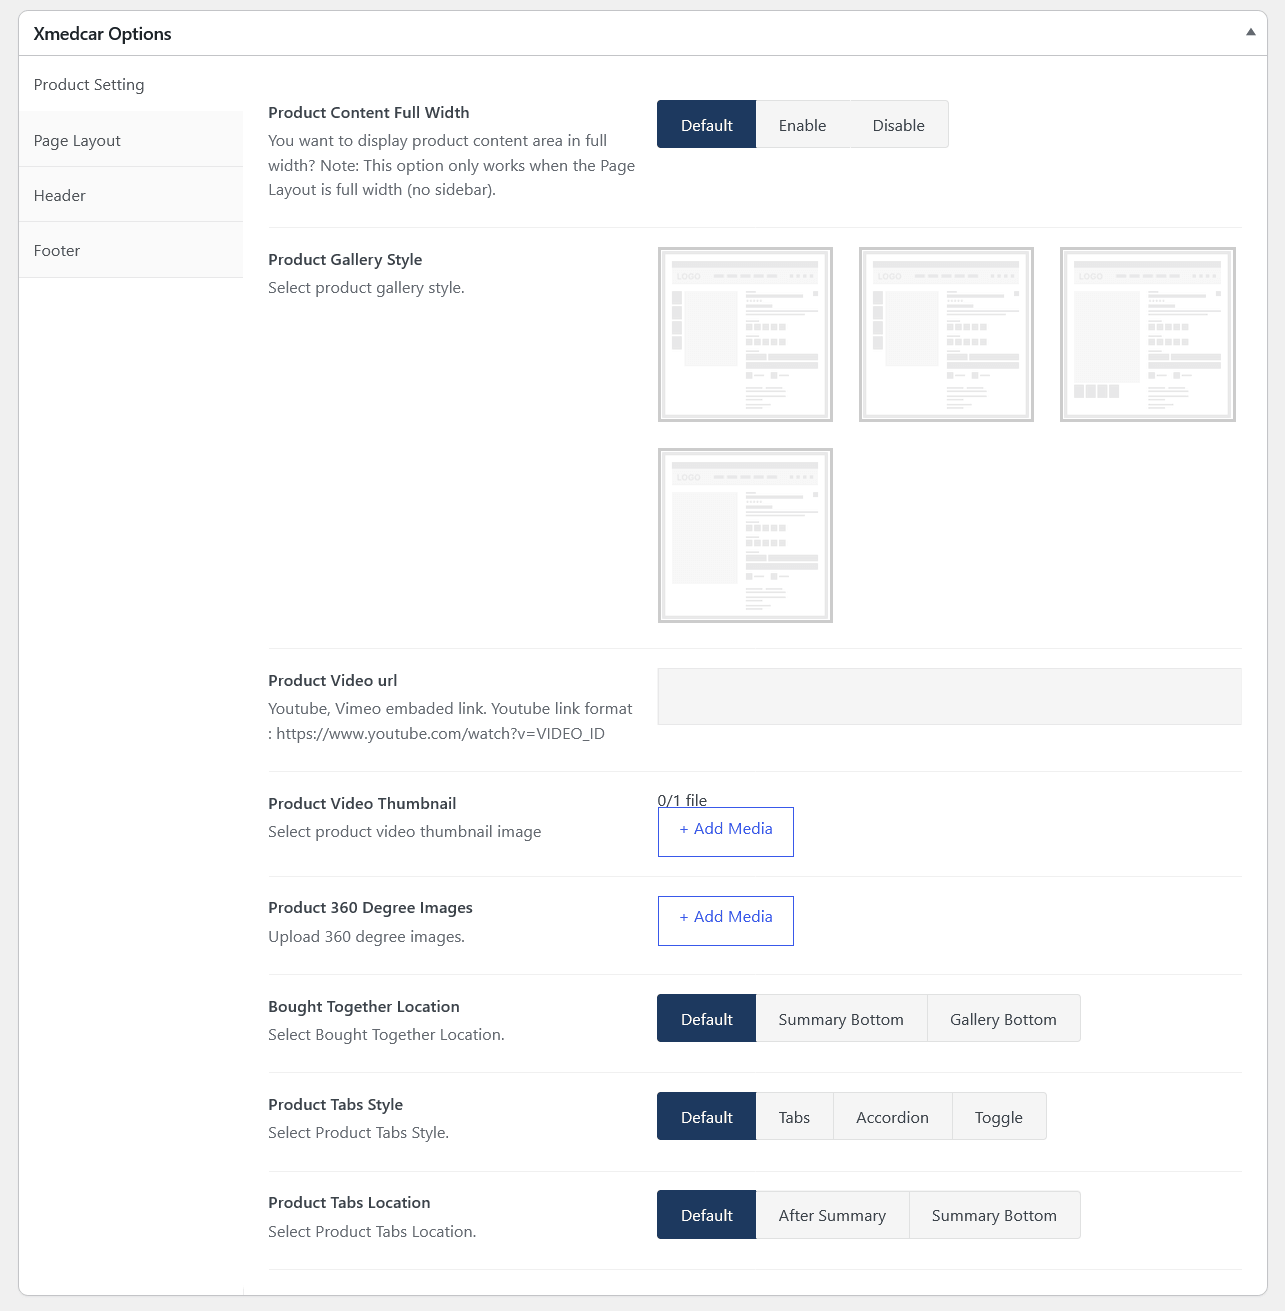
Xmedcar provides a dedicated options panel inside the product edit screen, allowing you to override global templates and customize layouts, embed product videos, attach size guides, and add interactive 360-degree gallery displays for individual products.
Setup & Usage Guide:
-
Log in to WordPress Dashboard:
Log in to your WordPress admin panel (e.g.,yoursite.com/wp-admin). -
Edit a Product:
Navigate to Products => All Products and click to edit your target product. -
Access Xmedcar Options Settings:
Scroll down below the main content editor and locate the Xmedcar Options metabox panel. -
Configure Fields:
Customize settings as needed:- Product Content Layout: Select the default layout grid or override it to full width, left sidebar, or right sidebar.
- Product Gallery Style: Select the thumbnail design layout (e.g., horizontal grid, vertical grid, or simple carousel list).
- Product Video URL: Paste a YouTube or Vimeo URL link to display an interactive video preview option in the main product gallery.
- Product Size Guide: Select a pre-designed chart template. You can build these charts under Size Chart => Add New in the dashboard.
- Product 360 Degree Images: Upload a collection of sequential images to enable an interactive 360-degree rotation widget on the frontend.
- Product Tabs Style & Location: Override the layout of additional description/specification tabs.
-
Update Product:
Click the blue Update (or Publish) button on the right sidebar to apply the options.
Product Options Metabox Configuration Panel:
Product Global Custom Tab
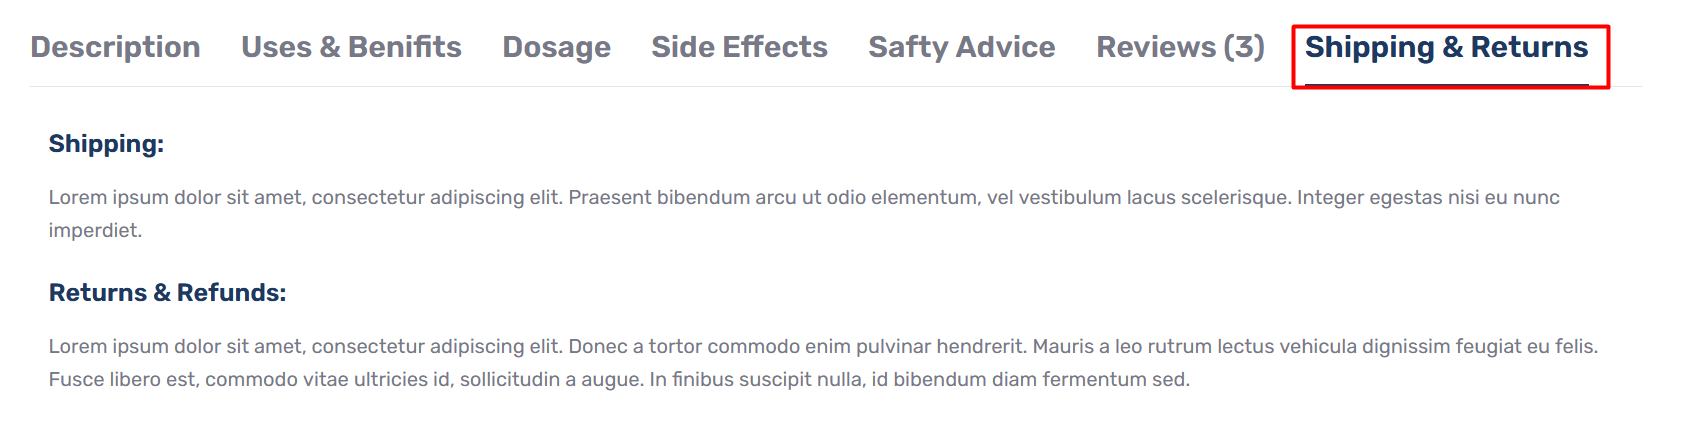
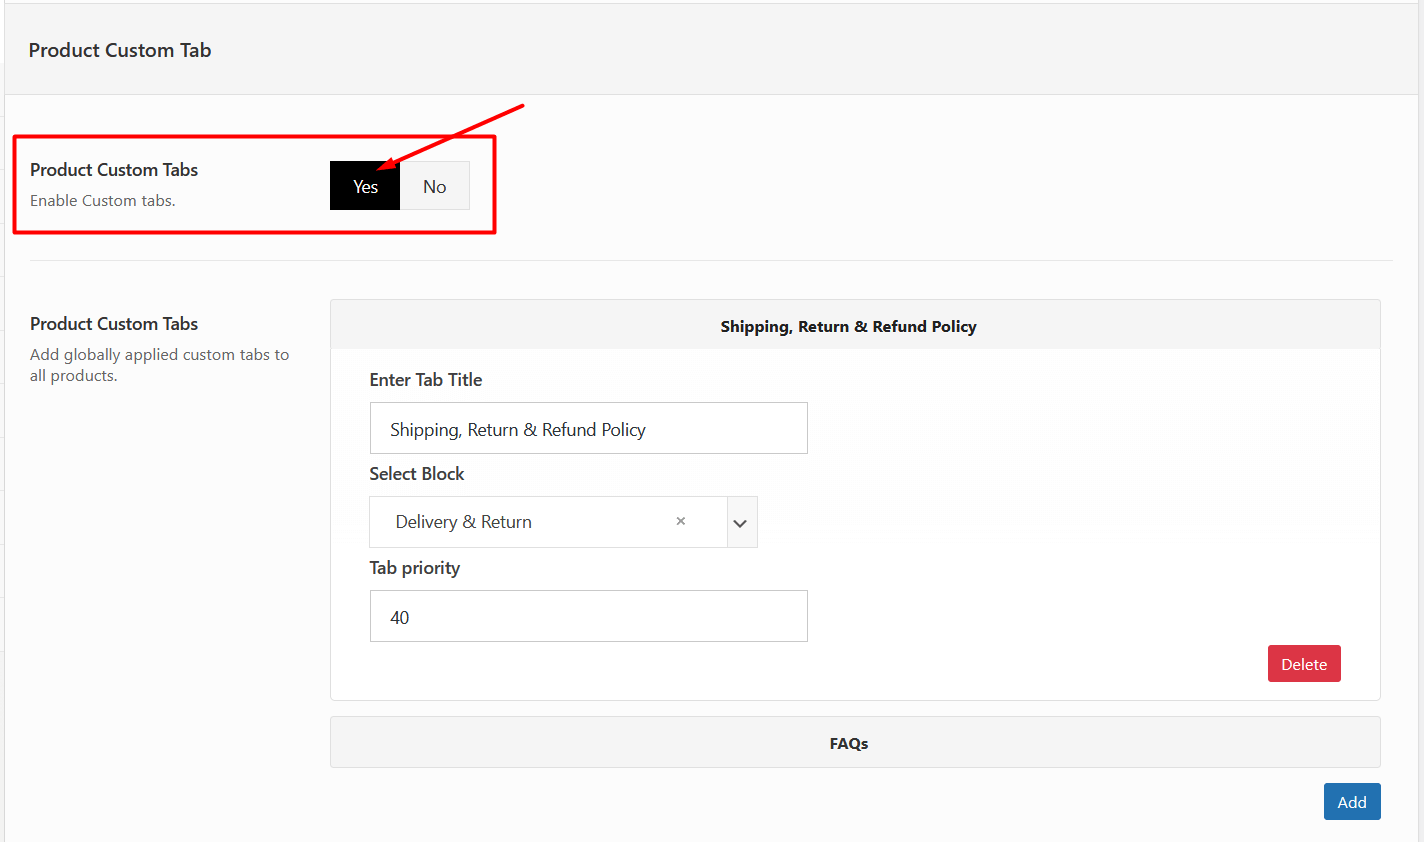
You can add custom product tab from Xmedcar => Theme Options => Single Product => Tab. These tabs display for all products.
Specific Product Custom Tab
In this section you add custom tab for specific product.
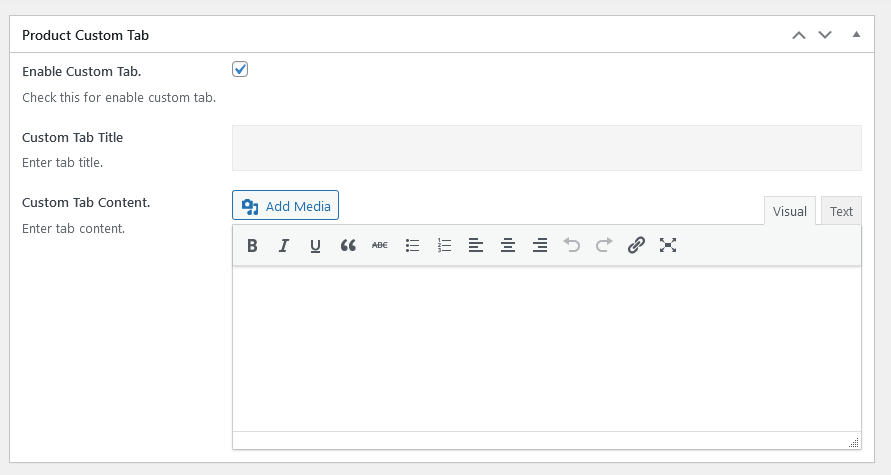
- Enable Custom Tab : Check this for add custom tab.
- Custom Tab Title : Enter custom tab title.
- Custom Tab Content : Enter custom tab content.
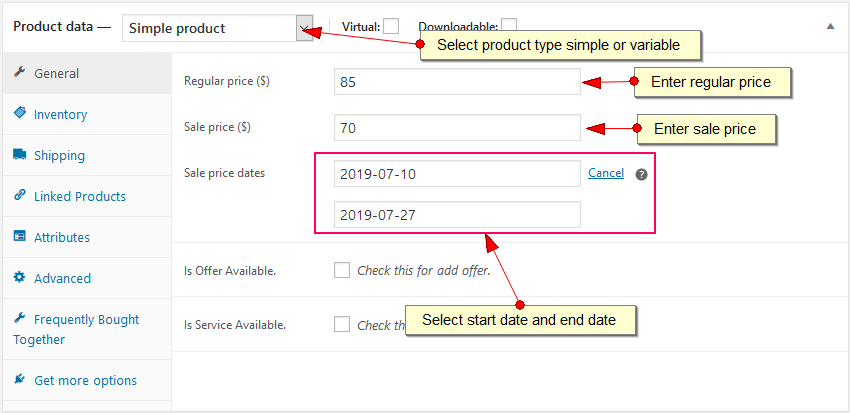
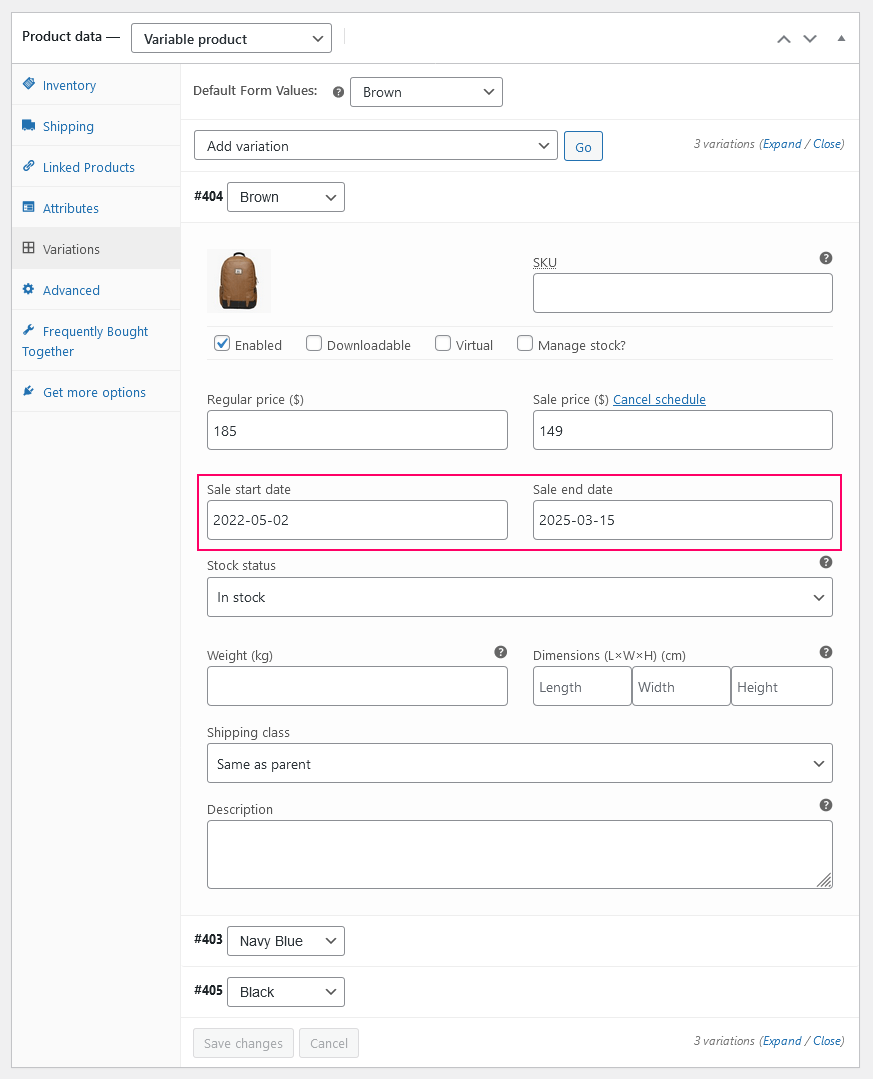
Product Countdown Timer
For simple product
For Variable product
Ask a Questions
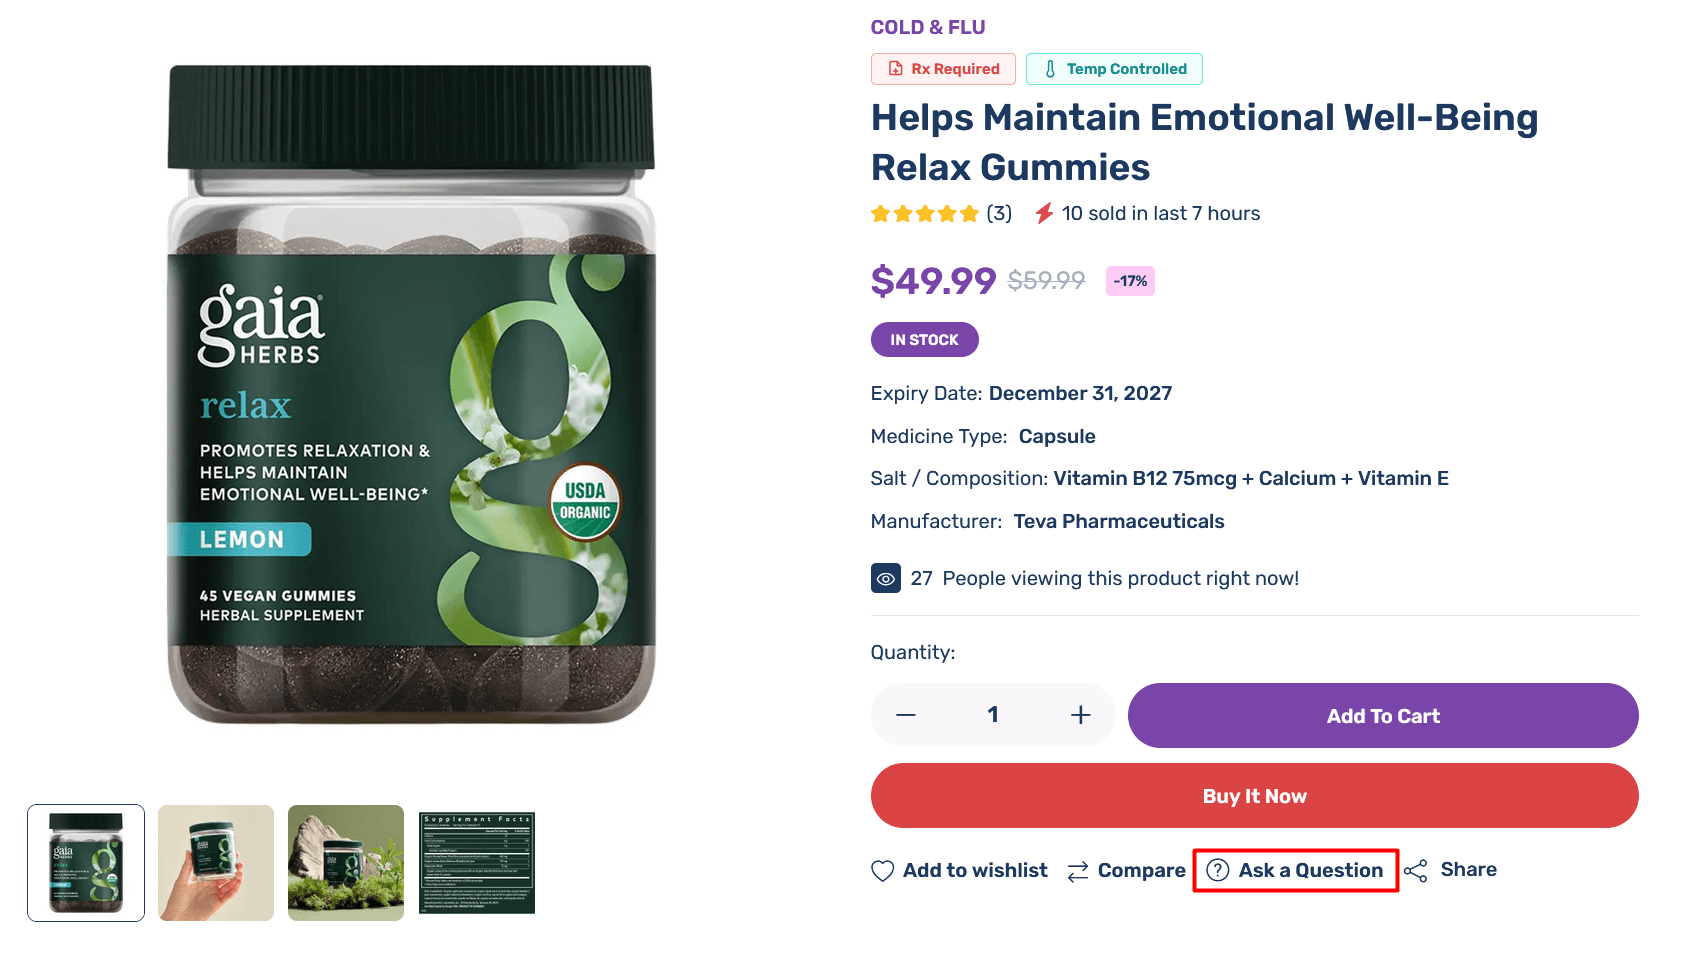
You can enable Ask a Questions feature from Xmedcar => Theme Options => Single Product => Advance Options. See below screenshot
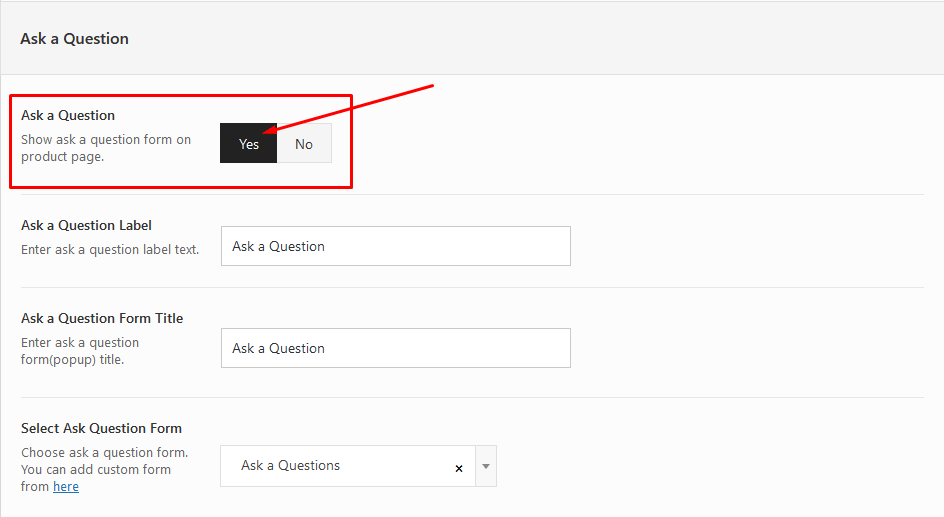
Ask a Questions Form
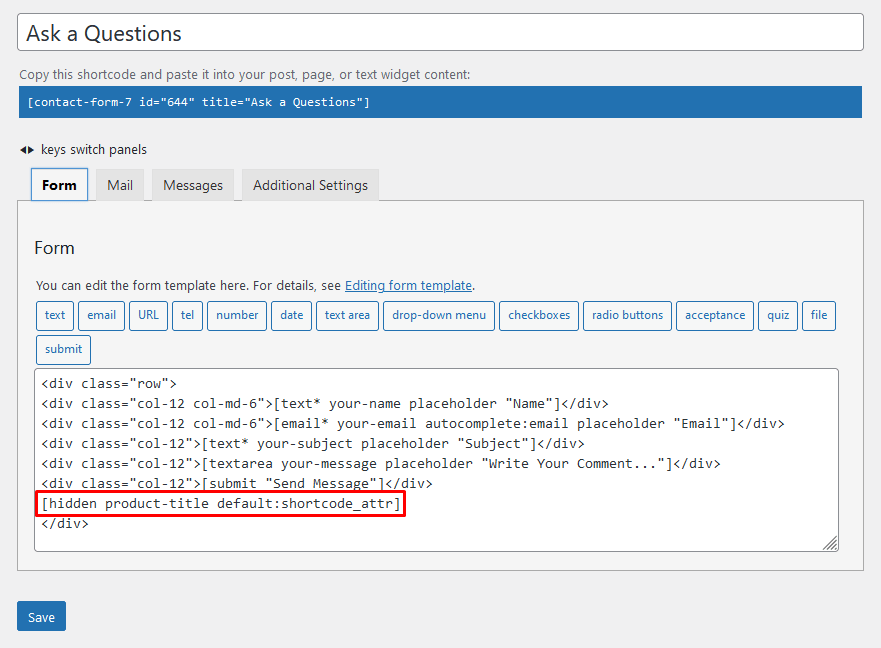
Form HTML
Here : [hidden product-title default:shortcode_attr] field for get current product title
Ask a Questions Mail Settings
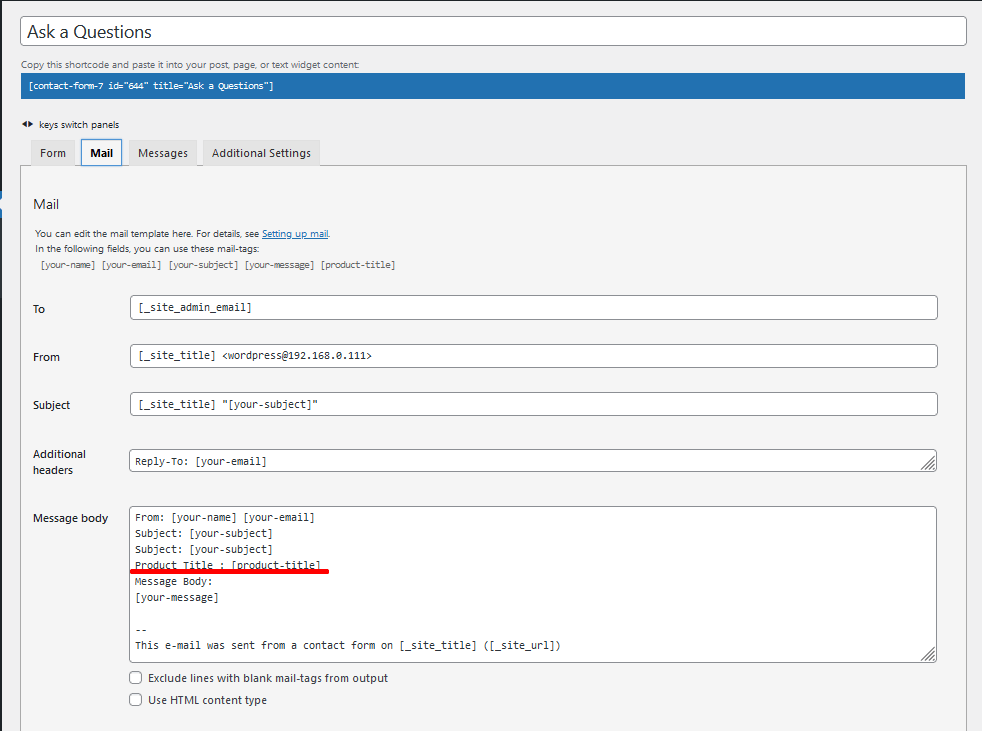
Use [product-title] tag for show display product title in mail.
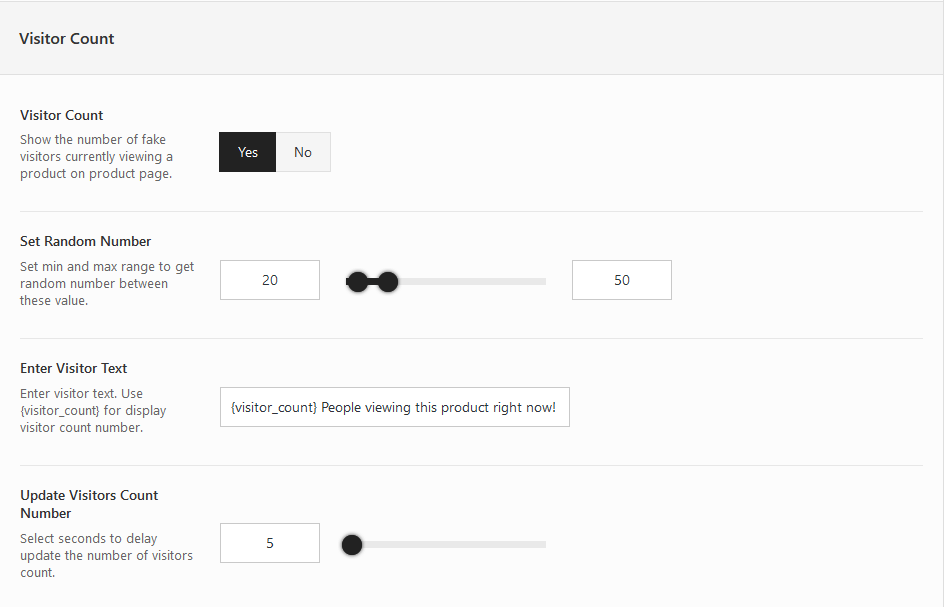
Visitor Count
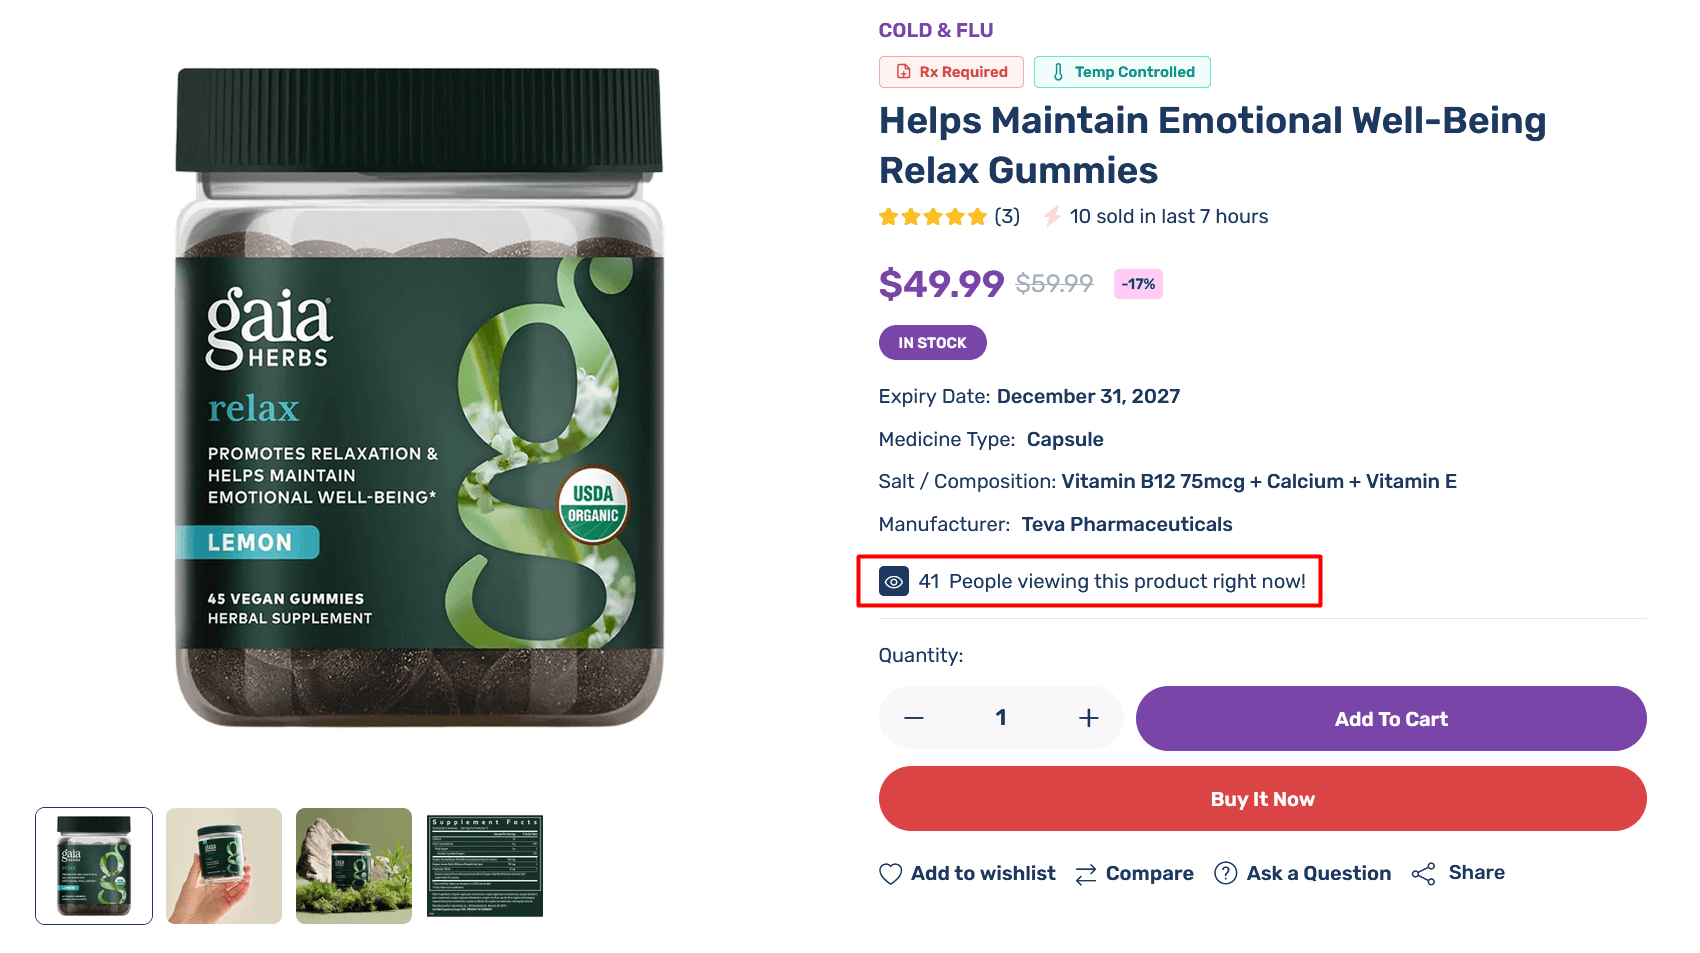
You can enable Visitor Count feature from Xmedcar => Theme Options => Single Product => Advance Options. See below screenshot
Pincode Checker
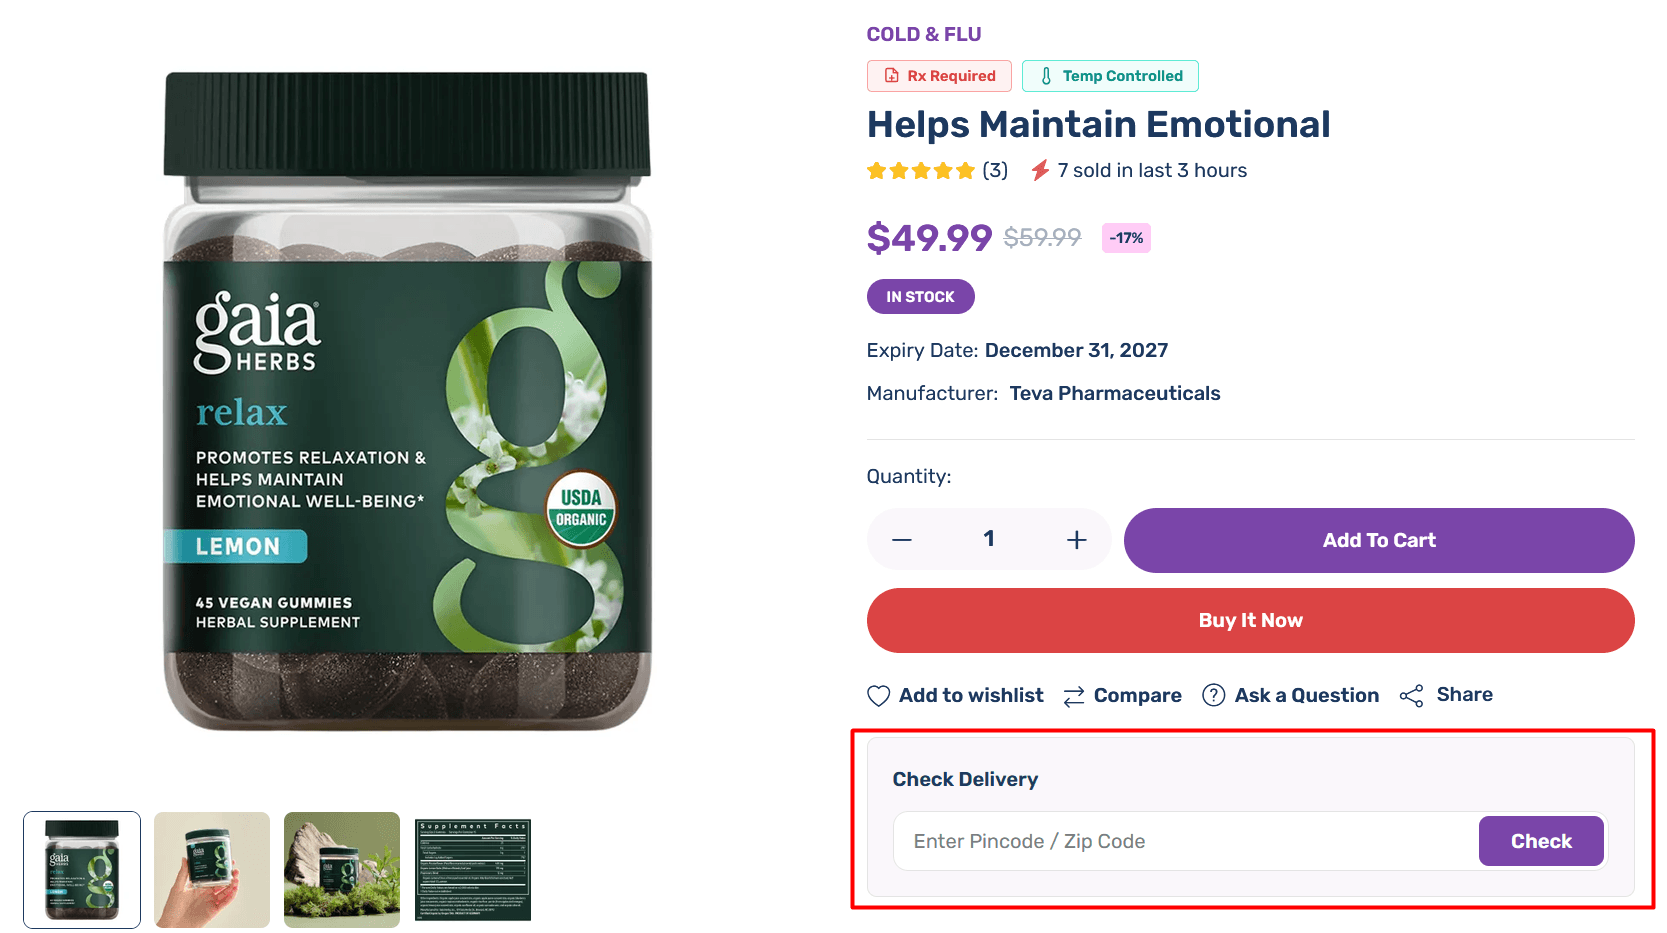
The Pincode Checker feature allows online customers to enter their postal code (pincode/zipcode) on product pages to verify delivery availability, estimated delivery days, and Cash on Delivery (COD) eligibility before placing an order.
Part 1: Configure Pincode Checker in Xmedcar Theme Options
-
Enable Feature Globally:
Go to Xmedcar => Theme Options => Single Product => Advance Options and switch Pincode Checker to Enable. -
Configure Serviceable Pincodes List & Messages:
In Theme Options => Single Product => Advance Options:- Success Message & Estimate: Enter delivery timeframe message (e.g., Delivery Available. Delivered within 2-4 business days).
- Unserviceable Pincode Error Notice: Enter error text shown for unserviced zip codes.
-
Frontend Checking:
A Check Delivery Pincode widget appears on product pages. Customers enter their zip code and click Check to instantly view delivery availability and estimated arrival times.
Part 2: Setup Serviceable Pincodes in WooCommerce Settings
-
Go to WooCommerce Shipping Settings:
Navigate to WooCommerce => Settings => Shipping => Shipping Zones. -
Add a Shipping Zone:
Click Add Shipping Zone (e.g., Zone Name: Express Delivery Zone). -
Limit Zone to Specific Postcodes:
Under Zone Regions, click Limit to specific postcodes. Enter your serviceable pincodes (one per line or comma-separated, e.g., 110001, 400001), ranges (90001...90050), or wildcards (700*). -
Add Shipping Methods & Save:
Click Add Shipping Method (e.g. Flat Rate or Free Shipping) and click Save Changes.
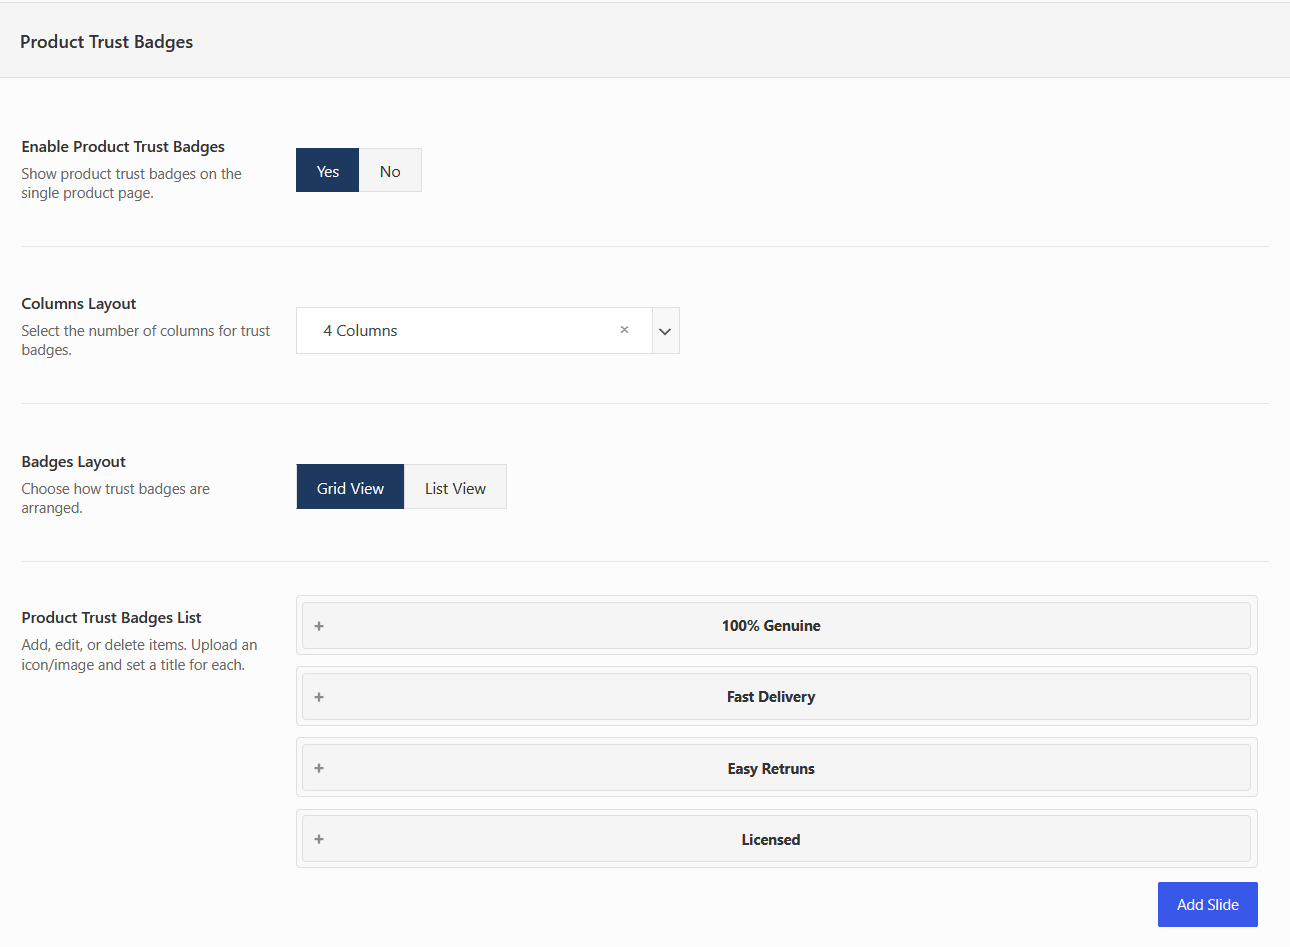
Product Trust Badges
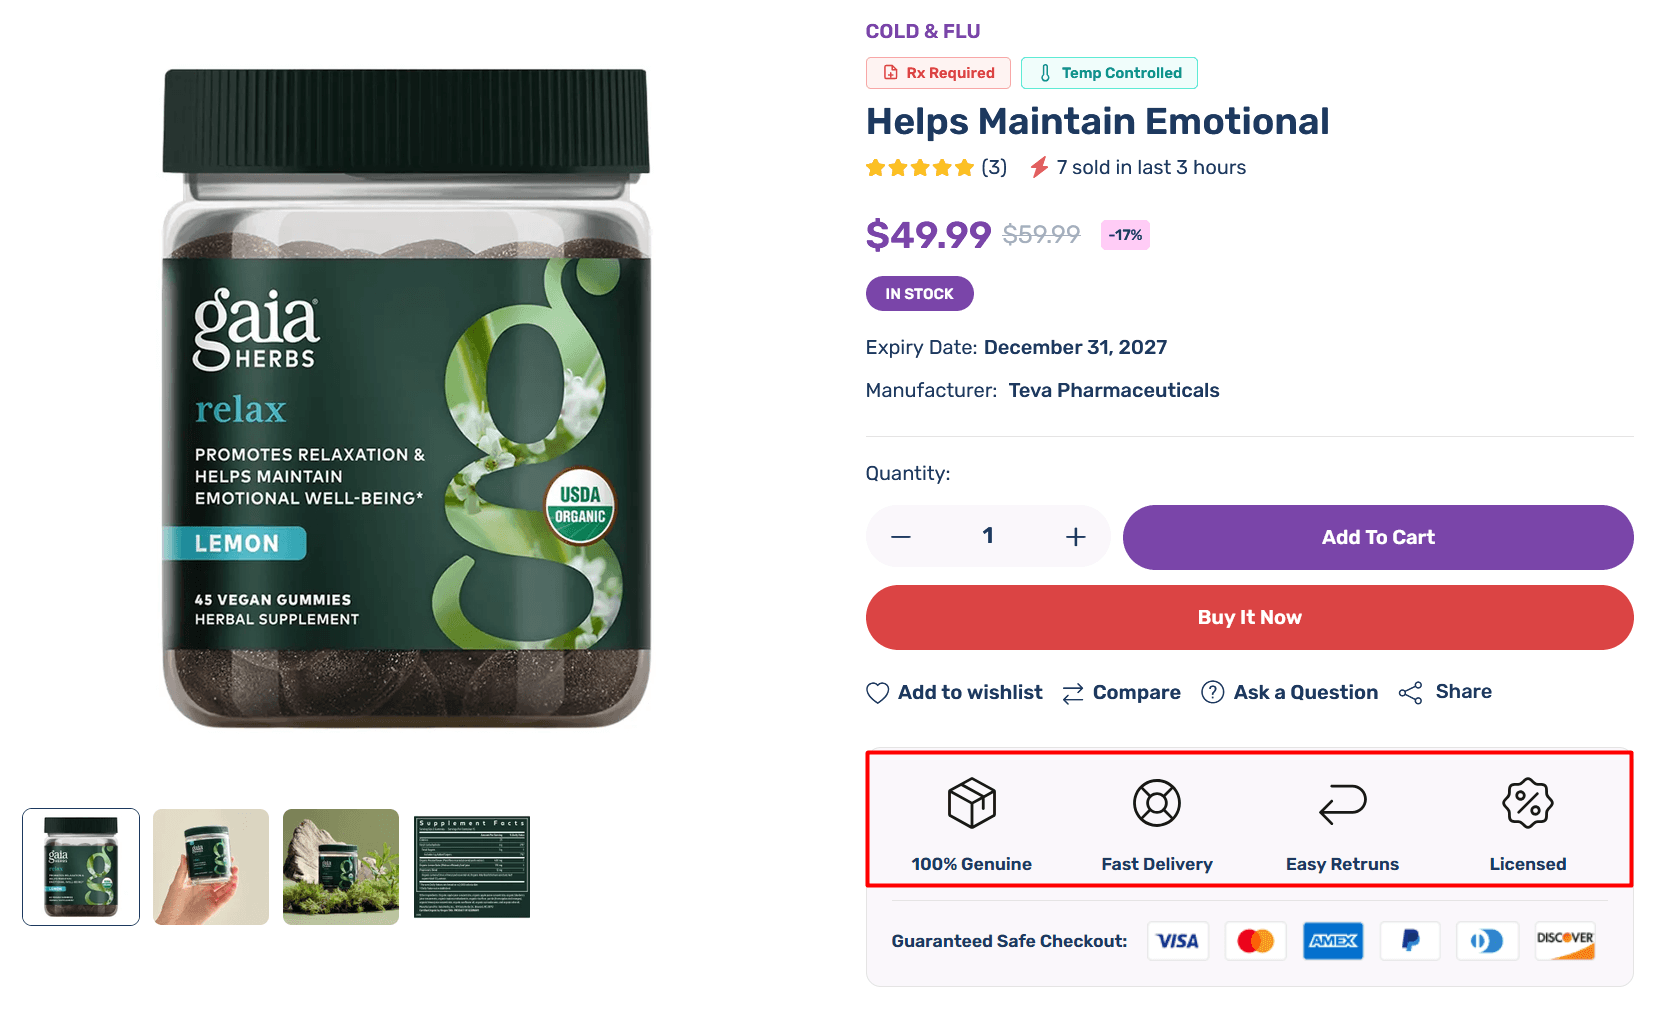
You can enable Product Trust Badges from Xmedcar => Theme Options => Single Product => Advance Options. See below screenshot
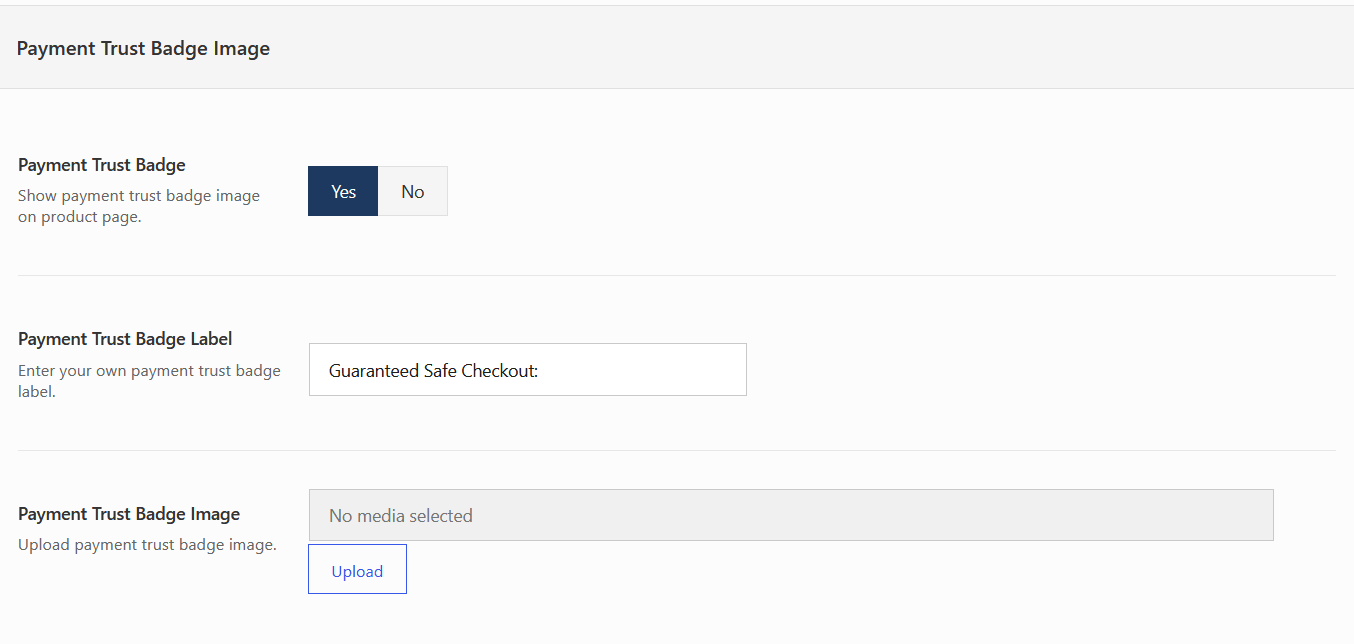
Payment Trust Badge Image
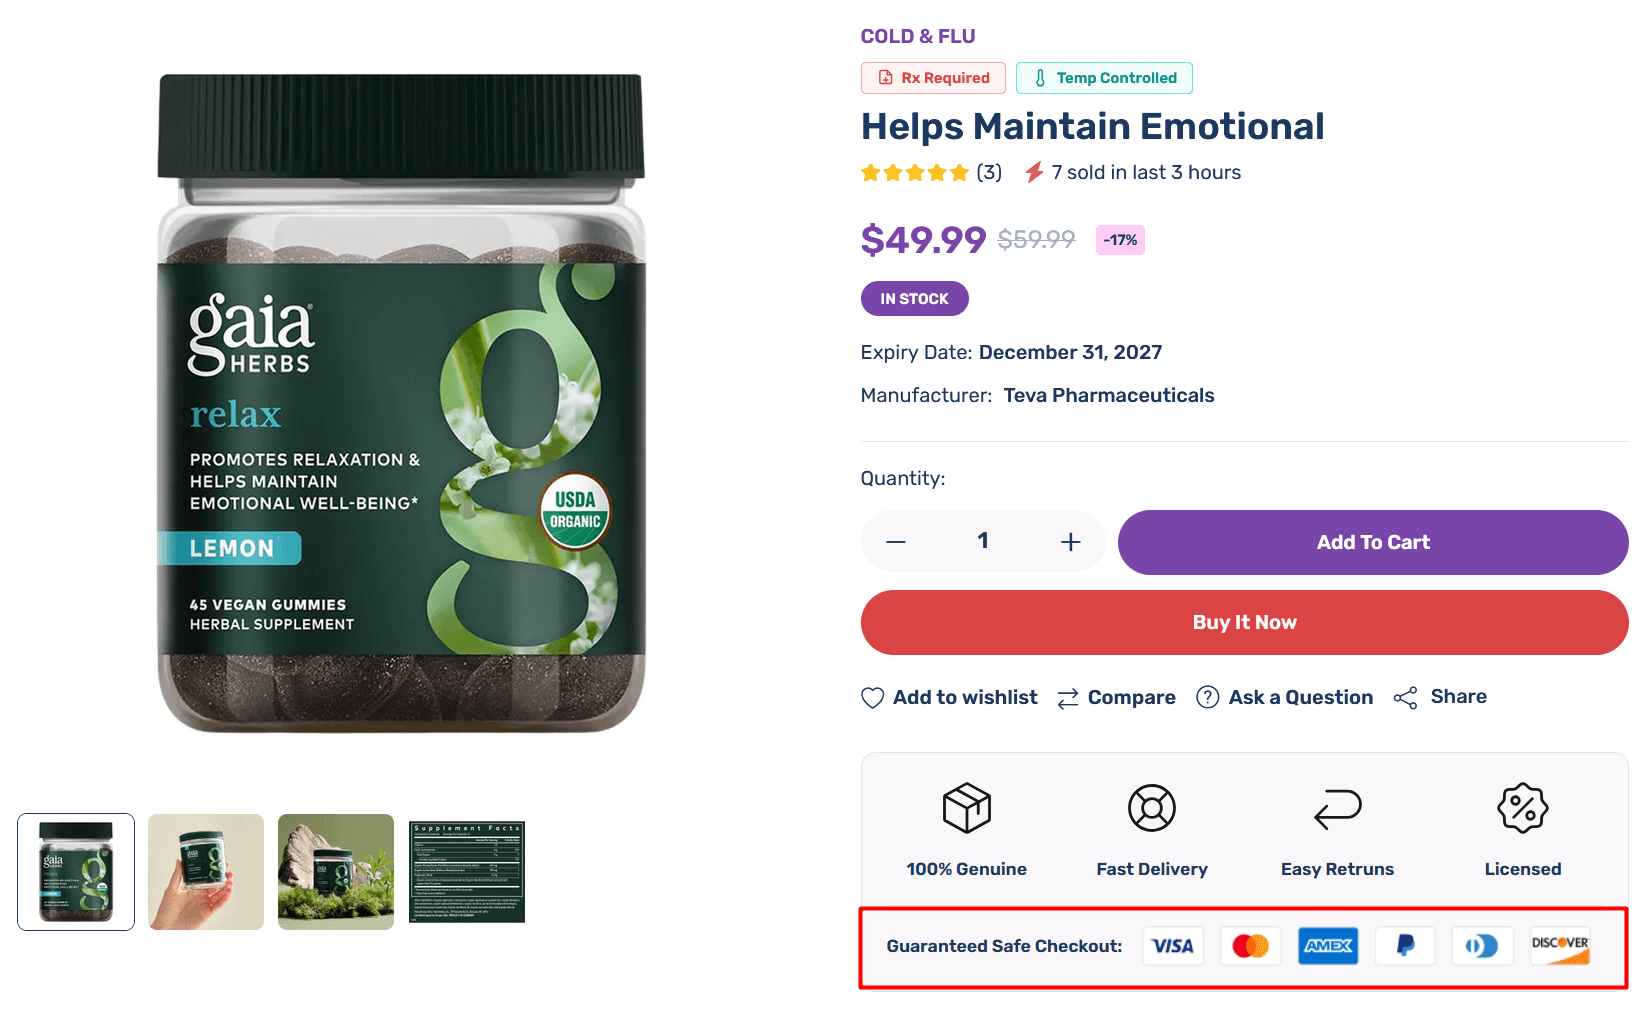
You can enable Payment Trust Badge Image from Xmedcar => Theme Options => Single Product => Advance Options. See below screenshot
Frequently Bought Together
The "Frequently Bought Together" feature increases average order value by recommending related products and add-ons directly on the single product page, allowing customers to add multiple items to their cart with a single click. Configuring this feature consists of two main parts:
Part 1: Enable Frequently Bought Together Globally
-
Log in to WordPress Dashboard:
Log in to your WordPress admin panel (e.g.,yoursite.com/wp-admin). -
Navigate to Theme Options:
Go to Xmedcar => Theme Options. -
Go to Single Product Options:
Navigate to the Single Product => Frequently Bought Together sub-tab. -
Enable and Locate:
Toggle **Frequently Bought Together** to Yes, customize the display title label (e.g., Frequently Bought Together), and choose the display location on the product page (e.g., Summary Bottom or Below Product Tabs). Save changes.
Part 2: Add Recommended Products to an Individual Item
-
Edit the Parent Product:
Go to Products => All Products and select the main product you want to edit. -
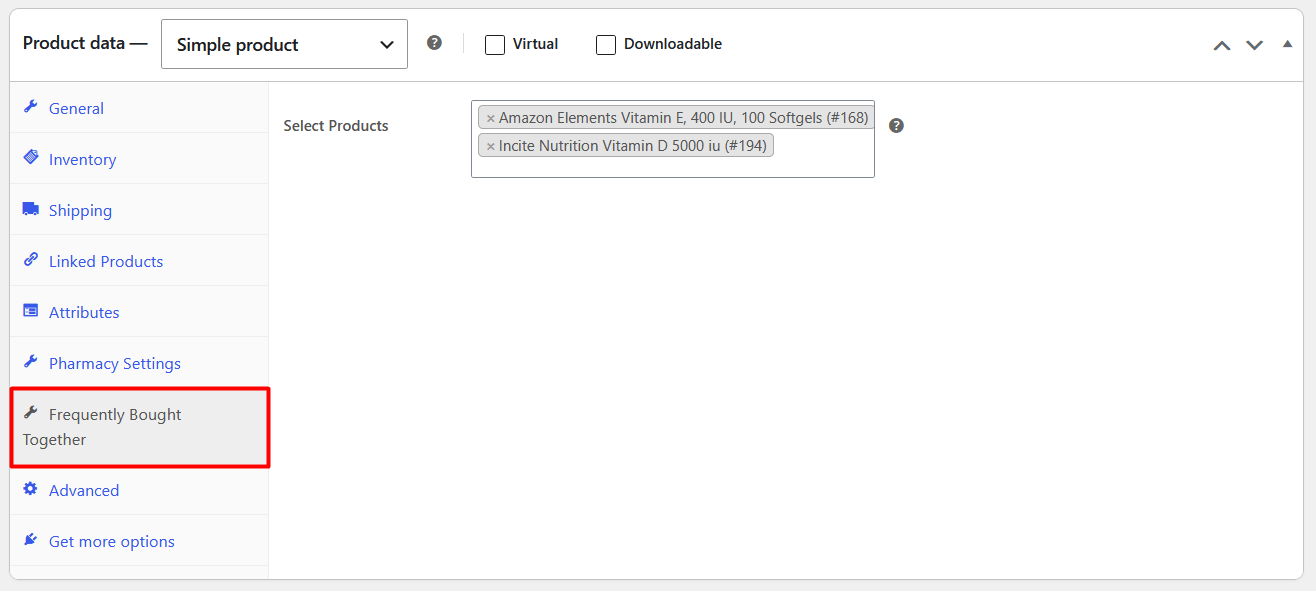
Access Bought Together Tab:
Scroll down to the Product Data panel and click on the Frequently Bought Together tab. -
Add Products:
In the search box, search for and select the related items you wish to recommend alongside this product. -
Update Product:
Click Update to save the changes and display the products group widget on the front end.
Configuring Bought Together Products in WooCommerce:
Product Image Size Settings
To ensure your product and catalog images look crisp, blur-free, and align perfectly inside grid loops, you can configure standard WooCommerce rendering dimensions and cropping rules.
Setup & Usage Guide:
-
Log in to WordPress Dashboard:
Log in to your WordPress admin panel (e.g.,yoursite.com/wp-admin). -
Open the Customizer:
Navigate to Appearance => Customize. -
Access WooCommerce Image Settings:
Click on the WooCommerce tab and select Product Images from the list. -
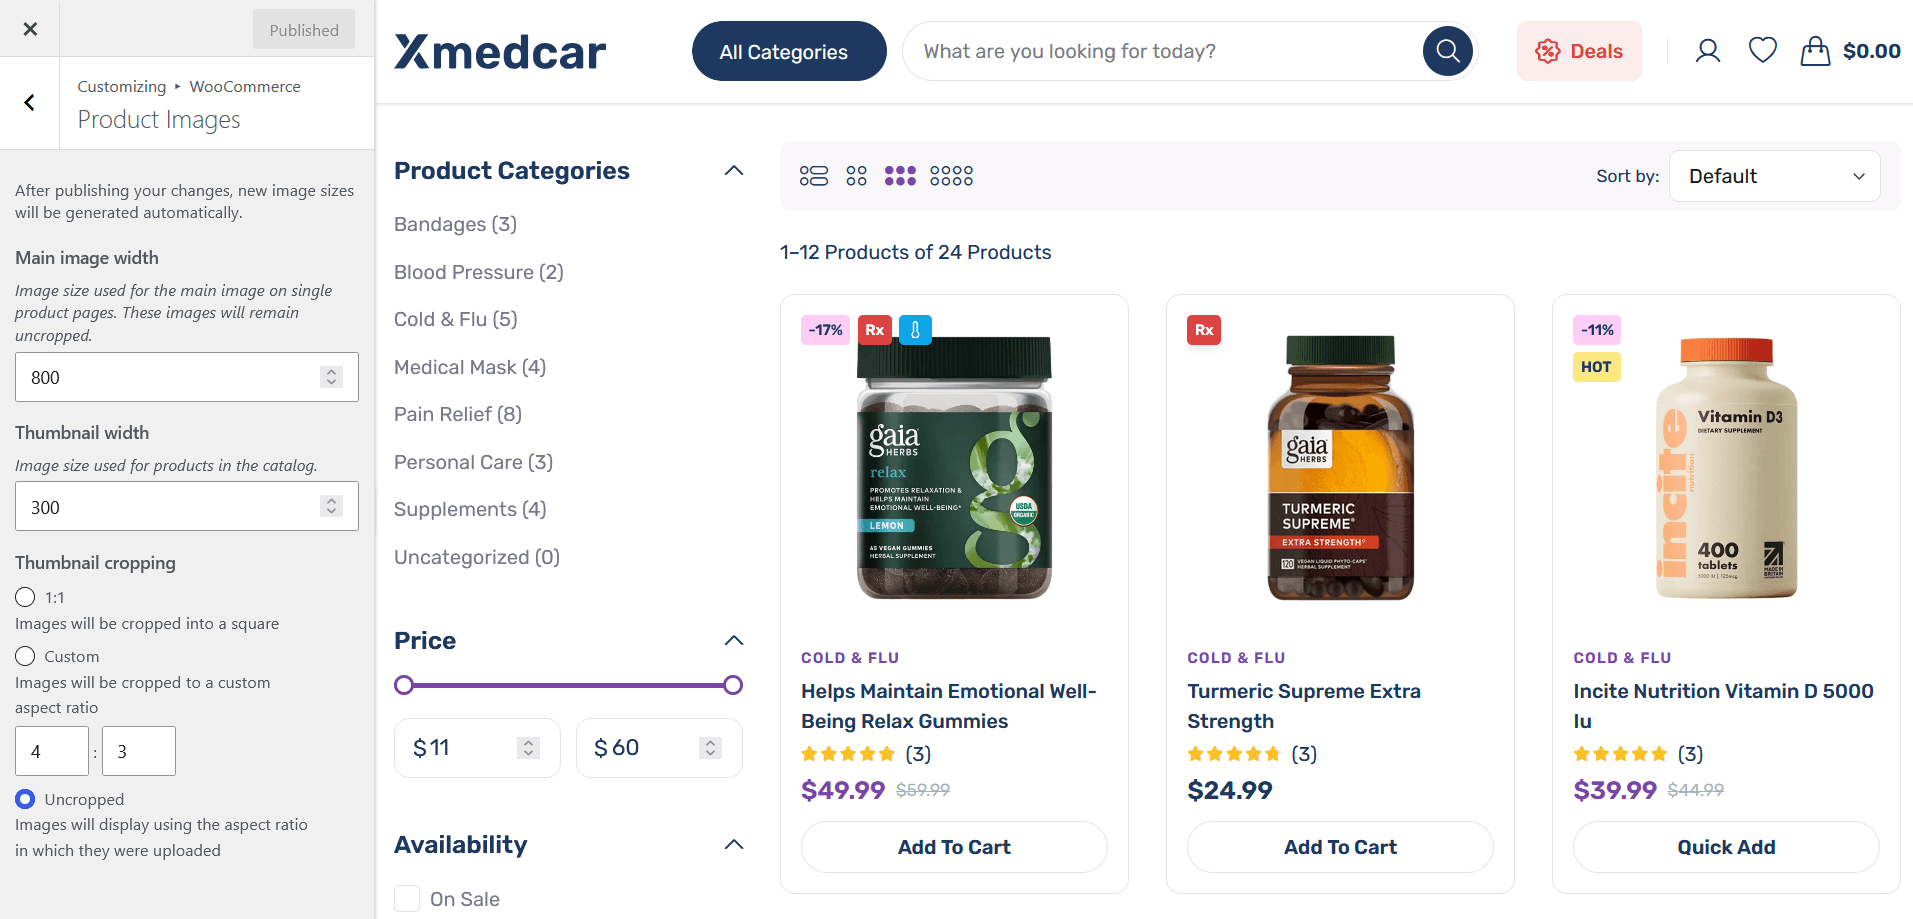
Set Main Image Width (Single Product Page):
Enter the rendering width of your main single product gallery image in the Main image width field (we recommend **800px** or higher to maintain clarity). -
Set Thumbnail Width (Shop Catalog & Grid Loops):
Enter the rendering width of thumbnails in the Thumbnail width field (we recommend **300px** or higher). -
Configure Thumbnail Cropping Options:
Choose the aspect ratio logic for catalog thumbnails:- 1:1 (Square): Crops images into a perfect square layout (highly recommended to maintain clean grid row alignments).
- Custom: Crops images according to a custom aspect ratio ratio (e.g., 4:3 or 16:9).
- Uncropped: Preserves original height/width proportions. (Note: Using different aspect ratios for uploaded images will result in uneven grid alignment on frontend catalog screens).
-
Publish Changes:
Click the blue Publish button at the top of the Customizer panel to make these settings live.
WooCommerce Product Image Size Customizer Settings:
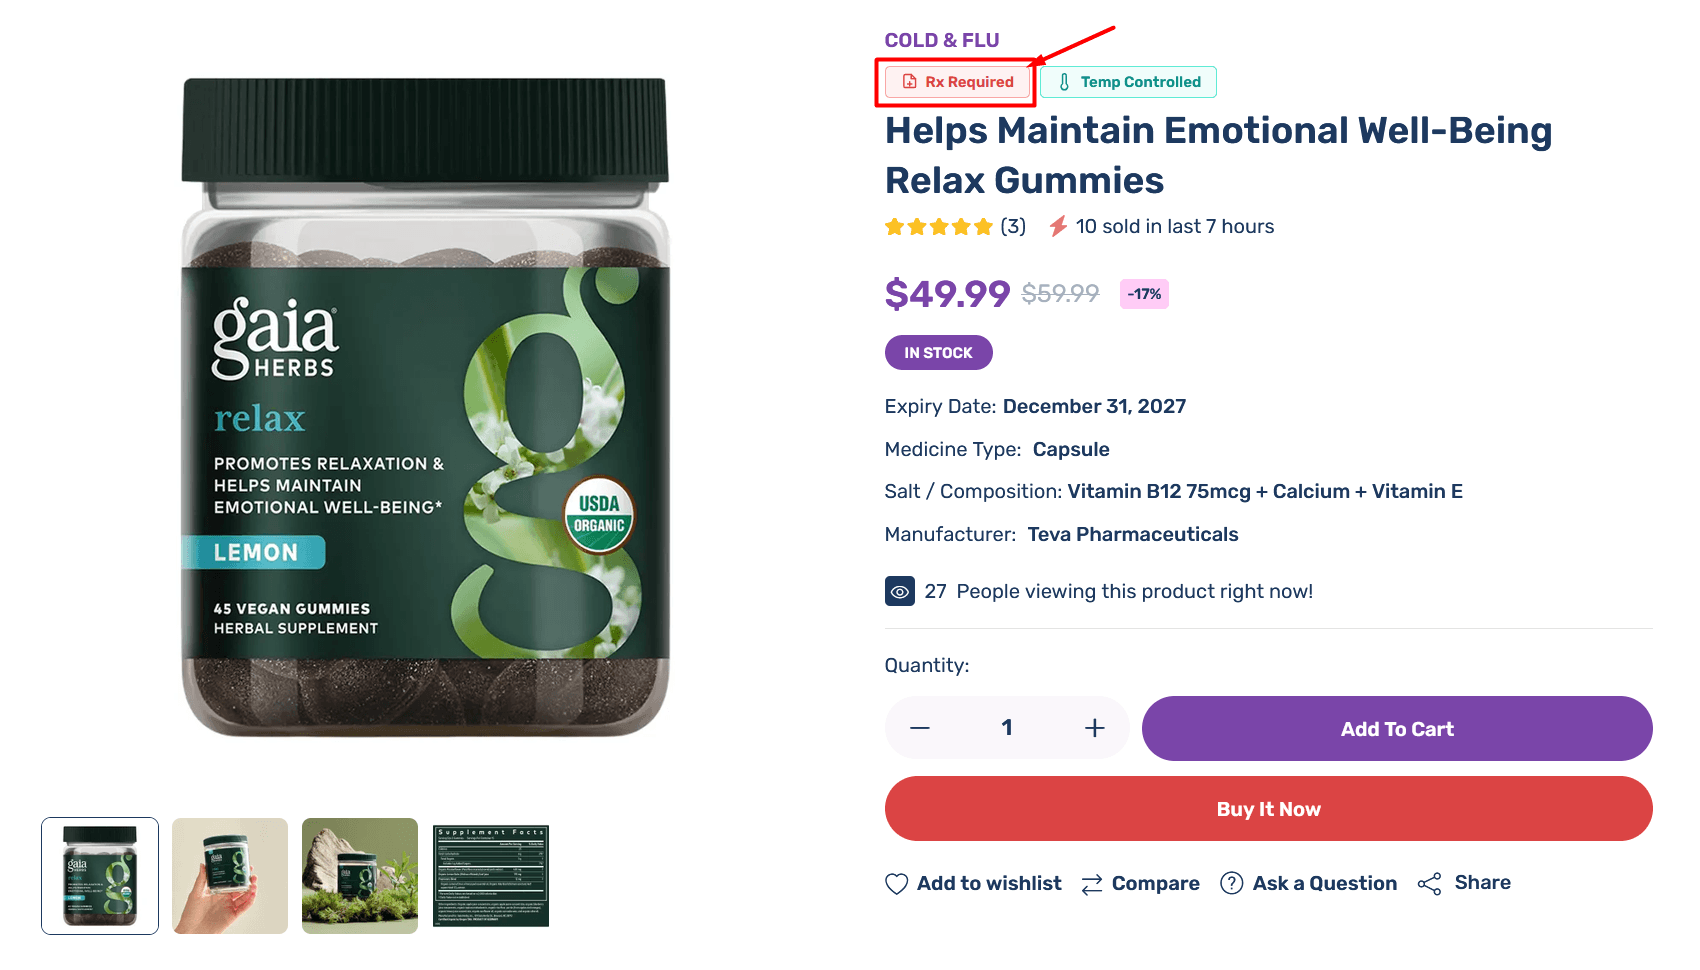
Prescription Badge (Rx Required)
The Prescription Badge feature allows store owners to mark specific medicines as requiring a valid doctor's prescription (Rx). When enabled, a visual badge is displayed across product catalog cards, single product pages, and search autocomplete results.
Setup & Usage Guide:
-
Enable Feature Globally in Theme Options:
Go to Xmedcar => Theme Options => Pharmacy Settings and switch the Prescription Badge option to Enable. -
Mark Products as Rx Required:
Go to Products => All Products => Edit Product. Scroll down to the Product Data panel, click the Pharmacy Settings tab, and check the Prescription Required (Rx) option. -
Frontend Badges & Search:
TheRx Requiredbadge will automatically display on shop catalog loop cards, single product badge container, and live AJAX search suggestions. -
Order & Prescription Management:
If prescription upload is enabled, customers can upload their prescription during purchase. Admin can view attached prescription documents directly under WooCommerce => Orders.
Prescription Upload
The Prescription Upload feature allows customers to upload their medical prescription document or image (JPG, PNG, PDF) on the checkout page when purchasing prescription-required (Rx) medicines, enabling store administrators to verify prescriptions prior to order fulfillment.
Workflow & Verification Logic
When a customer places an order containing prescription-required (Rx) products, an Upload Prescription file upload field displays on the checkout page. Once submitted, the uploaded prescription file is securely attached to the WooCommerce order metadata, allowing store administrators to inspect the document directly under order details.
Setup & Usage Guide:
-
Enable Feature Globally in Theme Options:
Go to Xmedcar => Theme Options => Pharmacy Settings and switch Prescription Upload to Enable. -
Configure Upload Settings:
Under Theme Options => Pharmacy Settings => Prescription Upload, configure permitted file formats (JPG, PNG, PDF) and maximum file size limits (MB). -
Frontend Customer Upload Flow:
The Upload Prescription file button displays on the checkout page during checkout. Customers upload their medical prescription file before placing the order. -
Admin Prescription Verification:
Go to WooCommerce => Orders => View Order. The attached prescription document link is displayed under order details for admin verification prior to order shipping.
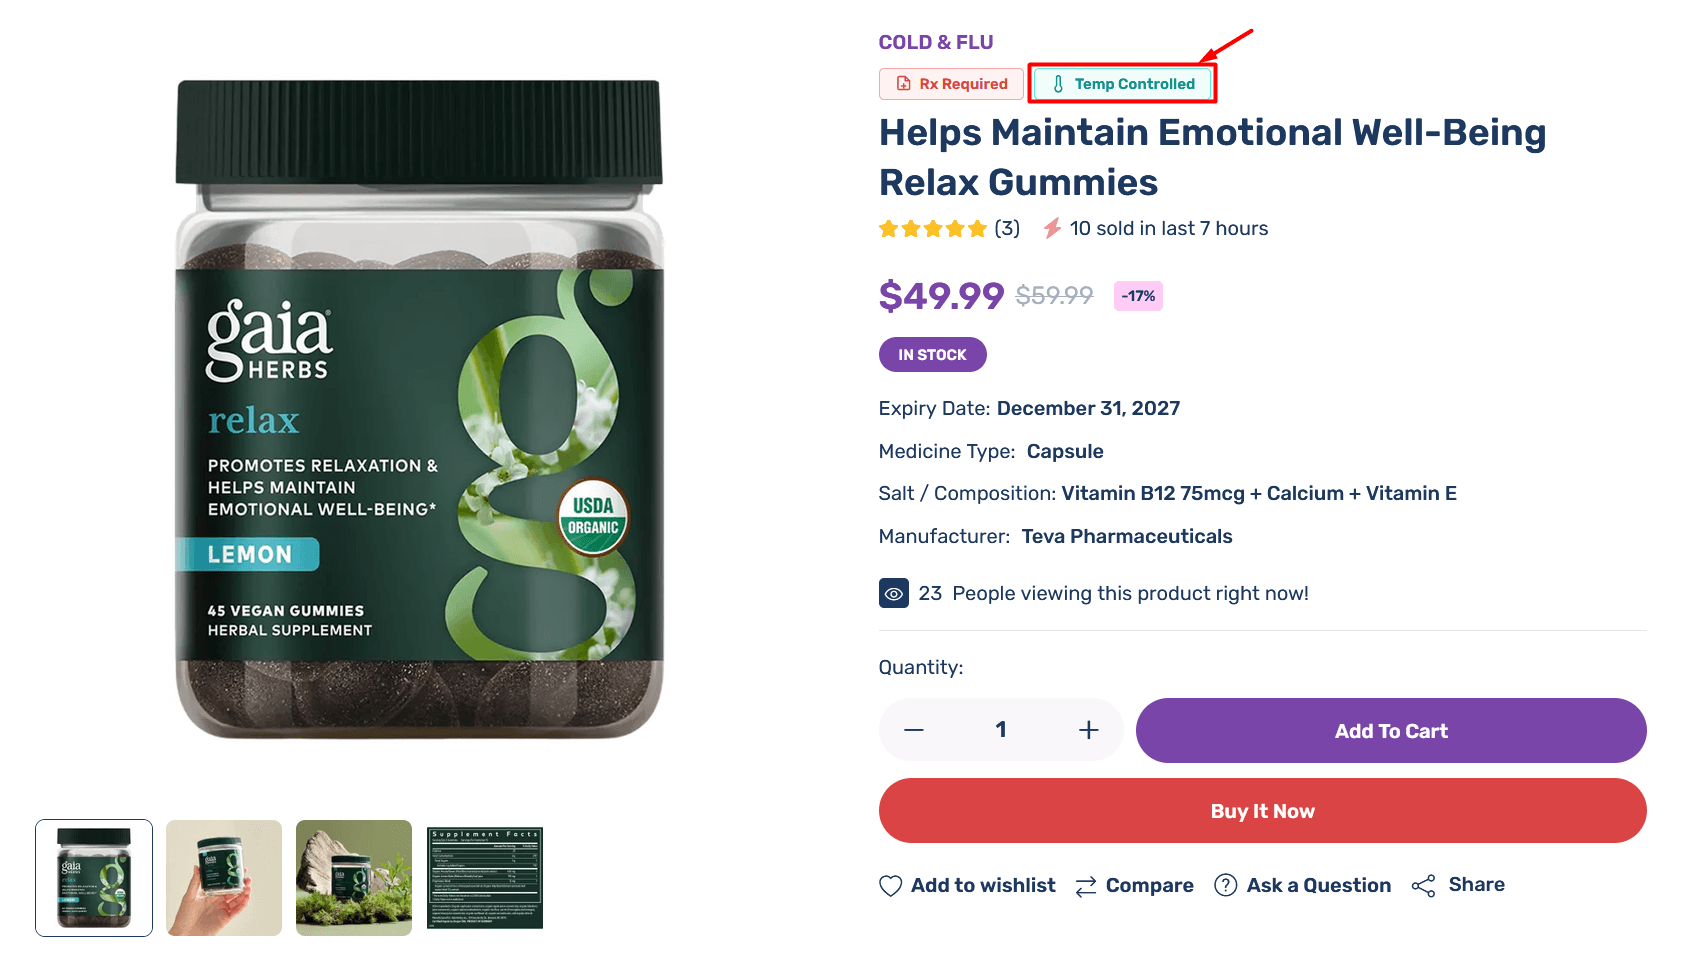
Temperature Controlled
The Temperature Controlled badge feature allows pharmacy store owners to mark temperature-sensitive medicines (such as insulin, vaccines, and cold-chain items) that require refrigerated storage or temperature-monitored shipping.
Setup & Usage Guide:
-
Enable Feature Globally in Theme Options:
Go to Xmedcar => Theme Options => Pharmacy Settings and switch the Temperature Controlled option to Enable. -
Mark Products as Temperature Controlled:
Go to Products => All Products => Edit Product. Scroll down to the Product Data panel, click the Pharmacy Settings tab, and check the Temperature Controlled option. -
Frontend Badges Presentation:
TheTemperature Controlledbadge will automatically display on shop catalog loop cards and the single product page badge container, informing customers of special handling requirements.
Expiry Date
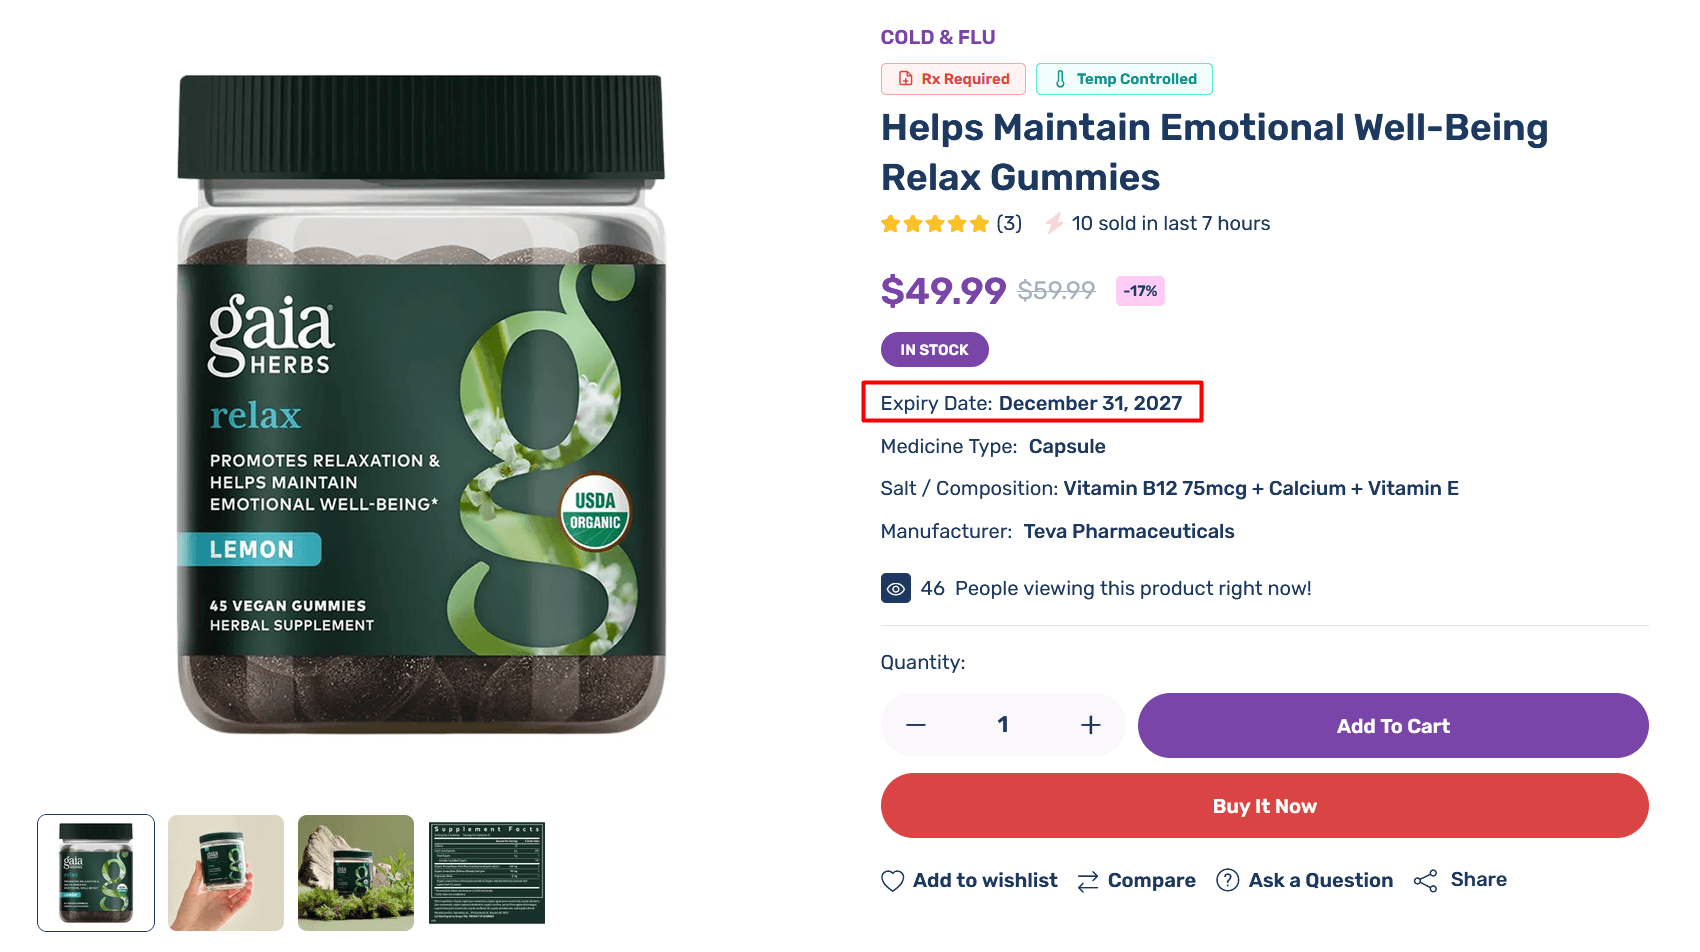
The Expiry Date feature allows store owners to set expiration dates for medicines, display expiry information to customers, trigger near-expiry warnings, and automatically manage or hide expired products.
Setup & Usage Guide:
-
Enable Feature Globally in Theme Options:
Go to Xmedcar => Theme Options => Pharmacy Settings and switch the Expiry Date option to Enable. -
Configure Expiry Date Options:
Under Theme Options => Pharmacy Settings => Expiry Date:- Show Expiry Date: Display medicine expiration date on single product pages.
- Near-Expiry Warning: Show a warning alert when a medicine is close to its expiry date.
- Near-Expiry Threshold (Days): Set the threshold (e.g., 30 days) before expiry to trigger the notice.
- Auto Hide Expired Medicines: Automatically hide expired products from shop catalog pages.
-
Assign Expiry Date to Products:
Go to Products => All Products => Edit Product. Scroll down to Product Data => Pharmacy Settings and enter the expiration date in the Expiry Date field. -
Frontend Alerts & Filtering:
The expiration date is displayed on the product page. Near-expiry items will show a warning alert box, and expired products are automatically hidden from catalog listings if configured.
Medicine Type
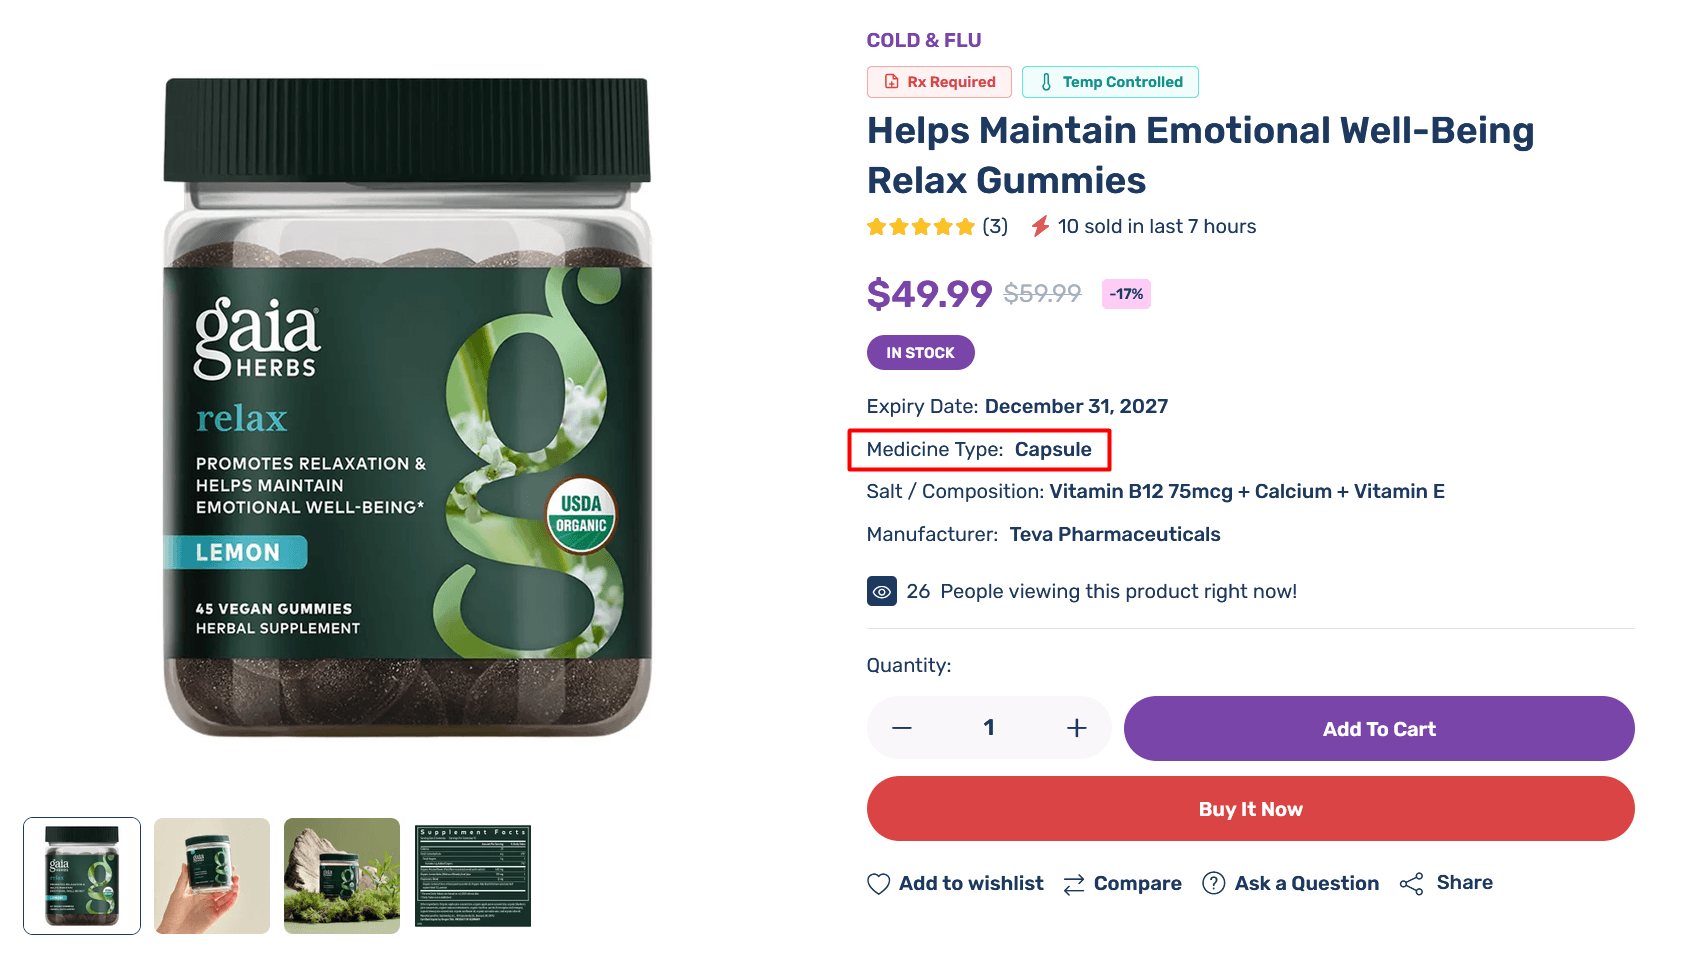
The Medicine Type feature allows store owners to classify medicines by dosage form (such as Tablet, Capsule, Syrup, Injection, Ointment, Drops, etc.) and allow customers to filter products by dosage type.
Setup & Usage Guide:
-
Enable Feature Globally in Theme Options:
Go to Xmedcar => Theme Options => Pharmacy Settings and switch Medicine Type to Enable. -
Configure Medicine Type Options:
Under Theme Options => Pharmacy Settings => Medicine Type, set Show Medicine Type to Yes. -
Create Medicine Types:
Go to Products => Medicine Types (taxonomy menu) and add dosage categories such as Tablet, Syrup, Capsule, Injection, Drops, etc. -
Assign Medicine Type to Products:
Go to Products => All Products => Edit Product. Scroll down to Product Data => Pharmacy Settings tab and select the dosage form from the Medicine Type dropdown. -
Shop Sidebar Filter Widget:
Add thePLS: Medicine Type Filterwidget to your Shop Sidebar under Appearance => Widgets to enable sidebar filtering by dosage type with live product counts.
Generic & Branded Medicines
The Generic & Branded Medicines feature allows store owners to classify products as Generic or Branded medicines, display custom colored badges on product cards, recommend lower-cost generic or brand-name alternatives, and enable shop sidebar filtering by category.
Matching & Recommendation Logic
When viewing a product page, the system displays the Generic / Branded Alternatives section based on two matching strategies:
- Manual Selection: Explicitly assigned alternative products in the
Generic Alternatives / Equivalent Productssetting take top priority. - Automatic Salt Composition Match: If no manual alternatives are selected, the system automatically searches for products sharing the exact same active chemical composition (Salt / Composition) that belong to the opposite category (e.g., suggesting Generic alternatives for a Branded medicine).
Setup & Usage Guide:
-
Enable Feature Globally in Theme Options:
Go to Xmedcar => Theme Options => Pharmacy Settings and switch Generic & Branded Medicines to Enable. -
Configure Generic & Branded Settings:
Under Theme Options => Pharmacy Settings => Generic & Branded Medicines:- Product Badges: Toggle Generic & Branded badges on product loop cards and product details.
- Badge Text & Colors: Customize badge labels (default: Generic, Branded) and custom background colors.
- Show Alternatives Section: Display the Generic/Branded Alternatives carousel on single product pages.
-
Assign Category & Alternatives to Products:
Go to Products => All Products => Edit Product. Scroll down to Product Data => Pharmacy Settings tab:- Select Medicine Category (Generic Medicine or Branded Medicine).
- Optionally choose specific products in Generic Alternatives / Equivalent Products.
-
Shop Sidebar Filter Widget:
Add thePLS: Generic & Branded Filterwidget to your Shop Sidebar under Appearance => Widgets to allow customers to filter products by category (List or Dropdown format) with live product counts.
Salt / Composition
The Salt / Composition feature allows store owners to record active drug ingredients and strengths (e.g. Paracetamol 500mg + Caffeine 30mg) for medicine products. This powers product detail displays, substitute medicine matching, and shop sidebar filtering.
Setup & Usage Guide:
-
Enable Feature Globally in Theme Options:
Go to Xmedcar => Theme Options => Pharmacy Settings and switch Salt/Composition to Enable. -
Configure Salt/Composition Settings:
Under Theme Options => Pharmacy Settings => Salt/Composition, set Show Salt/Composition to Yes. -
Assign Salt / Composition to Products:
Go to Products => All Products => Edit Product. Scroll down to Product Data => Pharmacy Settings tab and enter active ingredients into the Salt / Composition field. -
Substitute Matching & Sidebar Filter Widget:
Assigned salts are displayed on the product page and automatically match equivalent substitute medicines. Add thePLS: Composition Filterwidget to your Shop Sidebar under Appearance => Widgets to enable filtering by active ingredient.
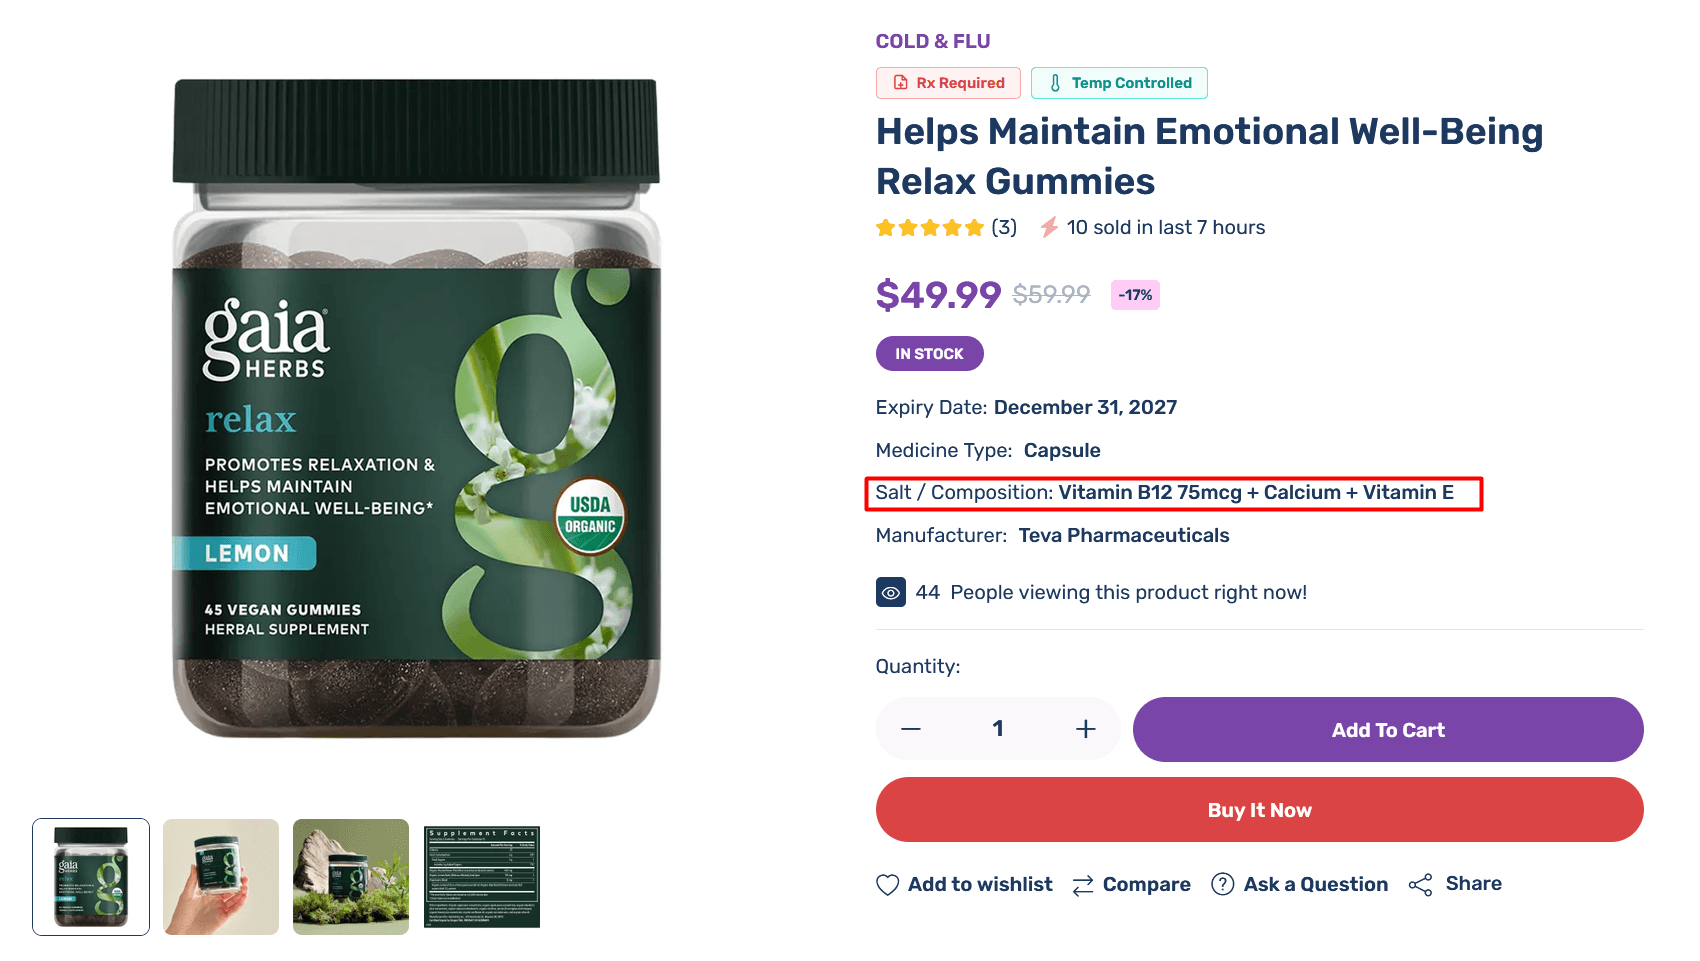
Manufacturer(Product Brand)
The Manufacturer feature allows store owners to record and display pharmaceutical company/brand details (such as Pfizer, Bayer, Cipla, etc.) on single product pages and allow customers to filter shop items by manufacturer brand.
Setup & Usage Guide:
-
Enable Feature Globally in Theme Options:
Go to Xmedcar => Theme Options => Pharmacy Settings and switch Manufacturer Name to Enable. -
Assign Manufacturer to Products:
Go to Products => All Products => Edit Product. Look at the right sidebar the Brands meta box.Check the box next to the brand name and save product. -
Frontend Presentation & Brand Filter Widget:
The manufacturer name displays in product summary metadata, and company details display in product details. Add thePLS: Products Brandwidget to your Shop Sidebar under Appearance => Widgets to enable brand filtering.
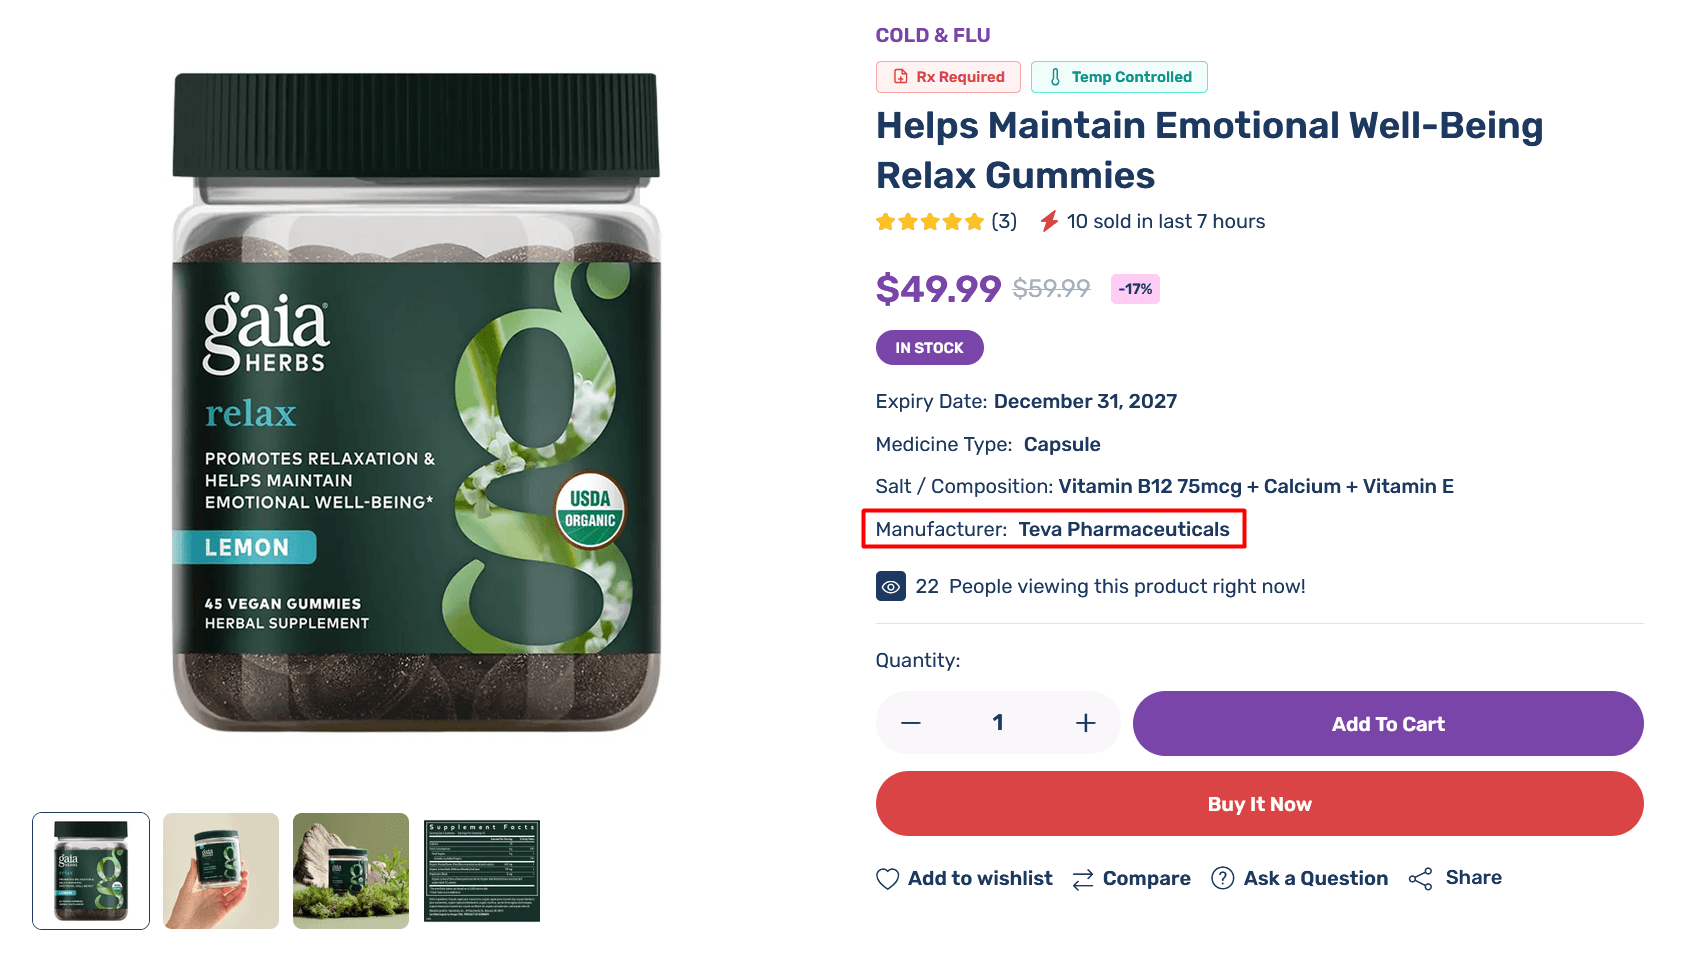
Manufacturer Information
The Manufacturer Information feature allows store owners to display pharmaceutical company/brand details on single product pages.
Setup & Usage Guide:
-
Configure Manufacturer Options:
Under Theme Options => Pharmacy Settings => Manufacturer:- Show Manufacturer Name: Display manufacturer brand name on single product pages.
- Show Manufacturer Information: Display detailed company overview and address details.

Subscription (Subscribe & Save)
The Medicine Subscription feature provides an automated Subscribe & Save recurring refill system designed for chronic and regular prescription medicines (such as 30-day, 60-day, 90-day, or 120-day delivery cycles).
Subscription Workflow & Logic
On eligible product pages, customers can choose between a standard One-Time Purchase or a discounted Subscribe & Save plan. Subscribers receive recurring deliveries at selected intervals, automated email renewal reminders, and can manage or pause subscriptions from their My Account dashboard.
Setup & Usage Guide:
-
Enable Feature Globally in Theme Options:
Go to Xmedcar => Theme Options => Pharmacy Settings and switch Medicine Subscription to Enable. -
Configure Subscription Plans & Discounts:
Under Theme Options => Pharmacy Settings => Medicine Subscription:- Apply Products for Subscription: Choose eligibility (All Products, Selected Categories, or Selected Products Only).
- Configure Plans & Discounts: Enable supply cycles (30, 60, 90, 120 Days) and set discount percentages for each plan.
- "Subscribe & Save" Badge: Display savings highlight badges (e.g. Save up to 15%).
- Subscription Reminders: Enable automatic pre-renewal notification emails (e.g. 3 days before renewal).
-
Configure Product Eligibility:
If subscription scope is set to selected categories or products, assign subscription options under Products => All Products => Edit Product => Product Data => Pharmacy Settings. -
Customer Subscription Management (My Account => Subscriptions):
Customers can log into their account dashboard and navigate to My Account => Subscriptions to view active recurring refills, check upcoming delivery/renewal dates, pause recurring deliveries, resume paused refills, or cancel an active subscription anytime. -
Store Admin Management (WooCommerce => Medicine Subscription):
Store administrators can monitor and manage all customer subscriptions by going to WooCommerce => Medicine Subscription in WordPress Admin. Admins can view subscriber details, upcoming renewal dates, active/paused statuses, and manage recurring refill orders.
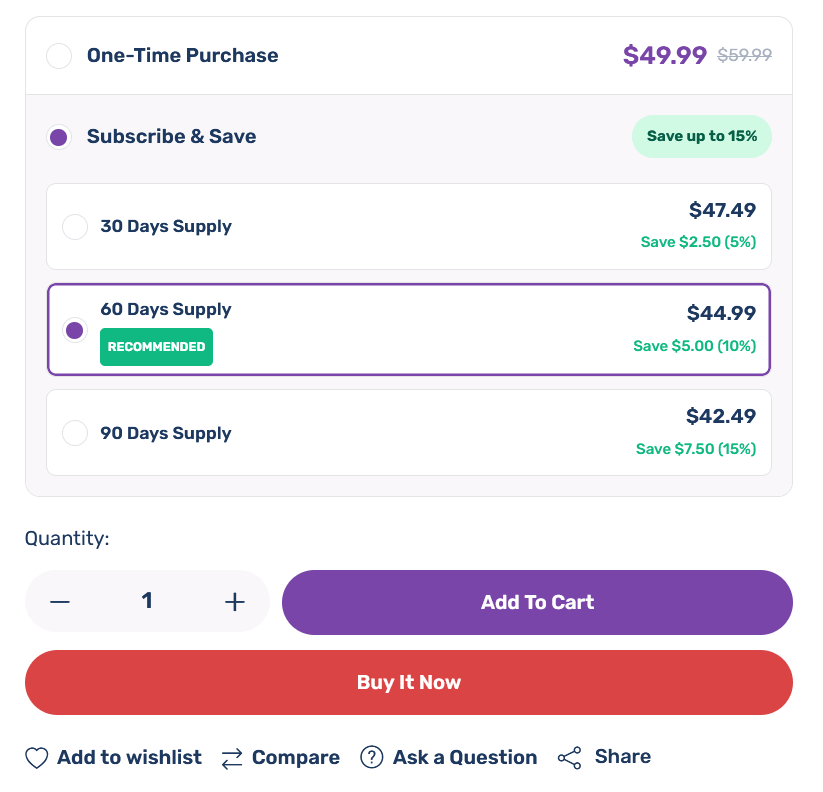
Medicine Info tabs
The Medicine Info tabs feature allows pharmacy store owners to display structured medical details—such as Uses & Benefits, Side Effects, How to Use, and Safety Precautions—in custom product tabs on single product pages.
Setup & Usage Guide:
-
Enable Feature Globally in Theme Options:
Go to Xmedcar => Theme Options => Pharmacy Settings and switch Medicine Info tabs to Enable. -
Enter Medical Details on Product Edit Page:
Go to Products => All Products => Edit Product. Scroll down to Product Data => Pharmacy Settings tab and fill in fields for Uses/Benefits, Side Effects, Directions for Use, and Safety Advice. -
Frontend Tab Display:
Structured medical tabs (Uses & Benefits, Side Effects, Directions for Use, Safety Advice) will automatically render on the single product page alongside standard product description tabs.
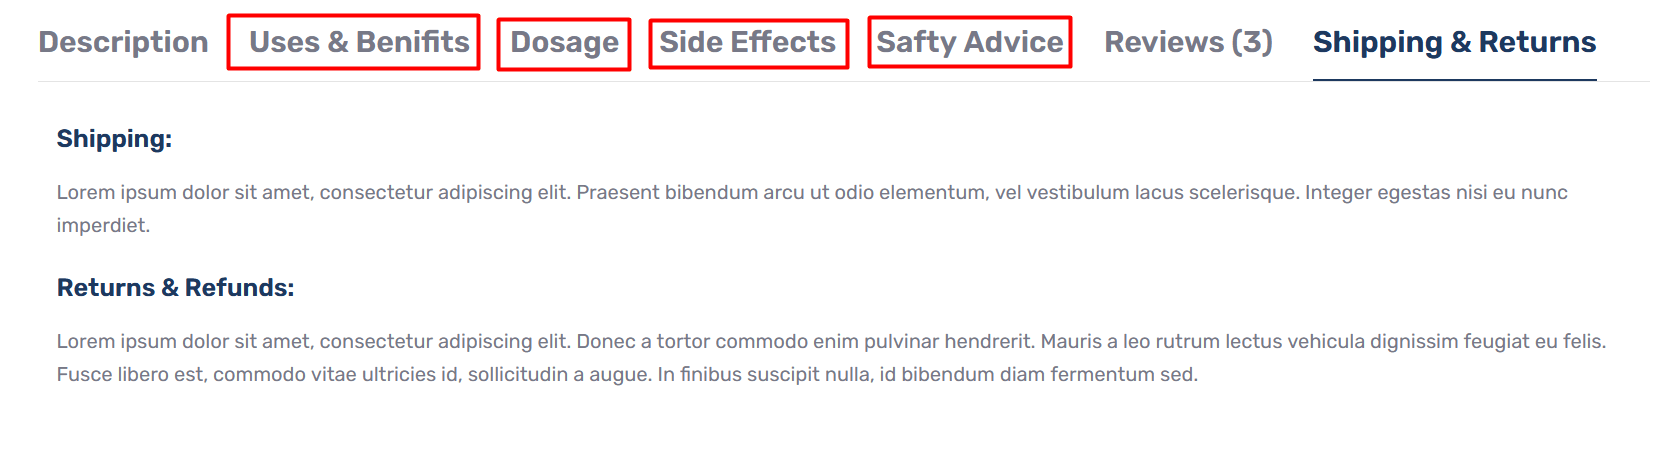
Manufacturer Infromation
You can enable Manufacturer Infromation from Xmedcar => Theme Options => Pharmacy Settings. See below screenshot


Medical Disclaimer
The Medical Disclaimer feature displays a prominent legal and medical advisory notice on product pages to inform customers that site content is for educational purposes and does not replace professional medical diagnosis or treatment.
Setup & Usage Guide:
-
Enable Feature Globally in Theme Options:
Go to Xmedcar => Theme Options => Pharmacy Settings and switch Medical Disclaimer to Enable. -
Customize Disclaimer Text:
Under Theme Options => Pharmacy Settings => Medical Disclaimer, enter your custom legal disclaimer statement in the text area. -
Frontend Presentation:
A styled notice box automatically renders on single product pages, ensuring medical compliance and legal protection.

Order via Prescription
The Order via Prescription feature provides a quick-order system allowing patients to upload their doctor's prescription directly via a dedicated header button, without manually searching for individual products.
Workflow & Order Conversion Logic
Patients click the Order via Prescription button in the header, taking them directly to the prescription submission page. Administrator review the uploaded doctor's prescription, convert the request into a WooCommerce order with prescribed products, and notify the customer to complete payment online.
Setup & Usage Guide:
-
Enable Feature Globally in Theme Options:
Go to Xmedcar => Theme Options => Pharmacy Settings and switch Enable Order via Prescription to Enable. -
Configure Security & Upload Options:
Under Theme Options => Pharmacy Settings => Order via Prescription:- Google reCAPTCHA: Enable reCAPTCHA protection and enter Site Key & Secret Key to prevent spam.
- Rate Limit & Max Upload Size: Set maximum upload file size (e.g. 5MB) and rate limits.
- Custom Labels: Set custom header button label (default: Order via Prescription) and submit button label (default: Upload & Order).
-
Frontend Header Button & Patient Submission:
Patients click the Order via Prescription button in the website header (linking directly to the Order via Prescription page). They attach their doctor's prescription image/document (PNG, JPEG, PDF), fill the contact details, and submit the request. -
Frontend Customer Tracking (My Account => Prescription Orders):
Logged-in customers can track submitted requests under My Account => Prescription Orders. They can view request statuses (Pending Review, Order Created), download uploaded prescription files, and click Pay Now once their request is converted into an active order. -
Admin Order Management (WooCommerce => Prescription Orders):
Store admins manage requests under WooCommerce => Prescription Orders. Administrator view patient details, download high-resolution prescription images, and update request statuses. -
Converting Prescription Request to Order & Customer Payment:
- Administrator opens the prescription request in Admin and clicks Convert to WooCommerce Order.
- Administrator selects matching store products, dosage forms, quantities, and prices as prescribed by the doctor.
- The system automatically creates a pending WooCommerce order linked to the customer's account and emails a direct payment link to the customer.
- The customer clicks the payment link (or clicks Pay Now under My Account => Prescription Orders) to complete payment online.
Substitute Medicines
The Substitute Medicines feature displays alternative brands or substitute products on single product pages that share the exact same active salt composition as the currently viewed product.
Matching Logic Overview
When a product page is viewed, the system automatically checks its assigned active chemical
ingredients (Salt / Composition). It queries the store database for other
published products sharing identical product_composition taxonomy terms, presenting
alternative brand options with matching dosage strengths.
Setup & Usage Guide:
-
Enable Feature Globally in Theme Options:
Go to Xmedcar => Theme Options => Pharmacy Settings and switch Substitute Medicines to Enable. -
Configure Substitute Medicines Settings:
Under Theme Options => Pharmacy Settings => Substitute Medicines:- Show Substitute Medicines: Display substitute recommendations on single product pages.
- Substitute Medicines Title: Custom section heading (e.g., "Substitute Medicines").
- Number of Substitutes: Set the maximum number of substitute products to display.
-
Assign Salt / Composition to Products:
Go to Products => All Products => Edit Product. Under Product Data => Pharmacy Settings, fill in the Salt / Composition field (e.g., Paracetamol 500mg). Ensure alternative products have matching composition entries. -
Frontend Carousel Display:
If alternative products sharing the same composition exist, a Substitute Medicines section will automatically display below product details, allowing customers to easily compare alternative brands.
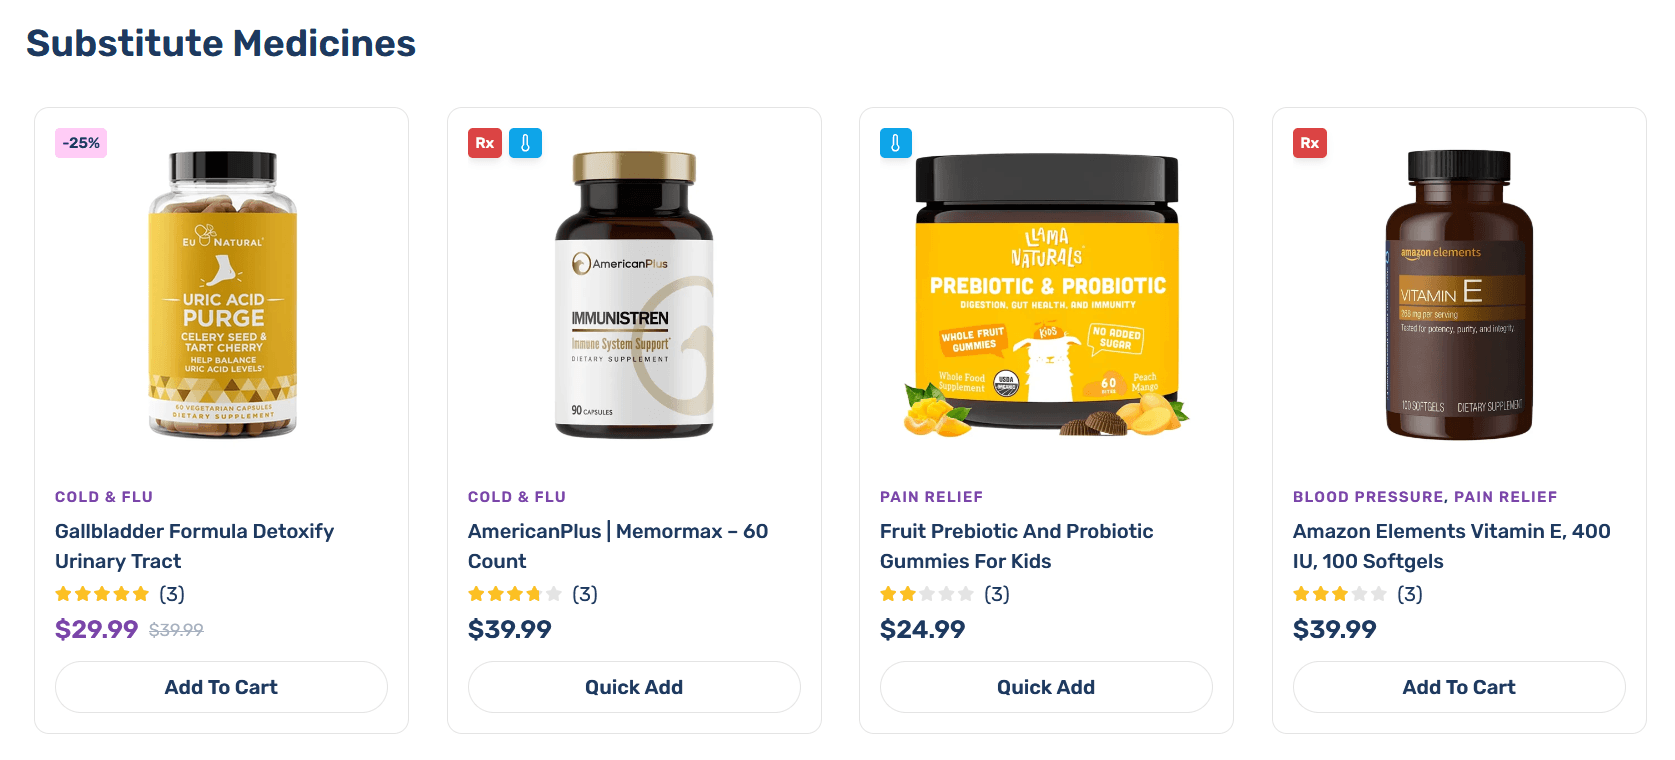
Documentation & Tutorials
WooCommerce Getting Started Guide
Video Tutorials
- What is WooCommerce?
- How To Install WooCommerce WordPress Plugin?
- How To Import WooCommerce Dummy Data?
- How To Get Better Product URL With Custom Permalink?
- How To Use Shop Page For Homepage?
- How To Display Product Categories On Shop Page?
- How To Change Shop Currency?
- How To Add A Simple Product?
- How To Sell A Service Product?
- How To Sell A Digital Product?
- How To Sell An Affiliate Product?
- How To Use Product Attributes?
- How To Add A Variable Product With Variations?
- How To Change Product Images Size?
- What Are Up Sells and Cross Sells?
- How To Create A Coupon Code?
- How To Add Terms & Conditions At Checkout Page?
- How To Enable Registration On "My Account" Page?
- What is System Status page?
Elements
Elementor Page Builder will help you manage your content at the WordPress sites and build any layout you can imagine in a few minutes without coding. You can read Elementor Documentation to get more details.
In Xmedcar, we also create some new elements that will help you build your website a lot easier.
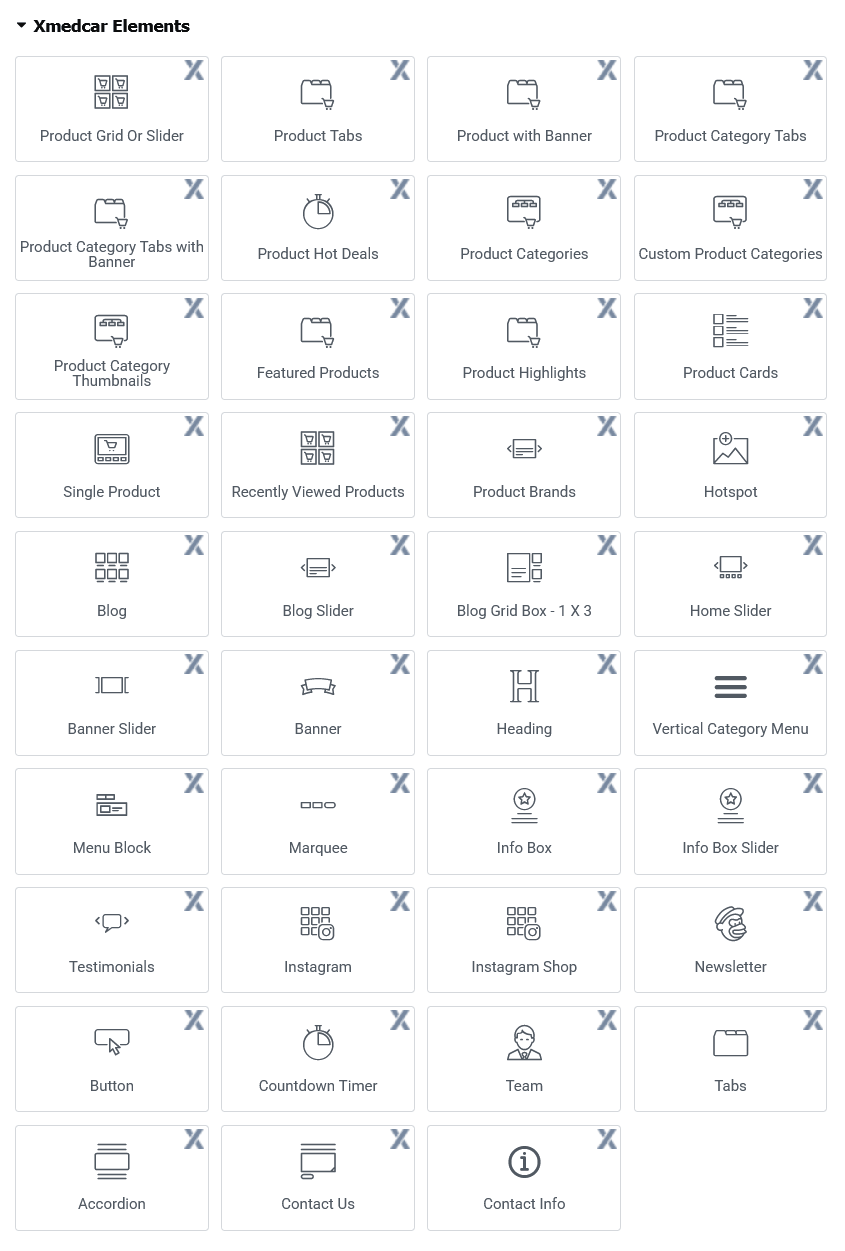
Elementor Settings
Enable elementor page builder for specific post type.
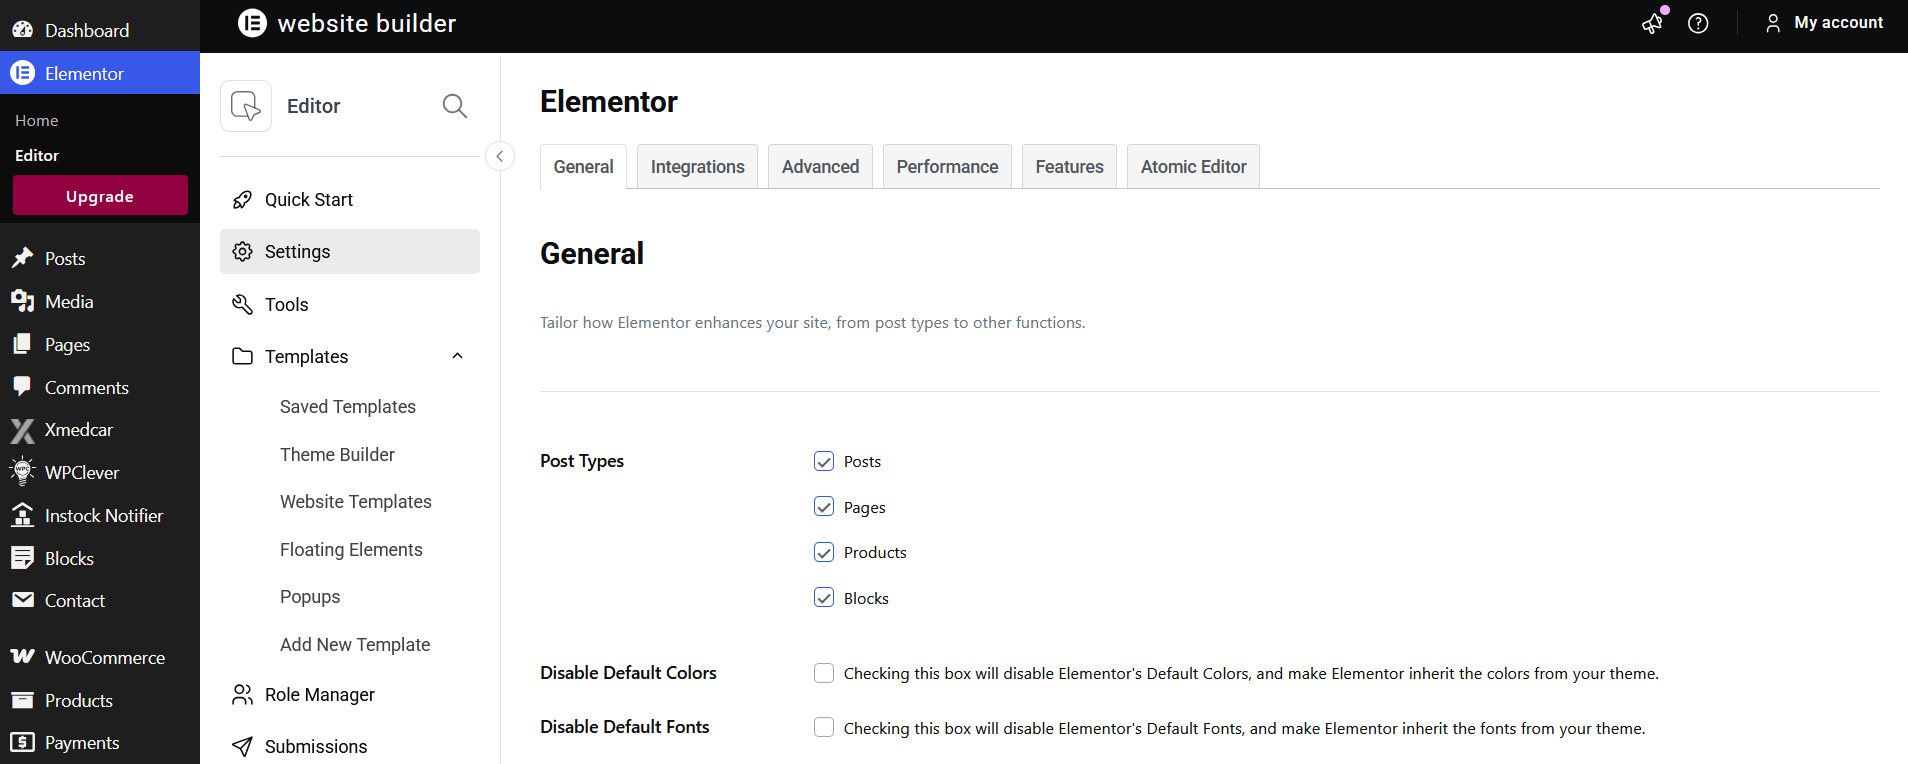
Products Grid Or Slider
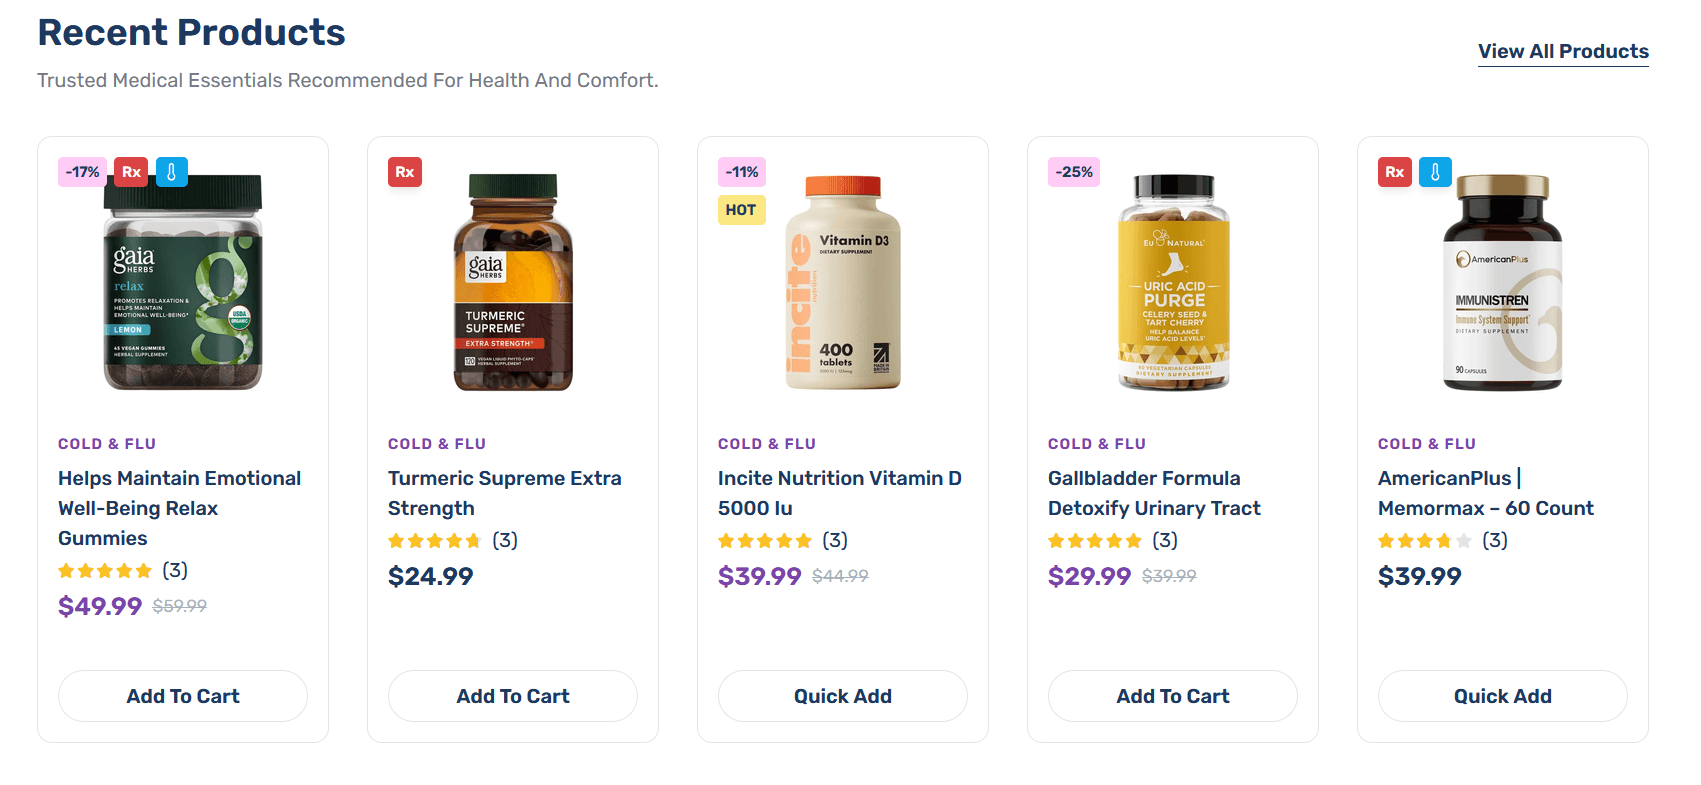
Products With Banner
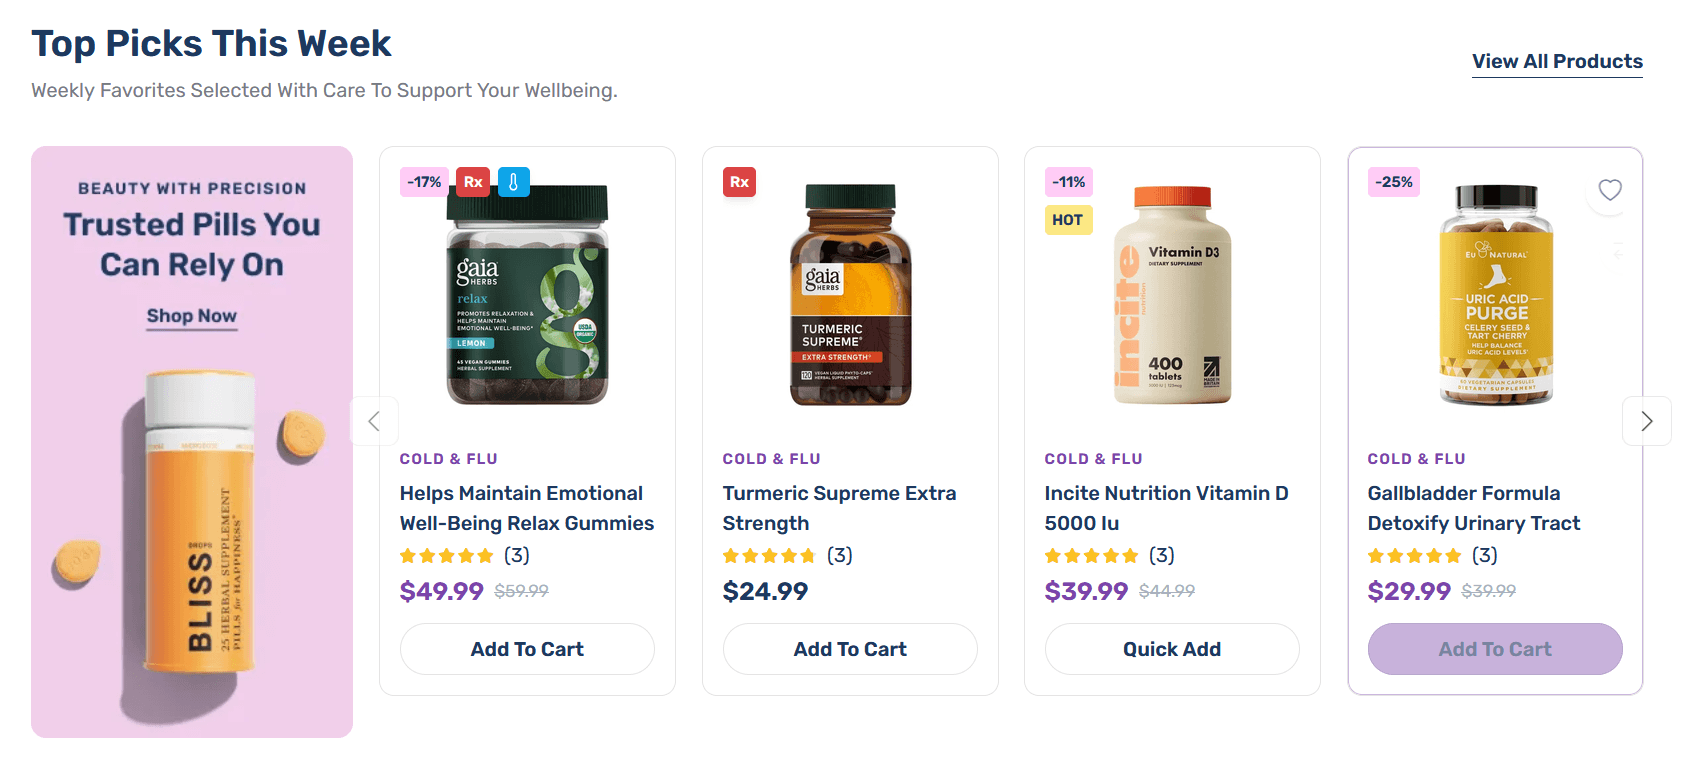
Products Tabs
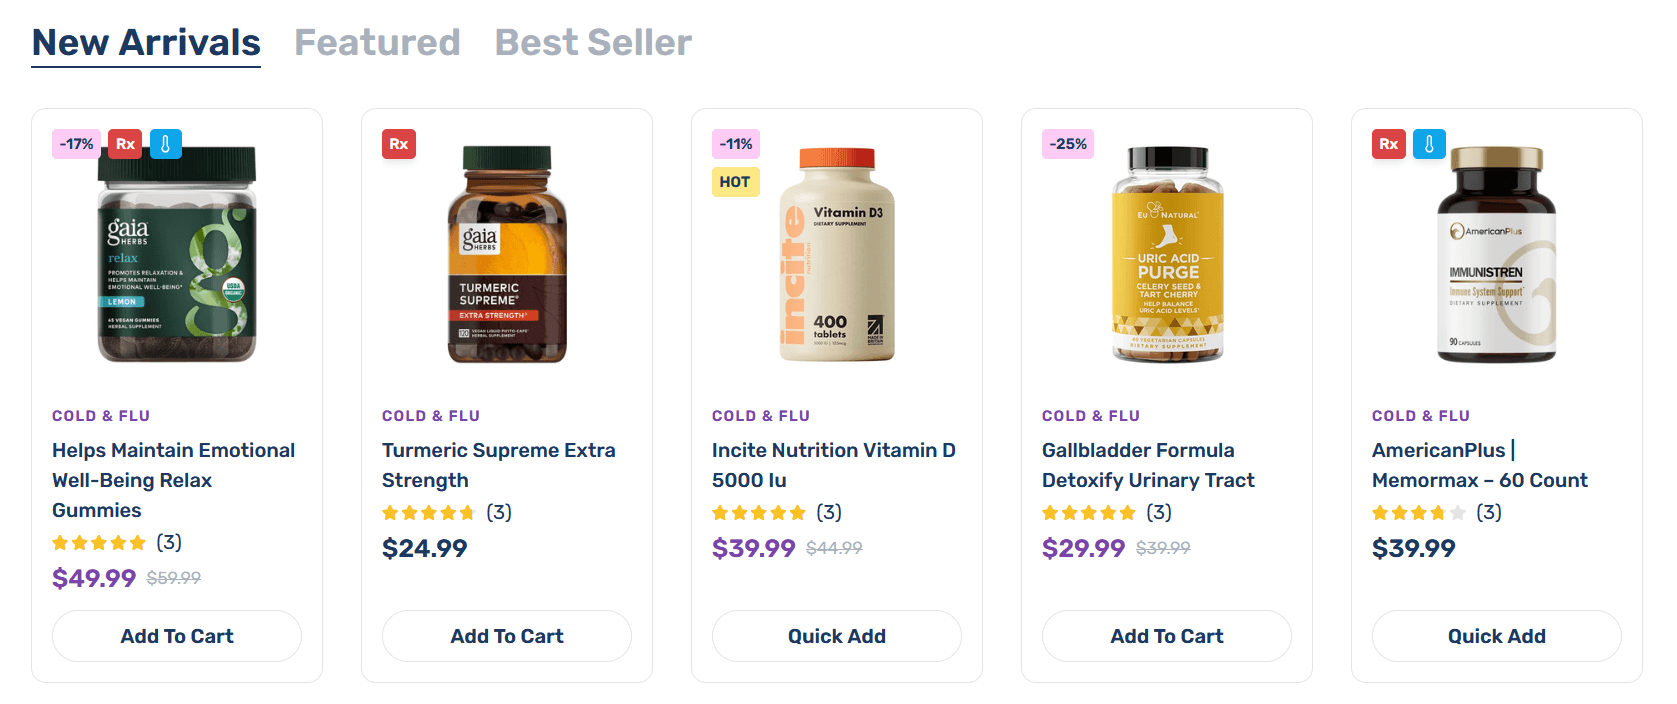
Products Tab With Title
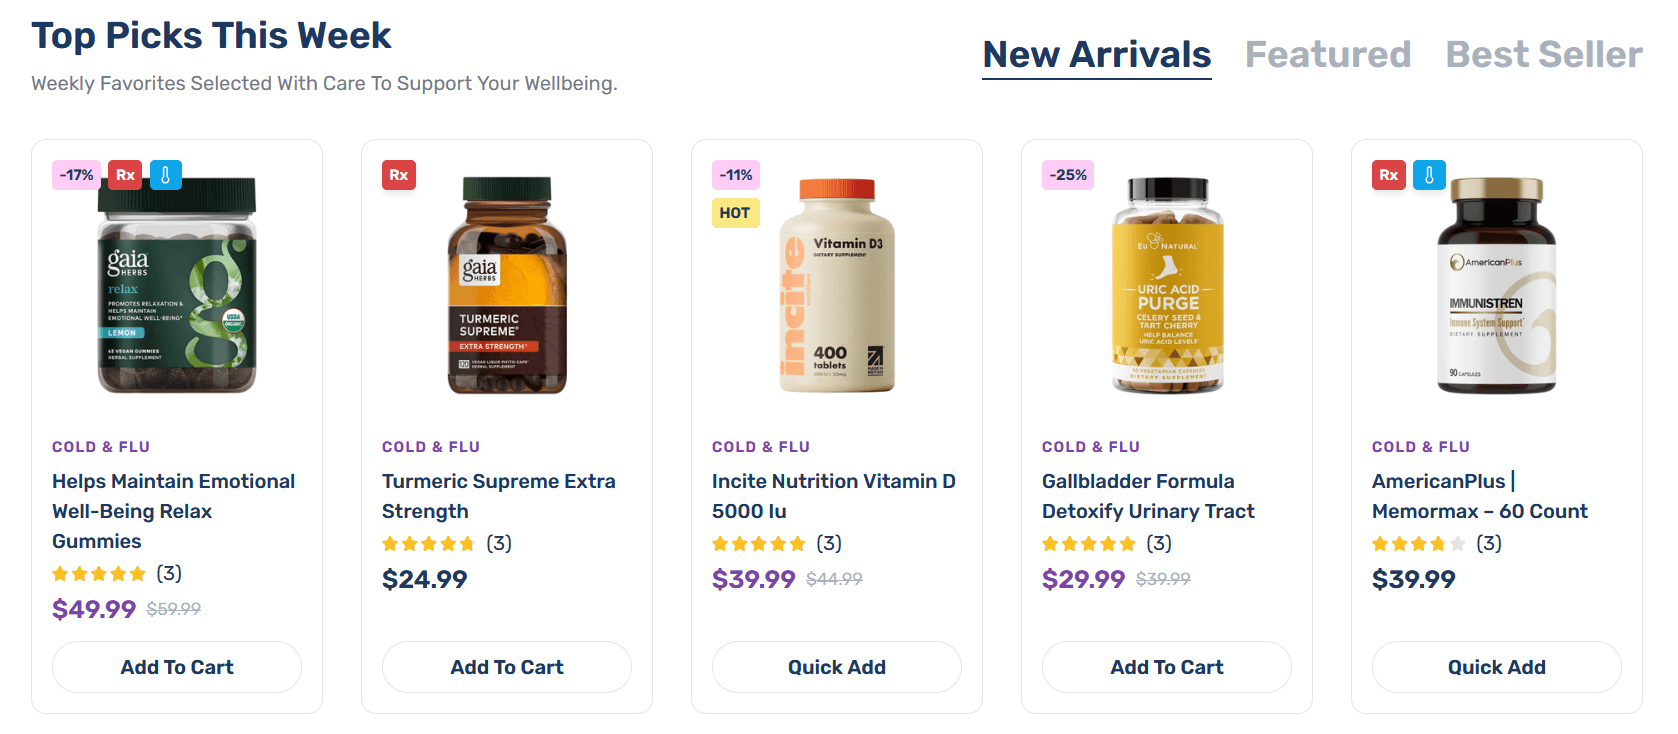
Products Category Tab
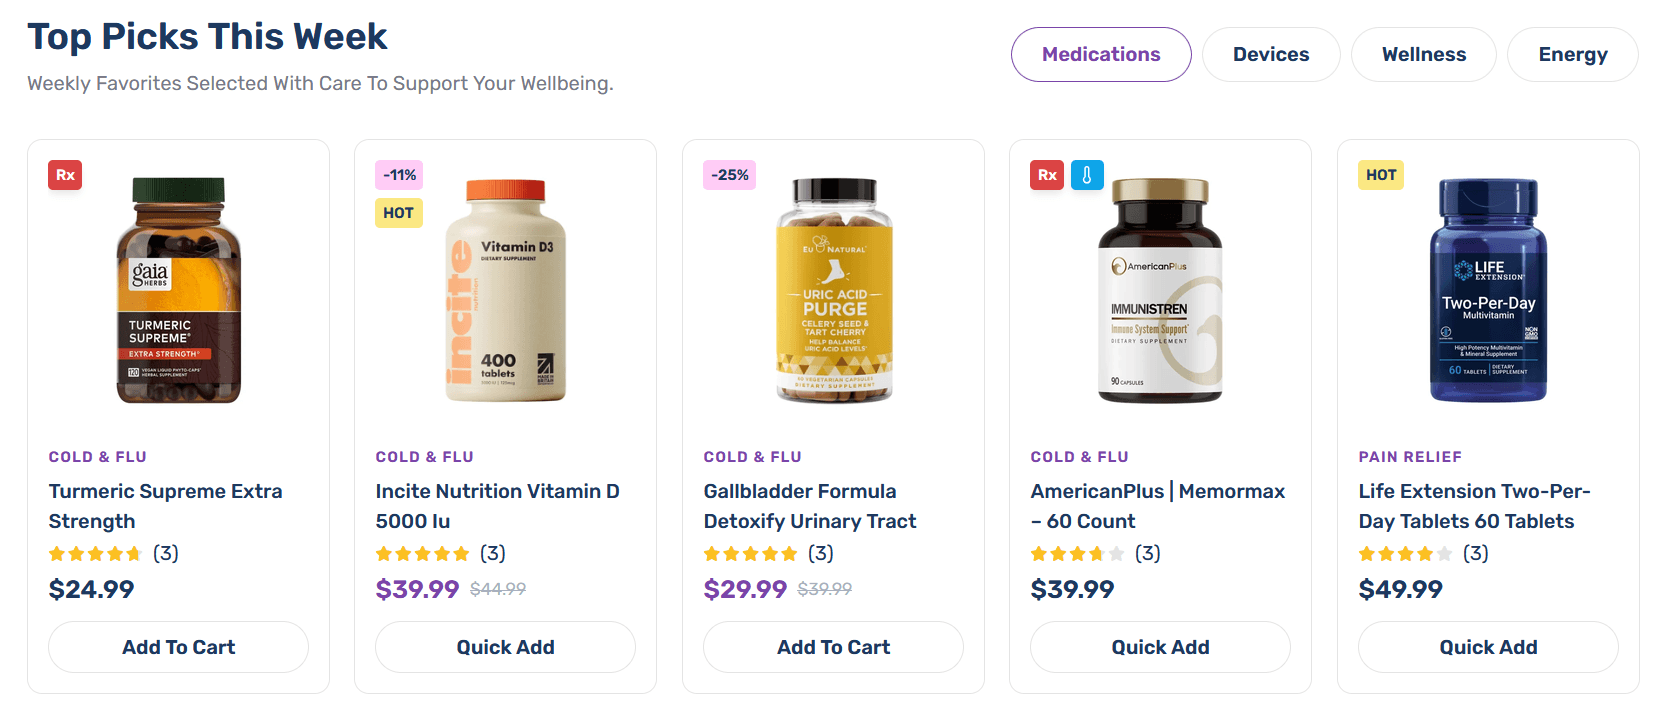
Products Categoy With Tabs
Products Hotdeal
Product Categories
Product Custom Categories

Product Categories Thumbnail
Product Categories Thumbnail Circle
Product Categories Thumbnail Icon
Featured Products

Products Highlight

Product Cards
Products Recently Viewed
Interior Collections

Single Product
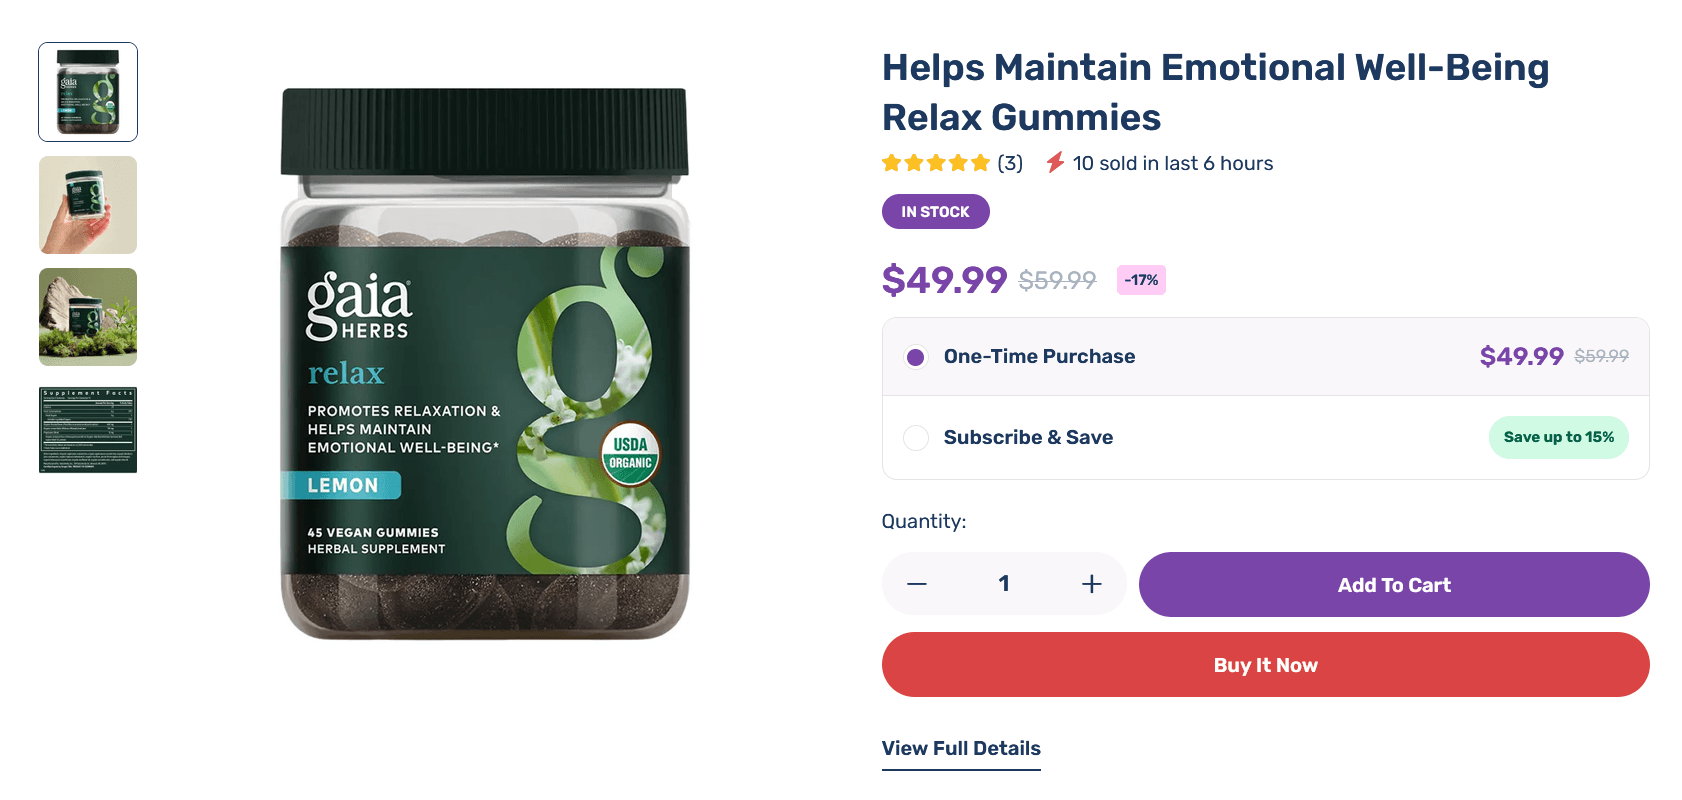
Product Brands

Hotspot

Hotspot Slider

Hotspot Bundle

Blog

Blog Listing
Blog Grid
Blog Grid Box - 1 X 2
Blog Slider

Home Slides

Banner

Banner Slider

Heading

Vertical Category Menu
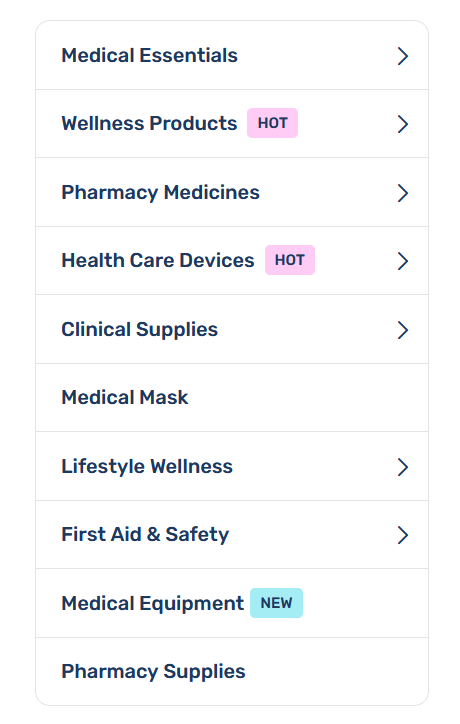
Info Box

Testimonials

Team



Newsletter

Form HTML
Mega Menu Items

CountDown Timer
Button

Tabs

Accordion
Marquee

Contact Info
Contact Us
Form HTML
Elementor
Enable Elementor for pages, posts and custom post types. Read more read Elementor Plugin Documentation.
Contact Form 7
Contact Form 7 is a Contact Form creation plugin that is very flexible and easy to use. It manages multiple contact forms, plus you can customize the form and the mail contents flexibly with simple markup. The form supports Ajax-powered submitting, CAPTCHA, Akismet spam filtering and so on. Read more on how to Create your own Contact Forms a few sections up in Creating Contact Forms or find out more on the plugin Contact Form 7 Plugin Documentation.
WPC Smart Wishlist for WooCommerce
WPC Smart Wishlist for WooCommerce is a powerful yet intuitive plugin for helping your customers manage their to-buy list and save favorite items for later purchase.
How to set Wishlist page?
Go to WPClever => Smart Wishlist, There you can set wishlist page.
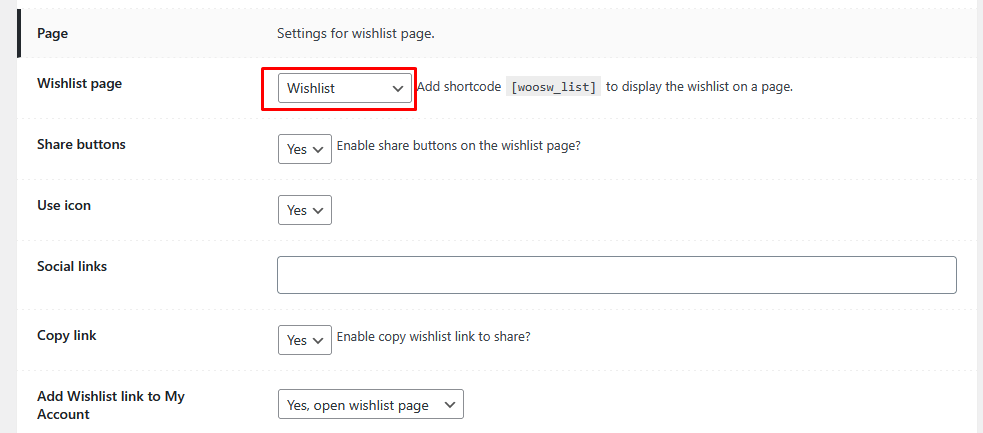
MailChimp for WordPress
MailChimp for WordPress comes with a free plugin, which is awesome by itself. It is actively used on nearly half a million sites and has been very well received by the WordPress community.
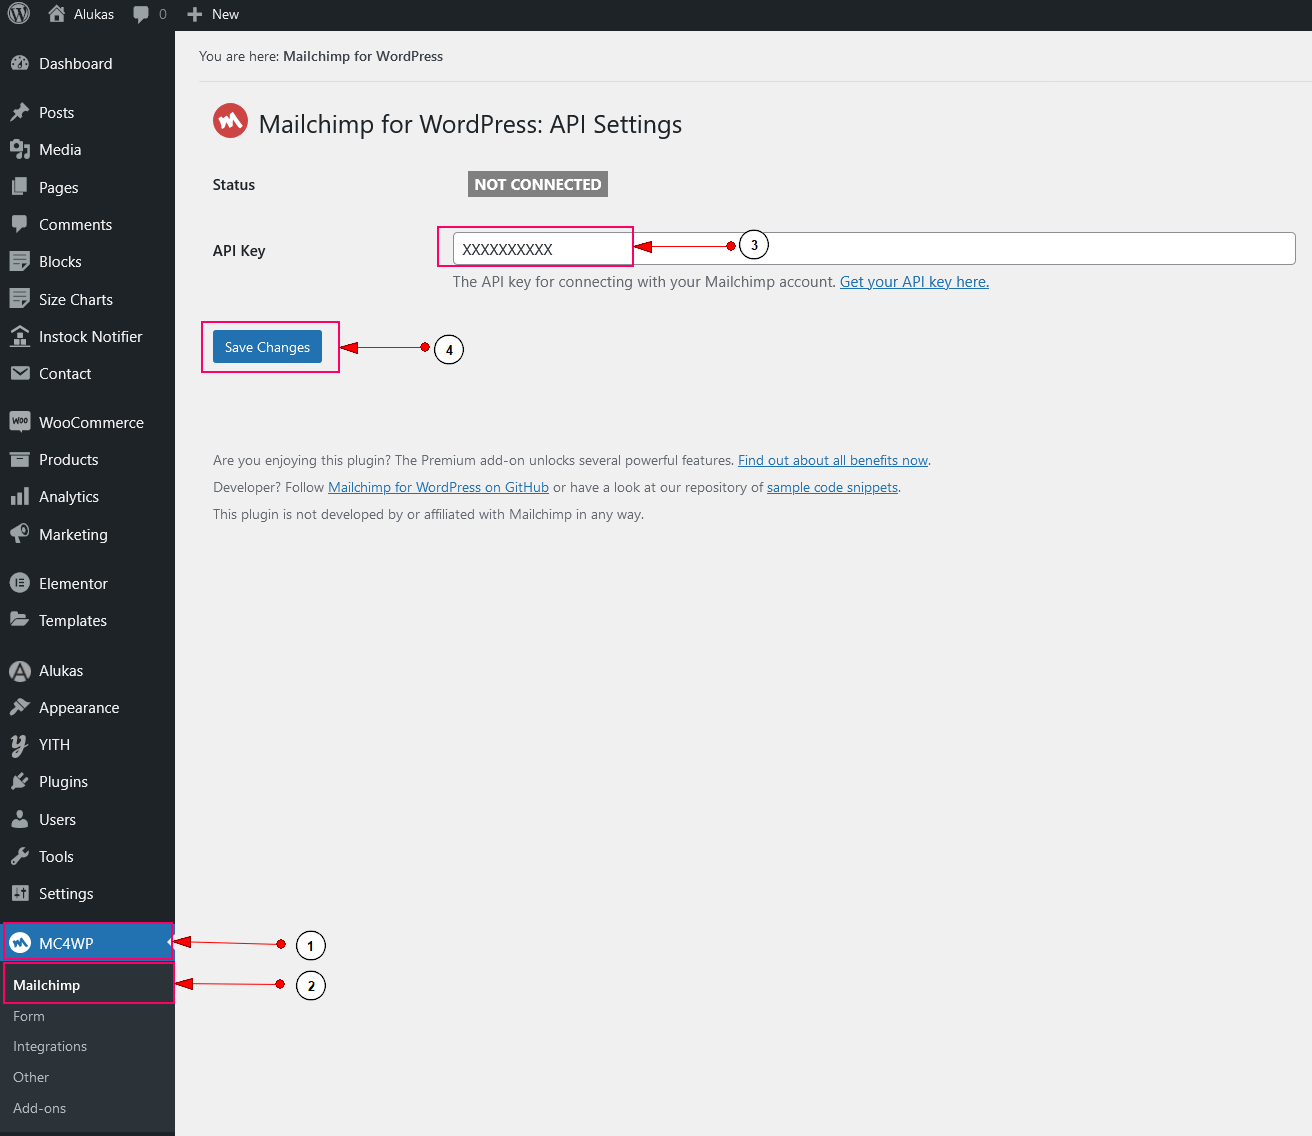
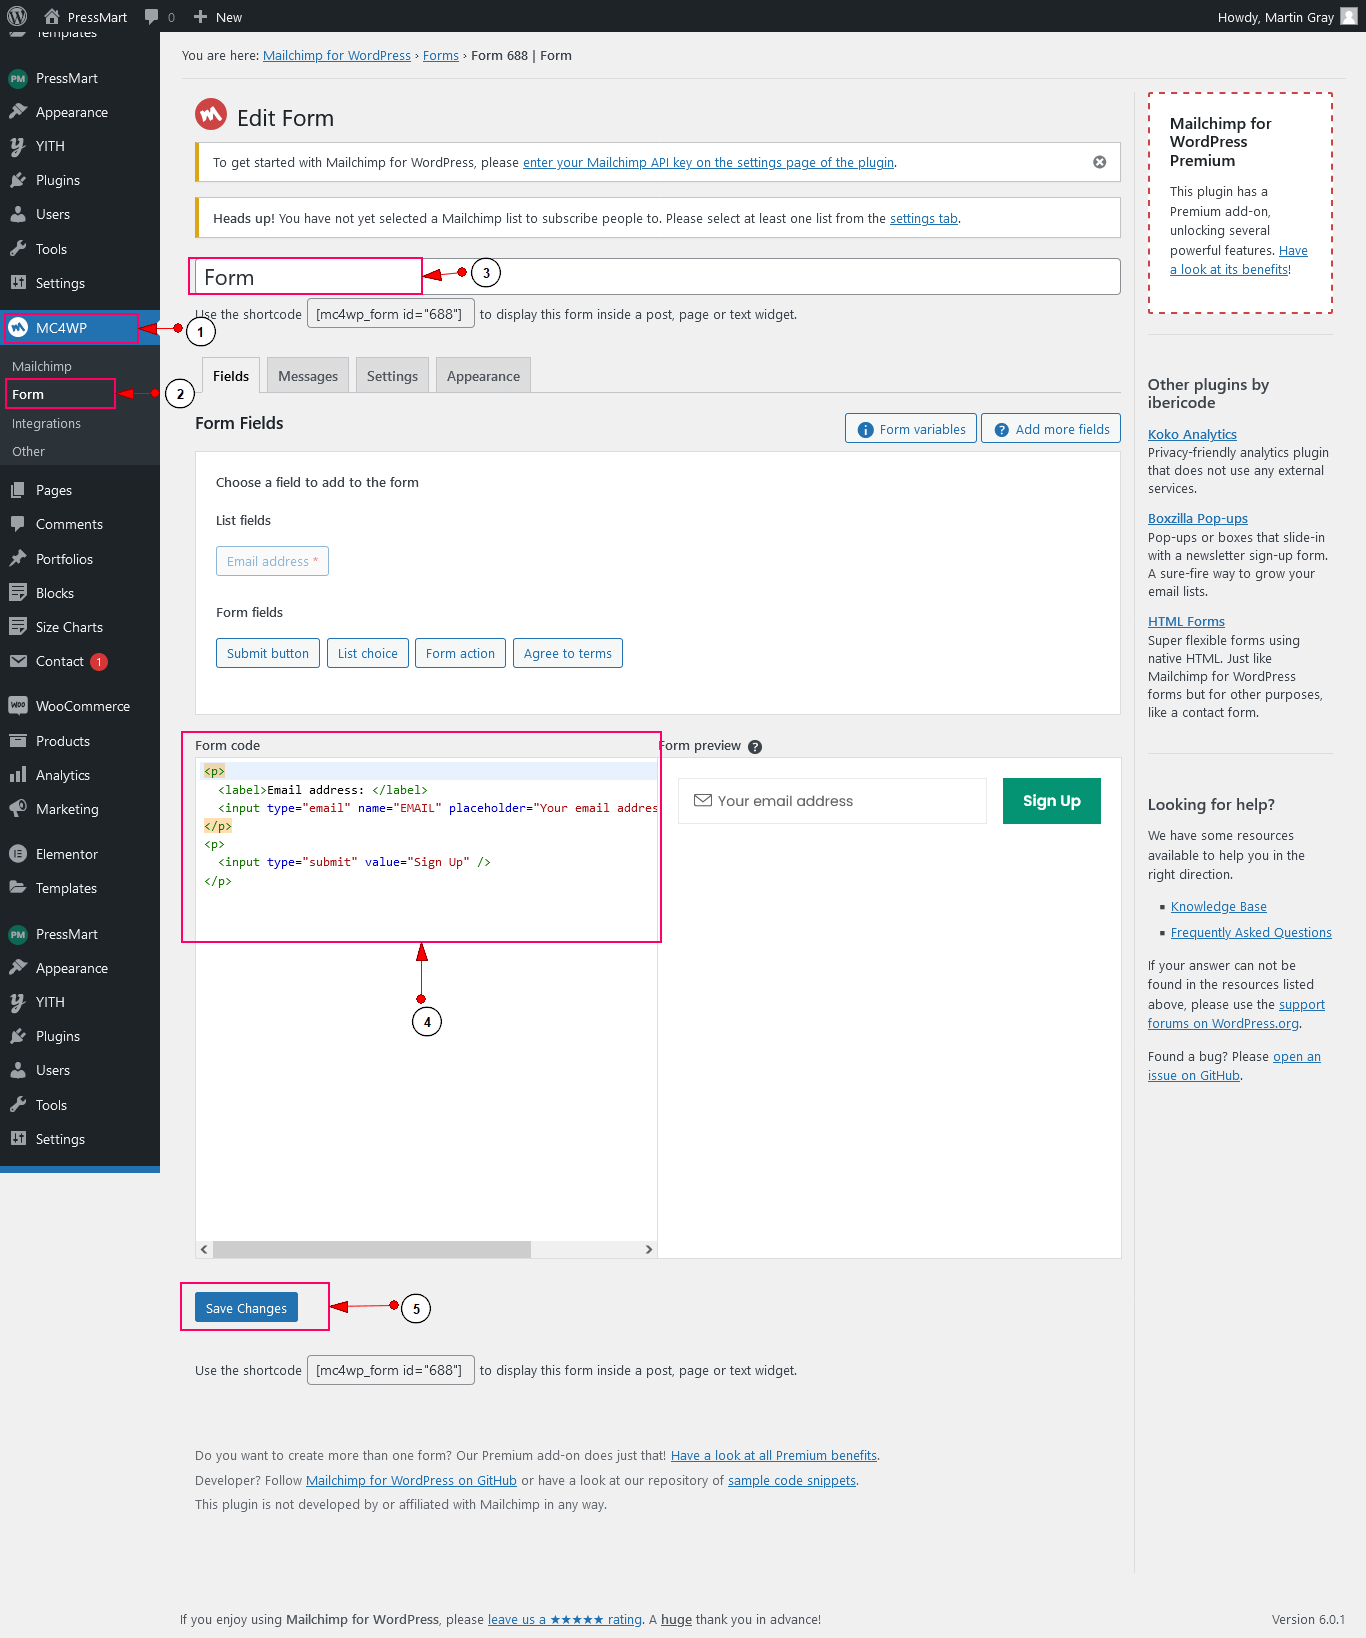
Form HTML
Form HTML With Agree to Terms checkbox
MailChimp for WordPress Plugin
More info on how to use these plugins can be found at MailChimp for WordPress Documentation pageFrequently Asked Questions
Below you will find solutions, recommendations, and step-by-step instructions for resolving the most common issues and questions regarding theme setup and WooCommerce operation.
1. How to find your purchase code?
Without a valid purchase code, you will not be able to activate automated theme updates or import demo layouts. Follow these steps to retrieve it:
-
Log in to Envato:
Log in to your ThemeForest / Envato Market account. -
Go to Downloads:
Hover over your username in the top-right corner of the screen and select Downloads. -
Download Certificate:
Locate Xmedcar in your list of purchased items, click the green Download button, and select License certificate & purchase code (available as a PDF or text file). -
Copy Code:
Open the downloaded file and copy the alphanumeric code listed under the Item Purchase Code field.
For more detailed information, please refer to the Envato Help Guide: Where Is My Purchase Code?
2. Theme is missing the style.css stylesheet error
This is a common upload issue caused by uploading the complete package file instead of the installable theme file. Resolve it by following these steps:
-
Go to Envato Downloads:
Visit your ThemeForest Downloads page. -
Download Theme File Only:
Click the Download button next to Xmedcar and select Installable WordPress file only. This downloads a clean xmedcar.zip. -
Install Clean Zip:
Go to your WordPress admin panel under Appearance => Themes => Add New => Upload Theme, select the newly downloaded xmedcar.zip file, and click Install Now.
3. "Are you sure you want to do this?" (or Link Expired / Upload Fail)
This warning displays during theme installations if you uploaded the full theme package or if your hosting server's maximum file size limit is set too low. Resolve this by applying either of the methods below:
-
Check File Type:
Ensure you are uploading only the installable xmedcar.zip file, and not the full package zip file. -
Method A: Install via FTP Client (Recommended):
Unzip the installable xmedcar.zip file on your computer. Log in to your hosting server via FTP, navigate to/wp-content/themes/, and upload the extractedxmedcarfolder. -
Method B: Increase Upload Limit:
Contact your hosting provider support team and request them to increase your server's PHP values forupload_max_filesizeandpost_max_sizeto at least 32MB or higher.
4. 500 Internal Server Error
This error is typically caused by insufficient hosting server resources. You can increase limits manually or request assistance from your hosting company:
-
Locate PHP Configuration:
Access your server root directory via FTP or File Manager and locate your activephp.ini,.htaccess, or.user.inifiles. -
Apply Resource Directives:
Add or edit the following PHP settings to match theme execution requirements: -
Contact Hosting Support:
If limits do not update or if you lack server write access, submit a ticket to your host support team asking them to increase these PHP configuration limits.
5. White Screen Of Death or PHP Error Notice
A blank white screen indicates a PHP error has occurred, but error displaying is turned off on your server. Follow these troubleshooting steps:
-
Open Configuration File:
Log in via FTP, locate thewp-config.phpfile in your WordPress root directory, and open it. -
Enable Debugging:
Locate the linedefine( 'WP_DEBUG', false );and change it todefine( 'WP_DEBUG', true );. Save the file. -
Analyze the Error:
Refresh the white screen. The site will now display the exact PHP error, including the file path and line number causing the issue (usually identifying an incompatible plugin). -
Temporarily Disable Plugin:
If the error identifies a plugin, rename that plugin's folder under/wp-content/plugins/via FTP to deactivate it and restore site access.
6. How to show the Registration Form on WooCommerce My Account page?
Follow these steps to show the customer sign-up form on your Account landing page:
-
Access WooCommerce Settings:
Navigate to WooCommerce => Settings in your WordPress dashboard. -
Open Accounts & Privacy:
Click on the Accounts & Privacy settings tab. -
Enable Customer Registration:
Locate the Customer registration options section and check the box for Allow customers to create an account on the "My account" page. -
Save Changes:
Click the Save changes button at the bottom of the page to apply the updates.
7. How to setup Language Switcher and Currency Switcher?
Xmedcar is designed to support translation and currency switchers. Set them up by following these steps:
-
Install Required Plugins:
Install and activate the premium WPML translation plugin and the free WooCommerce Multilingual companion plugin. -
Enable Switchers in Theme Options:
Go to Xmedcar => Theme Options => Header Settings and toggle Language Switcher and Currency Switcher options to Enable. -
Configure Translation Switcher:
Go to WPML => Languages => Custom language switchers to select flags, language names, display styles, and order. Learn more in the WPML Language Switcher Options guide. -
Configure Currency Switcher:
Go to WPML => WooCommerce Multilingual => Multi-currency to add active currencies, set exchange rates, and adjust currency switcher formatting. Learn more in the WooCommerce Multilingual guide.
8. How to update Slider Revolution and Xmedcar Extensions?
Since premium bundled plugins do not support direct Envato update keys, they must be updated manually. Follow these steps:
-
Go to Plugins Panel:
Navigate to Plugins => Installed Plugins. -
Deactivate Plugins:
Locate Slider Revolution and Xmedcar Extensions. Select them and click Deactivate. -
Delete Plugins:
Select both plugins again and click Delete. (Note: Deleting these plugins will NOT delete your sliders, custom blocks, or page content since data remains safe in the database). -
Reinstall Plugins:
Go to Appearance => Install Plugins from the admin sidebar. -
Install & Activate:
Select the checkbox next to both plugins, select Install from the bulk options dropdown list, and click Apply. Once installed, select Activate to complete the update.
9. Outdated WooCommerce Templates warning
This warning appears in your dashboard when you upgrade the WooCommerce plugin to a major new version before updating the theme files. Resolve it by applying these steps:
-
Download Theme Update:
Log in to ThemeForest and download the latest installable theme version zip file. -
Install Theme Update:
Navigate to Appearance => Themes => Add New => Upload Theme, upload the new theme zip file, and click install. WordPress will ask if you want to replace the current version with the uploaded version; click Replace current with uploaded.
10. Demo Content Duplicated
If the 1-Click Demo Importer page is refreshed or clicked multiple times during importing, duplicate pages, posts, menus, or products can occur. Resolve this using either of the methods below:
-
Method 1: Reset Website Database (Fastest - Fresh Start):
Install and activate the free WP Reset plugin. Go to Tools => WP Reset, typeresetinto the confirmation field, and click Reset Site. This resets your database back to standard default values, allowing you to run the demo importer cleanly. (Caution: This wipes all custom configurations, posts, and media). -
Method 2: Manual Cleanup:
Manually remove duplicates by going to Pages => All Pages, Products => All Products, and Appearance => Menus. Select duplicate entries and move them to Trash.
11. How to create an Order Tracking page?
Follow these steps to set up a functional shipping and delivery tracking page for customers:
-
Create a Page:
Navigate to Pages => Add New in your admin dashboard. -
Insert Shortcode:
Title your page (e.g., Track Your Order) and add the following shortcode block to the page content editor:[woocommerce_order_tracking]. Click Publish. -
Assign Page in Theme Options:
Go to Xmedcar => Theme Options => Shop Settings, locate the Order Tracking Page dropdown field, and select the tracking page you created in Step 2. Click Save Changes.
Thank you for purchasing our theme
If you have any questions that are beyond the scope of this documentation. Please feel free here.
Thanks so much!
Social Links
This widget allows you to display social links.Here display those links which you added in Xmedcar > Theme Options > Social > Social Profile.