Alukas - Documentation
Introduction
Thank you for purchasing Alukas - Modern Jewelry Store WordPress Theme! In this document you will find information on how to install, manage and update your theme, as well as create content, install plugins, import Demo data etc. If you have any questions that are beyond the scope of this help file, please feel free to contact us via Support link. We will do our best to answer you in shortest of time.
Note: All images are just used for Preview Purpose Only. They are not part of the theme and NOT included in the final purchase files.
Need Support?
We are always happy to help and we value our customers. All our files come with User Manual prepared specifically for each product – these help files are located inside your download packages.
Support for our items includes:
- Responding to questions or problems regarding the item and its features
- Fixing bugs and reported issues
- Providing updates to ensure compatibility with new software versions
Item support does not include:
- Customization and installation services
- Support for third party software and plugins
Support requests are processed on business days from 8:00 to 20:00 (GMT + 5.30 ) within 24hrs (usually less) in the order they were received. Support request sent during weekends/holidays will be processed on Monday or the next business day.
If you have any questions regarding to theme issues, please send us support request here.
You Need Installation or Customization Services?
If you need help Installation, Website/Theme Customization or Development, Add Specific Functionality, Back-end Custom Work, Front-end Custom Work, Custom Theme/Plugin Development, Theme & Plugin Updates and Testing & Bug Fixing, Please send us request HERE with your requirement. Our expert technical team will help you with some fees.
Our More Items:
PressMart - Modern Elementor WooCommerce WordPress Theme
Kapee - Modern Multipurpose WooCommerce Theme

EmallShop - Responsive WooCommerce WordPress Theme
BigBazaar - Responsive WooCommerce WordPress Theme
WordPress Information
To install this theme you must have a working version of WordPress already installed. If you need help installing WordPress, follow the instructions in WordPress Codex. Below are all the useful links for WordPress information.
- [WordPress Codex] - General info about WordPress and how to install on your server.
- [First Steps With WordPress] - General info about multiple topics about WordPress.
- [FAQ New To WordPress] - The most popular FAQ’s regarding WordPress.
Recommended PHP Configuration Limits
Many issues that you may run into such as; white screen, demo content fails when importing, empty page content, max execution time error, memory limit error, upload max filesize error and other similar issues are all related to low PHP configuration limits. The solution is to increase the PHP limits. You can do this on your own, or contact your web host and ask them to increase those limits to a minimum as follows:
Download Theme Package
To download, you need to log into your ThemeForest account and go to your download page. Locate the theme that you purchased in your Downloads list and click on the Download button
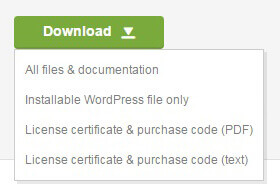
- All files & documentation : contains documentation, licenses, theme package, child theme package etc. So if you select this option, you need to extract the downloaded package and install the theme package inside.
- Installation WordPress file only : contains only the theme package
- License certificate & purchase code (PDF) : contains only the theme package
- License certificate & purchase code (text) : contains your license information in a text file
Theme Installation
After you download the package from ThemeForest, please unzip it. You'll see a file called alukas.zip, which is the main file needed to upload and install.
The theme files can be uploaded in two ways:
- Install via WordPress
- Install via FTP
1) Install via WordPress
- Login to your WordPress Dashboard.
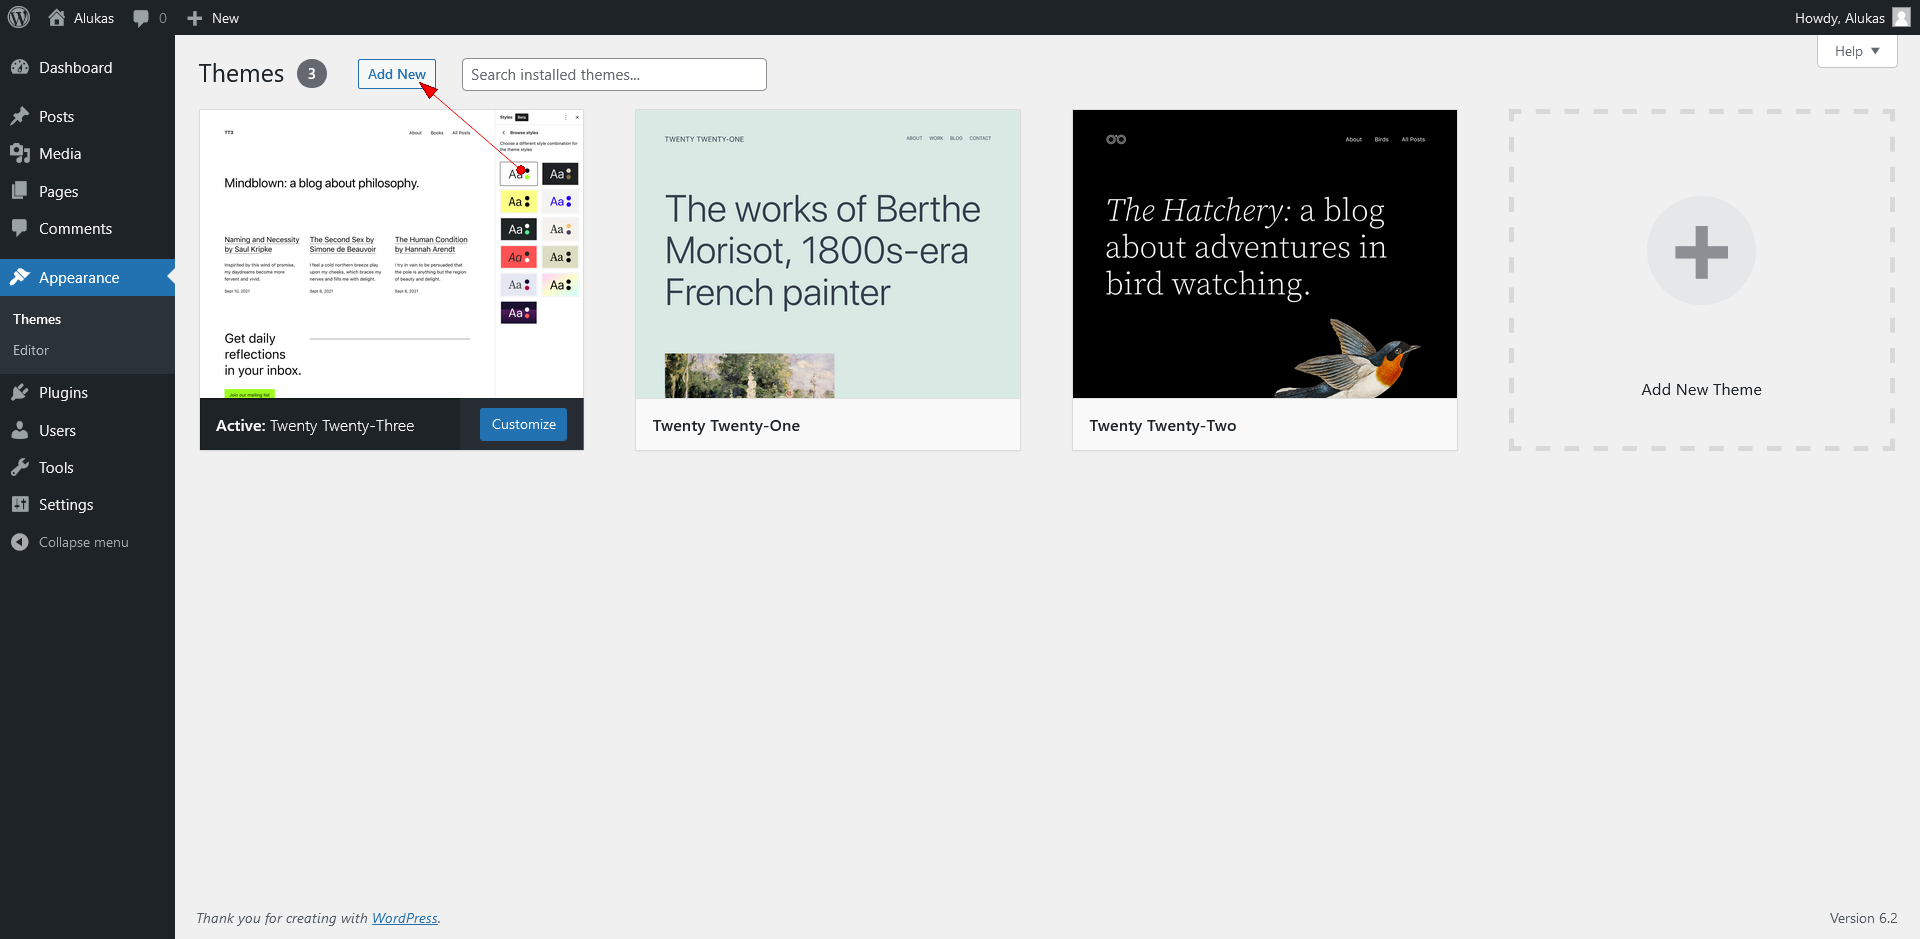
- Navigate to Appearance > Themes
- Click Add New button on top of the page.
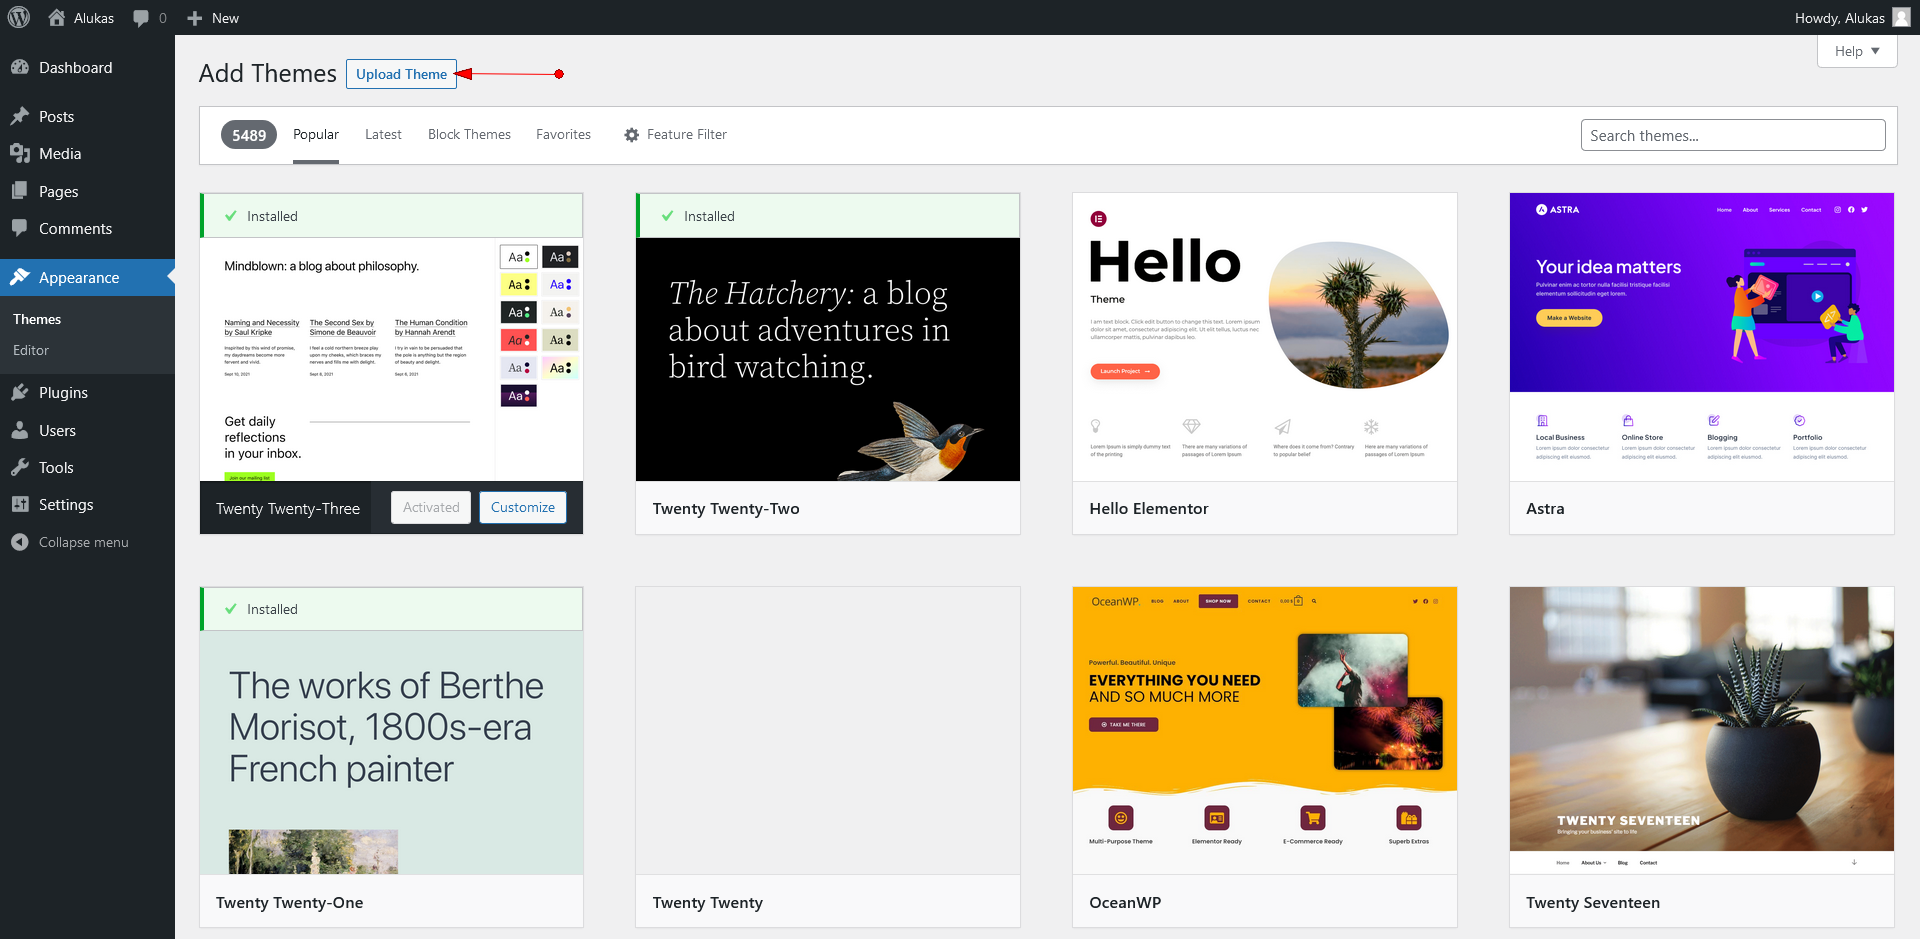
- Then click Upload Theme
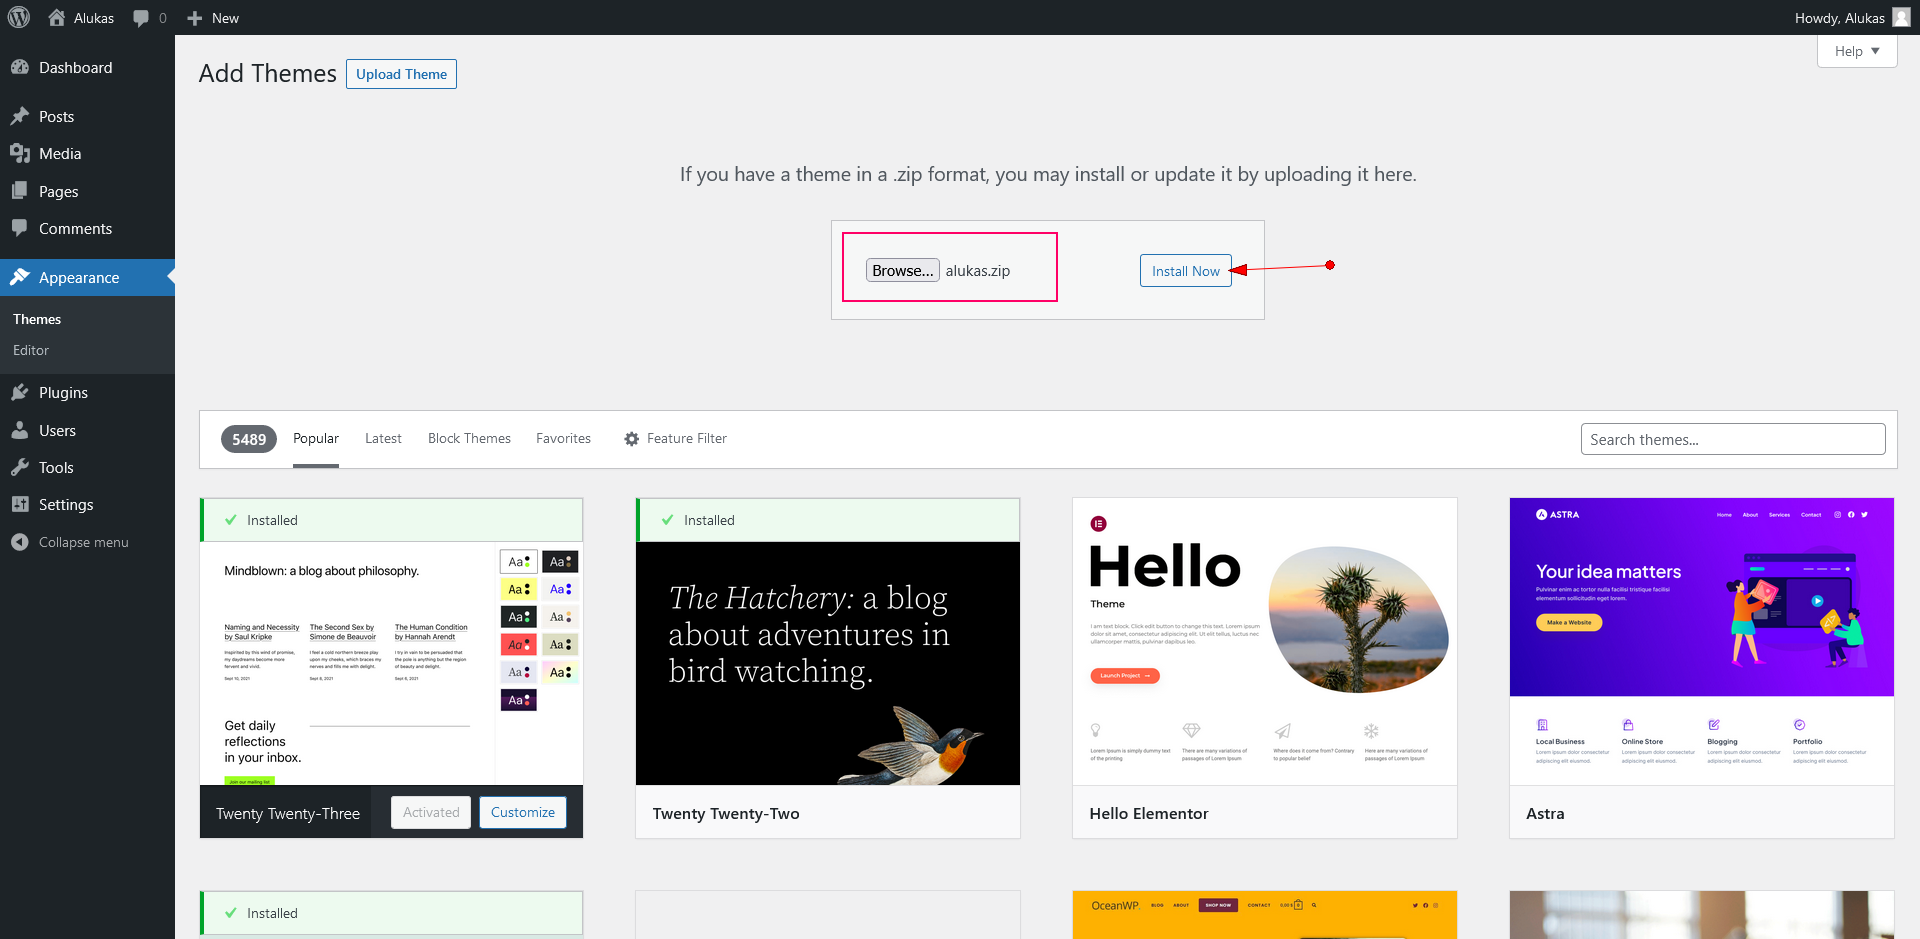
- Browse to the alukas.zip file and click Install now for the theme to be uploaded and installed.
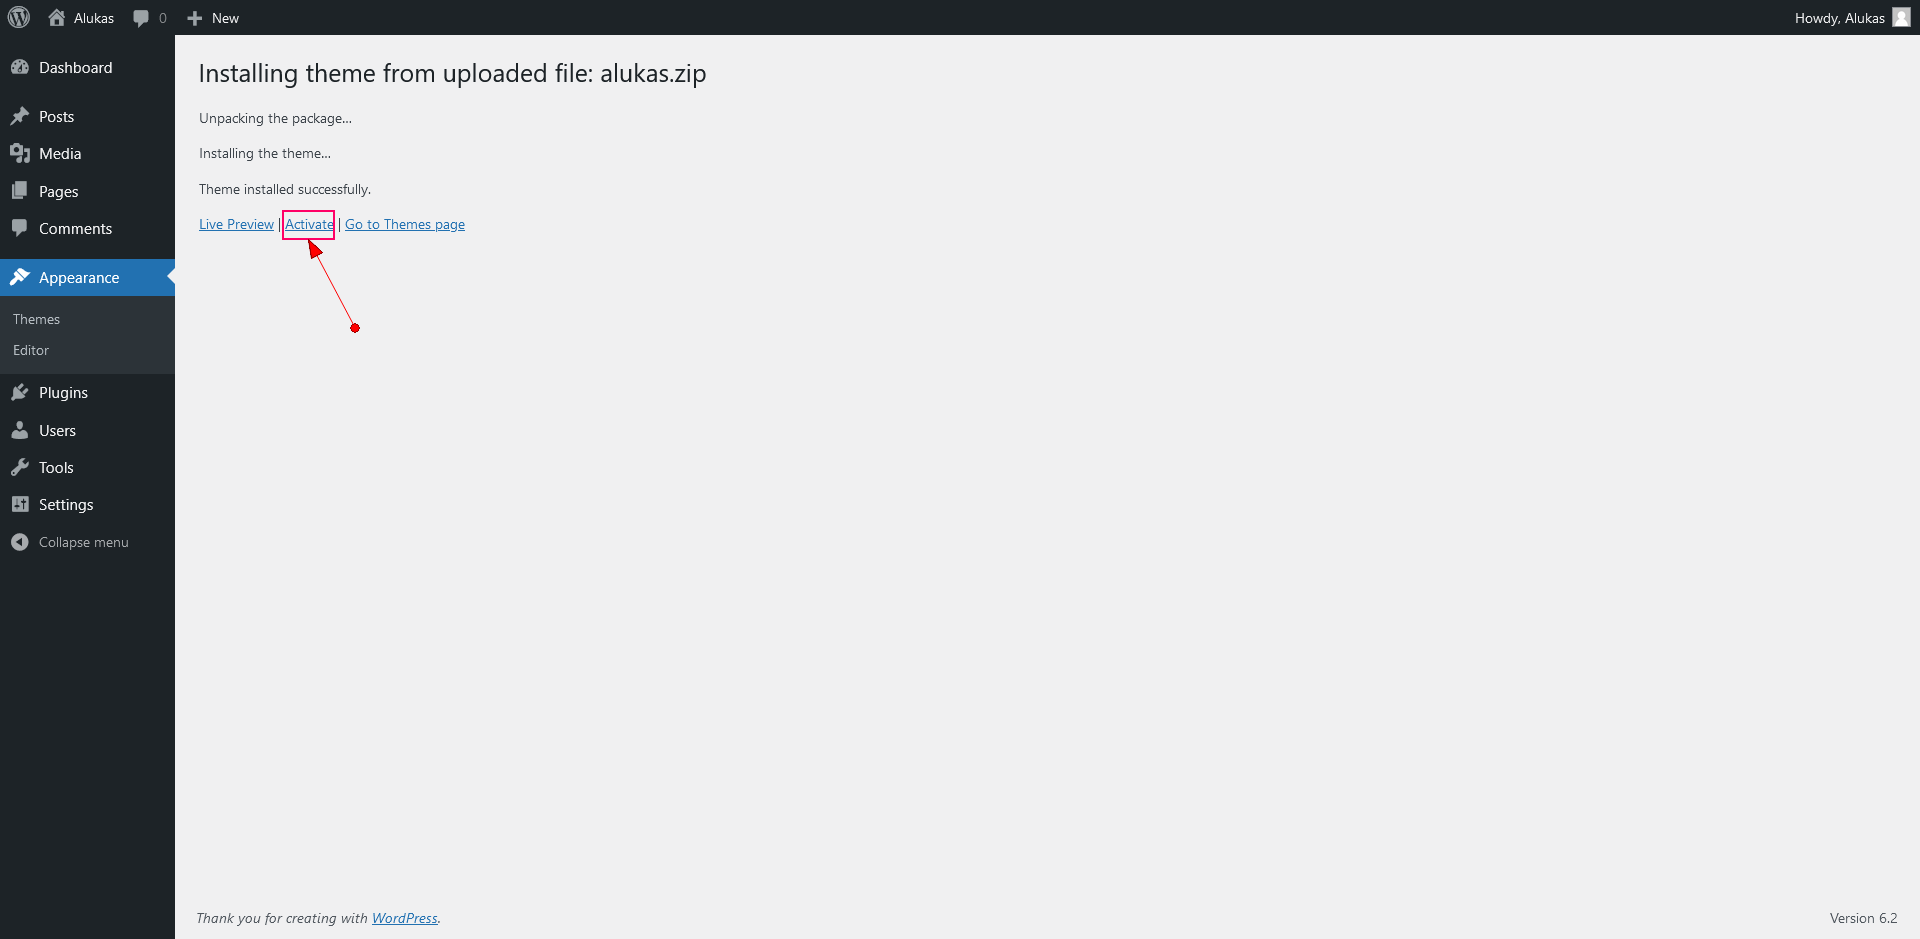
- After done installing, click Activate the theme
2) Install via FTP
- Using an FTP client (like FileZilla), connect to your server/hosting and navigate to your WordPress installation.
- Navigate to /wp-content/themes/ folder and upload the theme folder there (you need to unzip the theme alukas.zip package first).
- Locate your WordPress installation and upload the theme directory alukas (you unzipped in the previous step) into ../wp-content/themes/ in your WordPress installation.
- Log in to your WP Admin Dashboard and go to Appearance > Themes
- You will now see Alukas listed among the other themes. Just activate it!
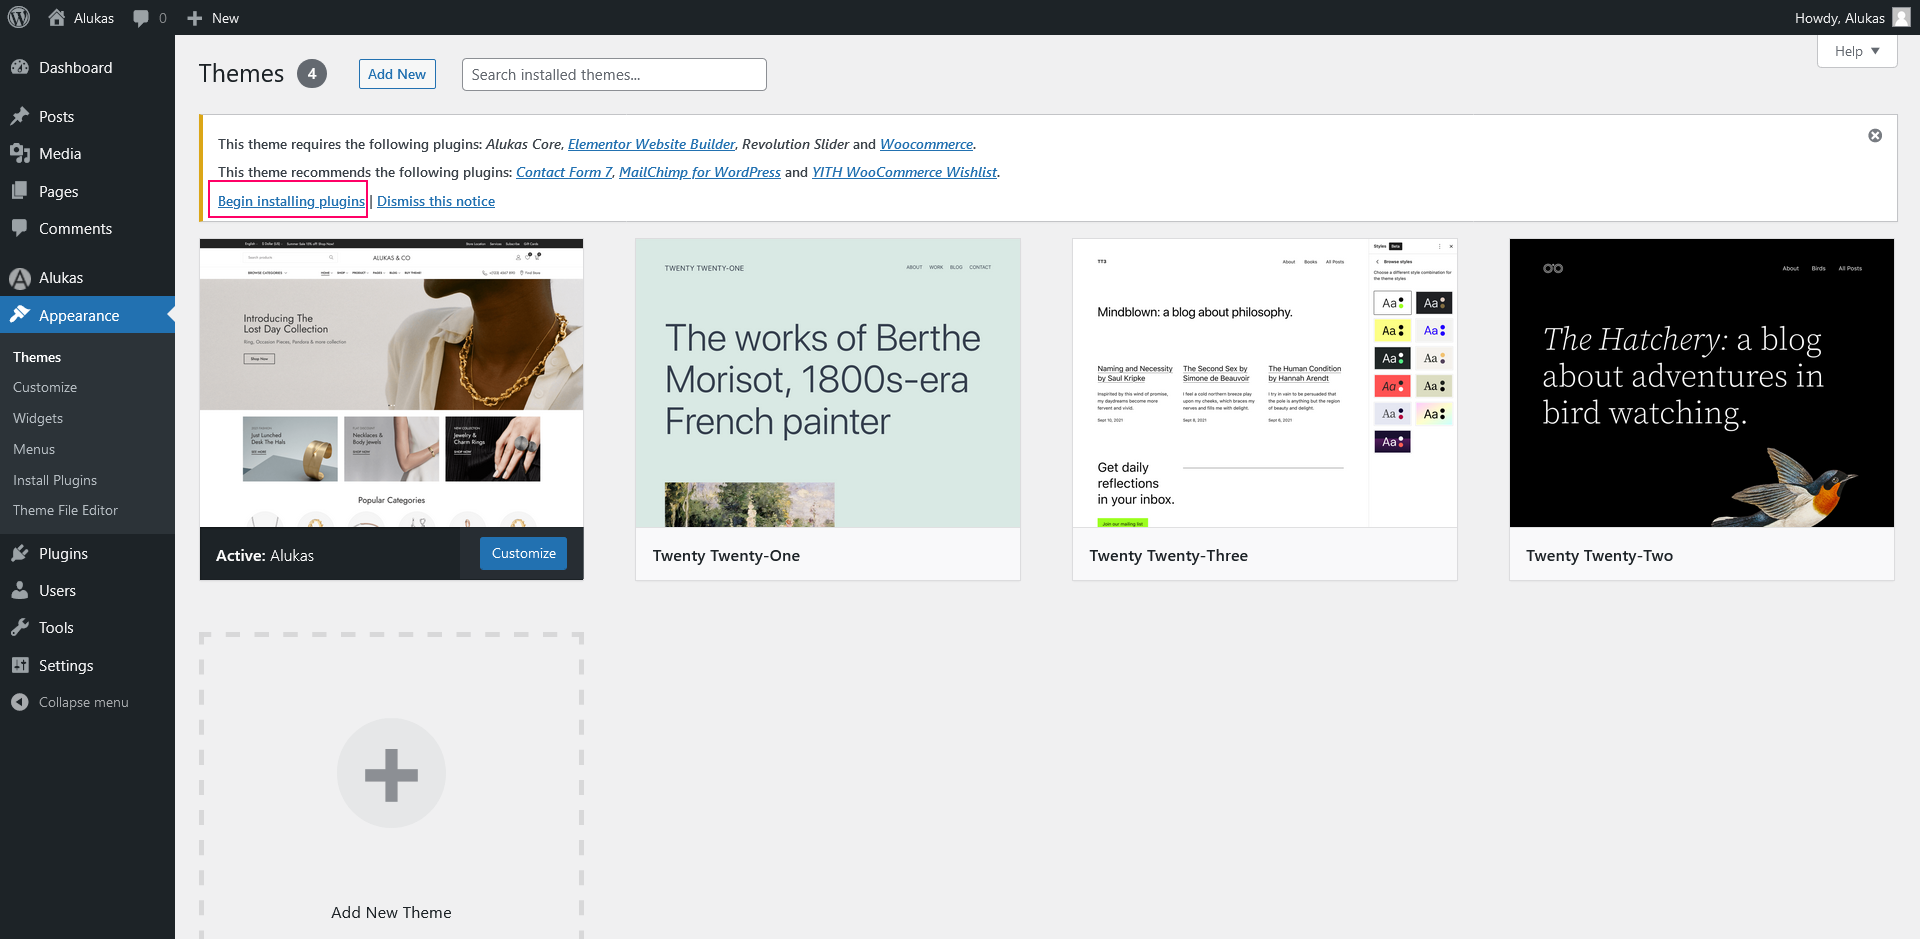
- Click on the Begin activating plugins links Or Go to Appearance > Install Plugins.
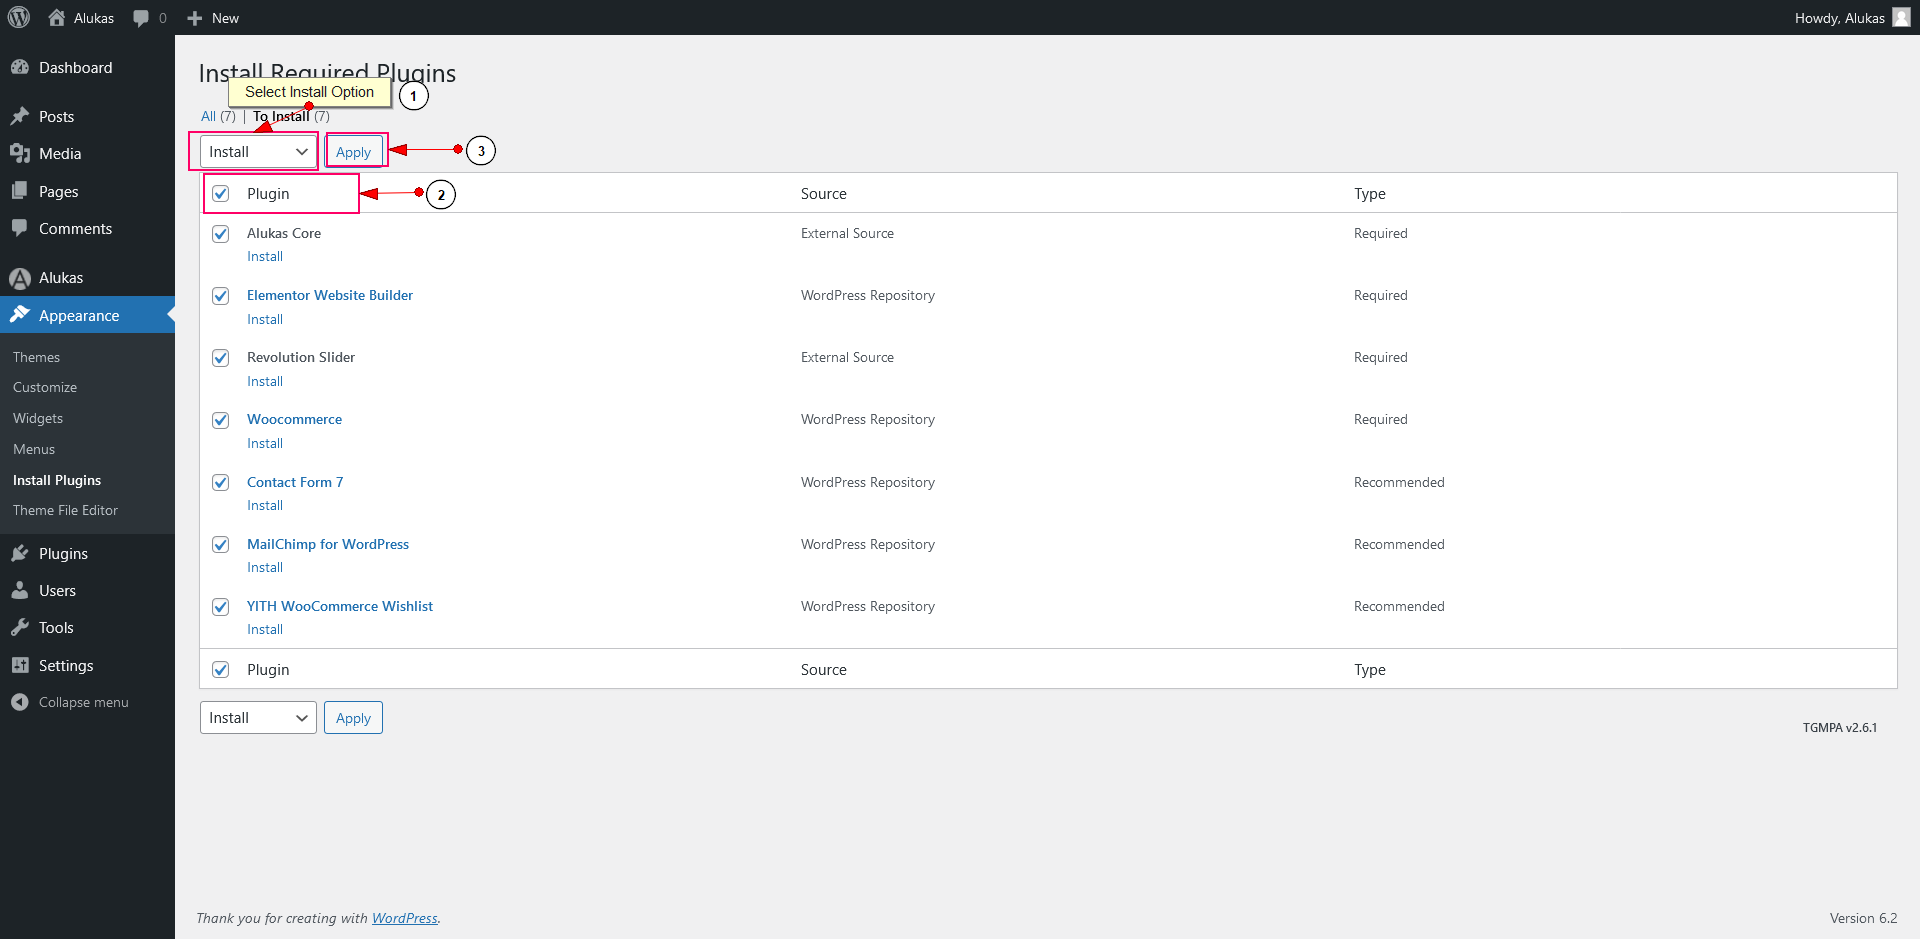
- Select all plugins that you wish to install (Selecting all of them is recommended).
- Change Bulk Actions drop down to Install then click Apply in order to install the selected Plugins.
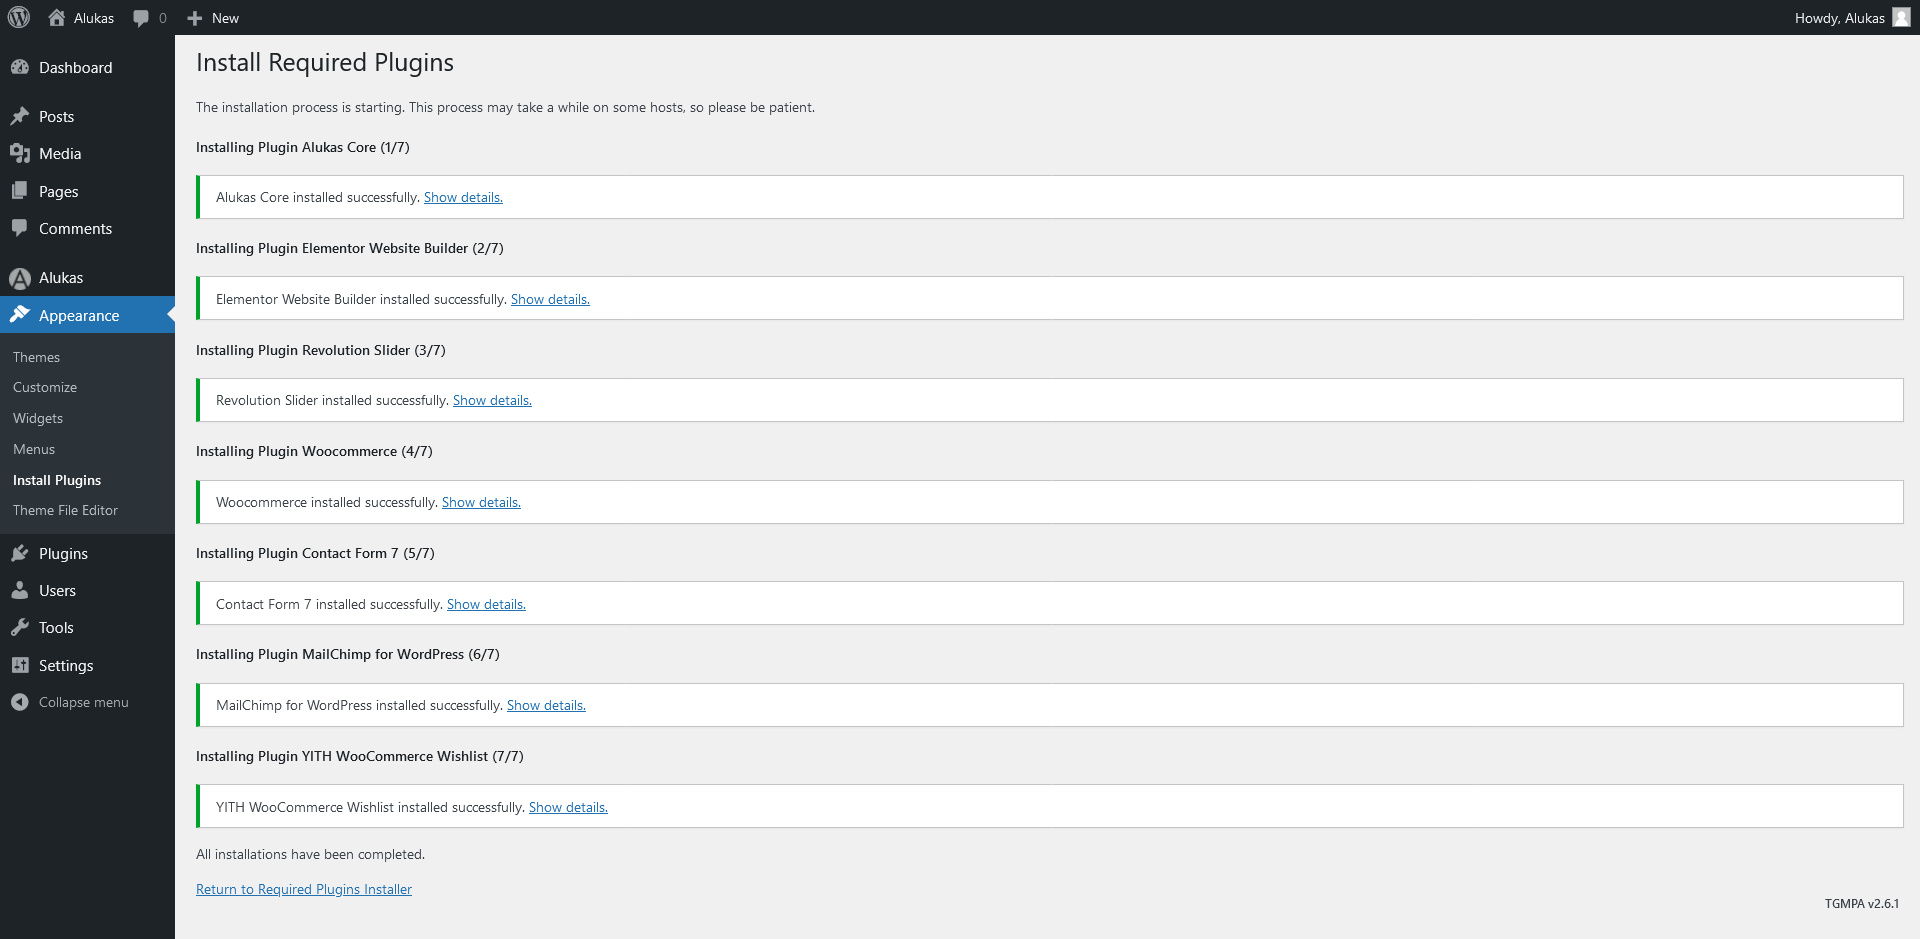
- After all plugin Installed then click on below Return to Required Plugins Installer link.
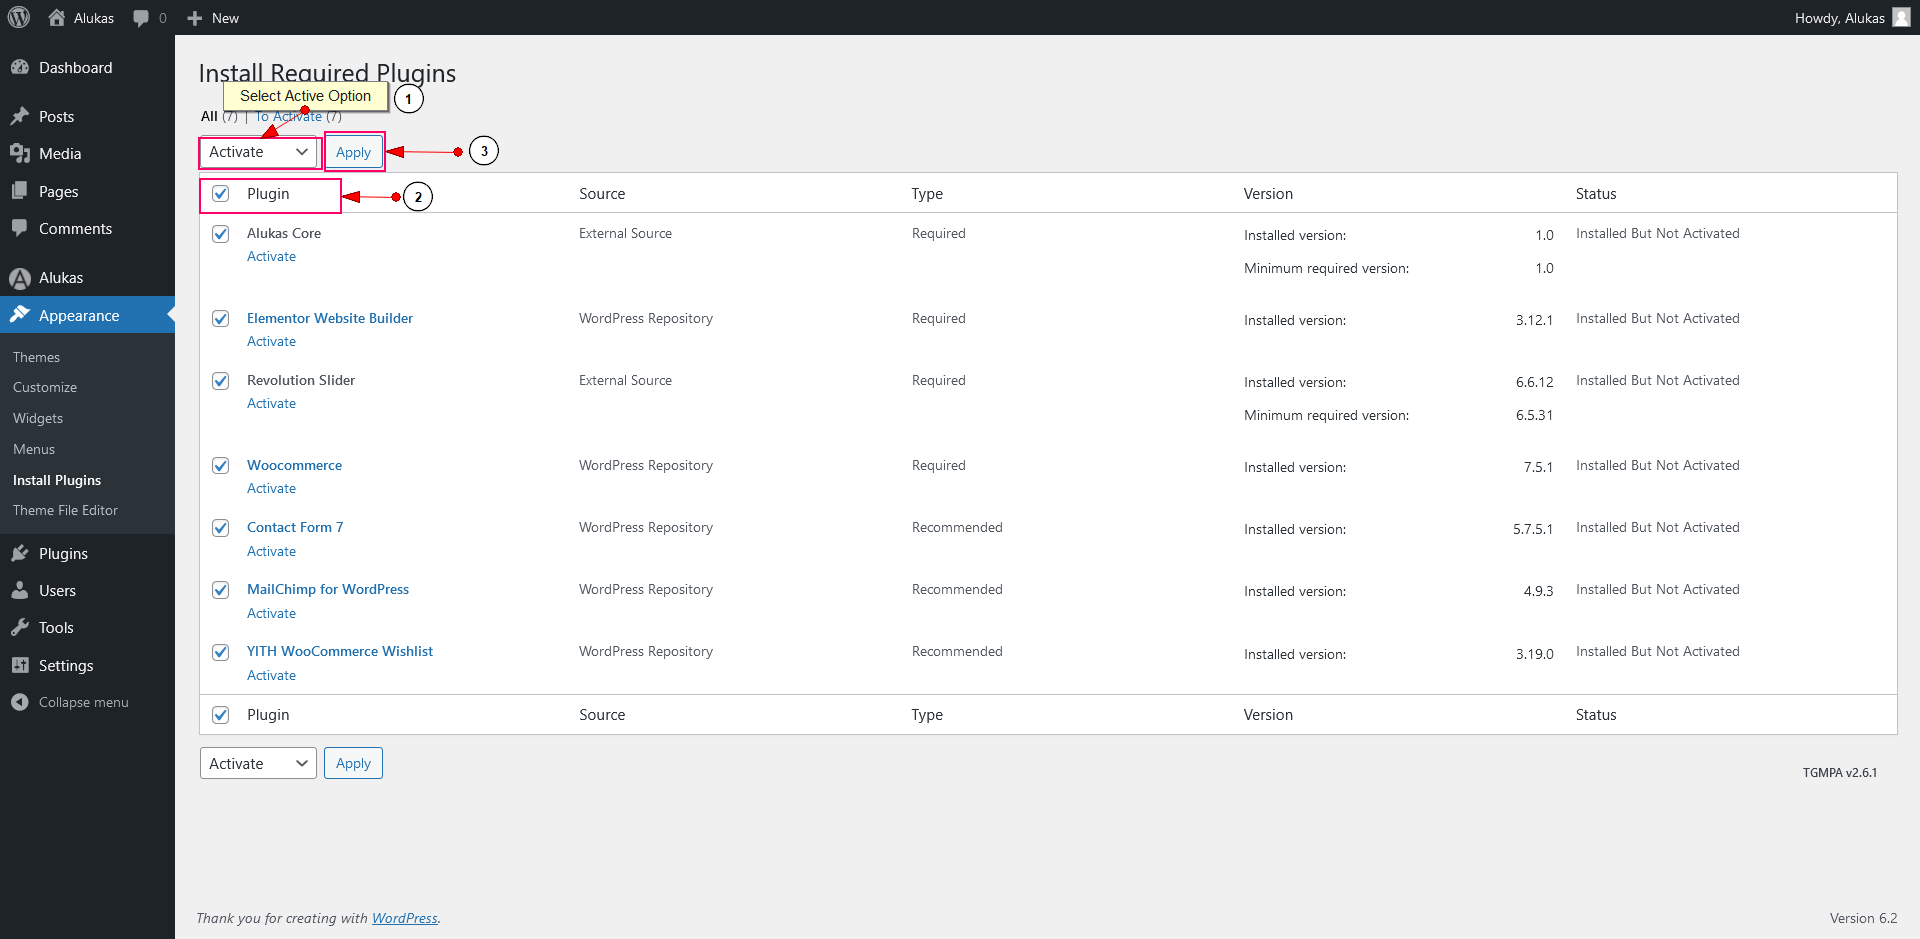
- Select again all plugins and Change Bulk Actions drop to Active then click Apply order to active the selected plugins..
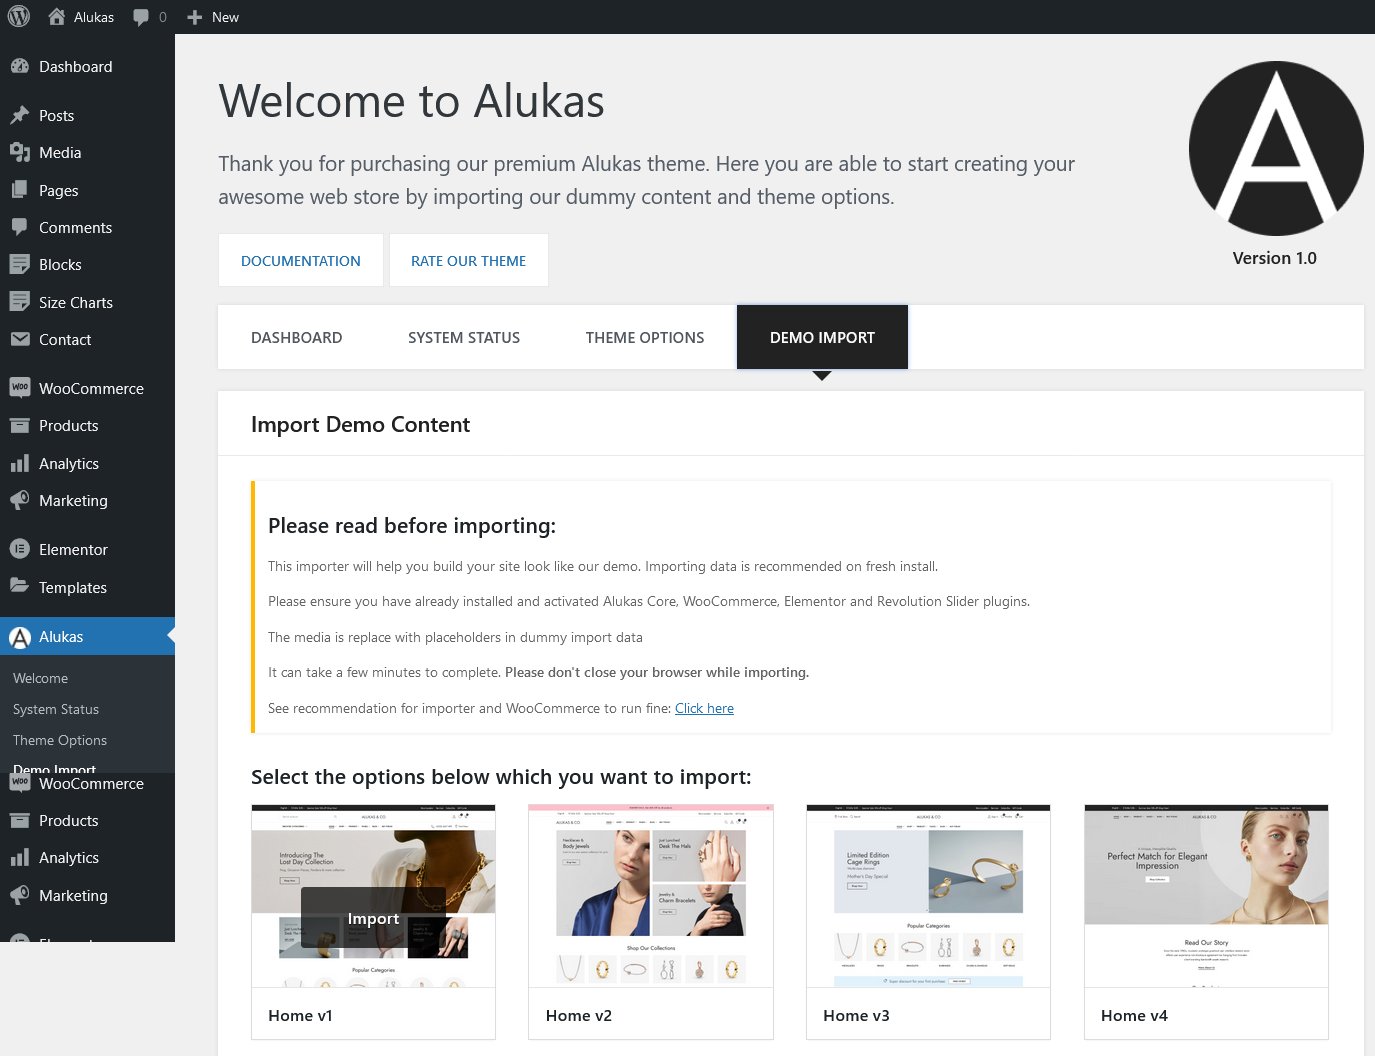
Import Demo Content
-
Login to your WordPress dashboard.
-
Go to Alukas > Demo Import.
-
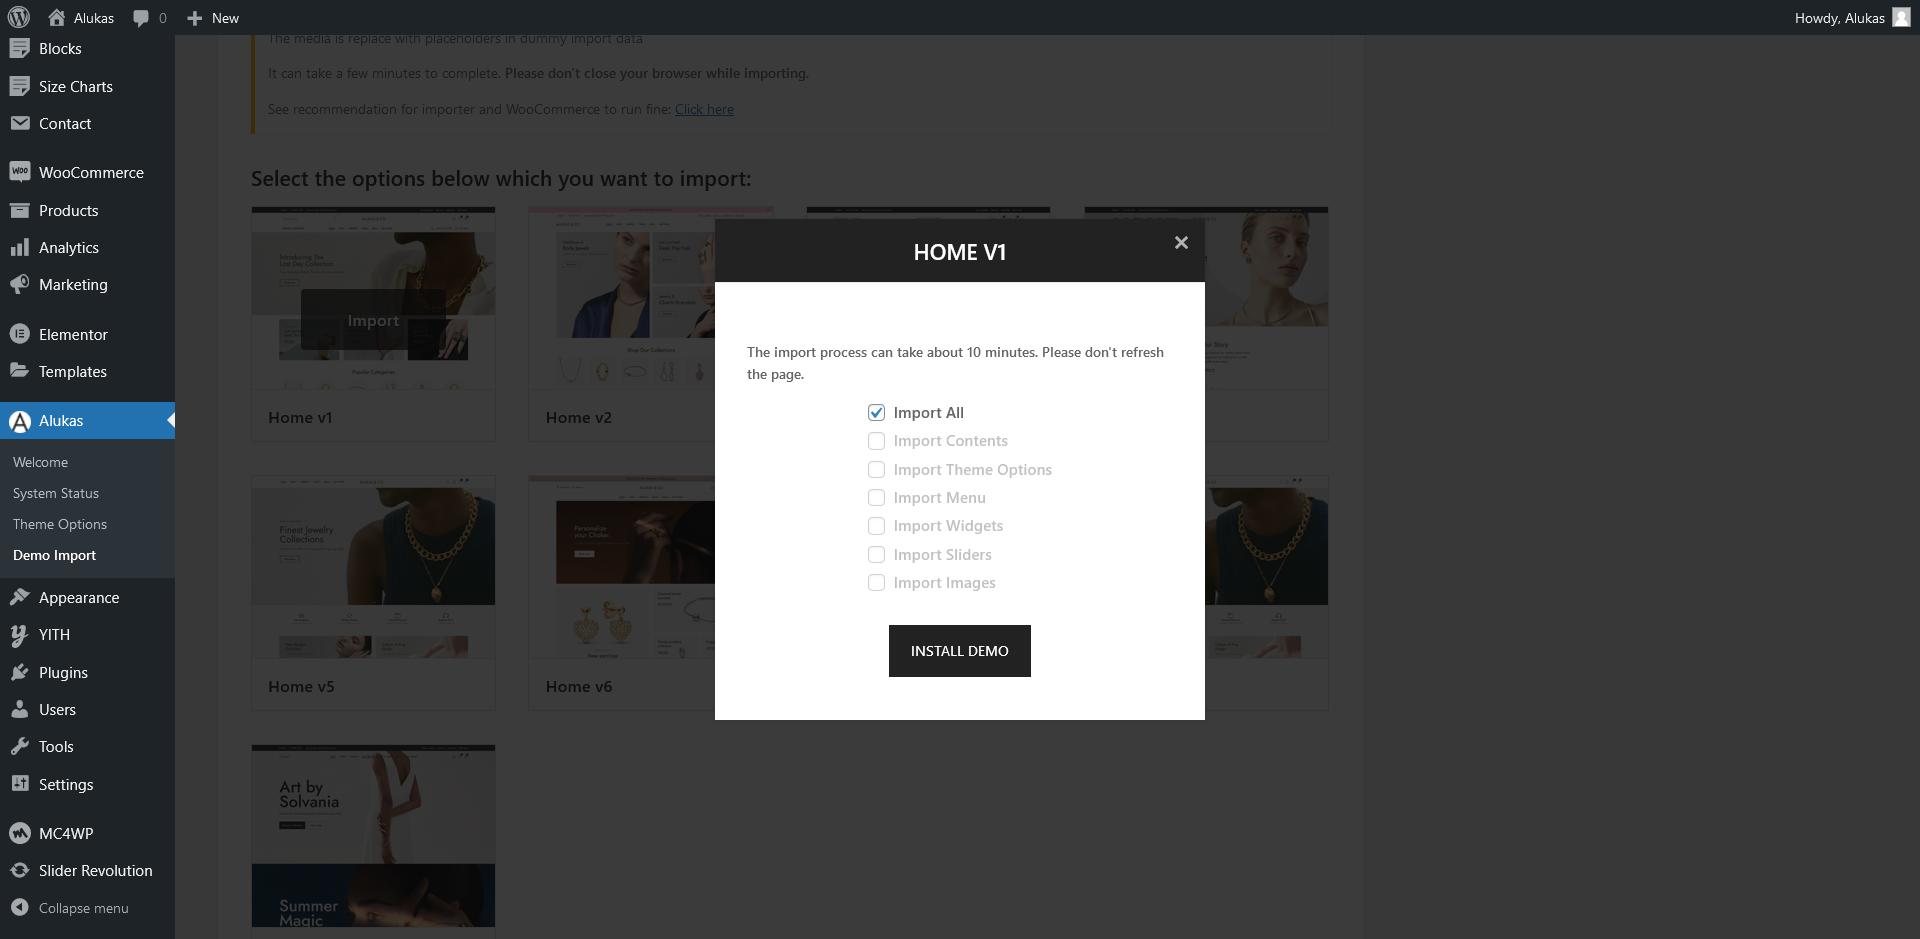
Choose demo as you want to import.
-
Choose import content you want and click on import button. The import process can take about 10 minutes. Please don't refresh the page.
Note : All images are just used for Preview Purpose Only. They are not part of the theme and NOT included in the final purchase files. Also in vendor demo vendor list display only preview purpose. Vendor will not be import when you import demo content. You need to create vendor on your site then it will be display there.
Translation Theme
The easiest way to translate our theme and plugin in your language is by using the Loco Translate WordPress plugin. To use loco translate plugin, please see the steps below:
Notice: If you translate complete our theme in your language, You must be need to translate our theme(Alukas) and our theme's plugin(Alukas Extensions)
1) Translate Theme(Alukas)
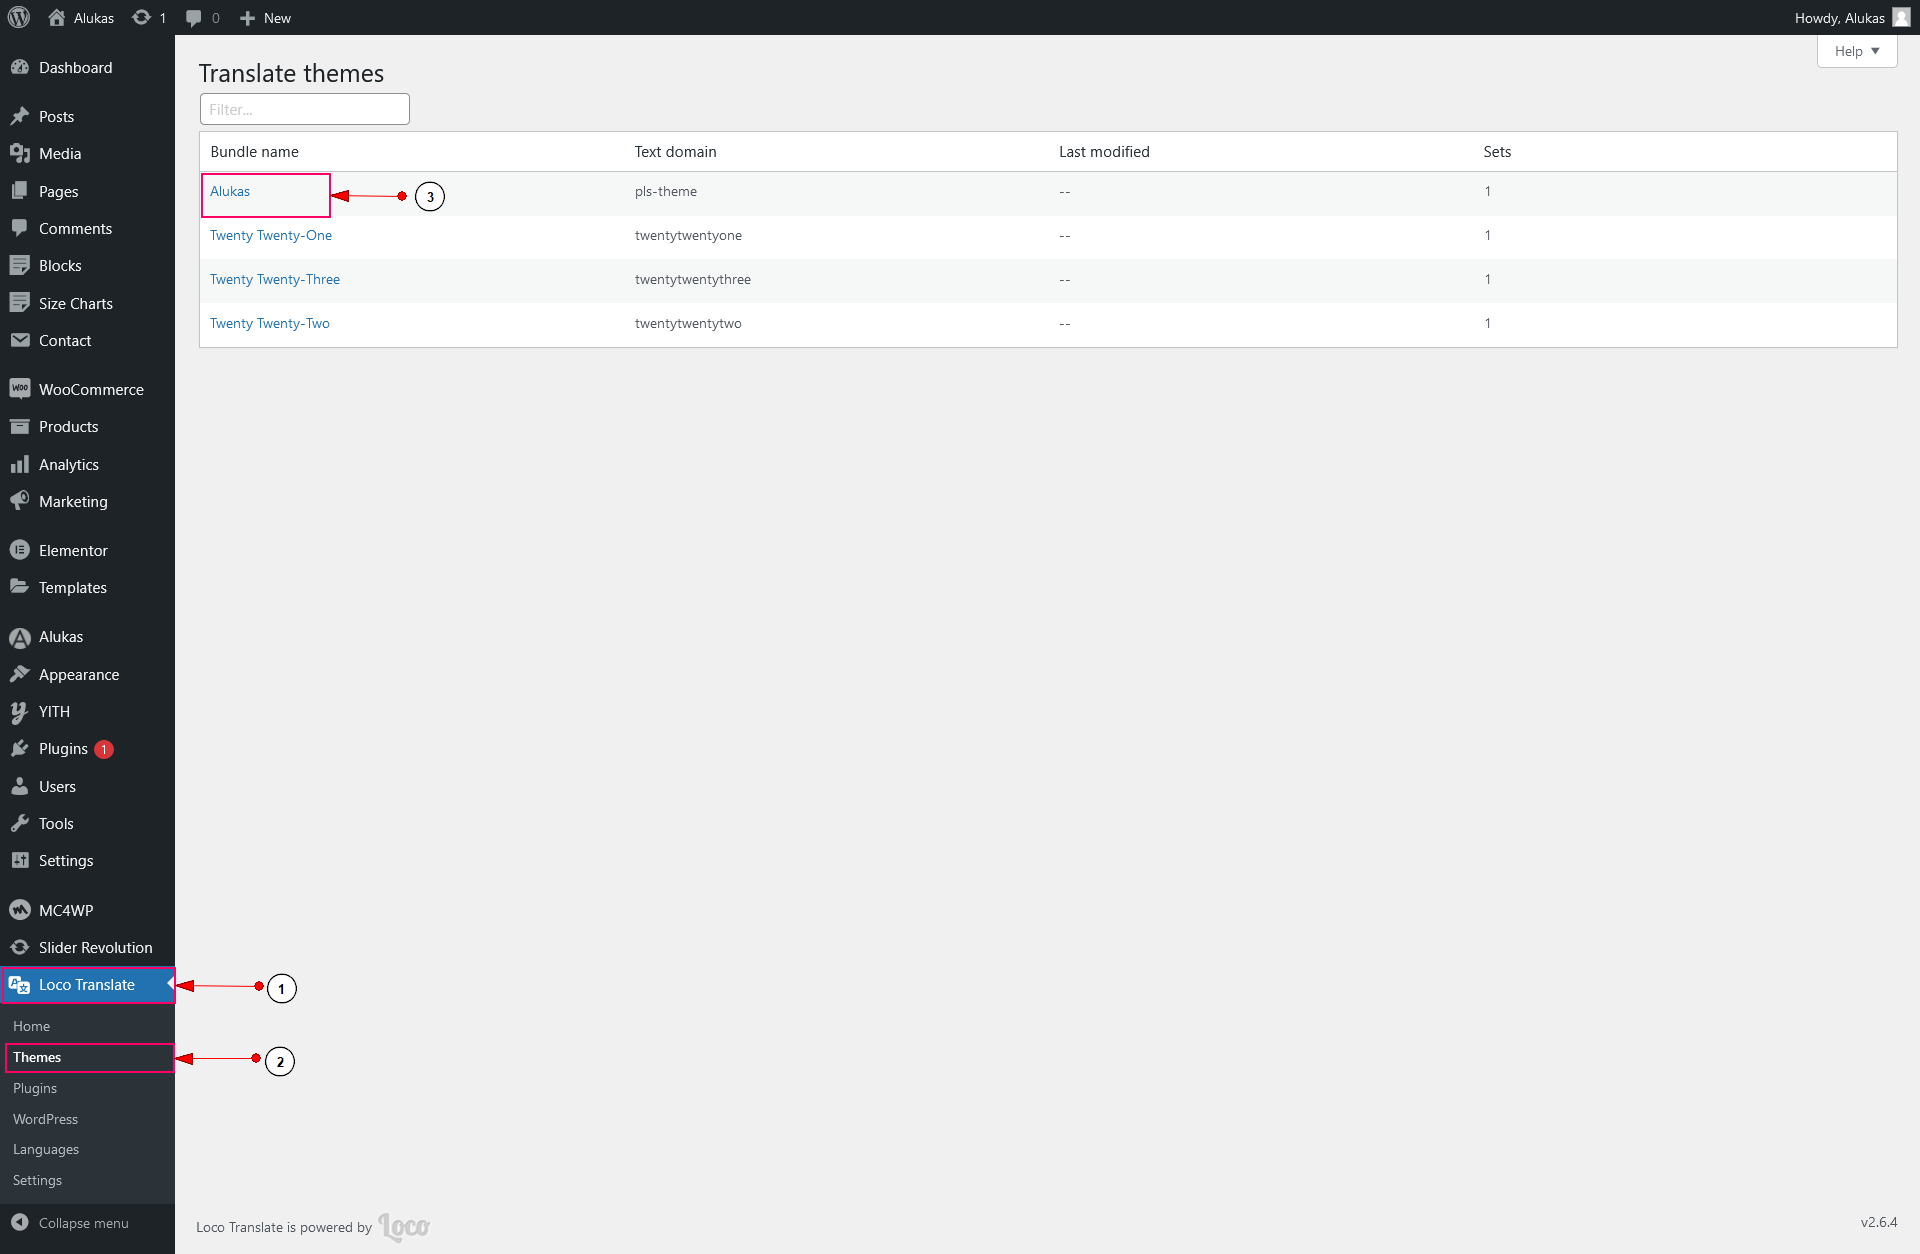
- Install Loco Translate WordPress plugin.
- Go to Loco Translate > Themes and click alukas theme.
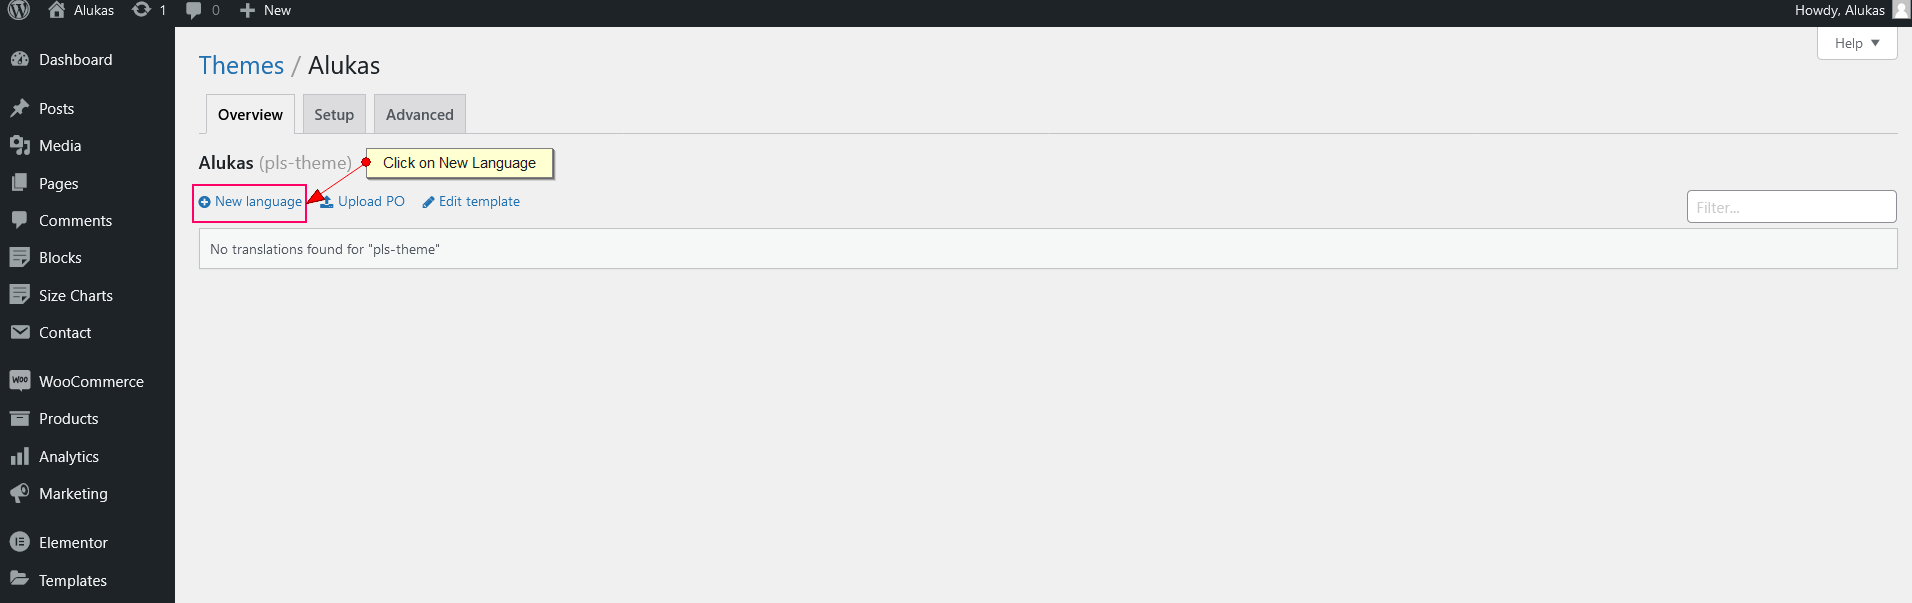
- Click New Language link.
- Choose your language and choose a location is in languages/themes/. We recommend you don’t choose a location is in themes/alukas/languages/, because after you update the theme all your custom files will be lost.
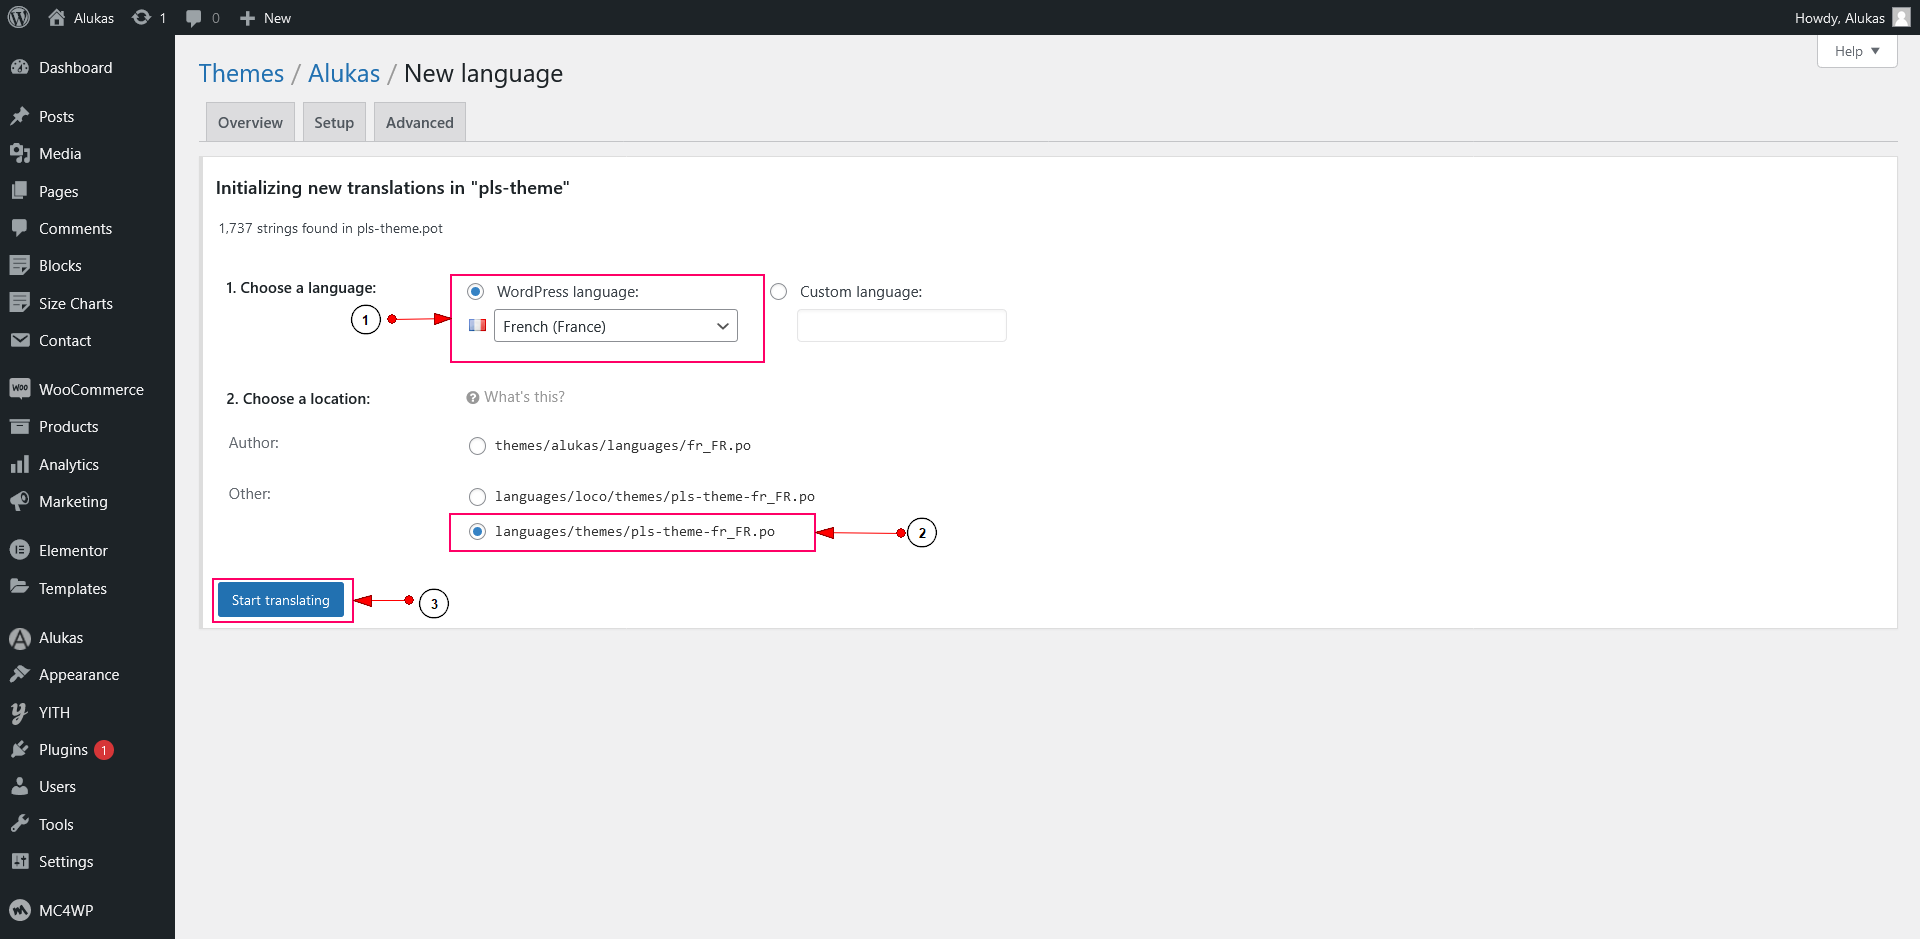
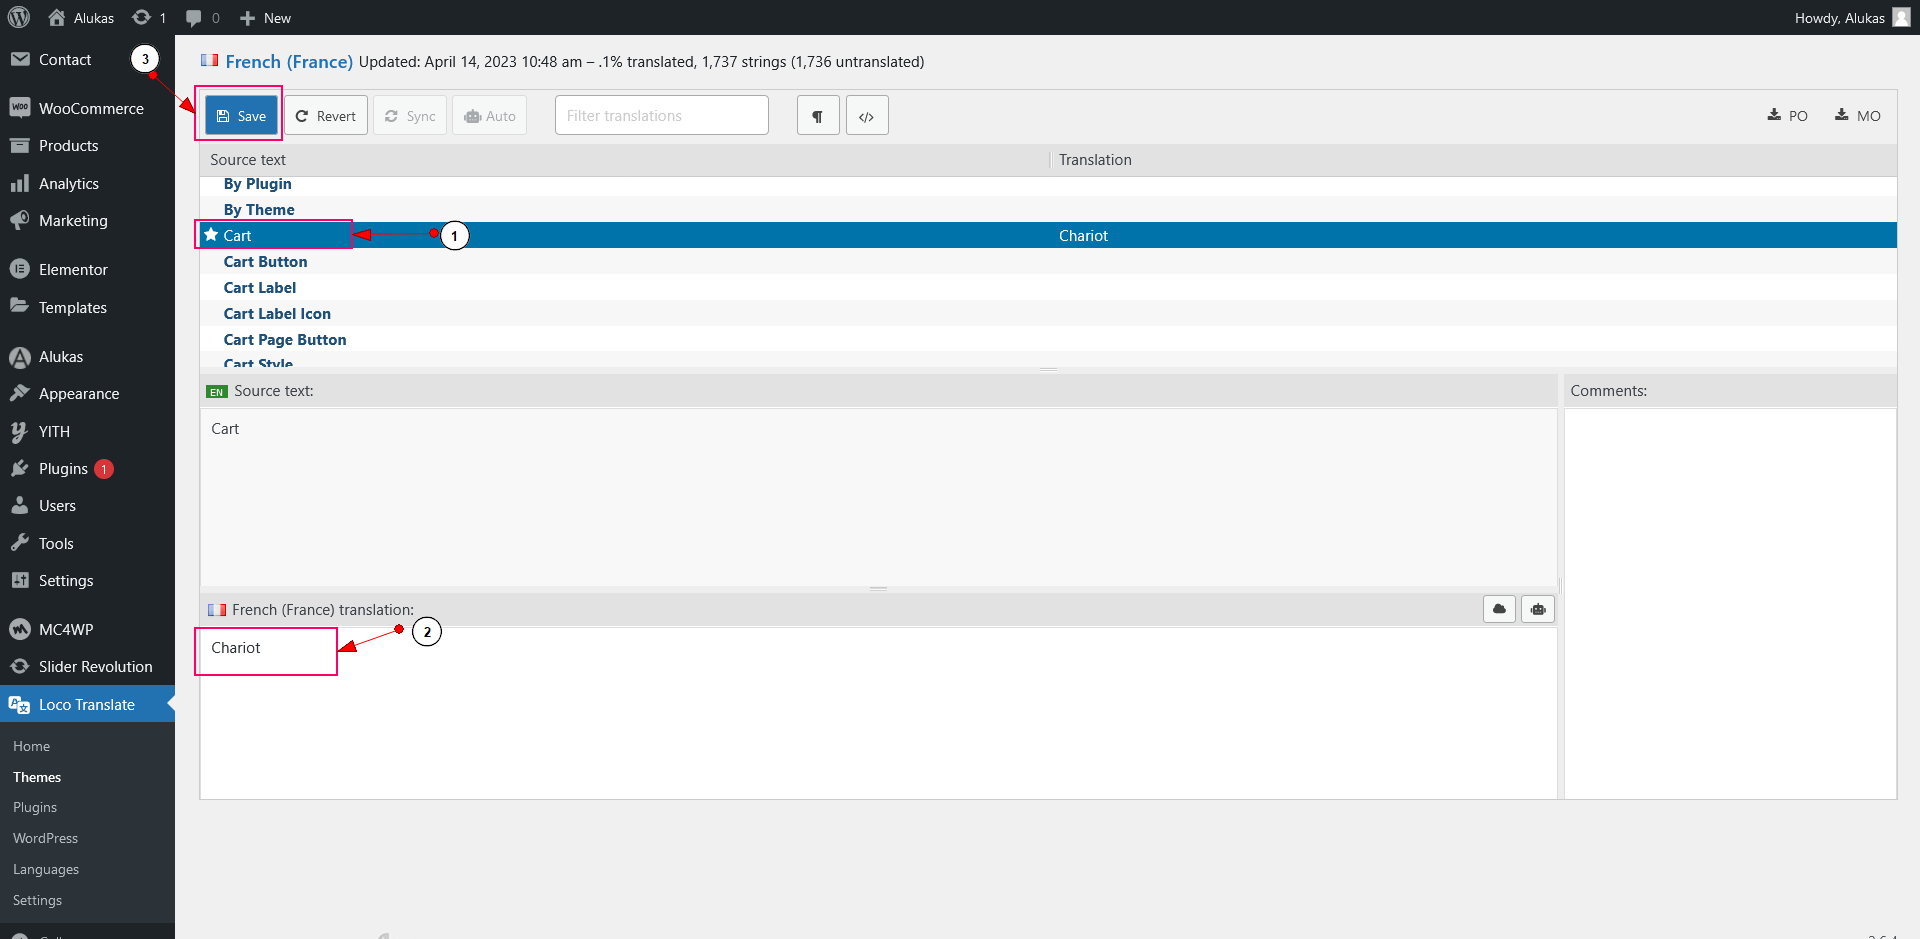
- Click Source Text and enter the text you want to translate in French translation.
- Click Save button.
- Note: To update your language file when you updated the theme, you only click Sync button.

2) Translate plugin(Alukas Core)
- Install Loco Translate WordPress plugin.
- Go to Loco Translate > plugin and click alukas-core.
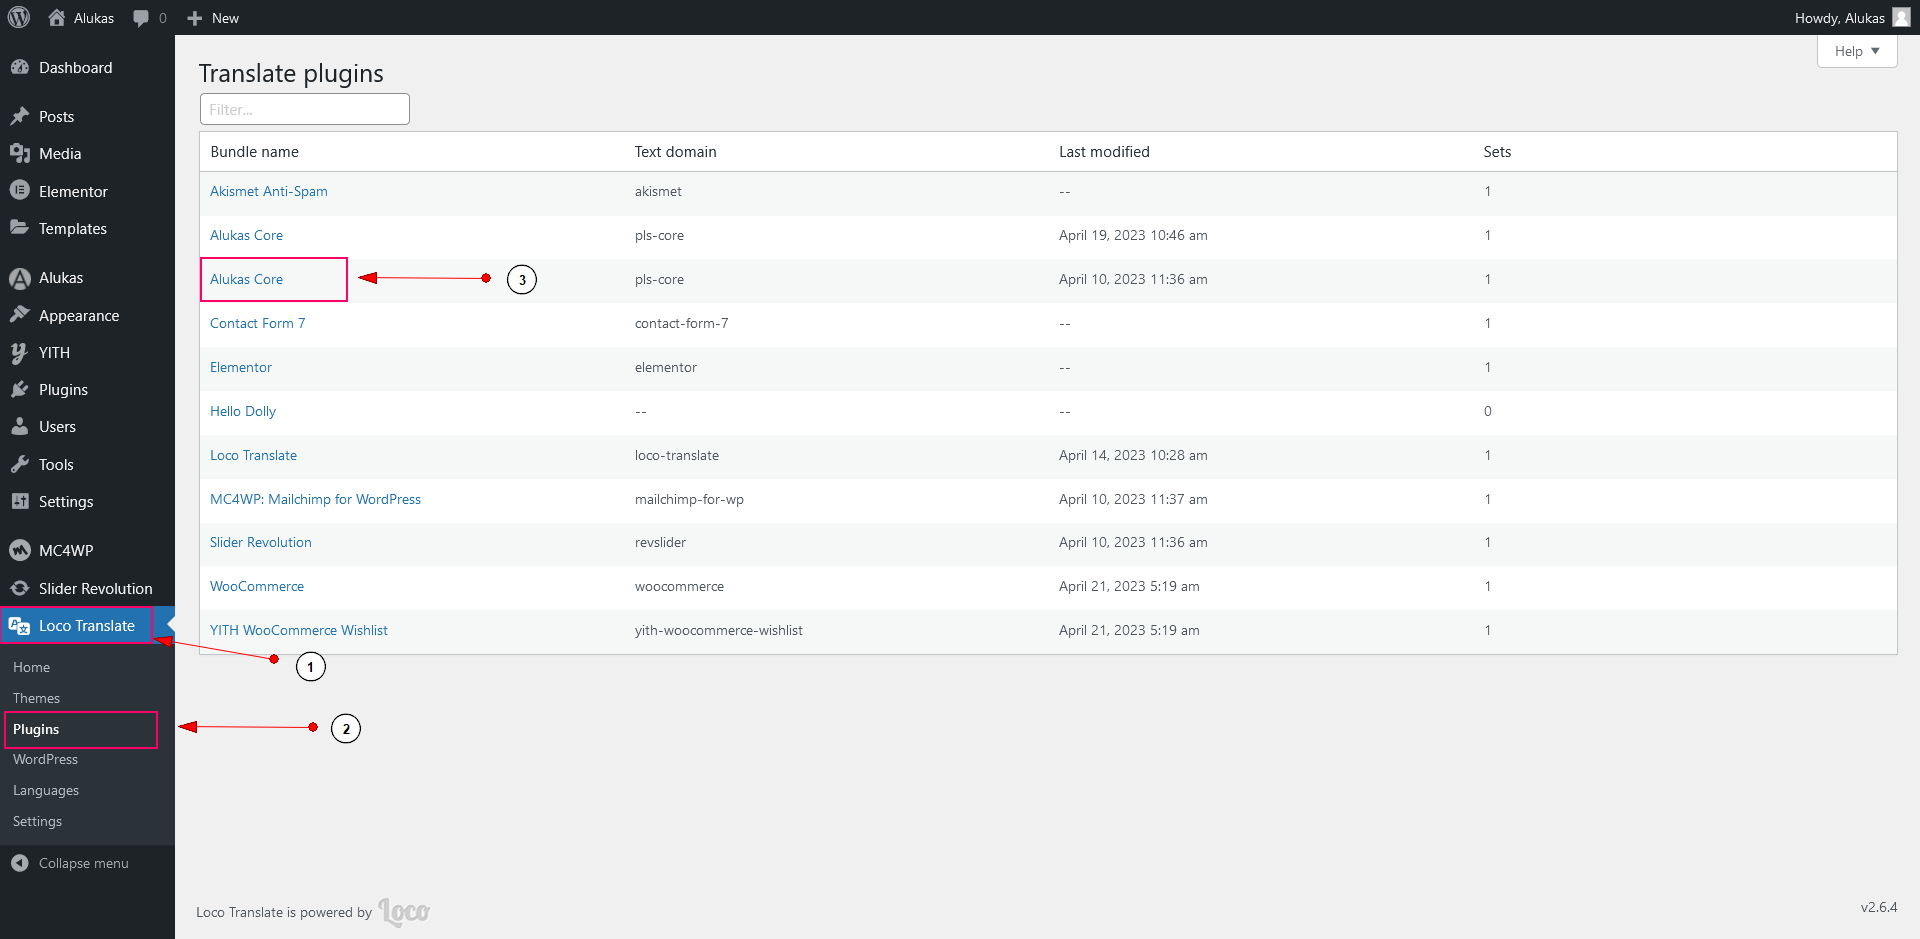
- Click New Language link.
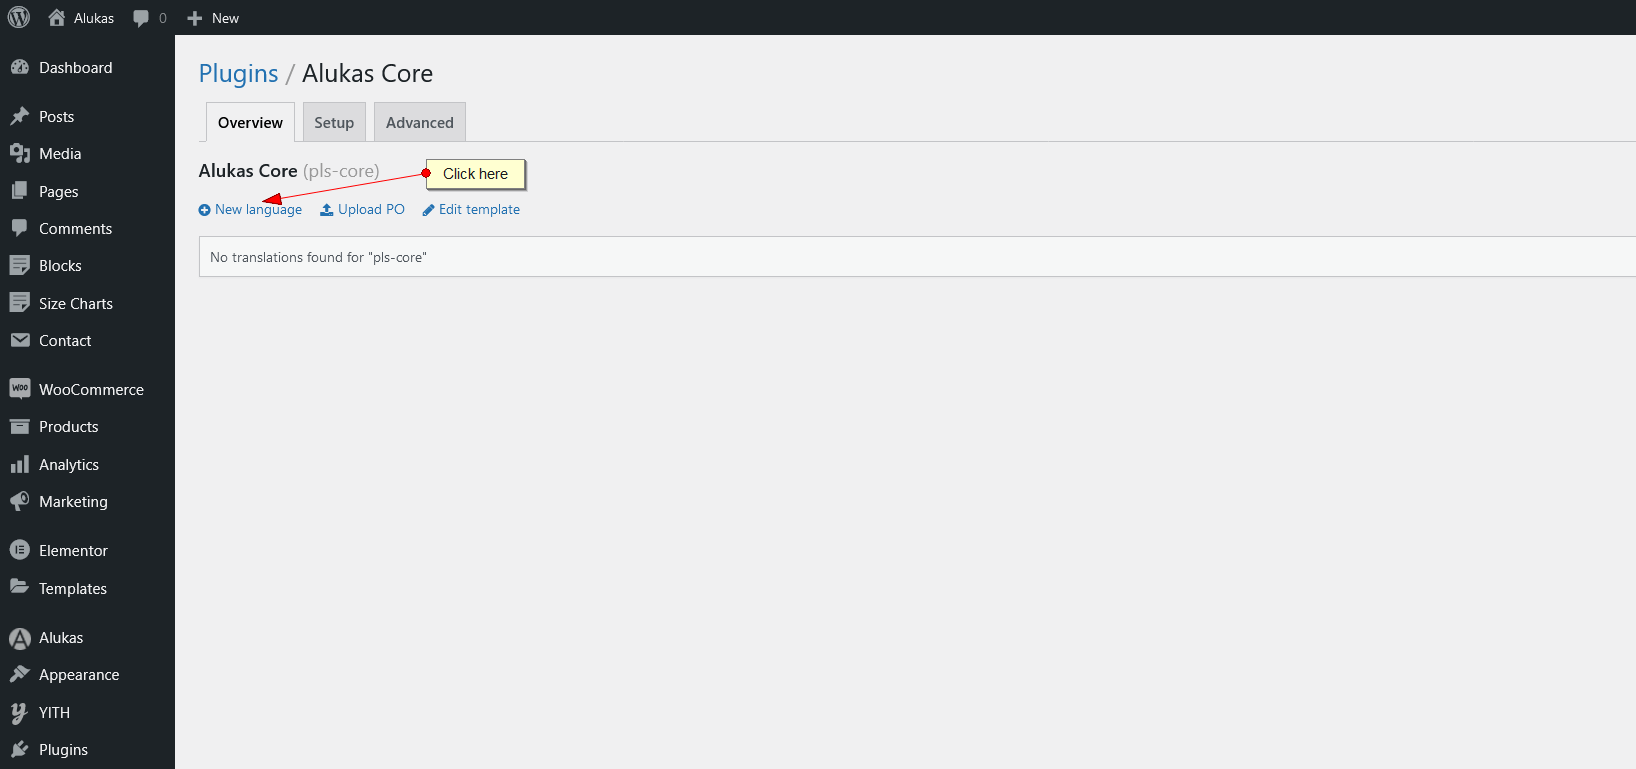
- Choose your language and choose a location is in languages/themes/. We recommend you don’t choose a location is in themes/alukas/languages/, because after you update the theme all your custom files will be lost.
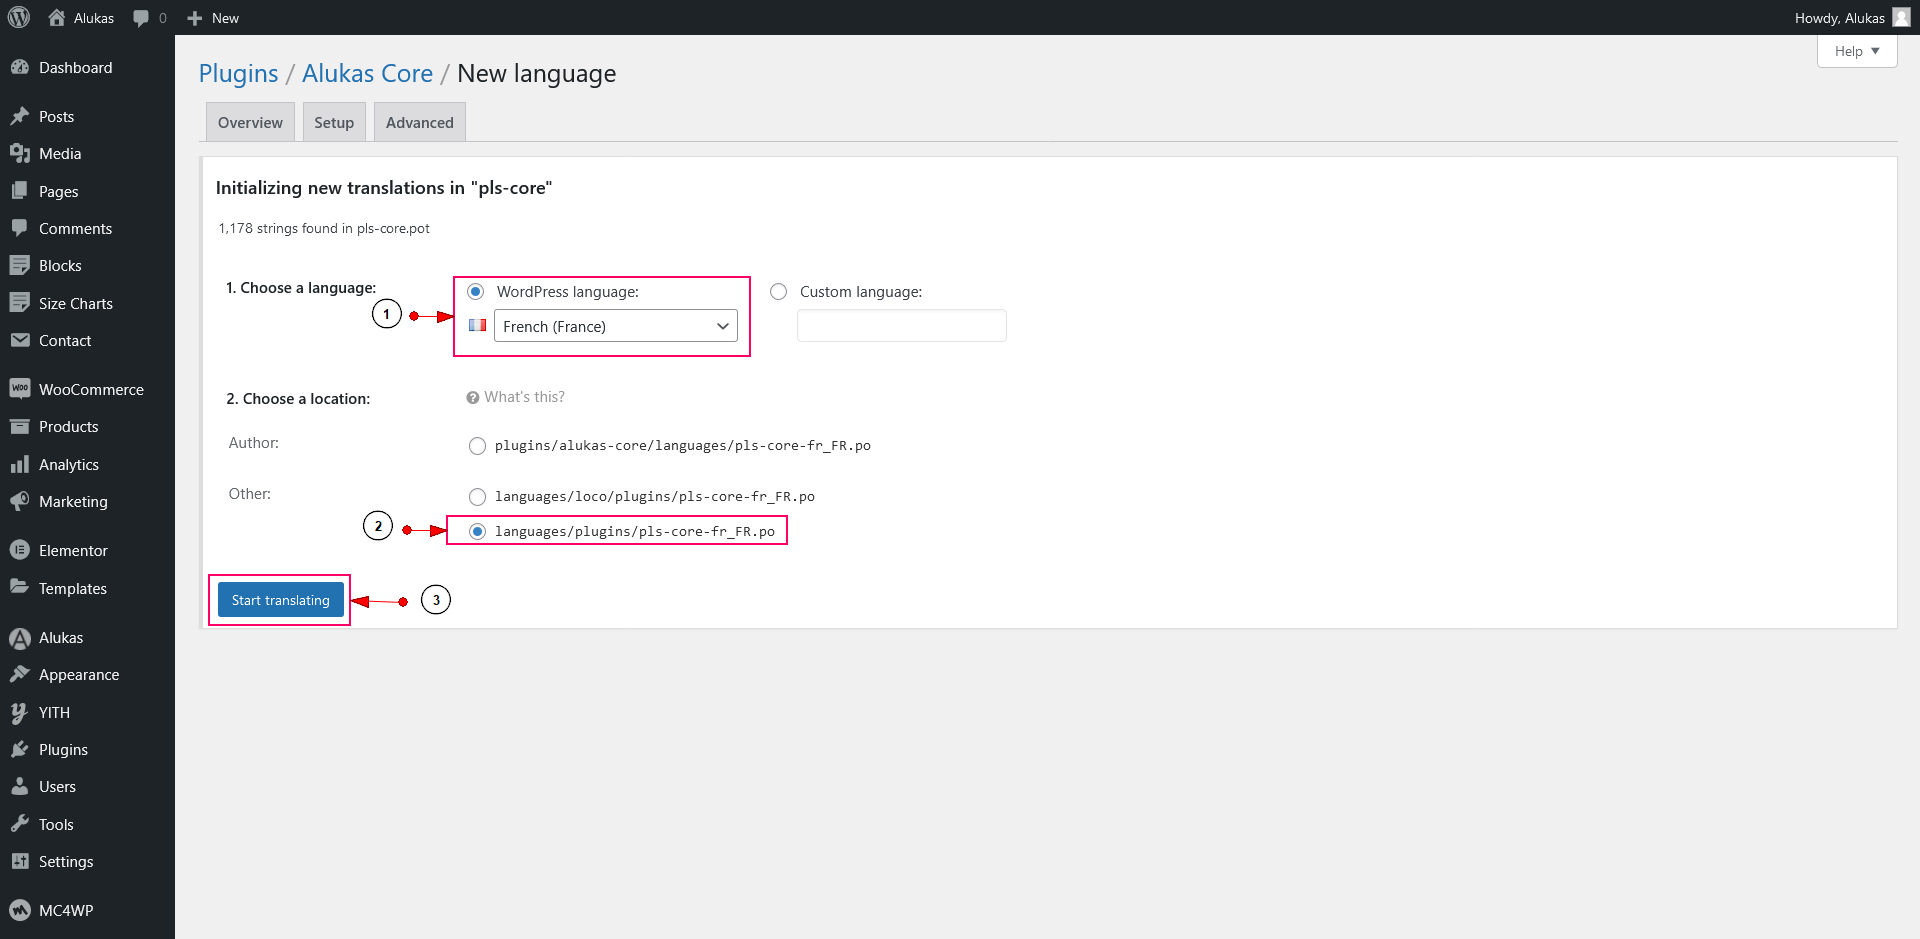
- Click Source Text and enter the text you want to translate in French translation.
- Click Save button.
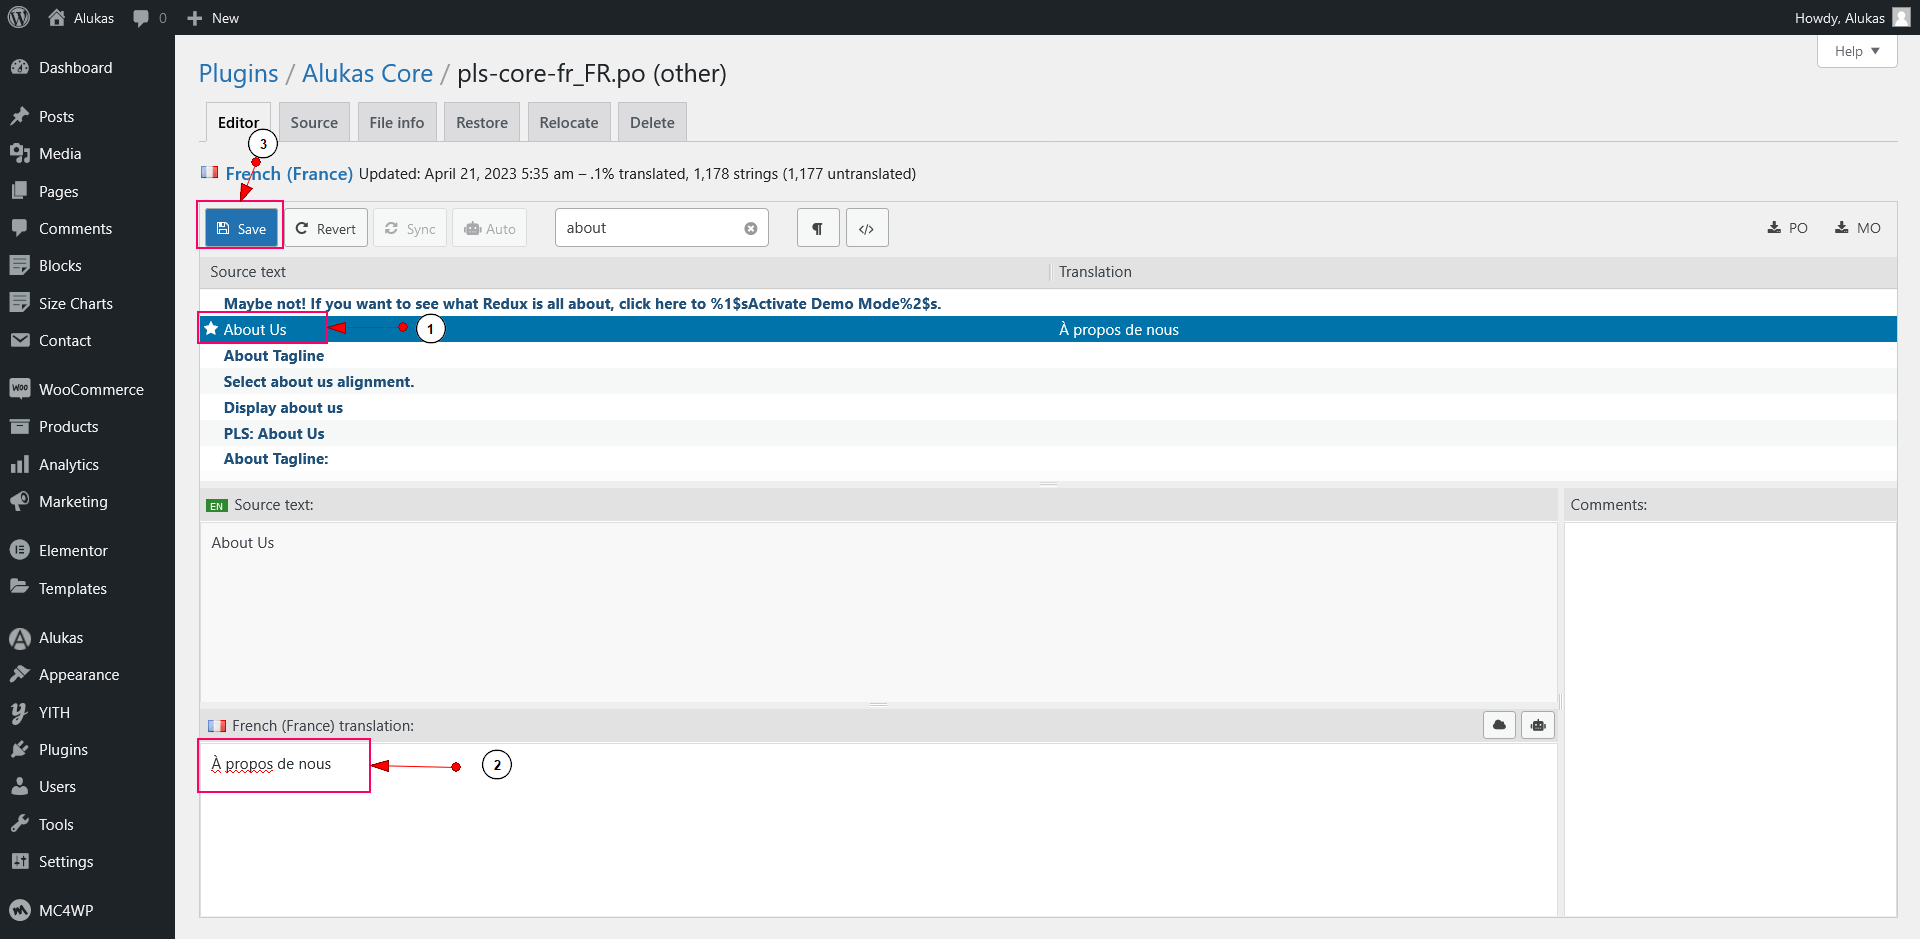
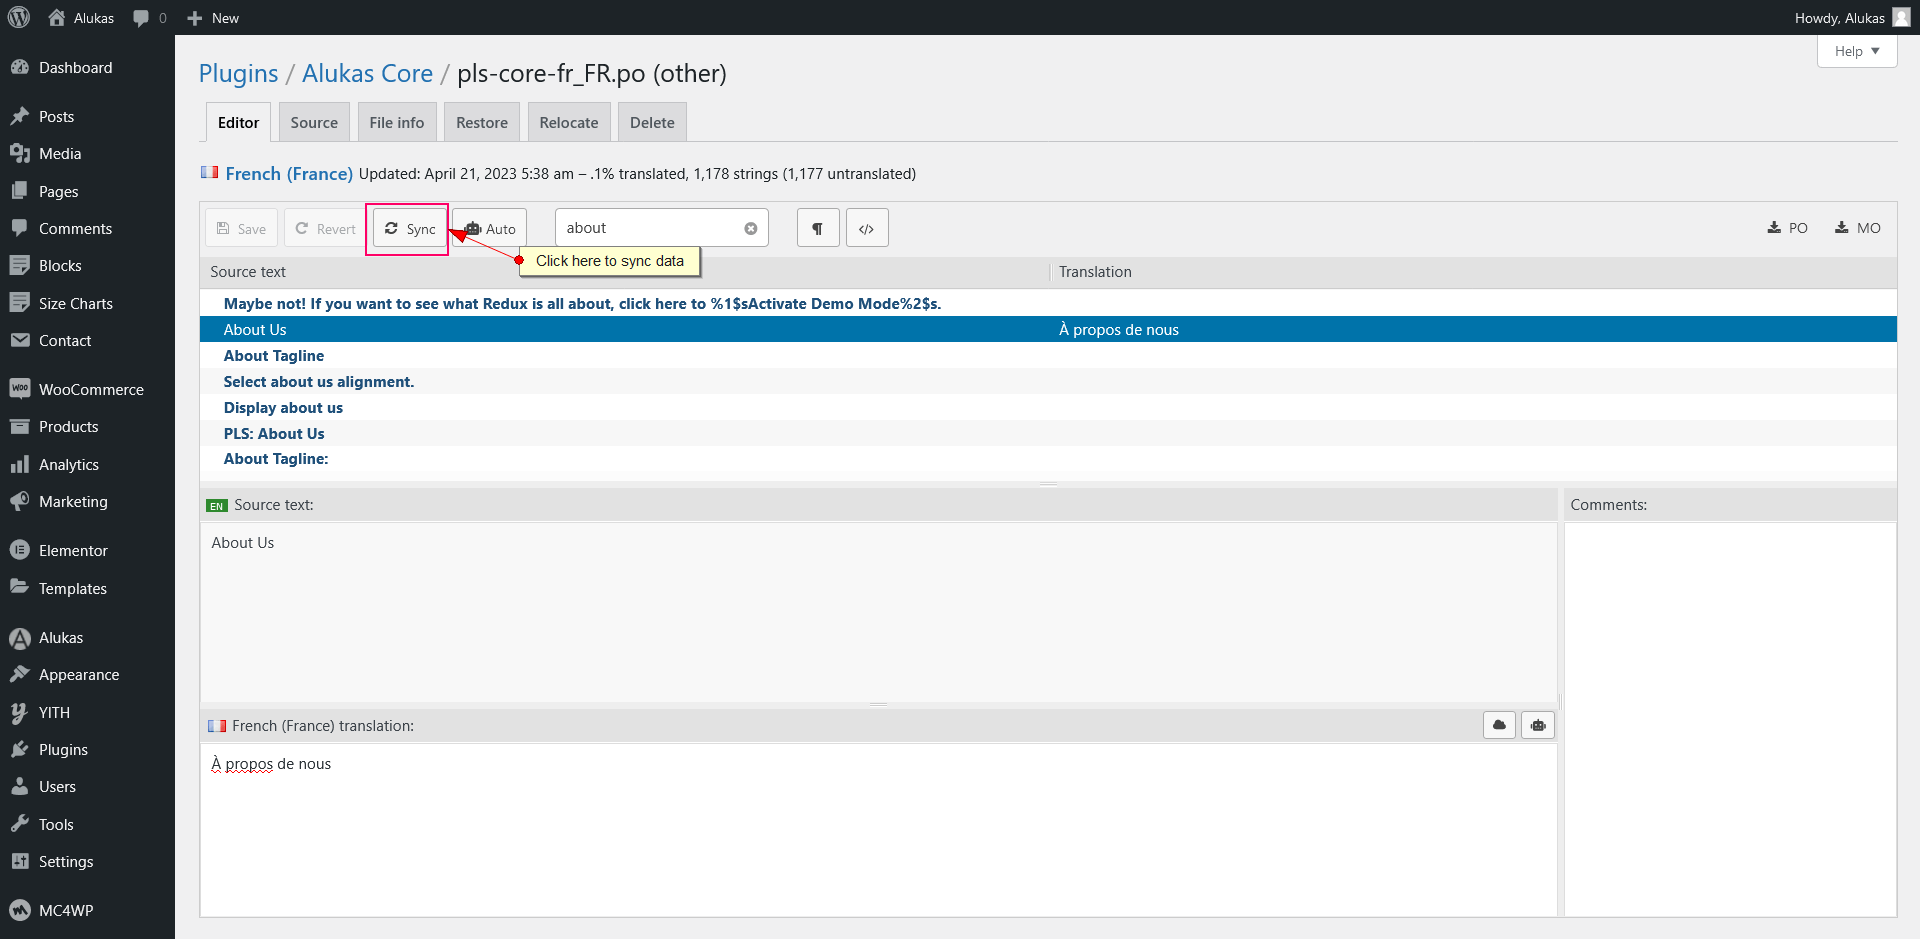
- Note: To update your language file when you updated the theme, you only click Sync button.
3) Use WPML with Alukas
Alukas theme is fully compatible with WPML plugin, the most famous plugin for building multilingual websites. Below you will find documentation for using WPML plugin with alukas. If you’ve purchased WPML and have any questions or issues, please check the links below.
- WPML Plugin - The highly recommended plugin to manage multi-lingual sites
- WPML Forum Support - If you bought WPML then you get free support from their amazing team
- Translating Widgets -Tutorial recommended by wpml team for translating widgets
Translate With WPML
Alukas theme fully compatible with WPML plugin. WPML makes it easy to translate your whole site in minutes.You can automatically translate your entire site using the Translate Everything mode. With this setting, WPML will automatically translate your content as you publish or update it. Translations can then be reviewed on the front-end and edited by the user (or local translator) if needed.
Installing WPML
The first time you use WPML, you can manually install it using the OTGS Installer plugin. This also allows you to register WPML so you can receive automated updates to future versions.
Learn more : WPML installation guide
Please install following WPML components.
- WPML Multilingual CMS
- String Translation
- Translation Management
- Media Translation
- WooCommerce Multilingual
WPML Setup Wizard
When you first activate WPML a setup wizard will help you specify the essential settings you need to prepare your site for multilingual content.
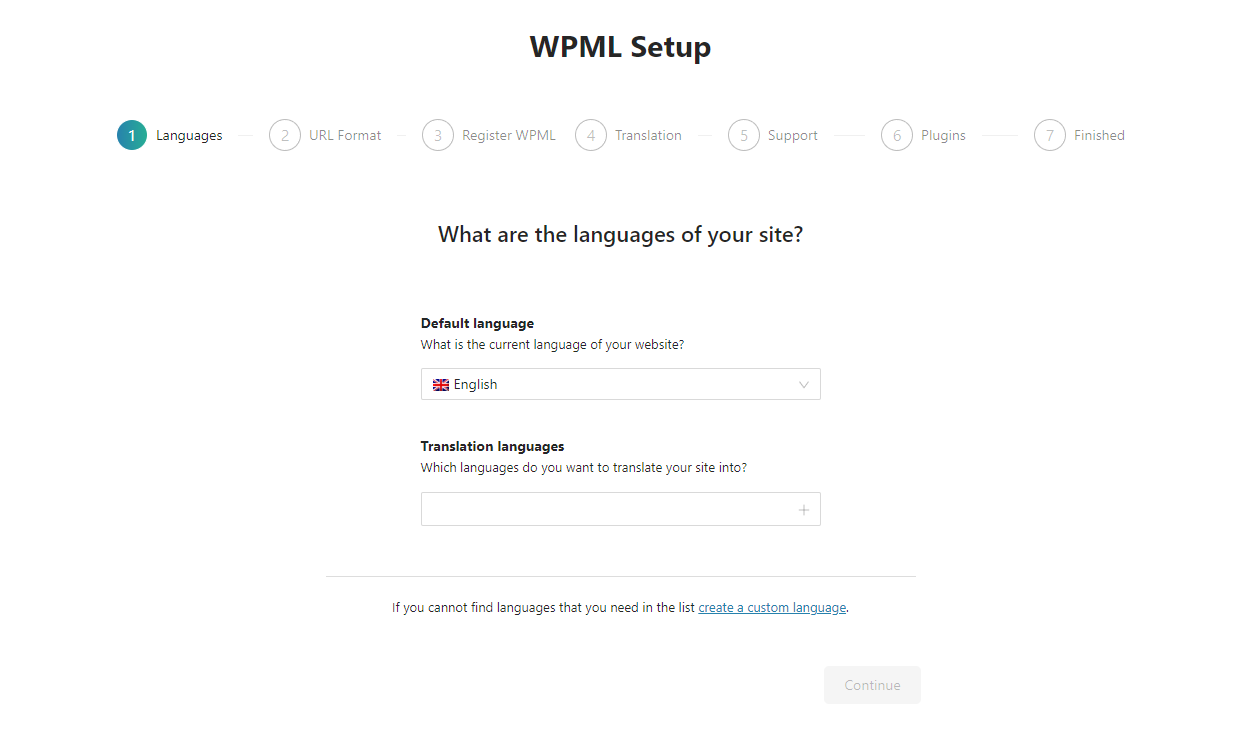
Follow the wizard to:
- Choose your site’s languages
- Choose your URL format
- Register WPML
- Choose your translation mode (see the next section for more details)
Translation Mode Options in WPML
You have two options for translating your site: Translate Everything or Translate Some. The WPML setup wizard will try to choose the best option for you depending on how much content is on your site.
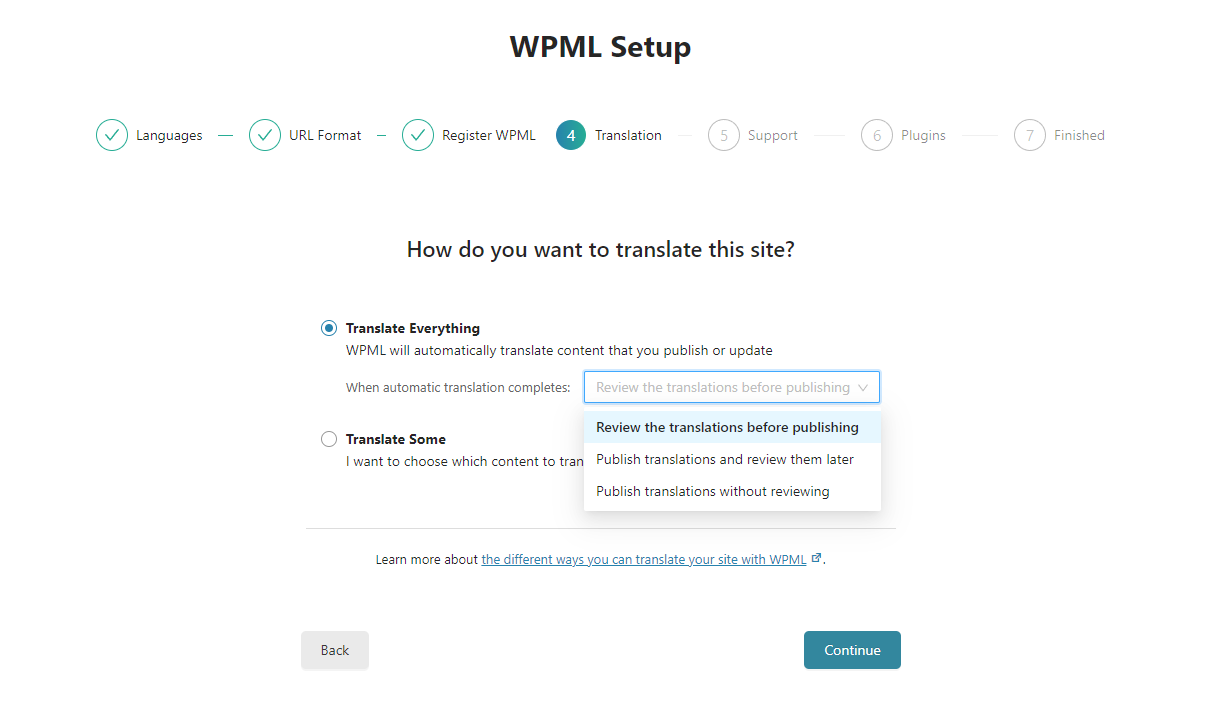
Translate Everything
When you select the Translate Everything mode, it automatically translates all your site’s content in minutes.
![]()
This feature works for the following types of content:
- Pages
- Posts
- Taxonomy terms that are assigned to posts or pages
- WooCommerce products
- And also work with custom post types, custom taxonomies
Learn More: WPML’s automatic translation. options.
Translate Some
If you don’t want to translate your whole site or would prefer to hire translators to work on your site, this option gives you more control over what you translate and who will translate it.
After selecting this translation mode, go to the WPML => Translation Management page and select content to translate.
![]()
Translating Yourself
If you want to translate your site your self, Then you can translate your posts and pages by clicking the plus and pencil icons.
![]()
When you or a local translator click to translate the content, you’re taken to WPML’s Advanced Translation Editor. It’s a professional-grade translation tool with features like one-click automatic translation, glossary, spell-checker, and more.
![]()
Learn more: About WPML’s Advanced Translation Editor.
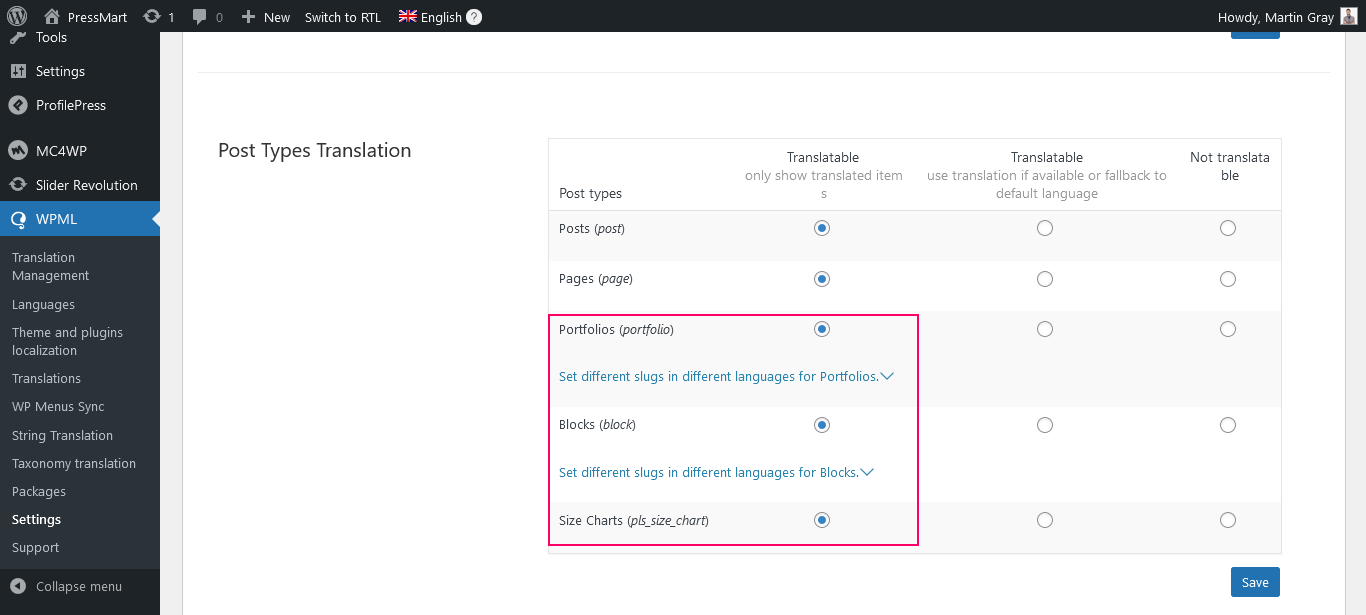
Translating Blocks and Size Chart
To translate the custom post types and taxonomies,go to WPML => Settings => Multilingual Content Setup. Navigate to Post Types Translation where you can choose the translations for Blocks, Size Charts.
Please follow below step for translate page,post or cusotm post type.
1) Clicking the plus Or pencil icons.
![]()
2) Click to plus icon, translate it and Save
![]()
3) If you want to translate automatically then click on Translate Automatically button. For this you need to purchase some credits.
![]()
Learn more: About automatic translation.
Translating theme and plugin texts
WPML String Translation allows users to translate texts that are not in posts, pages, and taxonomies.
Go to WPML => String Translation
![]()
Learn more: About String translation..
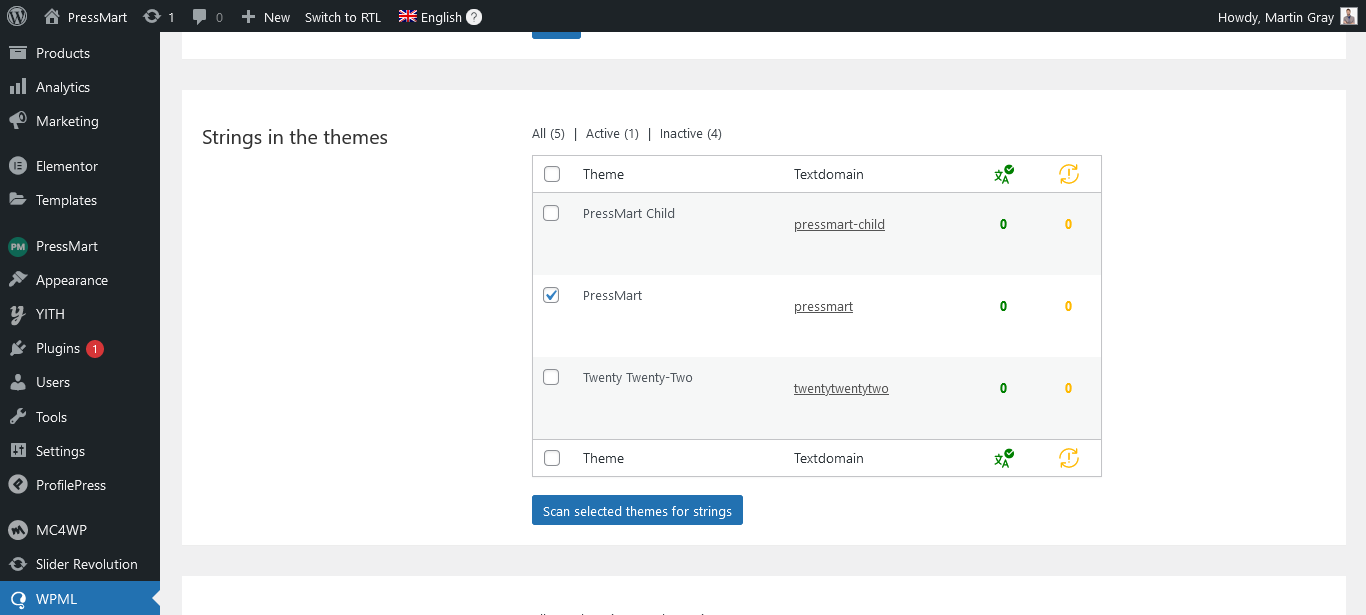
Scanning Themes and Plugins for Texts
If you didn't find any string in WPML => String Translation list then you need to scanning theme and plugin
Go to WPML => Theme and plugins localization. Select theme or plugin and then hit the scan string button.
Translating Custom Taxonomy
To translate the custom taxonomies,go to WPML => Settings => Multilingual Content Setup. Navigate to Taxonomies Translation where you can choose the translations for portfolio category, portfolio skill, product brand etc.
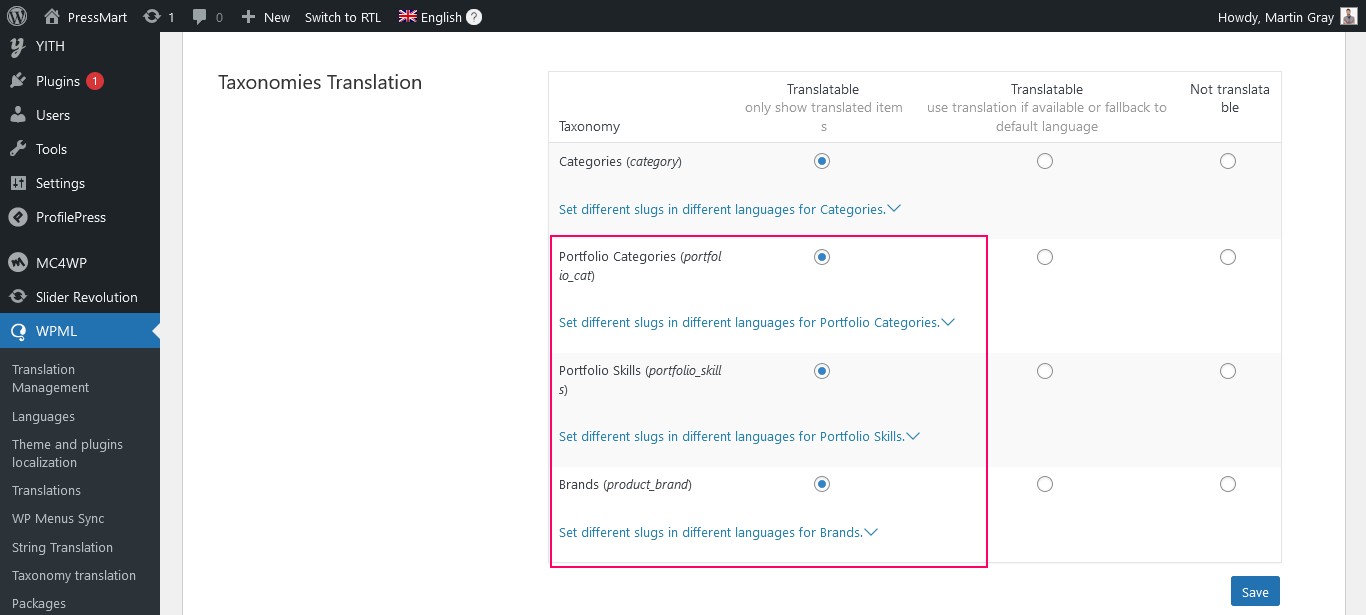
You can translate categories and tags assigned to a specific post or portfolio pages while translating them using the WPML translation editor screen. Furthermore, you can translate categories and tags on the WPML => Taxonomy Translation page.
1) Go to WPML => Taxonomy Translation and select taxonomy. Click to plus icon for translate it
![]()
2) Translate in your language and save.
![]()
Translating Menu
You can translate menus automatically, manually, or have WPML synchronize menu content.
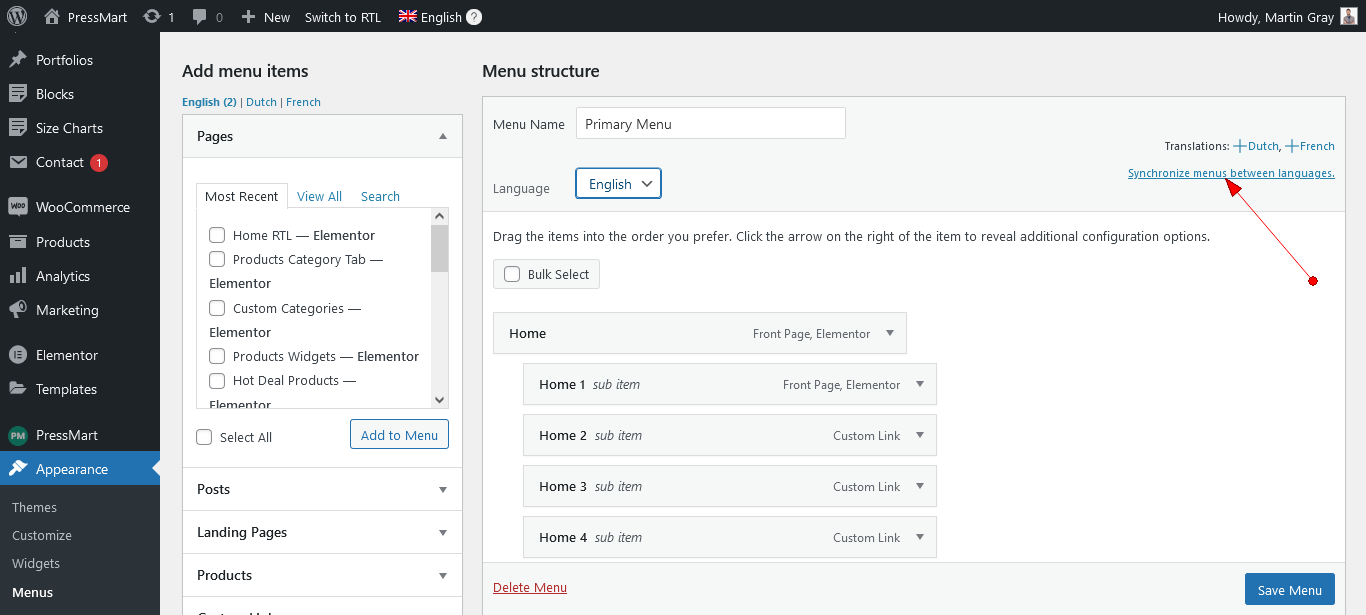
Learn more: About How translating menus.
Translating Widgets
you can easily translate your widgets using WPML’s String Translation. Go to WPML => String Translation and select Widgets in the domain selection dropdown. You will see all the default widgets registered available for translation. Or, you can use the search bar to find text from a custom widget.
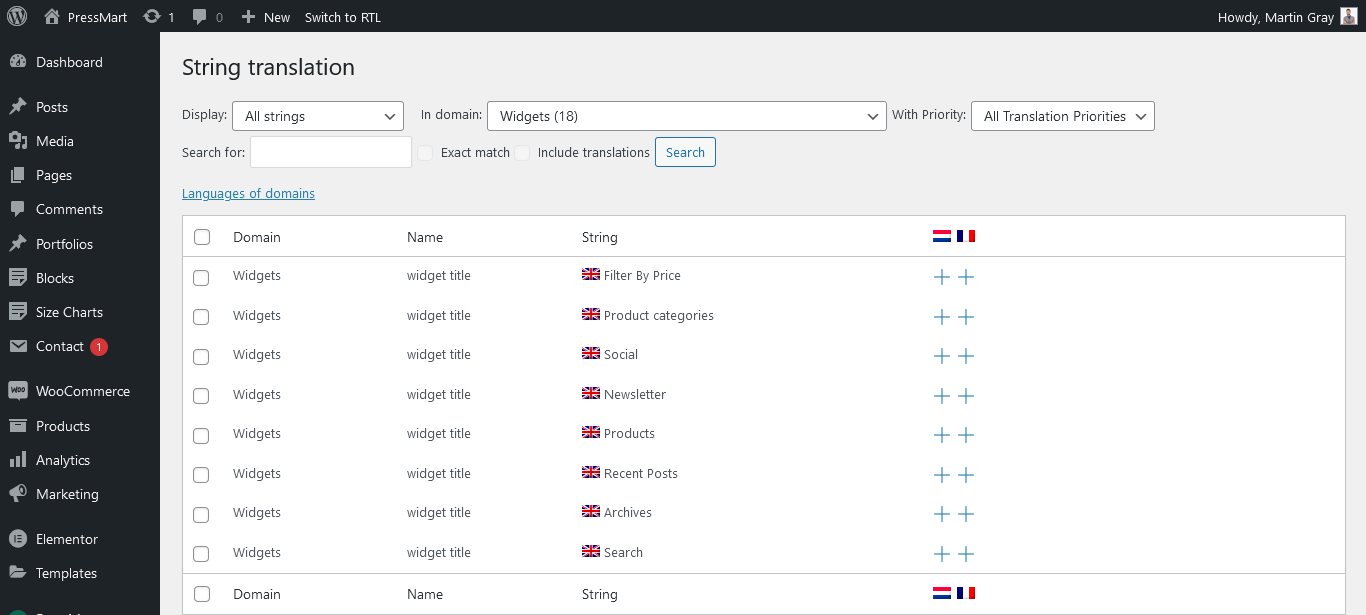
Learn more: About How translating Widgets.
WooCommerce Multilingual
WooCommerce Multilingual allows you to run WooCommerce stores with several languages and currencies.
set up the most important options for your multilingual store. To adjust any of these settings later, go to WooCommerce > WooCommerce Multilingual and click the Status tab.
Learn more: About WooCommerce Multilingual.
Enabling Multiple Currencies
With WooCommerce Multilingual, you can use multiple currencies on your sites. To enable it, go to WooCommerce > WooCommerce Multilingual and click the Multi-currency tab. There, you can configure secondary currencies, set different prices per currency, adjust currency switcher options, and more.
Learn more: About Multiple Currencies.
Translating WooCommerce Products
You translate WooCommerce products just like posts and pages. You can use the Translate Everything mode, choose to translate yourself or send products for translation to other translators or a translation service.
Learn more on the page about using WooCommerce Multilingual.
Translating Slider Revolution
The theme comes with the powerful Slider Revolution plugin. WPML have detaild documentation for how to translate Slider Revolution.
Language Switcher in Theme Header
Please follow Below step.
Go to WPML => Languages and enable Custom language switchers option.
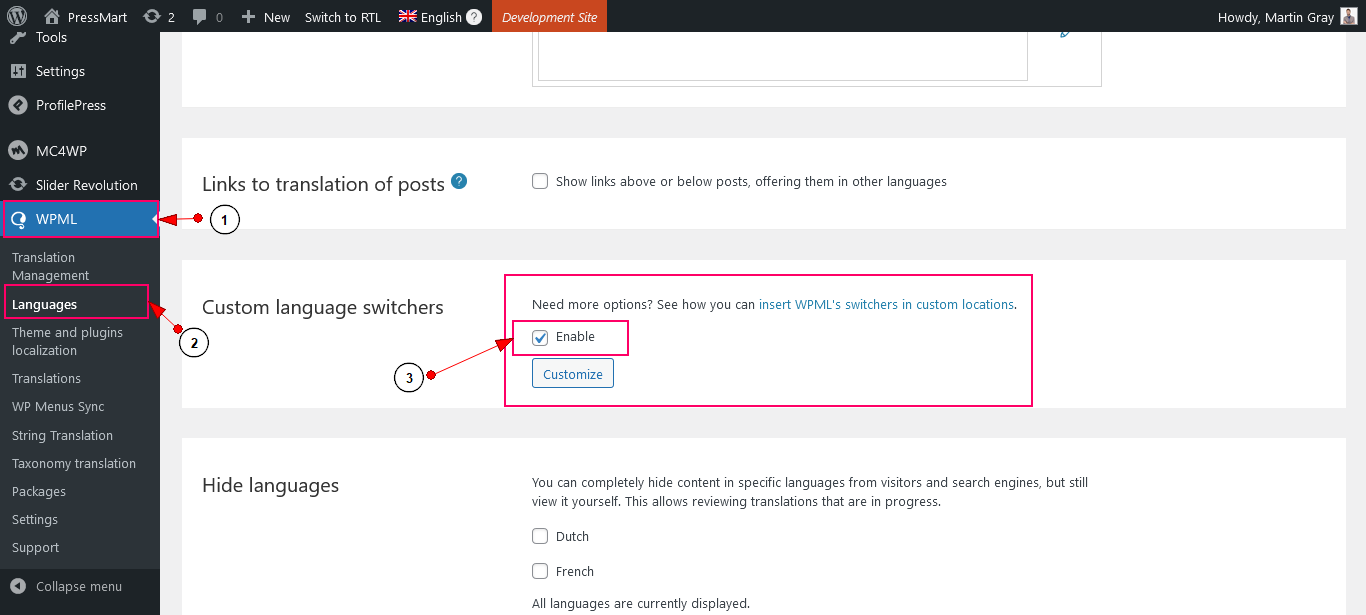
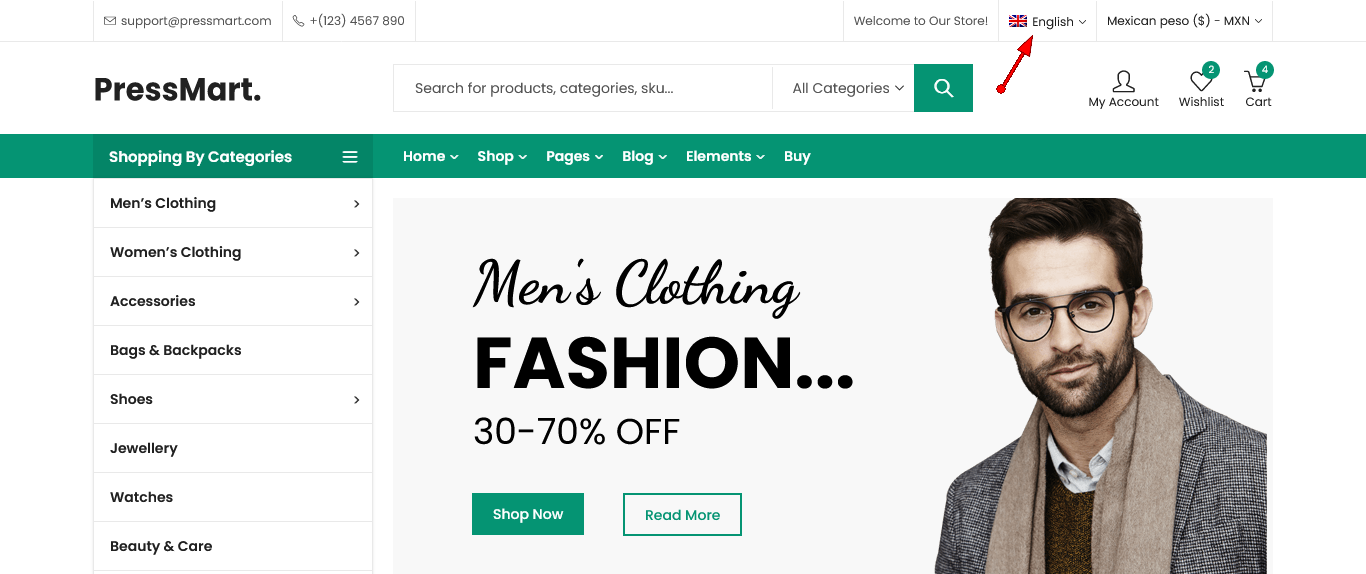
Customize language switcher as your need.

It's look like below image.
WPML Helpfull Links
Below you will find documentation for how to use WPML plugin.
Updating the theme
If you updating Alukas theme, Please following below step and update Alukas theme and this step is very easy and simple:
Notice:After updating the theme, Your content will not be lost. However, any customizations to the theme’s core files, such as PHP files, language files will be lost. So you need to the child theme to customize the theme and backup the language file if you translated the theme.
1) Theme Update Automatically
You can update the theme automatically by following this link-- https://envato.com/market-plugin/
2.Manual Update Via WordPress
- First Download Latest Installable theme from here.
- Login to your WordPress Dashboard.
- Go to Appearance > Themes
- Click Add New button on top of the page.
- Then click Upload Theme
- Upload the file you’ve downloaded from ThemeForest in step 1 and click Install Now
- After done installing, click Replace current with uploaded button
- That's It.
3.Manual Update Via FTP
- First Download Latest Installable theme from here Then extract it to your computer..
- Access your server via FTP or SFTP
- Browse to wp-content/themes/
- Delete the current theme folder (folder "alukas") then upload the new one downloaded in step 1. (Don't forgot to upload unzip folder.)
Plugin Update
You can update plugin like 'Slider Revolution' and others by following these steps--:
Notice: If you translated plugins and the language files are in plugins/your-plugin-name/languages/ (For example, plugins/alukas-code/languages), you need to upload them to wp-content/languages/plugins/. If not, after updating plugins, your translated language files will be lost.
- Login to your wp-admin
- Go to Plugins > Installed Plugins
- Now, delete those plugins which you want to update. For example, if you want to update 'Slider Revolution' plugins, then delete those plugins first.
- After deleting, you will get a notice to install those plugins again.
- Now install and activate those plugins. After installing, plugins will be updated automatically.
Child Theme
A WordPress child theme allows you to apply custom code changes to your site. Using a child theme ensures that all your customizations will not be overwritten even when you update the parent theme.
Alukas is fully child theme compatible. We have attached a basic child theme(alukas-child.zip) to the download package which contains the minimum of required files. If you are planing any code customizations we highly recommend to do this inside the child theme! Learn more about child themes here.
1) What is a Child Theme?
A child theme is a theme that inherits the functionality and styling of another theme, called the parent theme. Child themes are the recommended way of modifying an existing theme. Child themes allow you to modify or add to the functionality of the existing parent theme.
2) Why use a Child Theme?
Always use a Child Theme when modifying any theme files. This way you make sure a theme update will not wipe out any changes you have made to the files.
There are a few reasons why you would want to use a child theme: If you modify a theme directly and it is updated, then your modifications may be lost. By using a child theme you will ensure that your modifications are preserved.
Speed Optimization
What can make your site slower?
1. Plugins:
When you have a number of plugins active on your site, it can slow down your site. Deactivate all the plugins except the ones included within the theme and clear the browser cache. Then, you can activate your plugins one by one and check to see which plugin is slowing your site.
2. Images:
Images are a key factor in optimizing a website. It is important to optimize your images for your website. Images with large size can slow down your site. Do not upload images in large size. For instance, if your weblog is created by images with the size 800*600, you should upload an image with the same size and not bigger.
3. Host:
Your host or sever can be a reason of your site low speed. If you are using VPS for your hosting, it can be because of bad configurations and low resources. If you are using shared hosting, you need to contact your host provider in this regard so they can check it.
4. JS and CSS Files:
You should use a cache plugin. These plugins minify your files and combine them and stores a version of the file in cache in order to reduce your server requests and as a result, it will boost your site speed.
How To Improve Site Speed ?
1. Image Optimize:
You can compress images from CompressJPEG/TinyPNG website. Visit https://compressjpeg.com Or https://tinypng.com/ and compress all images before uploading them on your website. By this process, you can decrease your website loading time and provide your visitors, a better experience.
2 .htaccess Code For Better Website Speed:
If you familiar with .htaccess, you can go to the root foldef of your WordPress installation. Find .htaccess file and open it.Insert following code.
AddType application/x-font-woff .woff
AddType application/font-woff2 .woff2
AddType application/vnd.ms-fontobject .eot
<IfModule mod_deflate.c>
  AddOutputFilterByType DEFLATE text/html
  AddOutputFilterByType DEFLATE text/css
  AddOutputFilterByType DEFLATE text/javascript
  AddOutputFilterByType DEFLATE text/xml
  AddOutputFilterByType DEFLATE text/plain
  AddOutputFilterByType DEFLATE image/x-icon
  AddOutputFilterByType DEFLATE image/svg+xml
  AddOutputFilterByType DEFLATE application/rss+xml
  AddOutputFilterByType DEFLATE application/javascript
  AddOutputFilterByType DEFLATE application/x-javascript
  AddOutputFilterByType DEFLATE application/xml
  AddOutputFilterByType DEFLATE application/xhtml+xml
  AddOutputFilterByType DEFLATE application/x-font
  AddOutputFilterByType DEFLATE application/x-font-truetype
  AddOutputFilterByType DEFLATE application/x-font-ttf
  AddOutputFilterByType DEFLATE application/x-font-otf
  AddOutputFilterByType DEFLATE application/x-font-opentype
  AddOutputFilterByType DEFLATE application/x-font-woff
  AddOutputFilterByType DEFLATE application/font-woff2
  AddOutputFilterByType DEFLATE application/vnd.ms-fontobject
  AddOutputFilterByType DEFLATE font/ttf
  AddOutputFilterByType DEFLATE font/otf
  AddOutputFilterByType DEFLATE font/opentype

# For Olders Browsers Which Can't Handle Compression
  BrowserMatch ^Mozilla/4 gzip-only-text/html
  BrowserMatch ^Mozilla/4\.0[678] no-gzip
  BrowserMatch \bMSIE !no-gzip !gzip-only-text/html
</IfModule>

<ifModule mod_gzip.c>
  mod_gzip_on Yes
  mod_gzip_dechunk Yes
  mod_gzip_item_include file \.(html?|txt|css|js|php|pl)$
  mod_gzip_item_include mime ^application/x-javascript.*
  mod_gzip_item_include mime ^text/.*
  mod_gzip_item_exclude rspheader ^Content-Encoding:.*gzip.*
  mod_gzip_item_exclude mime ^image/.*
  mod_gzip_item_include handler ^cgi-script$
</ifModule>

## EXPIRES CACHING ##
<IfModule mod_expires.c>
ExpiresActive On
ExpiresByType application/vnd.ms-fontobject "access plus 1 year"
ExpiresByType application/x-font-ttf "access plus 1 year"
ExpiresByType application/x-font-opentype "access plus 1 year"
ExpiresByType application/x-font-woff "access plus 1 year"
ExpiresByType application/font-woff2 "access plus 1 year"
ExpiresByType image/jpg "access plus 1 year"
ExpiresByType image/jpeg "access plus 1 year"
ExpiresByType image/gif "access plus 1 year"
ExpiresByType image/png "access plus 1 year"
ExpiresByType text/css "access plus 3 month"
ExpiresByType application/pdf "access plus 3 month"
ExpiresByType text/x-javascript "access plus 3 month"
ExpiresByType application/x-shockwave-flash "access plus 3 month"
ExpiresByType image/x-icon "access plus 1 year"
ExpiresDefault "access plus 3 month"
</IfModule>
## EXPIRES CACHING ##
<ifModule mod_headers.c>
    Header set Connection keep-alive
</ifModule>
<IfModule mod_header.c>
  # 3 Month
  <FilesMatch "\.(flv|gif|jpg|jpeg|png|ico|swf)$">
    Header set Cache-Control "max-age=7257600"
  </FilesMatch>
  # 1 Week
  <FilesMatch "\.(js|css|pdf|txt)$">
    Header set Cache-Control "max-age=604800"
  </FilesMatch>
  # 10 Minutes
  <FilesMatch "\.(html|htm)$">
    Header set Cache-Control "max-age=600"
  </FilesMatch>
  # NONE
  <FilesMatch "\.(pl|php|cgi|spl)$">
    Header unset Cache-Control
    Header unset Expires
    Header unset Last-Modified
    FileETag None
    Header unset Pragma
  </FilesMatch>
</IfModule>
# END WordPress
(Note: Please don't replace any code that already exists on the .htaccess file. It may have serious implications on your website.)
3. We recommend use follow plugins to boost your site performance..
- WP Rocket
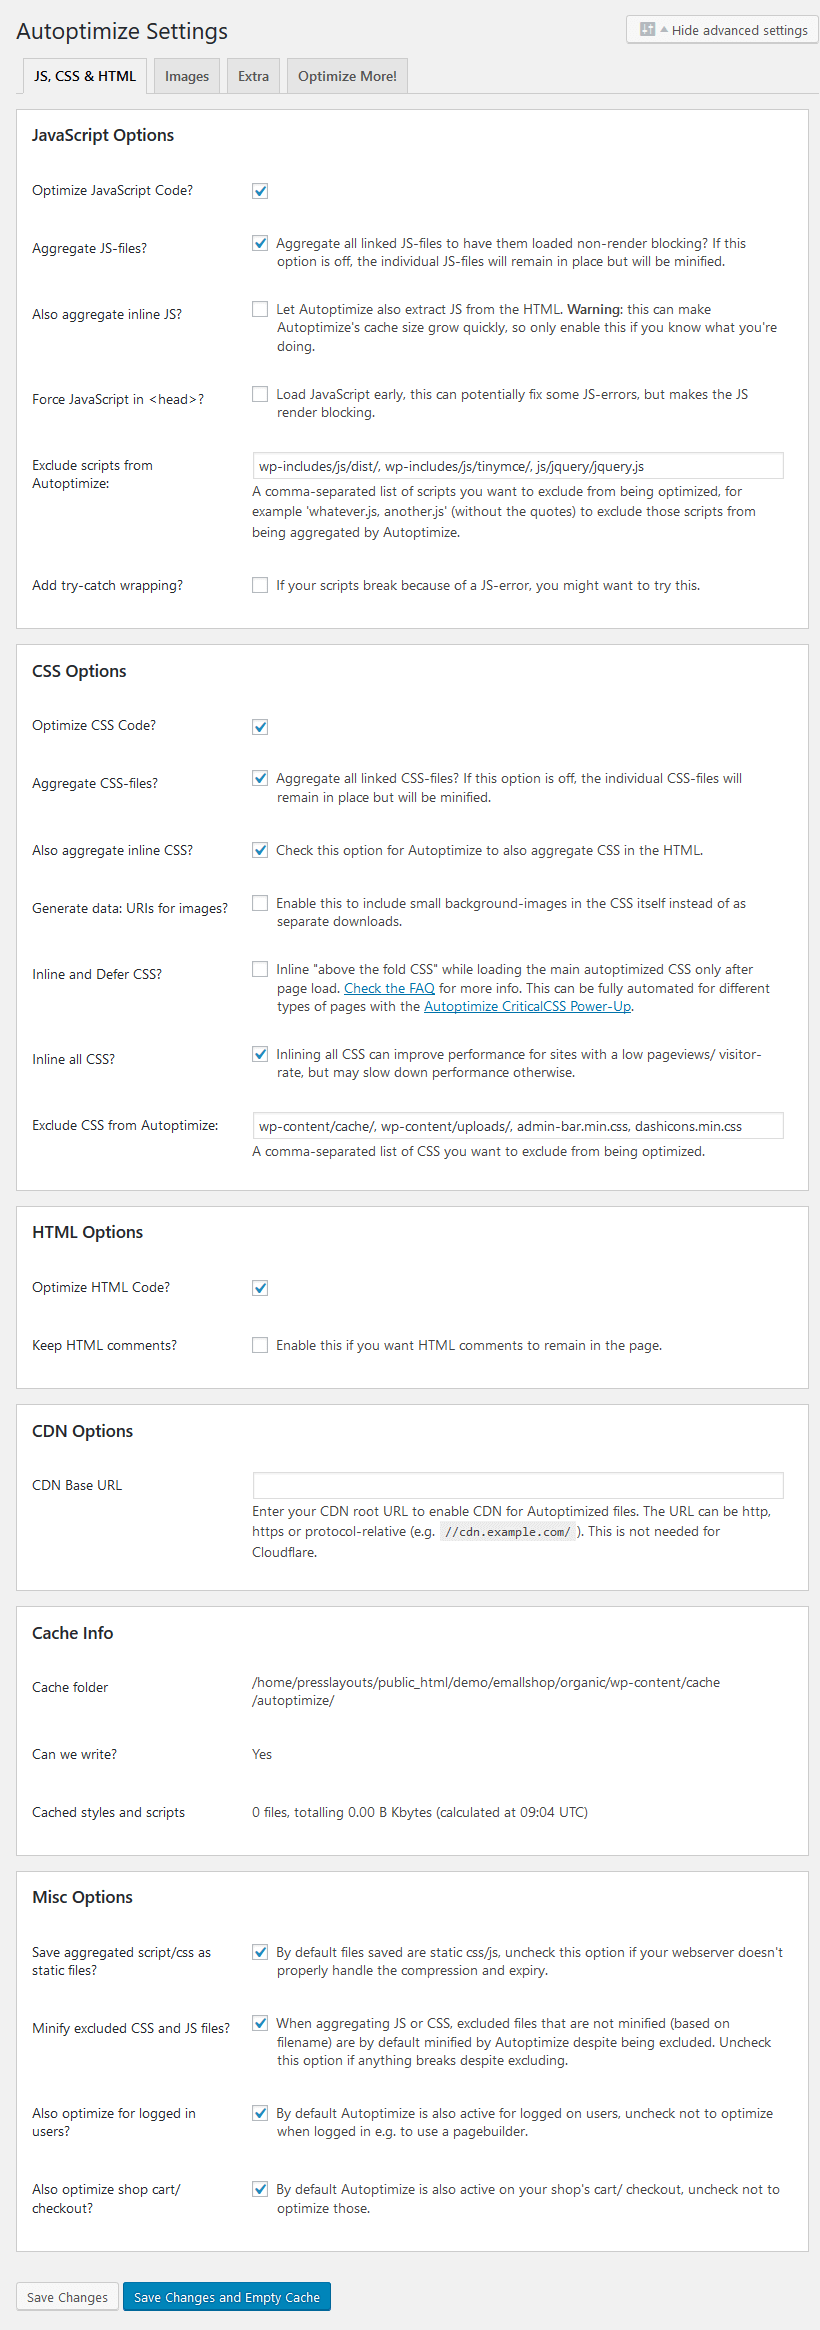
- Autoptimize
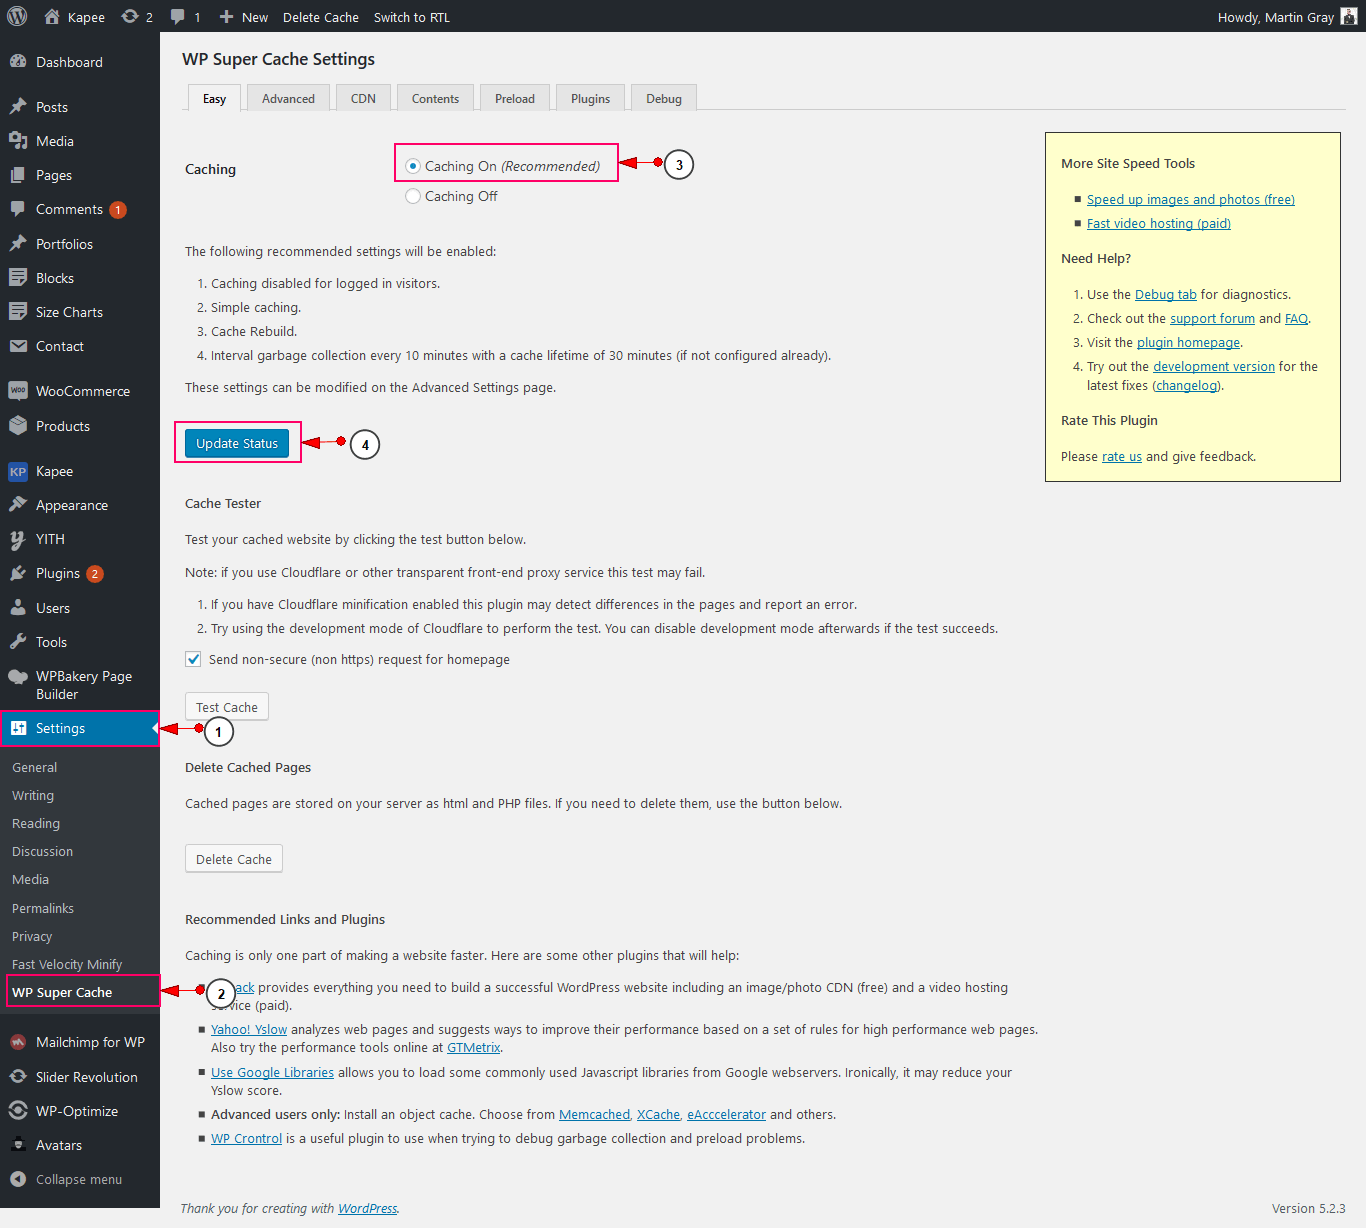
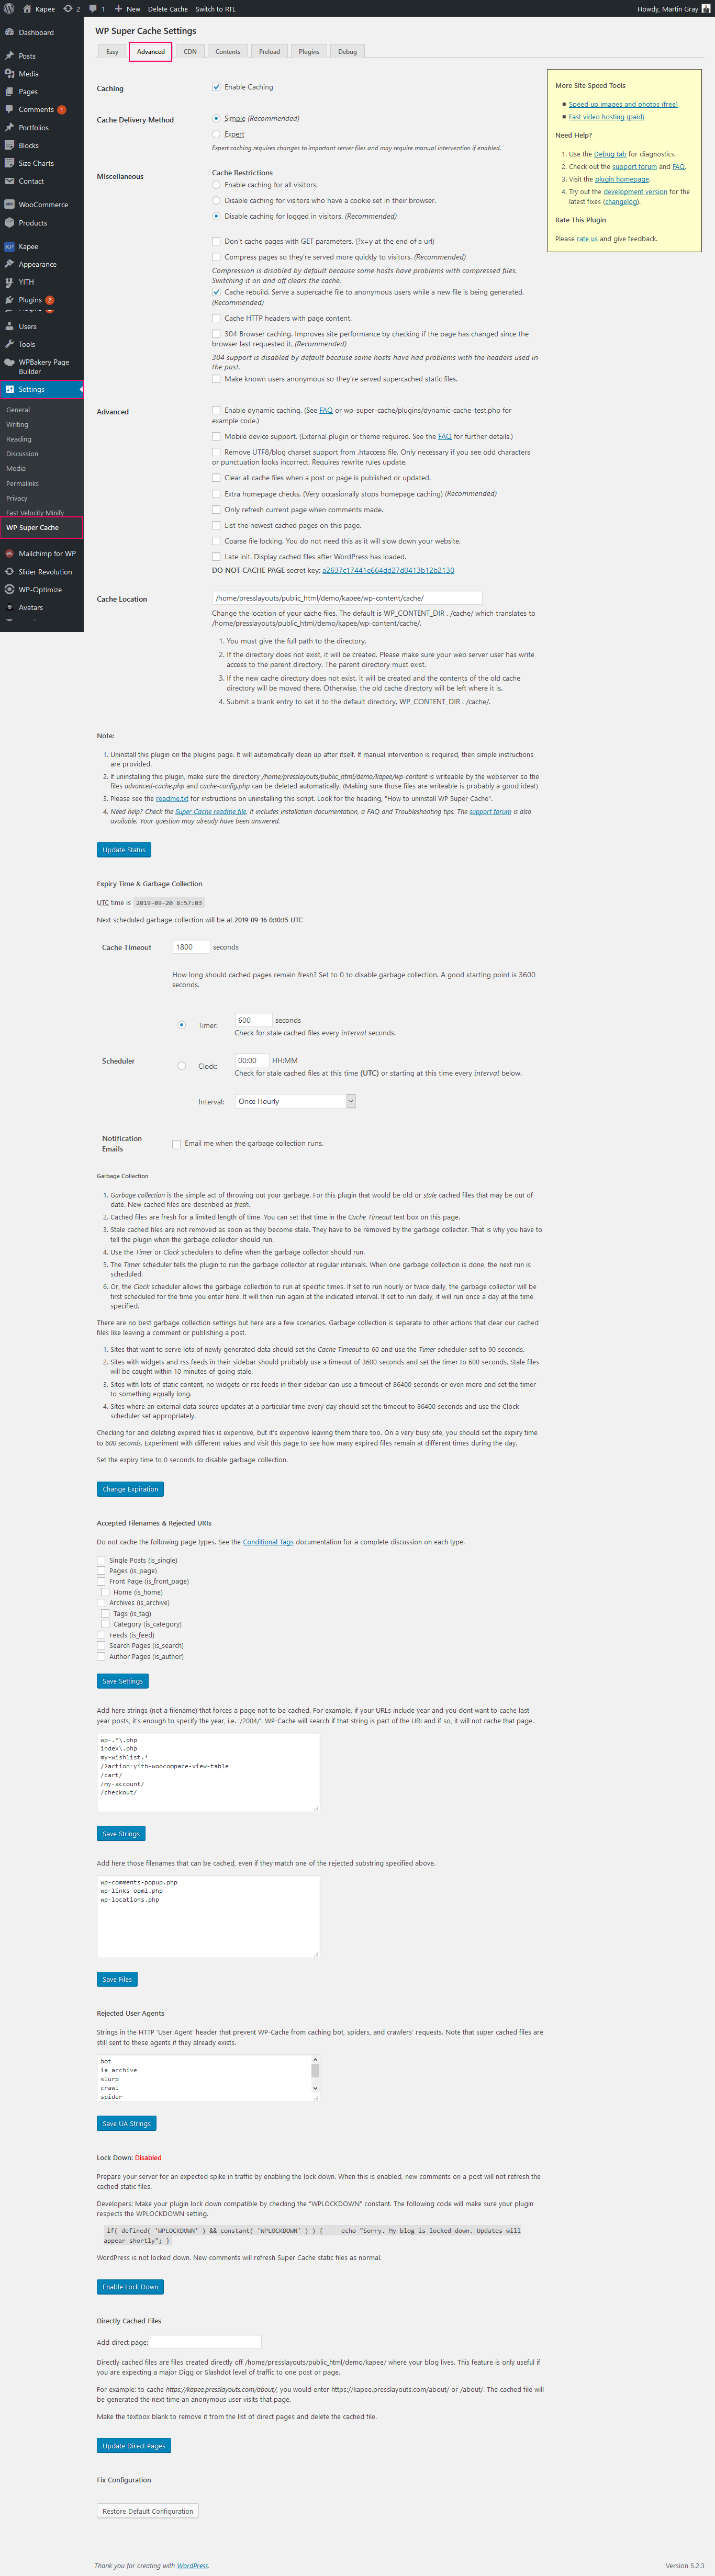
- WP Super Cache
1. WP Rocket
- Please install and activate WP Rocket plugin.
- Please check your site after complete the configuration.
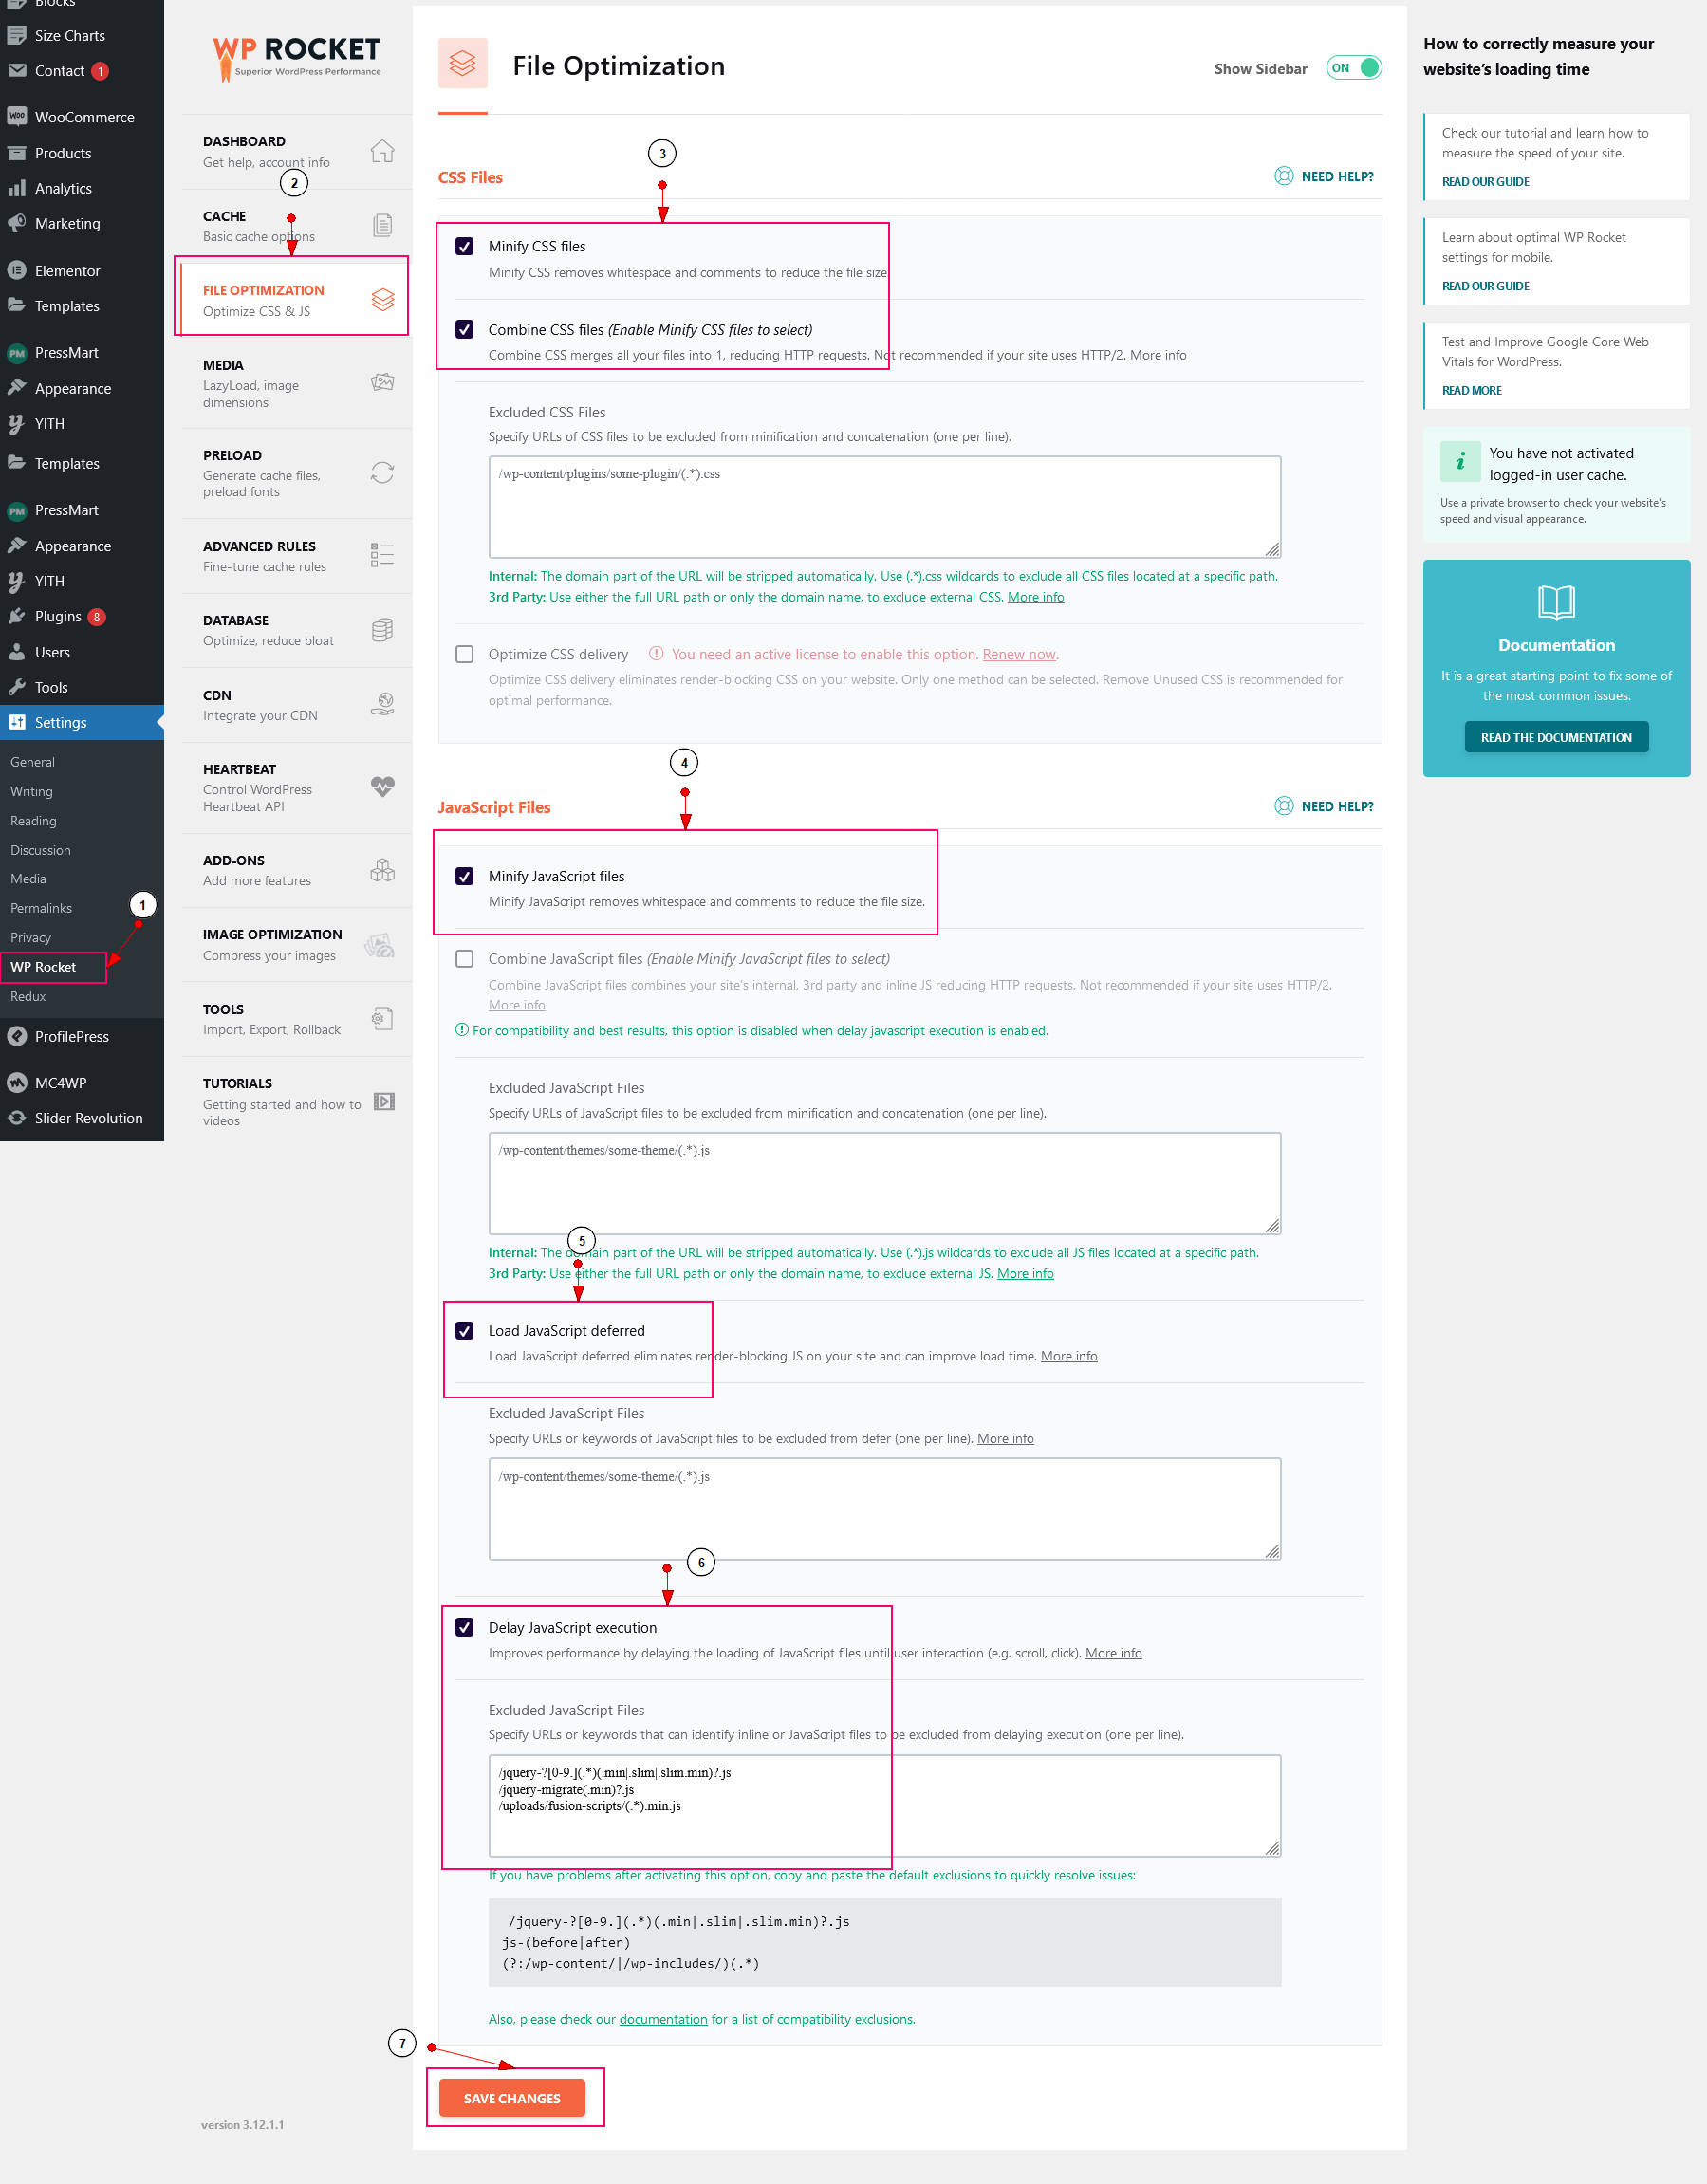
3. Please follow this article for fix slider revolution issue with WP Rocket plugin.
2. Autoptimize
- Please install and activate Autoptimize plugin.
- Please check your site after complete the configuration.
3. WP Super Cache
- Please install and activate WP Super Cache plugin.
- Enable cache options.
- You should exclude the my account, cart, checkout, compare, wishlist pages if you are using WooCommerce plugin.
Home Page Setting
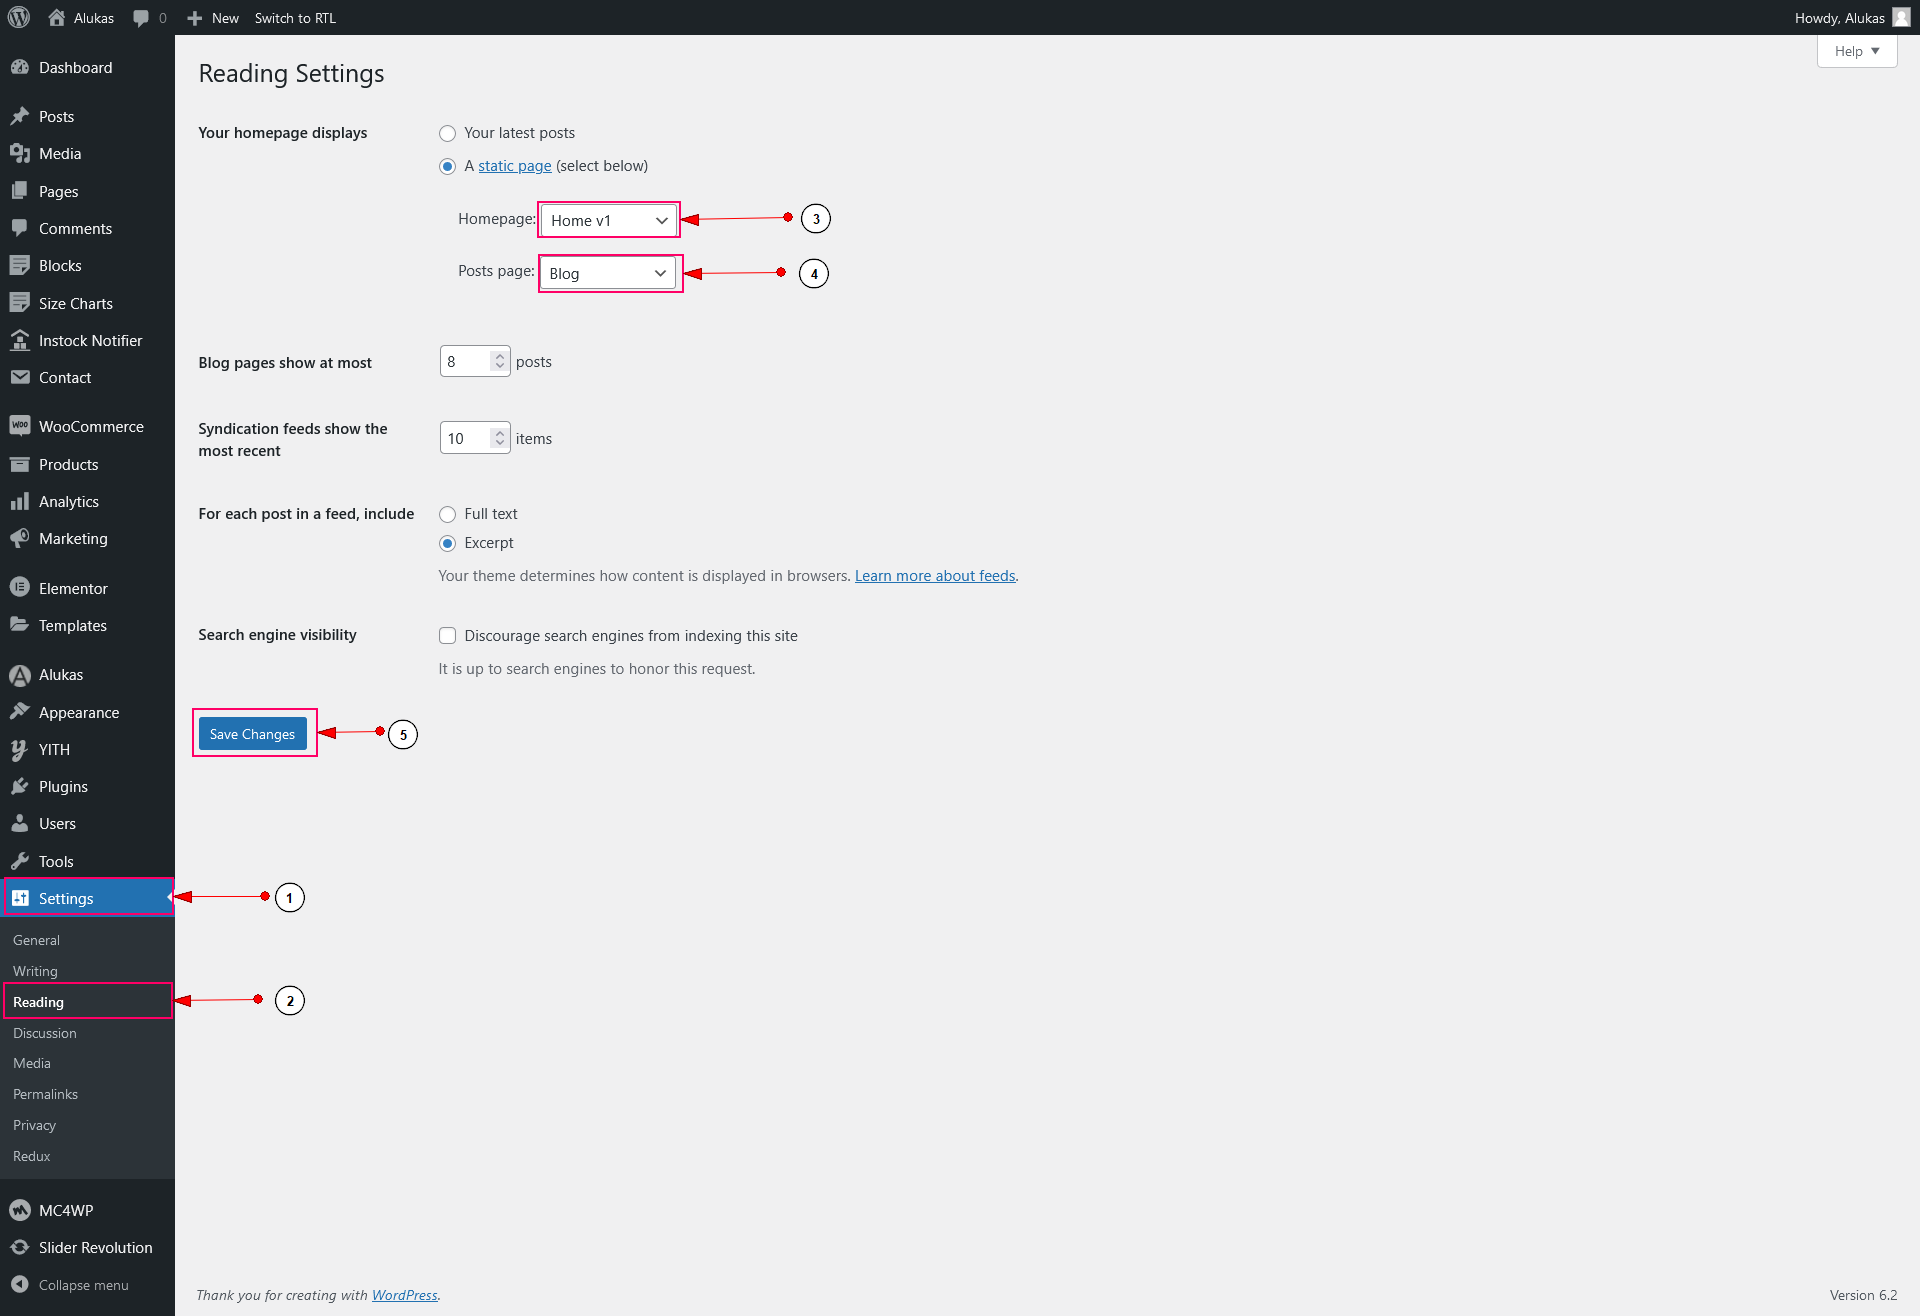
Please go through the following points to learn how to set home page:
- Login to your wp-admin
- Navigate to "Settings > Reading".
- Your homepage displays: Select a static page .
- Homepage : Select home page from dropdown list.
- Then Click on Save button
Create Page
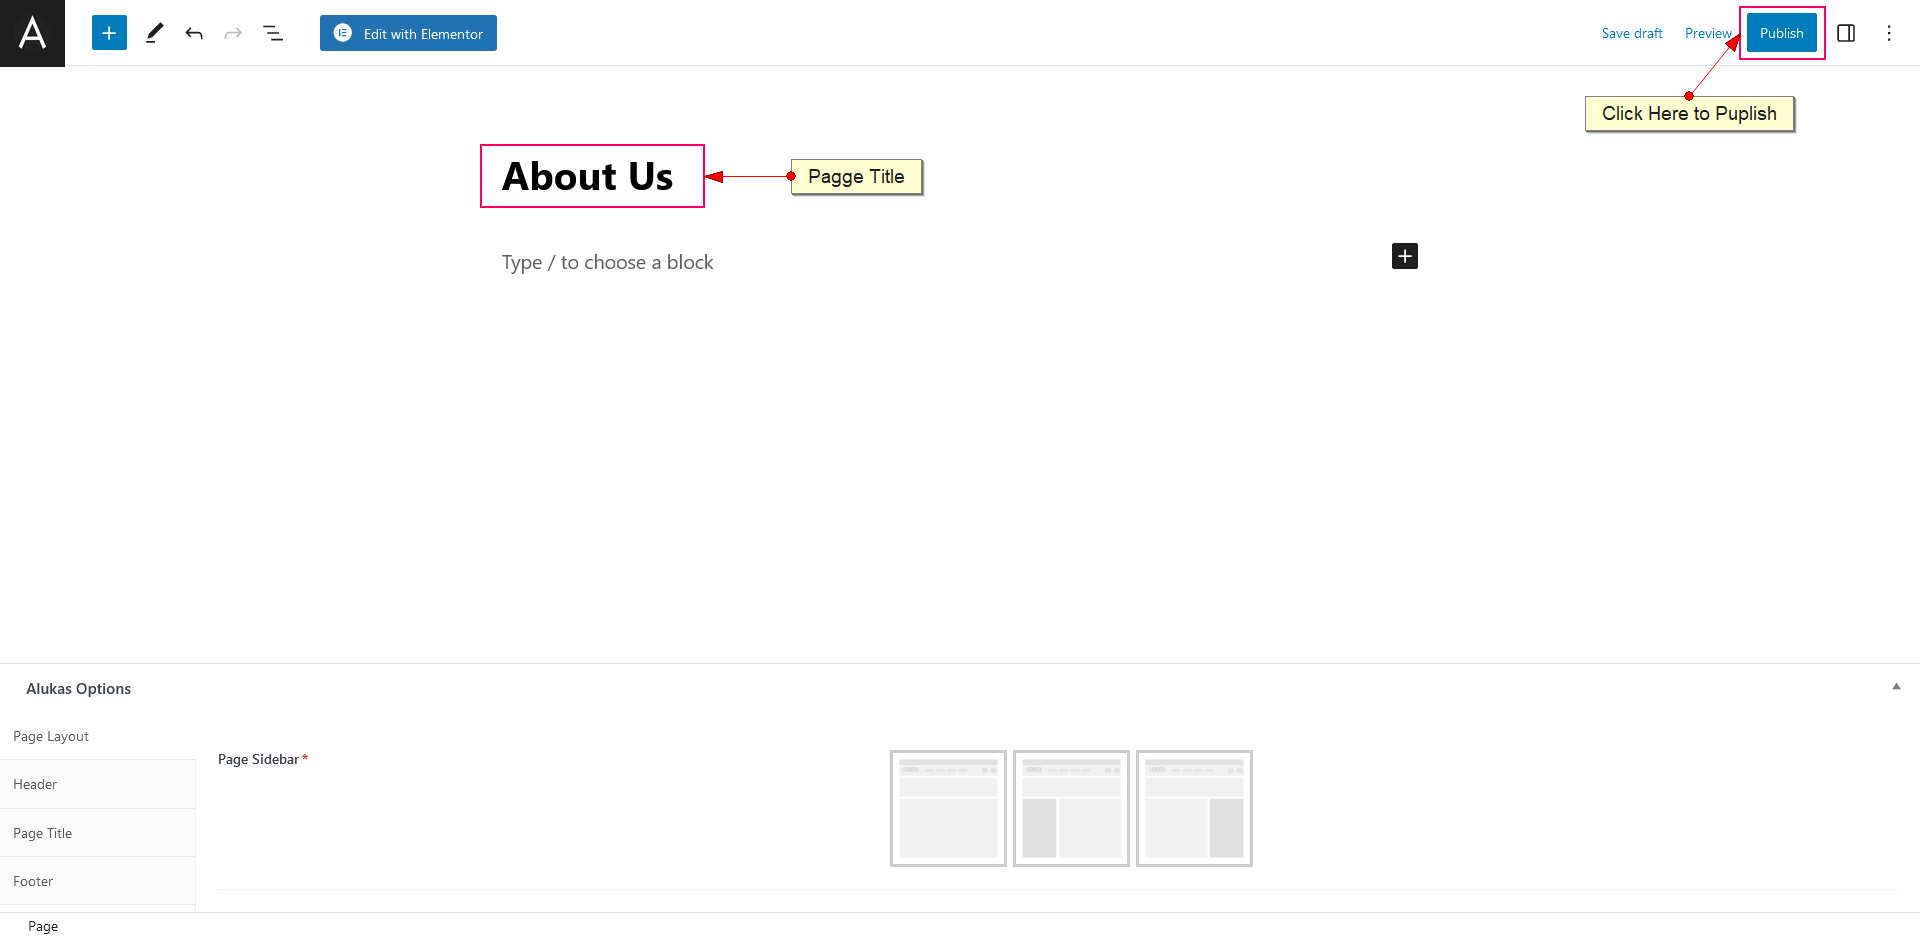
Please go through the following points to learn how to create page:
- Login to your wp-admin and navigate to page.
- Go to add new page.
- Enter page title
- Upload feature image.
- Select page meta options.
- Select page layout.(Full Page, Left Sidebar,Right Sidebar)
- Click on publish button for publish page.
Edit page With Elementor
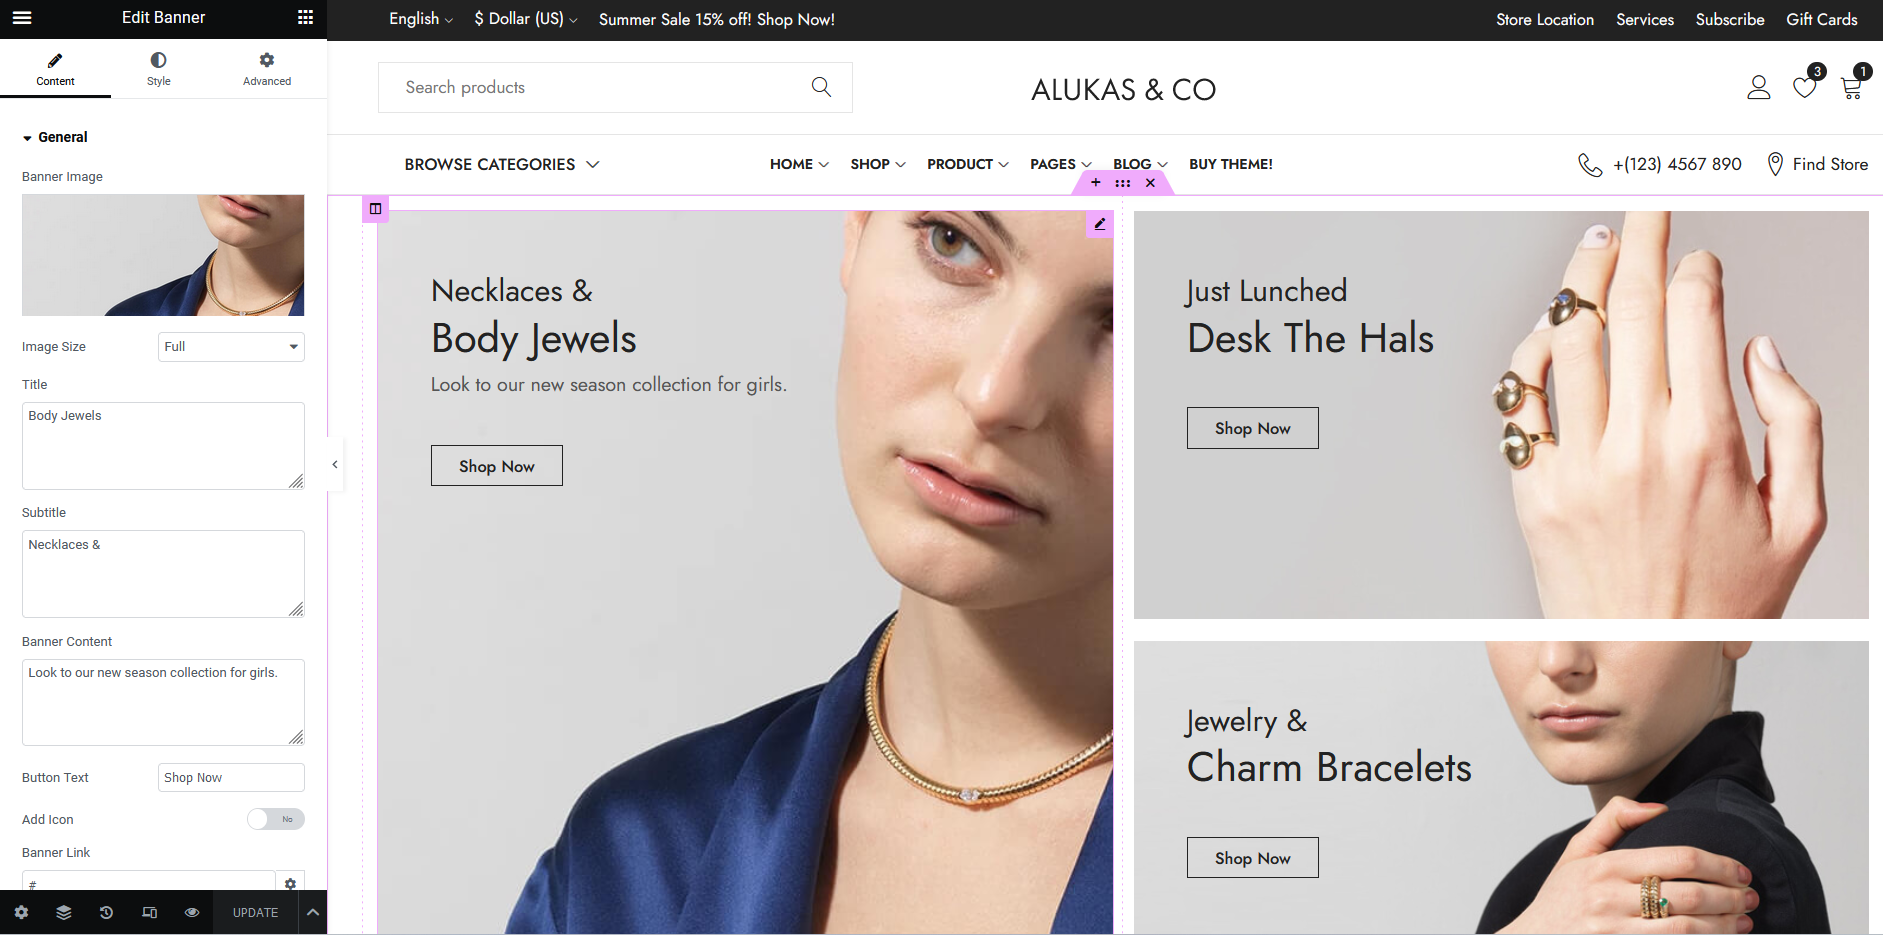
For existing pages, you can select Edit with Elementor directly from the WordPress dashboard.
- From the WordPress dashboard, click the Pages tab
- Hover over the page name
- Select Edit with Elementor
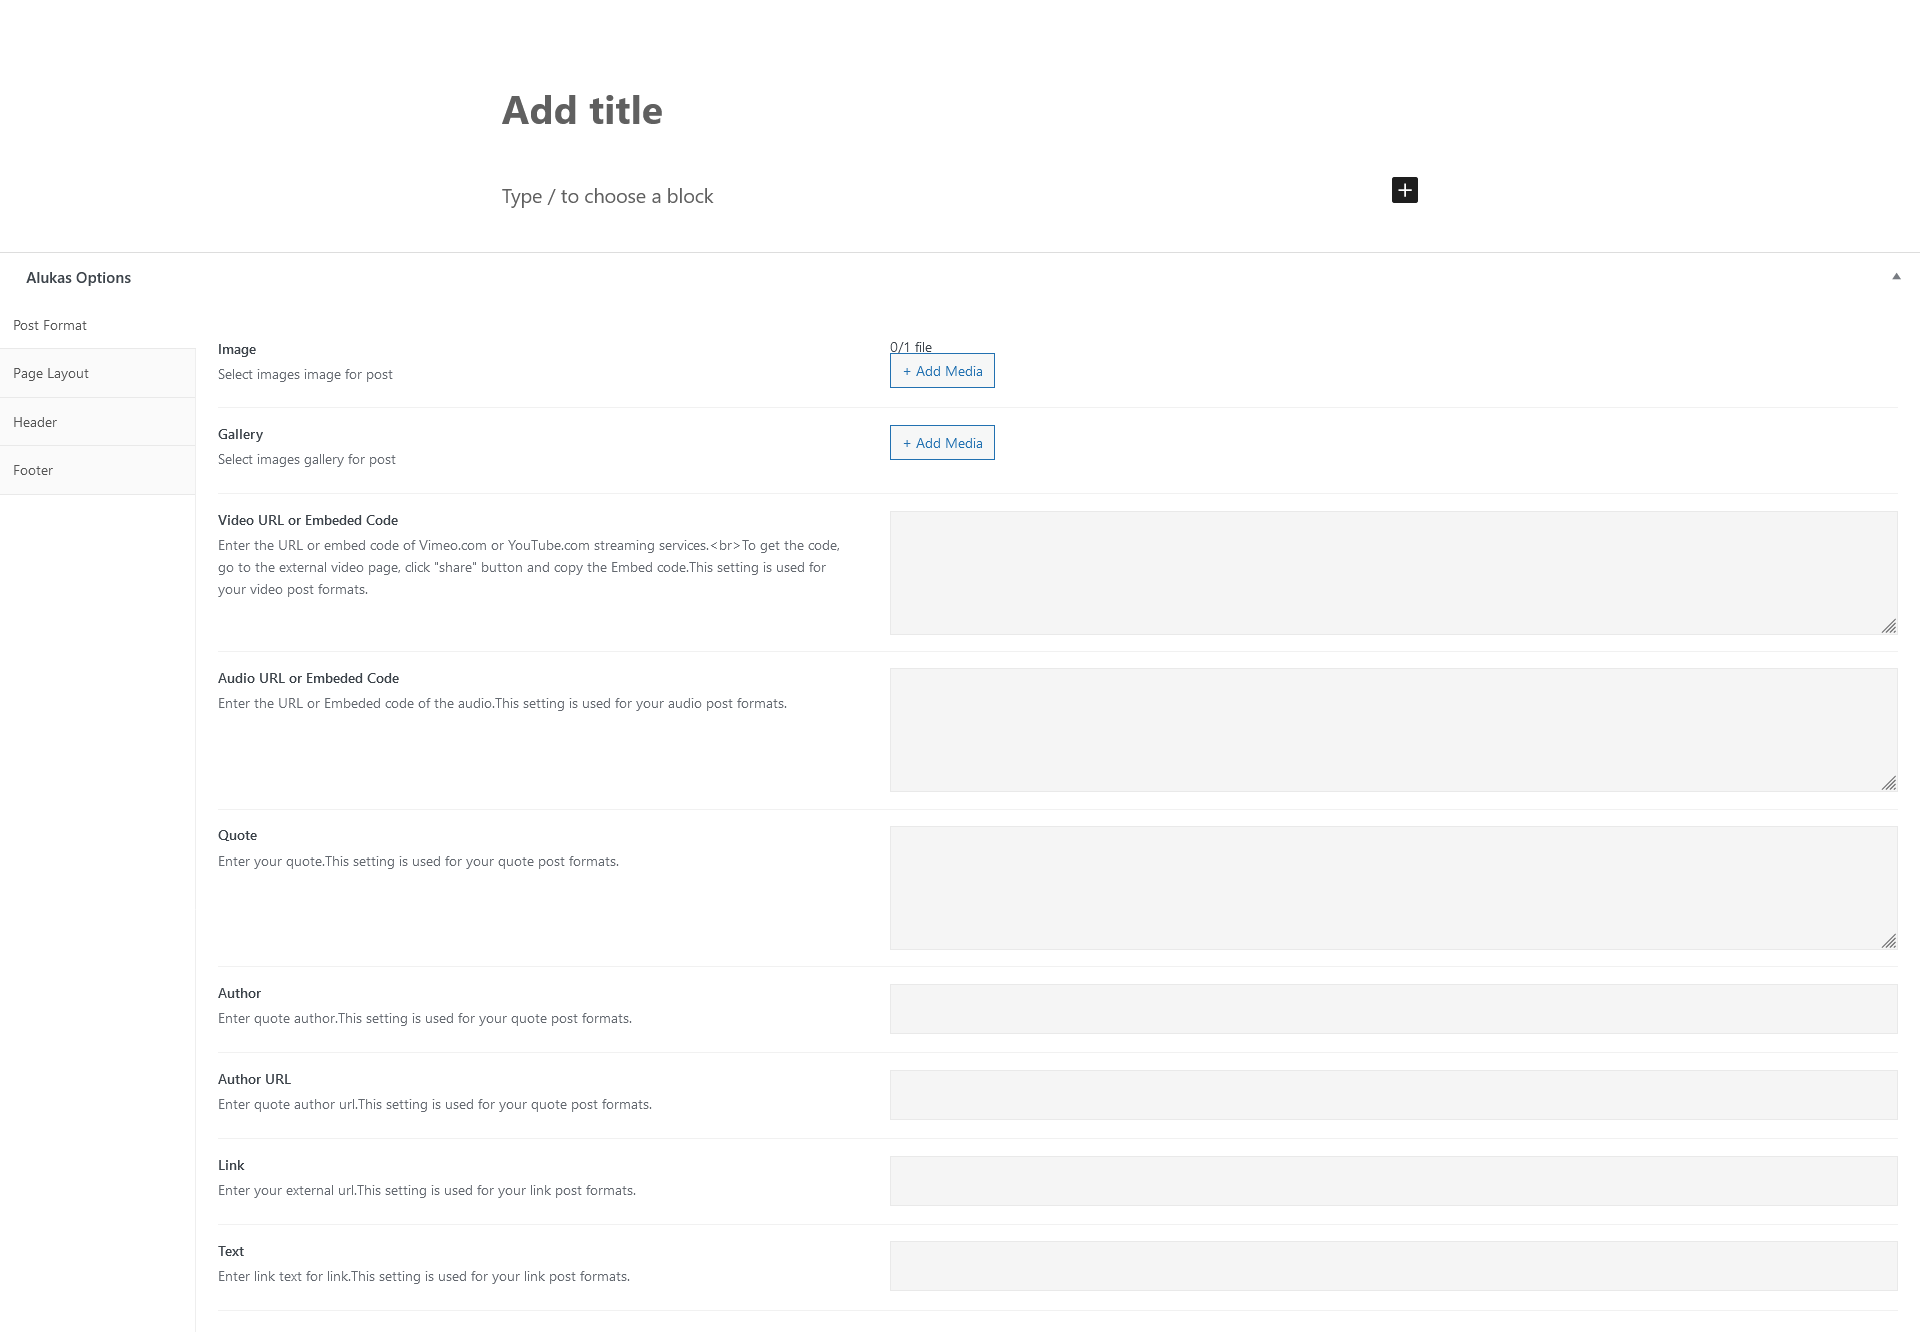
Page Title Background Image
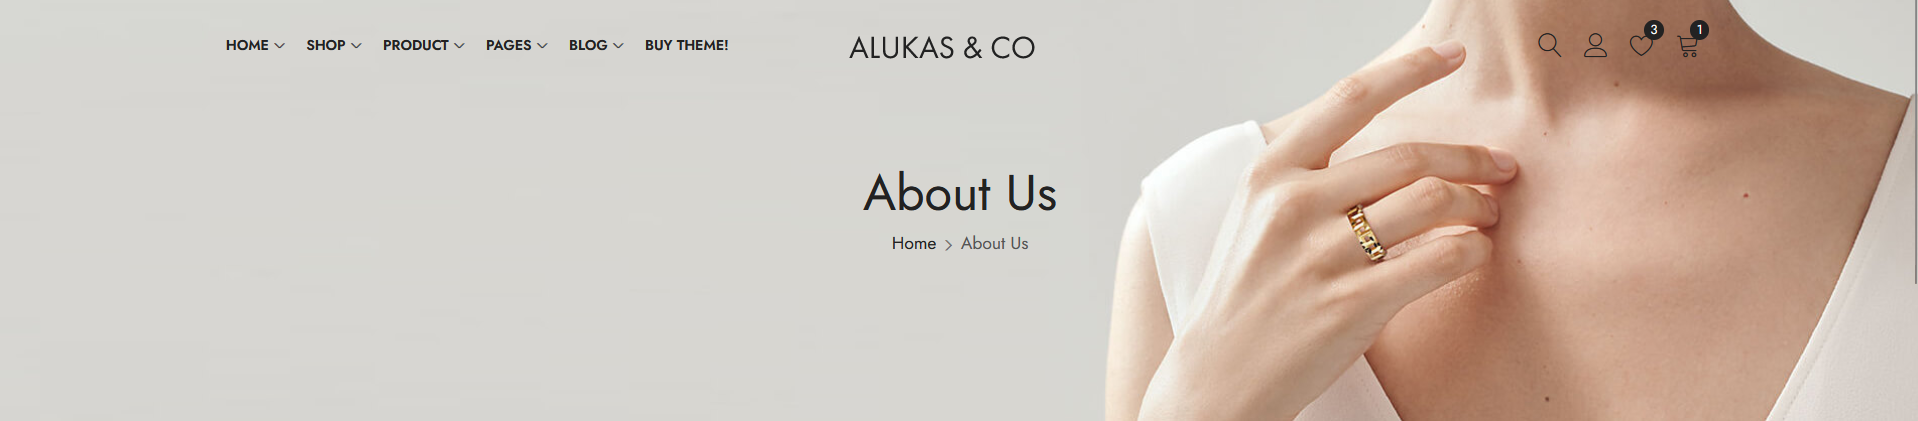
Please go through the following points to learn how to set page title background image:
- Login to your wp-admin.
- Go to Page and edit page which you want to set/edit page title image .
- Scroll down to the alukas options
- Select page title tab from the left menu. See screenshot
- There you can update backgound color or image. See screenshot. NOTE : It's not work when select title style as Title centered.
Create Post
Please go through the following points to learn how to create post:
- Login to your wp-admin and navigate to posts.
- Go to add new post.
- Enter post title.
- Select post format.
- Select post categories.
- Insert post tag.
- Upload post feature image.
- Select post meta options.
- Enter post experts.
- Click on publish to publish post.
Menu
1. Create menu

- Login to the WordPress Dashboard.
- Navigate Appearance > Menus.
- Type Your menu name on 'Menu Name' field.
- Click the Create Menu button. Your menu is now defined, and you can now add pages to it.
2. Add Menu Items
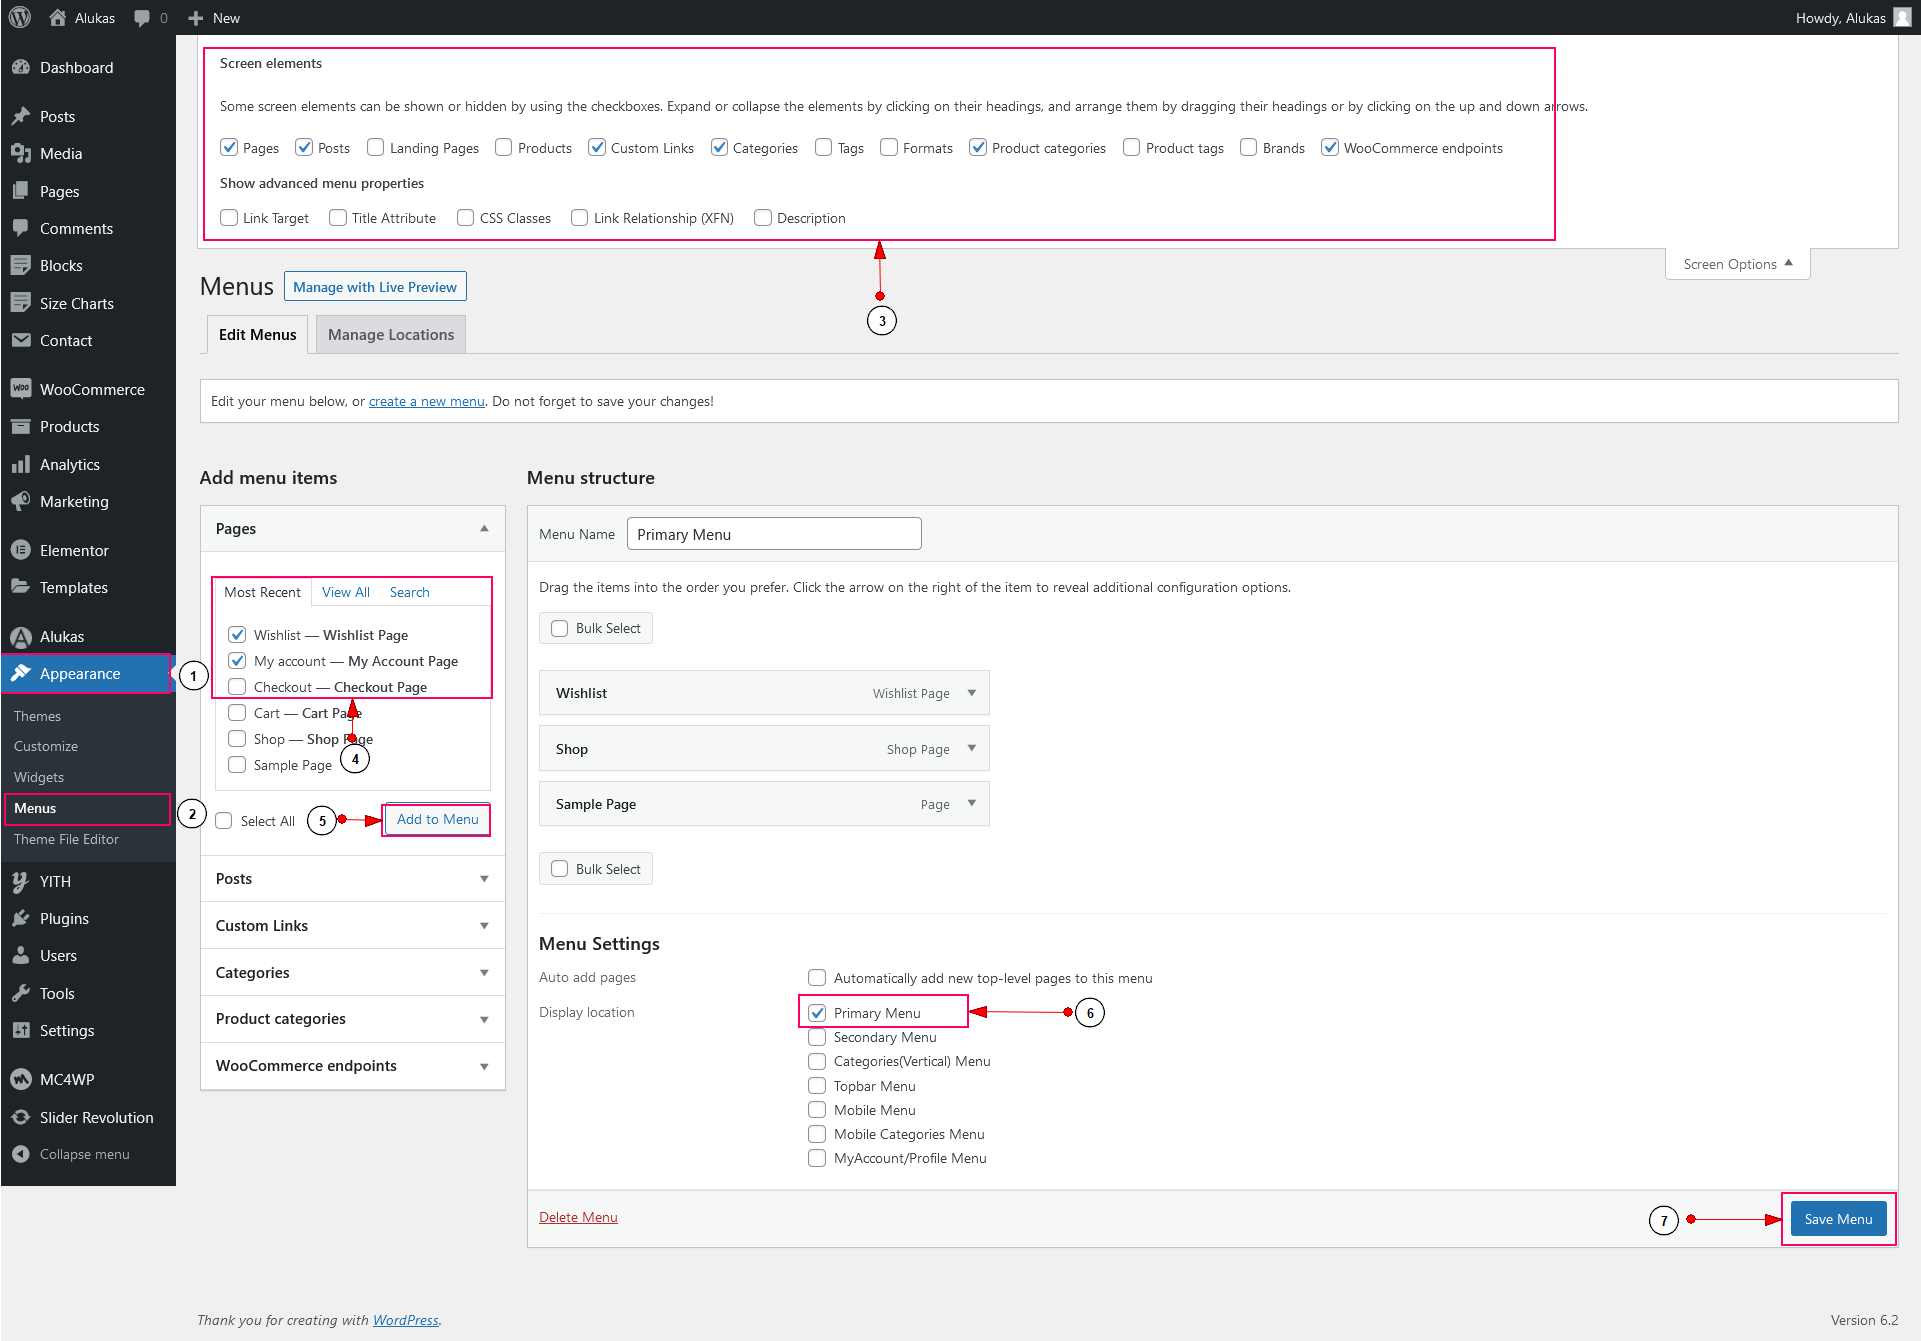
- Login to the WordPress Dashboard.
- Navigate Appearance > Menus.
- Click on "Screen Options" button in the top right hand corner to choose which items you can use to add to a menu such as "Product categories", "Categories" etc.
- Select the Pages that you want to add by clicking the check box next to each Page's title.
- Click on "Add to menu" button to add selected items to menu
- Choose position for menu in "Display Location".
- Click on "Save Menu" button to save everything.
Mega Menu
1. Add menu block
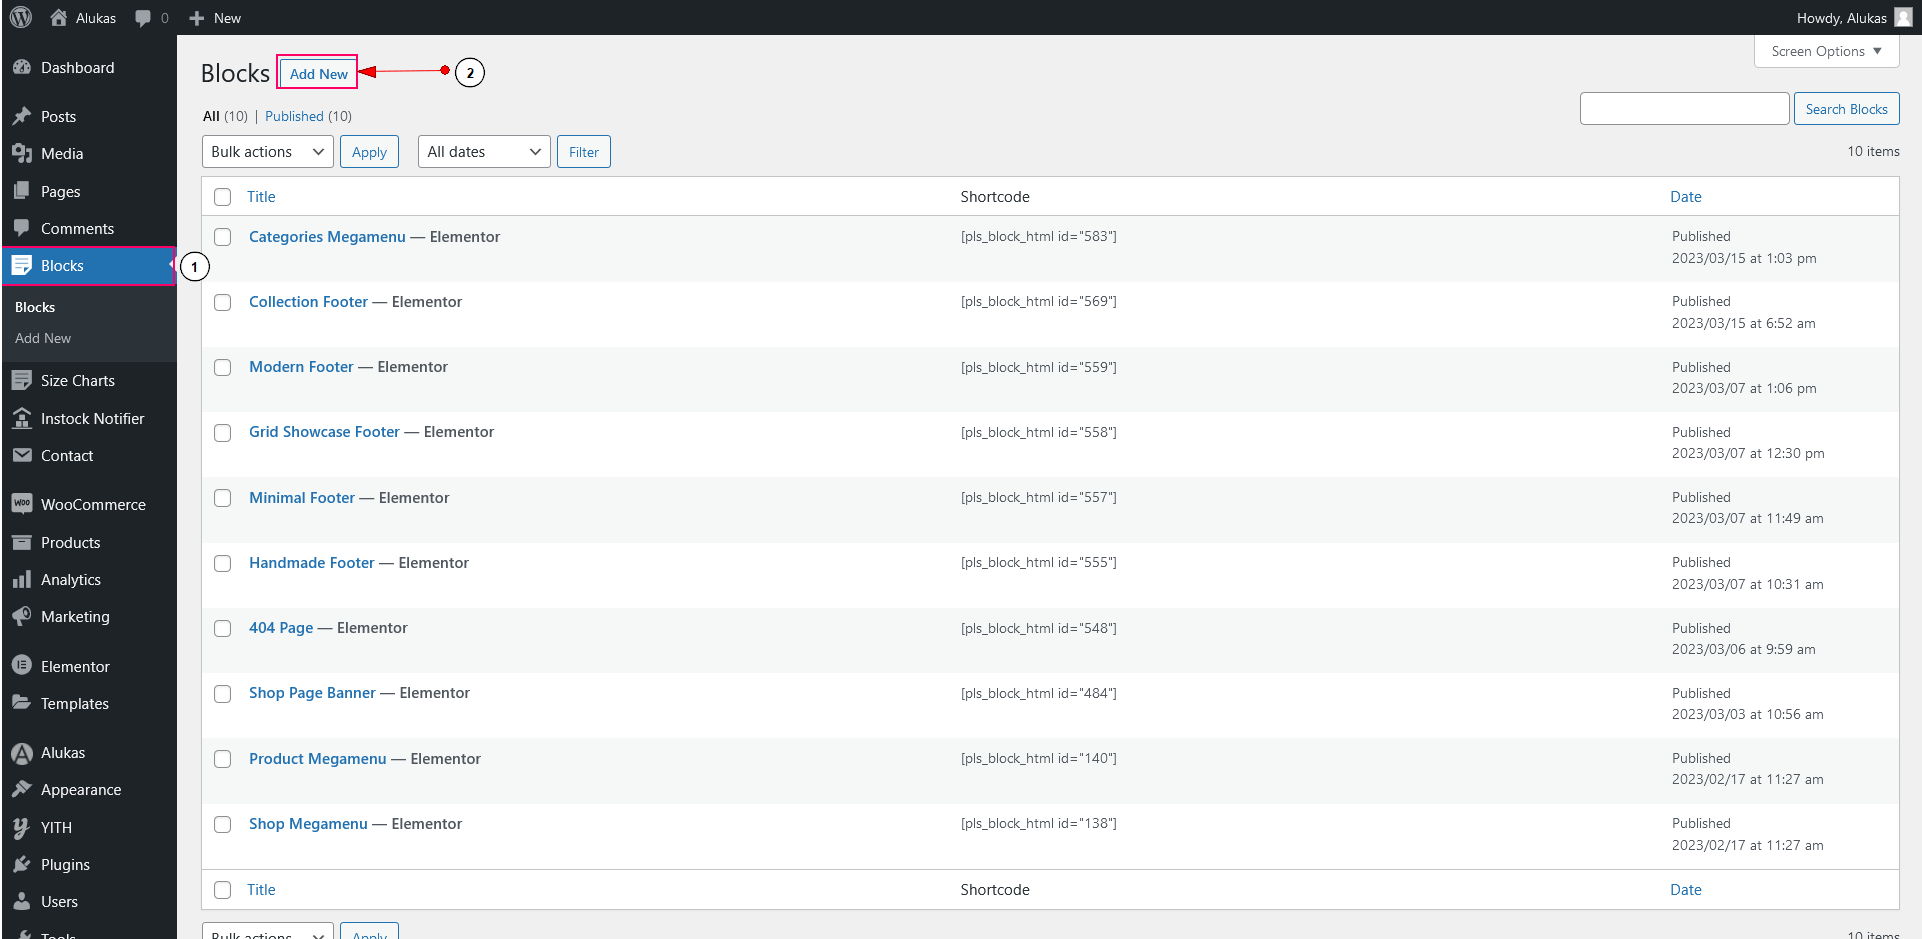
- Login to the WordPress Dashboard.
- Navigate Blocks.
- Click on 'Add New' button to create new blok.
- There you can create menu layout with Elementor Page Builder elements.
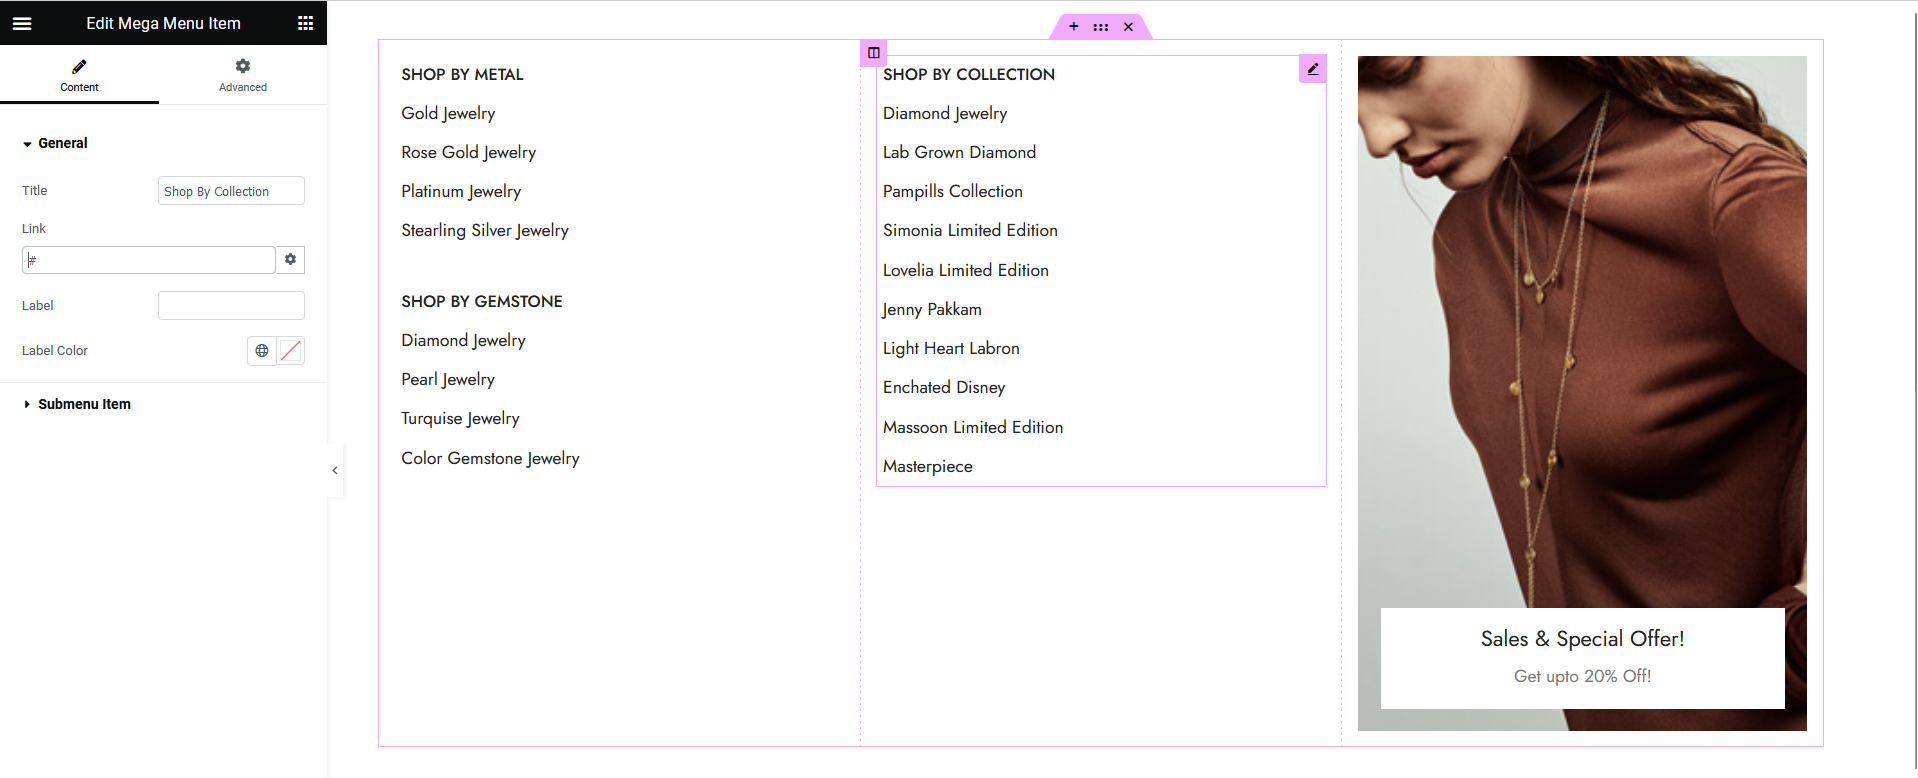
2. Assign Block to menu
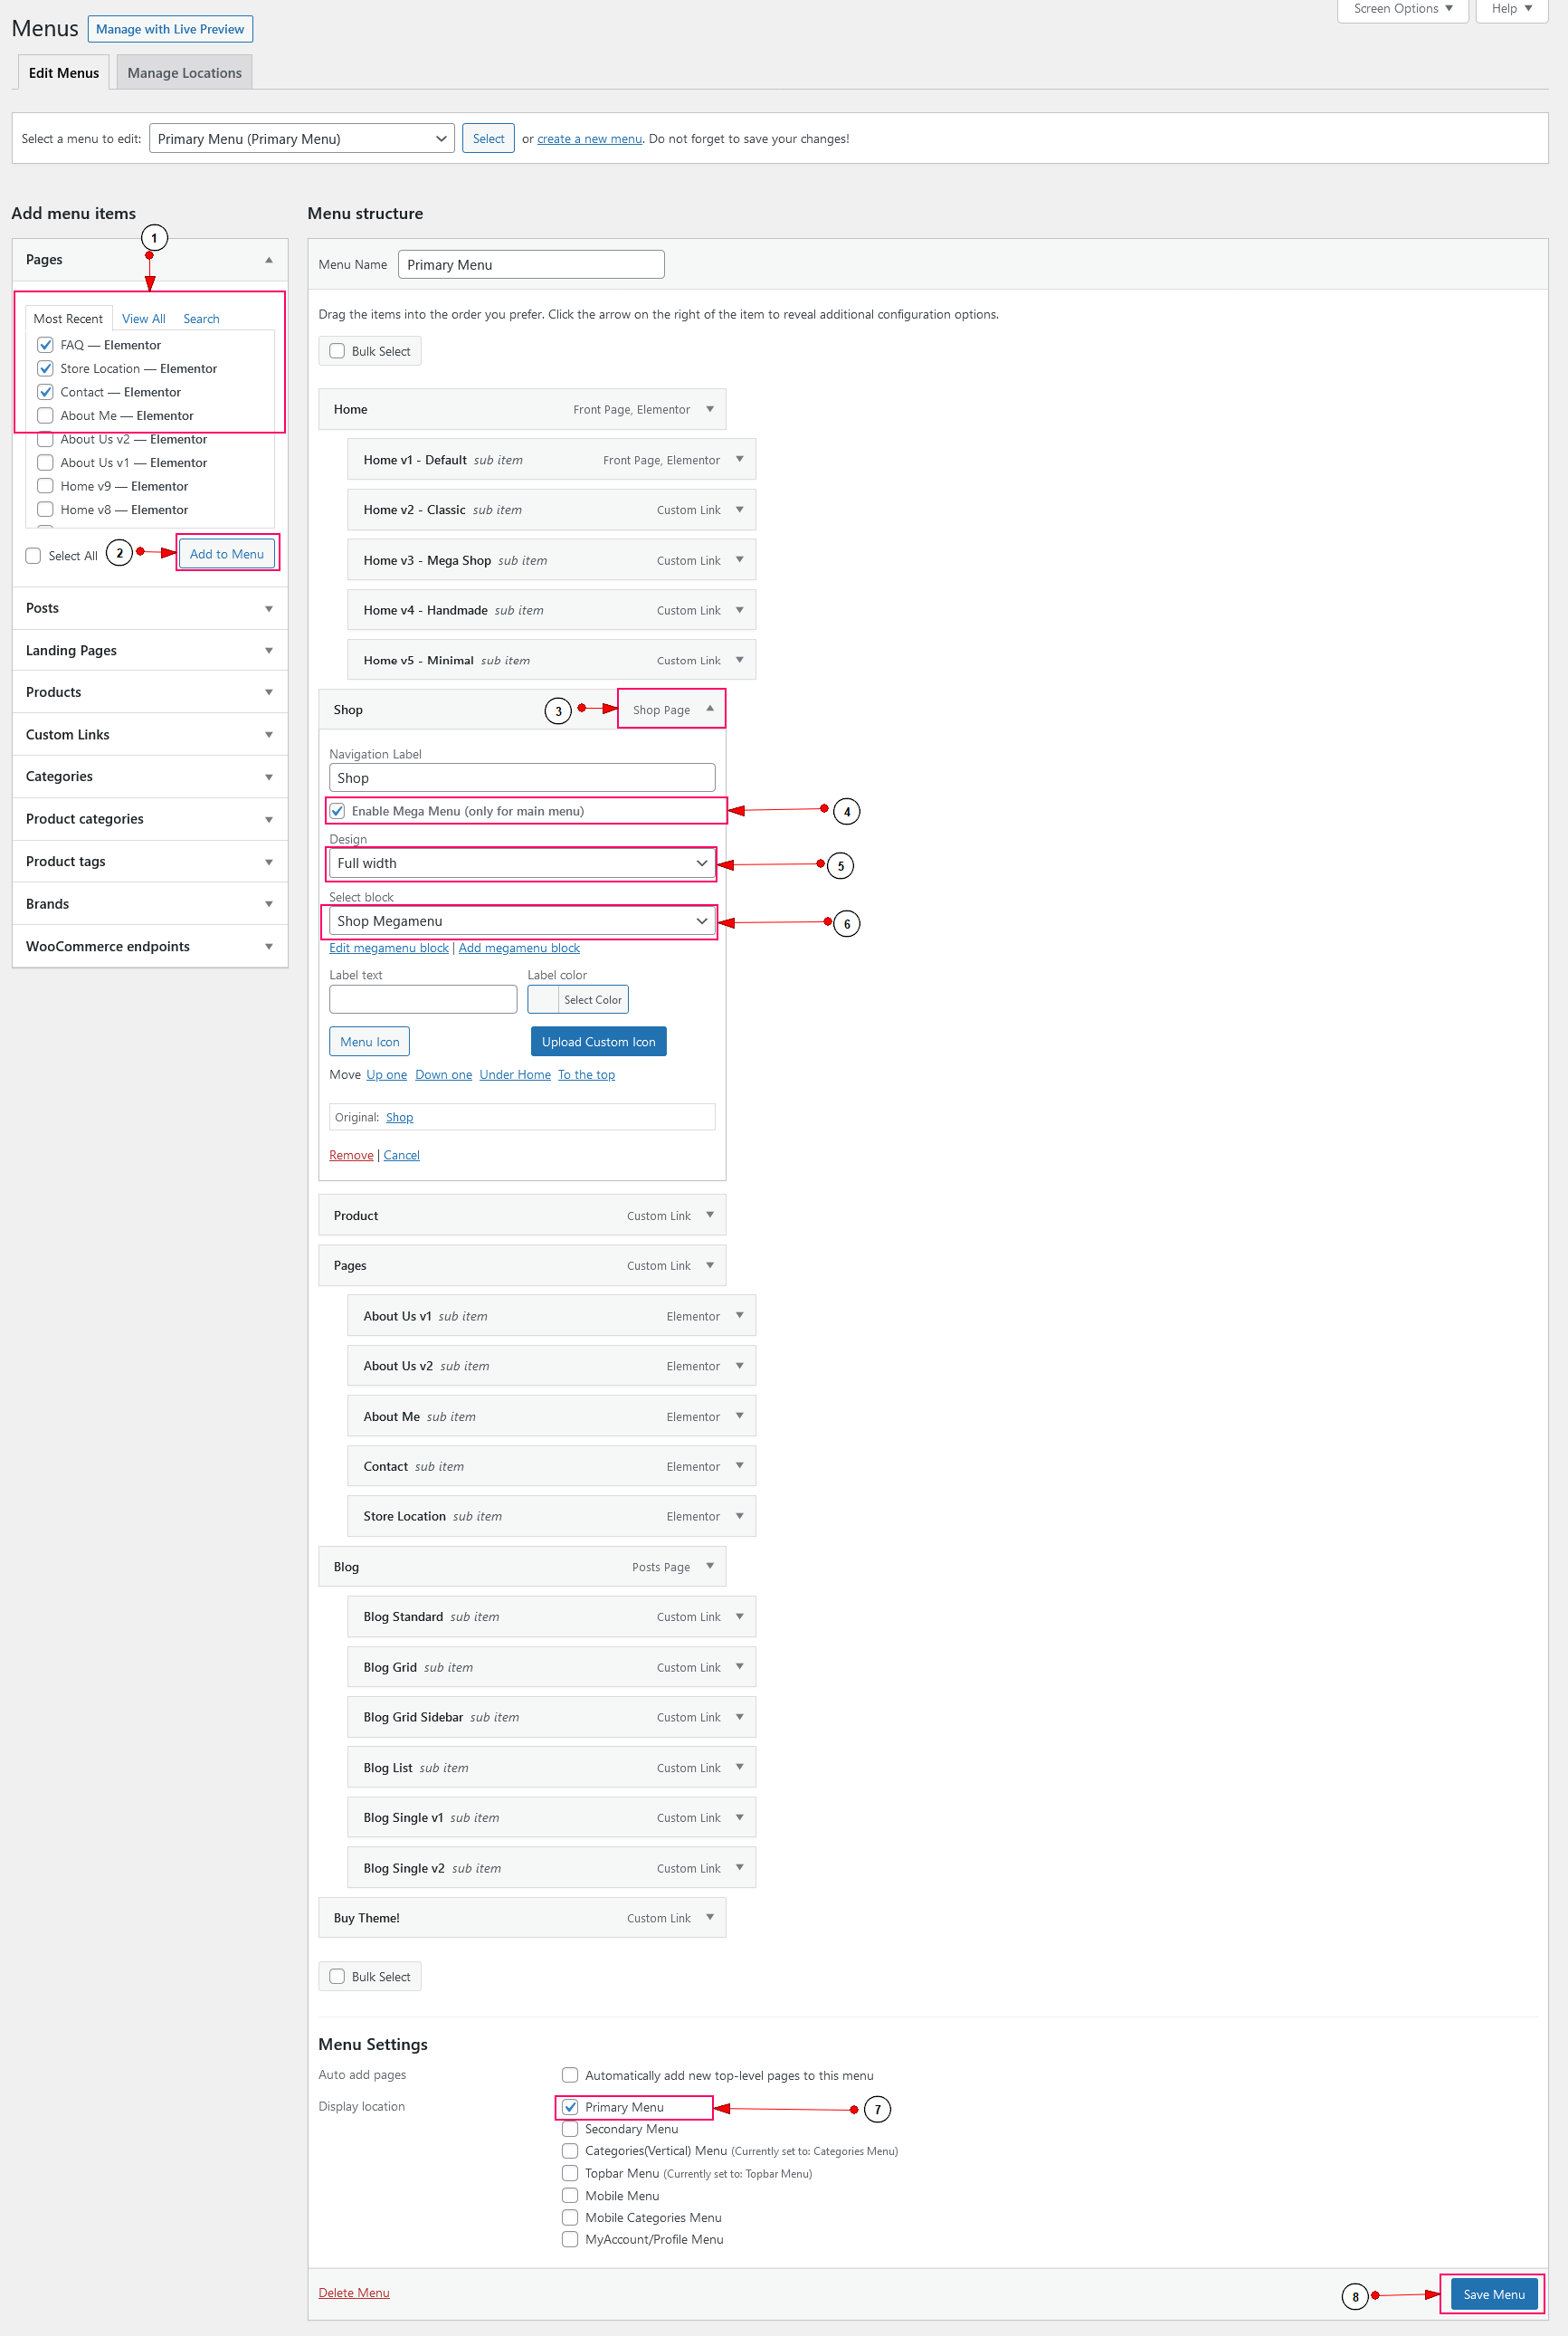
- Login to the WordPress Dashboard.
- Navigate Appearance > Menus.
- Select the Pages that you want to add by clicking the check box next to each Page's title.
- Click on "Add to menu" button to add selected items to menu
- Click on parent menu to show menu options.
- Checked "Enable Mega Menu" check box.
- Select megamenu design (Full width Or Custom Sizes) .
- Select block which you create in Add menu step.
- Choose position for menu in "Display Location".
- Click on "Save Menu" button to save everything.
Sidebars
WordPress Widgets add content and features to your sidebars. In the Alukas, you have following sidebars:
1. Theme's Sidebar
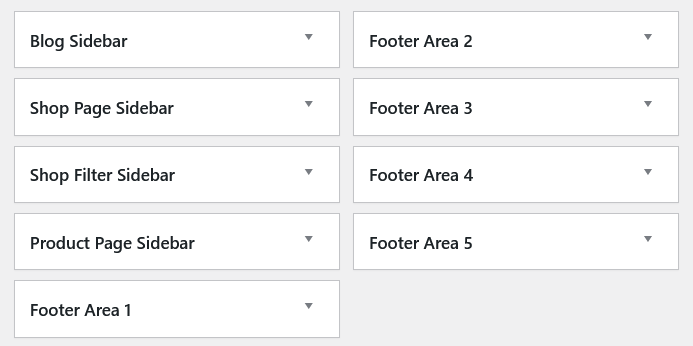
- Blog sidebar - it is displayed on the blog, category, tag, post pages.
- Shop Page Sidebar - it is displayed on the shop, product category, product tag pages.
- Shop Filter Sidebar - It is special sidebar. It is display on shop pages.It's visible when Shop Top Filter options is enable in theme options.
- Product Page Sidebar - It is display on single product page.
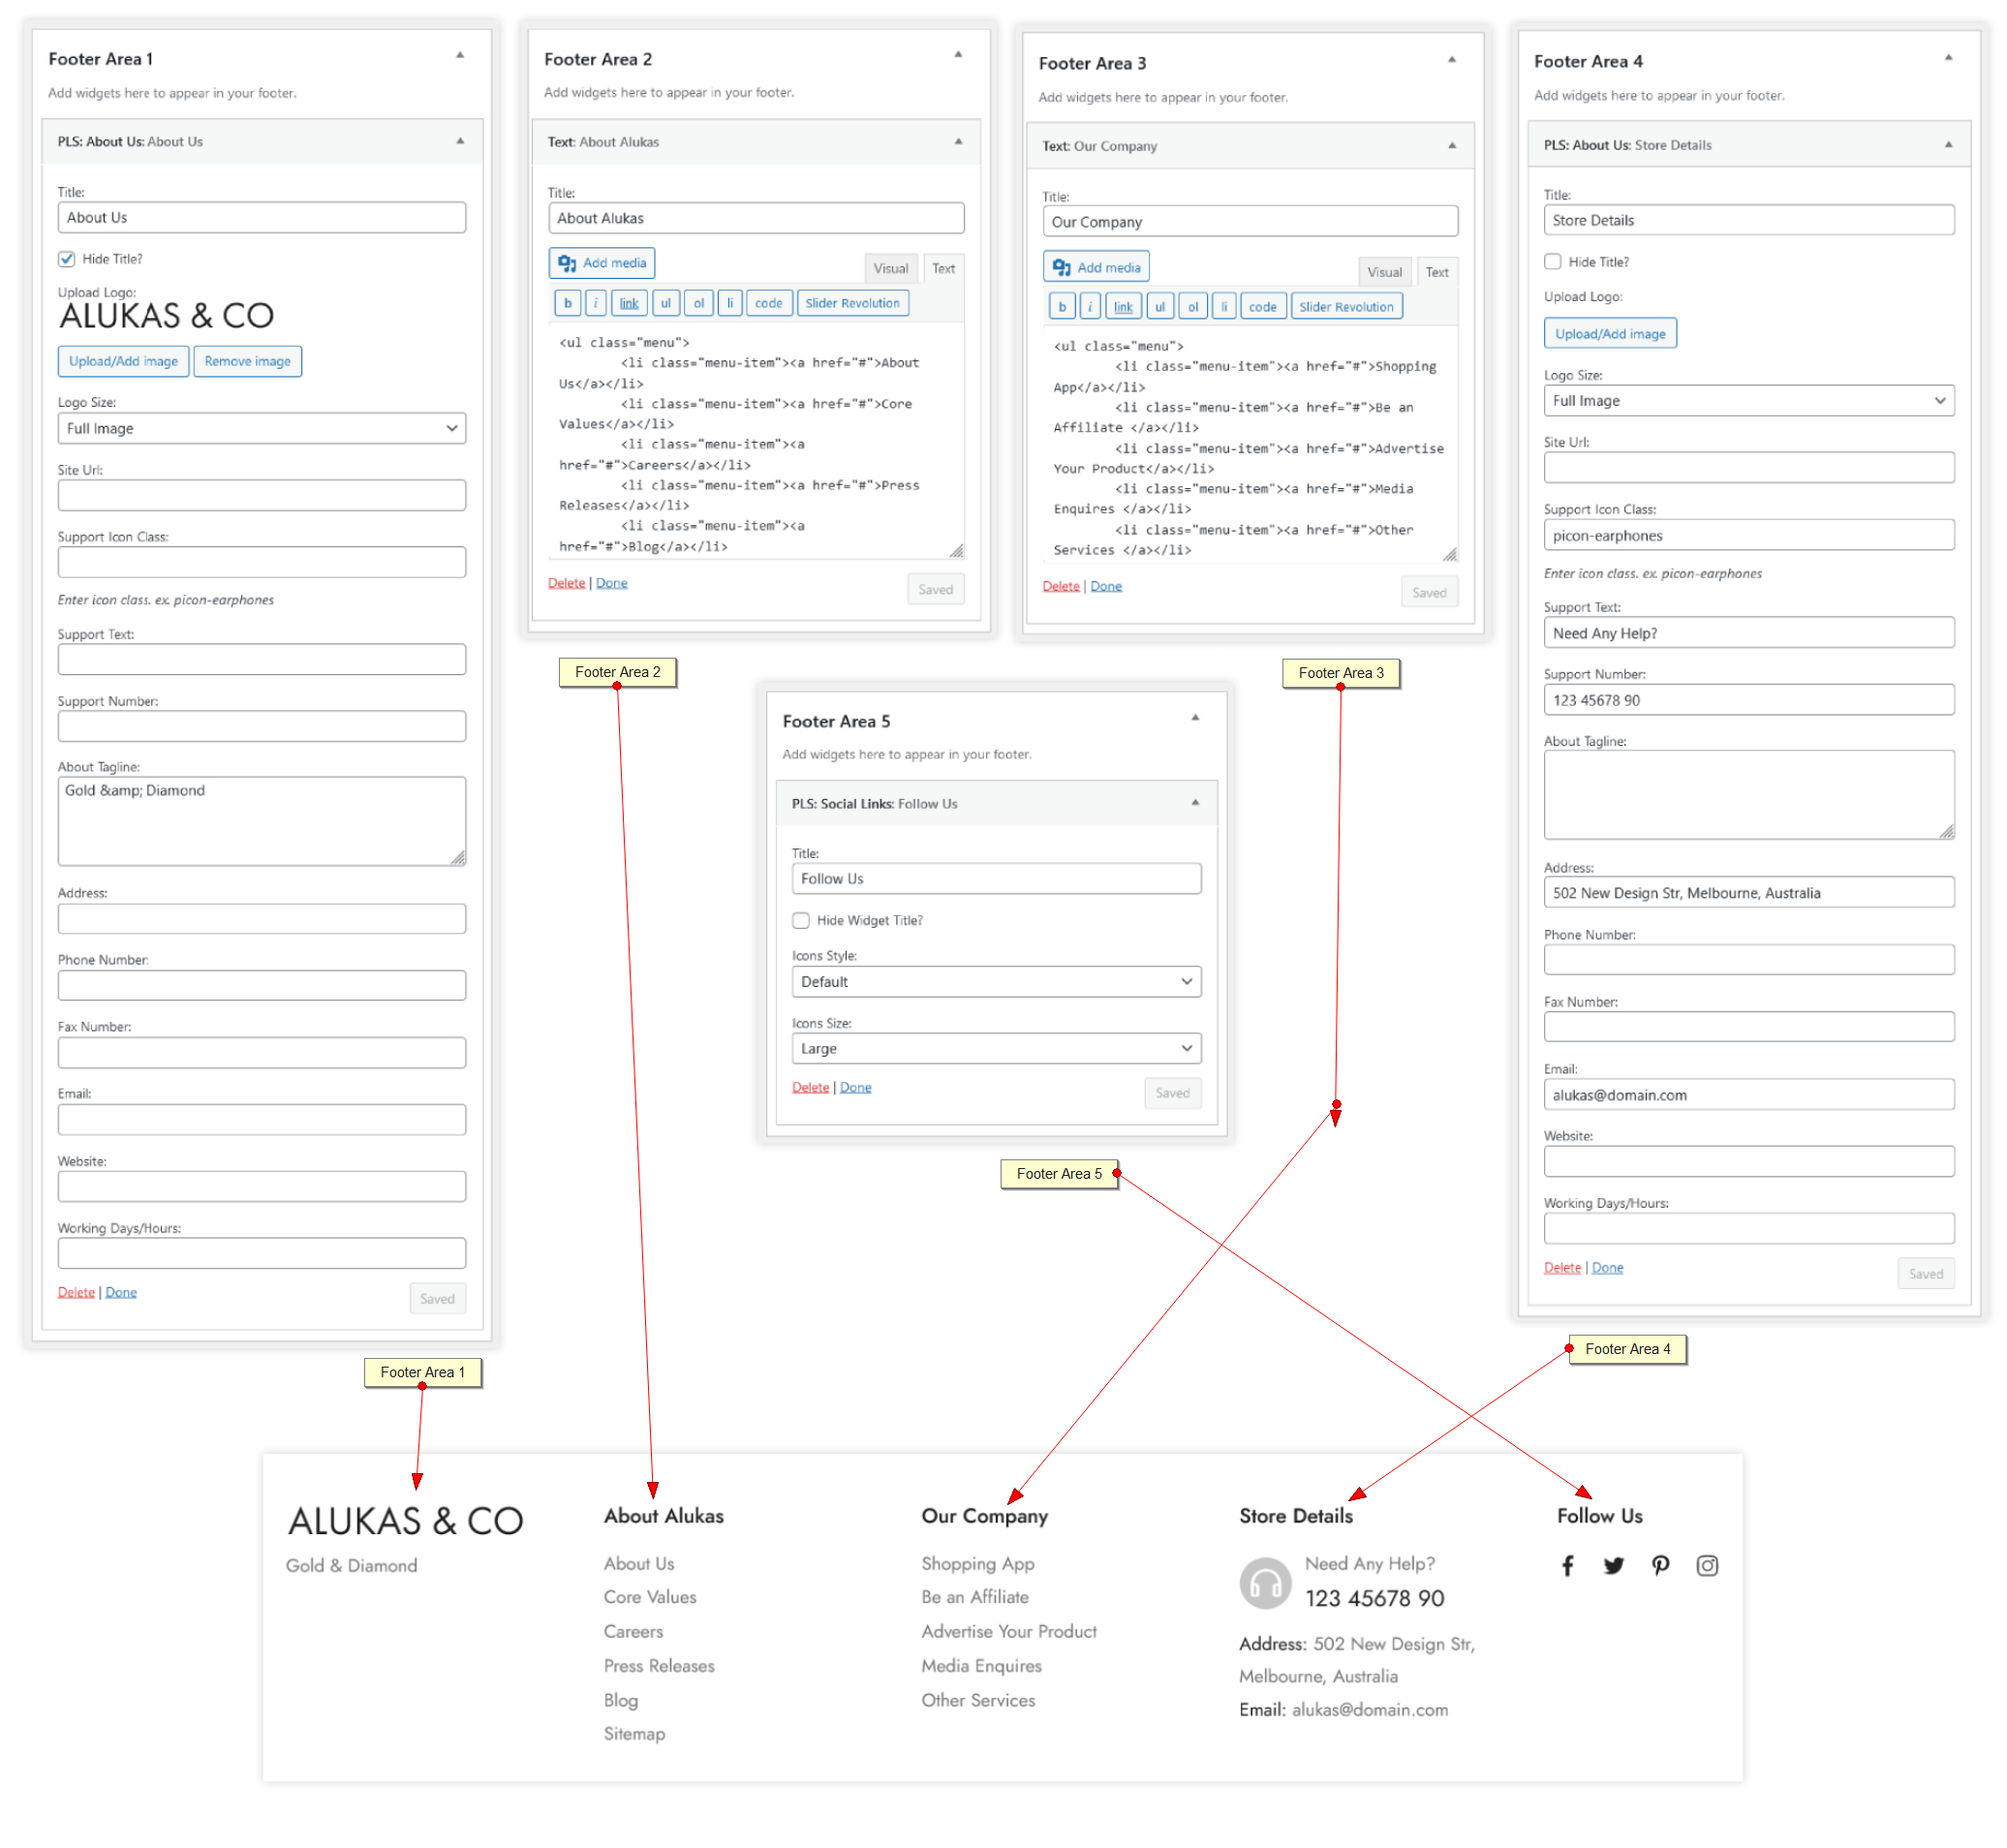
- Footer Area 1 - It display on first column in footer area.
- Footer Area 2 - It display on second column in footer area.
- Footer Area 3 - It display on third column in footer area.
- Footer Area 4 - It display on fourth column in footer area.
- Footer Area 5 - It display on fifth column in footer area.
2. Crate Cutom Sidebar

- Enter sidebar name.
- Click on "Add Widget Area" button to add sidebar.
Note :- You can assign this sidebar on posts/pages from pages options or theme options.
3. Remove Custom Sidebar

- Click on trace icon to remove custom sidebar.
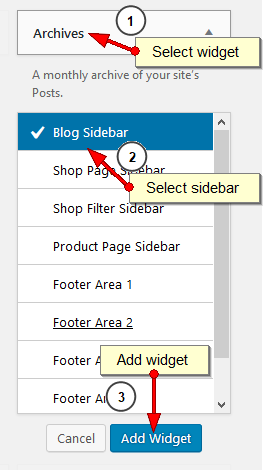
Add Widgets To Sidebar
- Login to the WordPress Dashboard.
- Navigate Appearance > Widgets.
Widgets List
Alukas comes with some custom widgets. See below list of widgets.

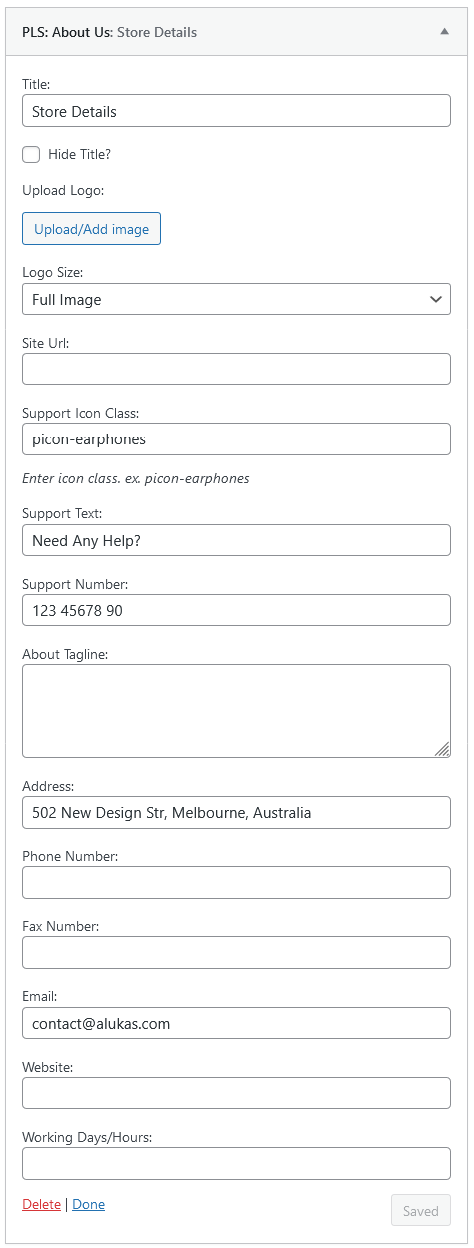
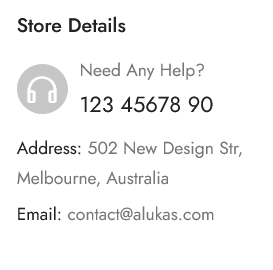
About Us
This widget display information about your site.
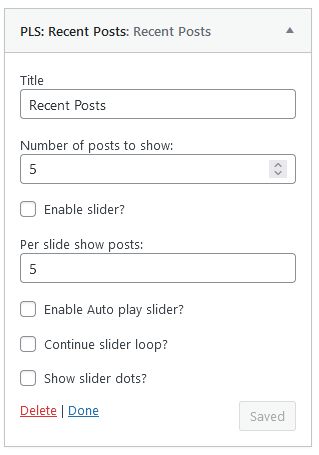
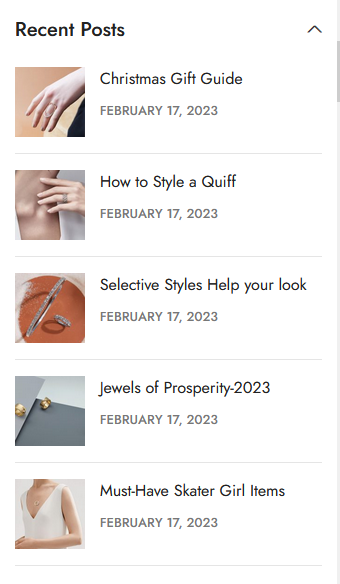
Recent Posts
This widget allows you to display recent posts.
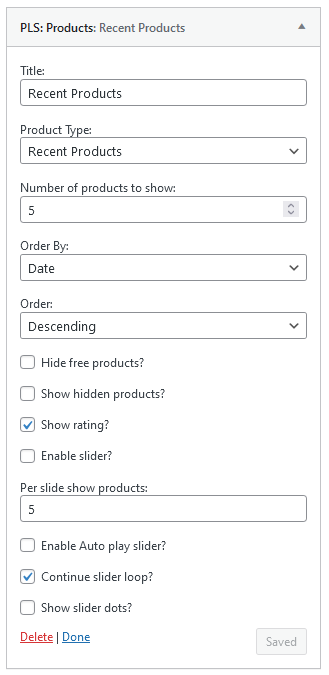
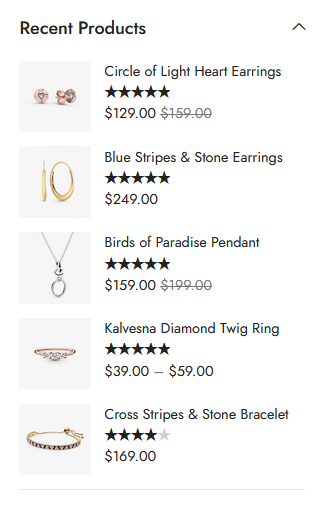
Products
This widget allows you to display products.
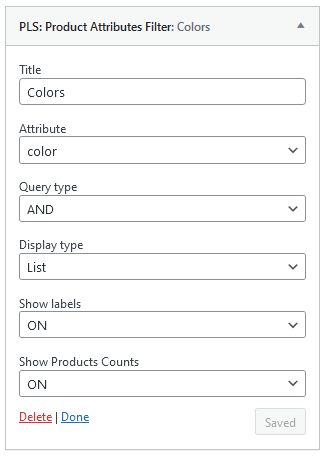
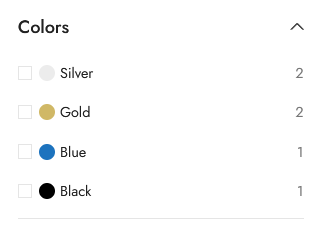
Attributes Filter
This widget allows you to display product attributes.
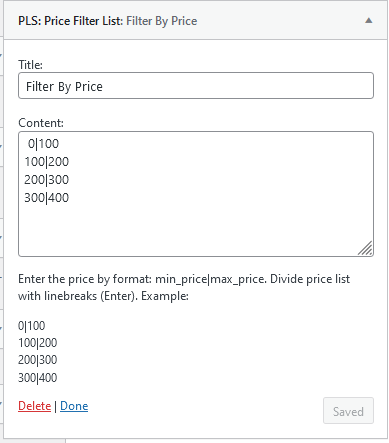
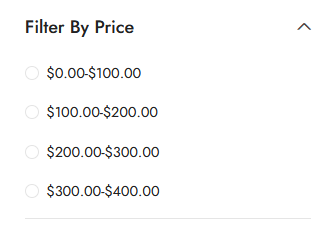
Price Filter List
This widget allows you to display price filters.
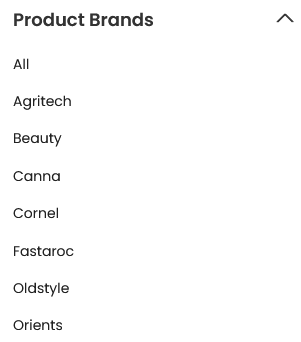
Products Brand
This widget allows you to display products brand.
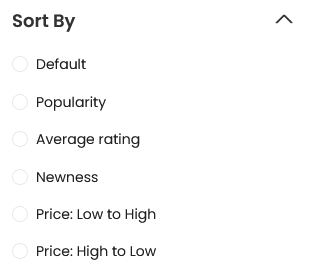
Product Sorting
This widget allows you to display product sorting options.
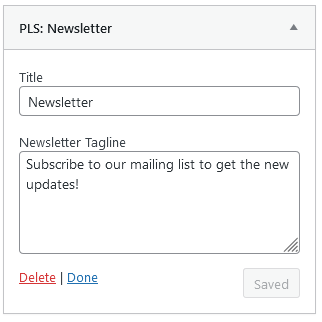
Newsletter
This widget allows you to display newsletter form.

Site Logo
To upload your site logo, Please go to Alukas > Theme Options > General. From there you can upload site logo.
Favicon Icon
To upload favicon icon, Please go to Appearance > Customize > Site Identity. From there you can upload site favicon icon.
Language Switcher

For language switcher you need to install and activate WPML plugin. This plugin not include with theme package. You need to buy it separately from wpml.org
Alukas theme also support free Polylang and TranslatePress Multilingual plugins
Currency Switcher

For currency switcher you need to install and activate other third party currency switcher plugins. Alukas theme support WooCommerce Multilingual & Multicurrency with WPML and FOX – Currency Switcher Professional for WooCommerce plugins.
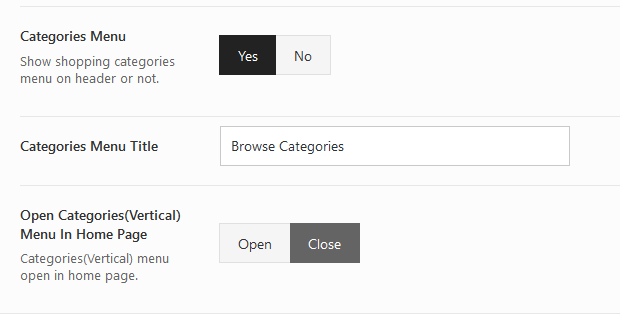
Shopping By Categories Menu
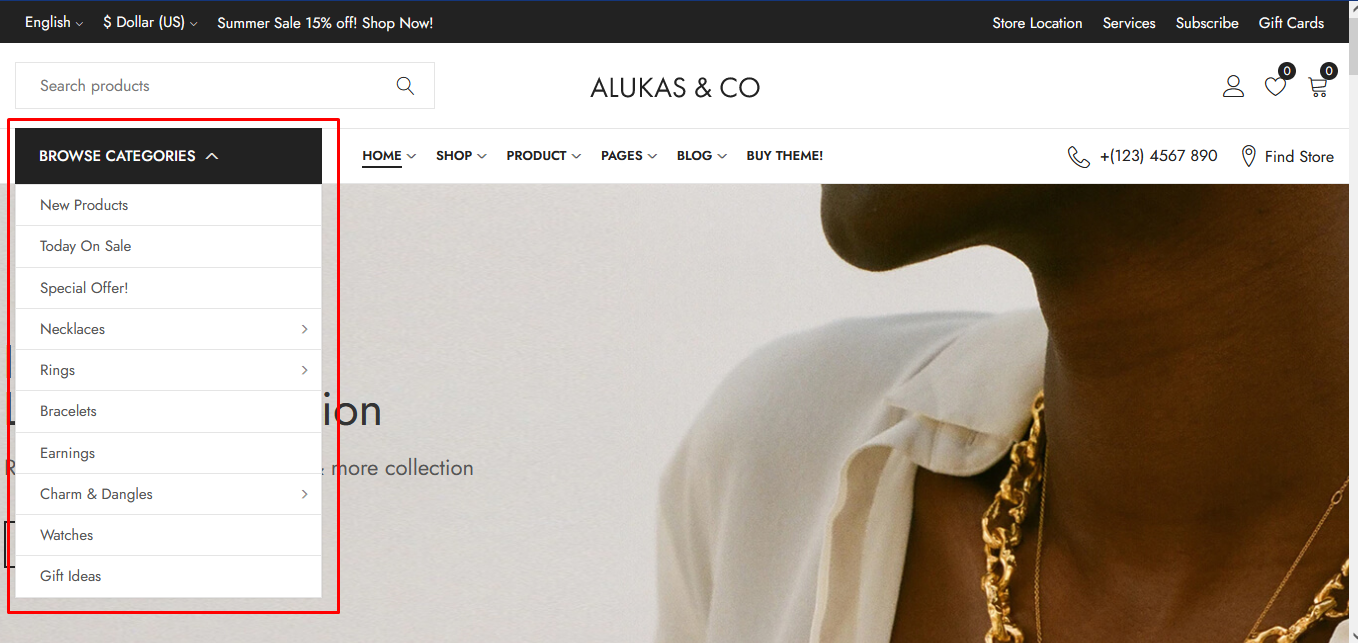
You can manage Category menu options from Alukas => Theme Options => Header. There you can change menu title, Enable or disable menu and open category menu by default menu on home page.
NOTE : You can create menu and manage menu items from Appearance => Menus.

Footer Style
To set up your footer, navigate to Alukas > Theme Options > Footer from your WordPress admin panel.
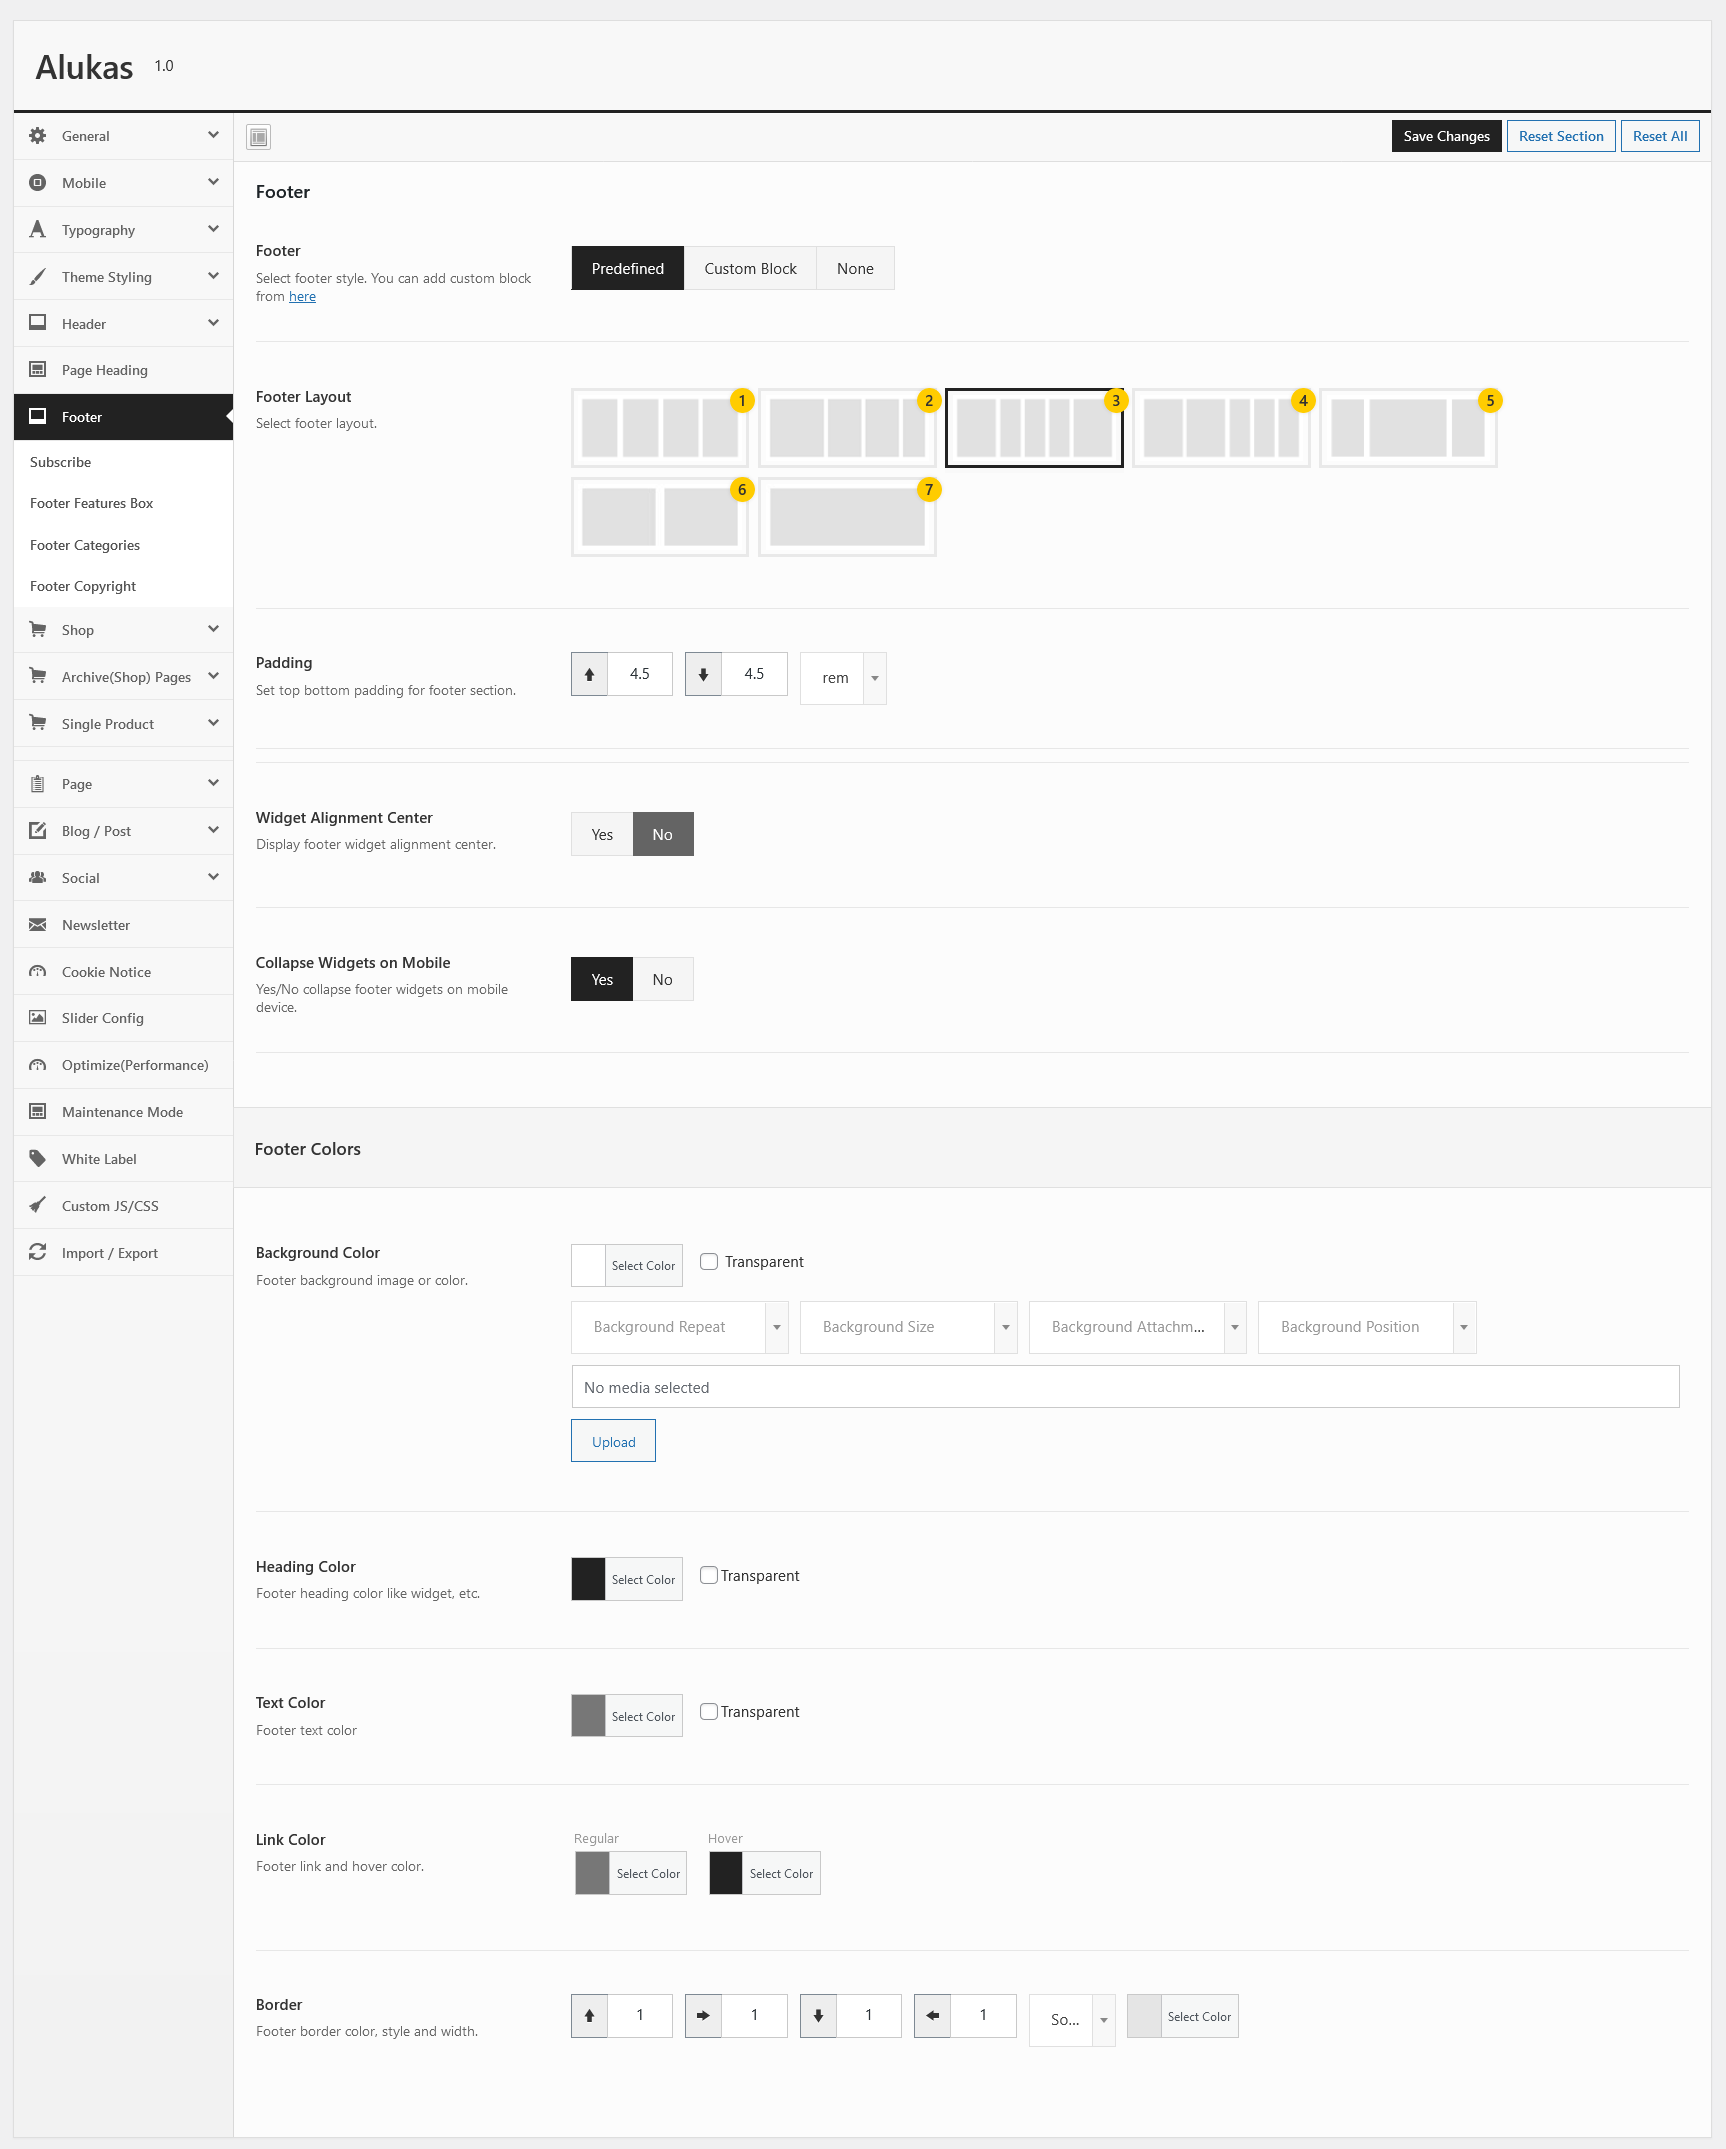
Footer Widgets
Content is added to your footer via widgets. Navigate to Appearance > Widgets from your WordPress admin panel. The widget area footer 1 display in 1st columns,footer 2 display in 2nd column, footer 3 display in 3rd column, footer 4 display in 4th column and footer 5 display in 5th column. To add a widget to one of the Footer widget areas, simply drag the desired widget to one of the Footer widget areas on the right.
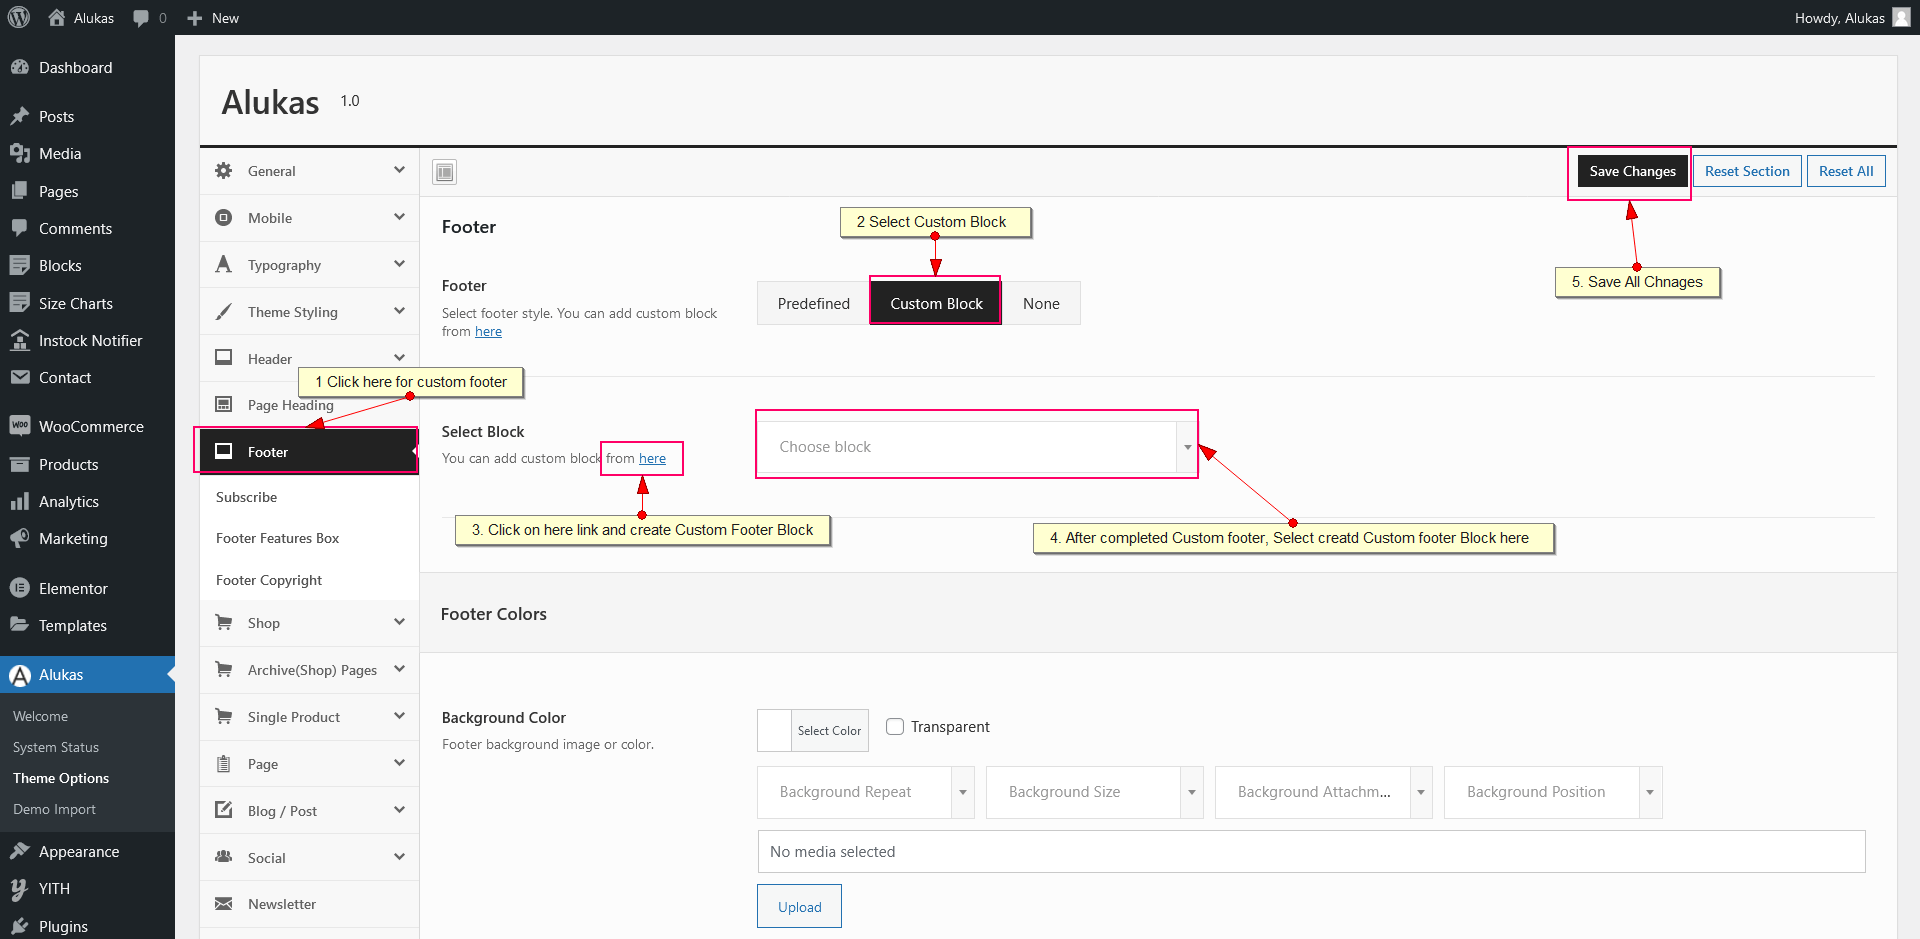
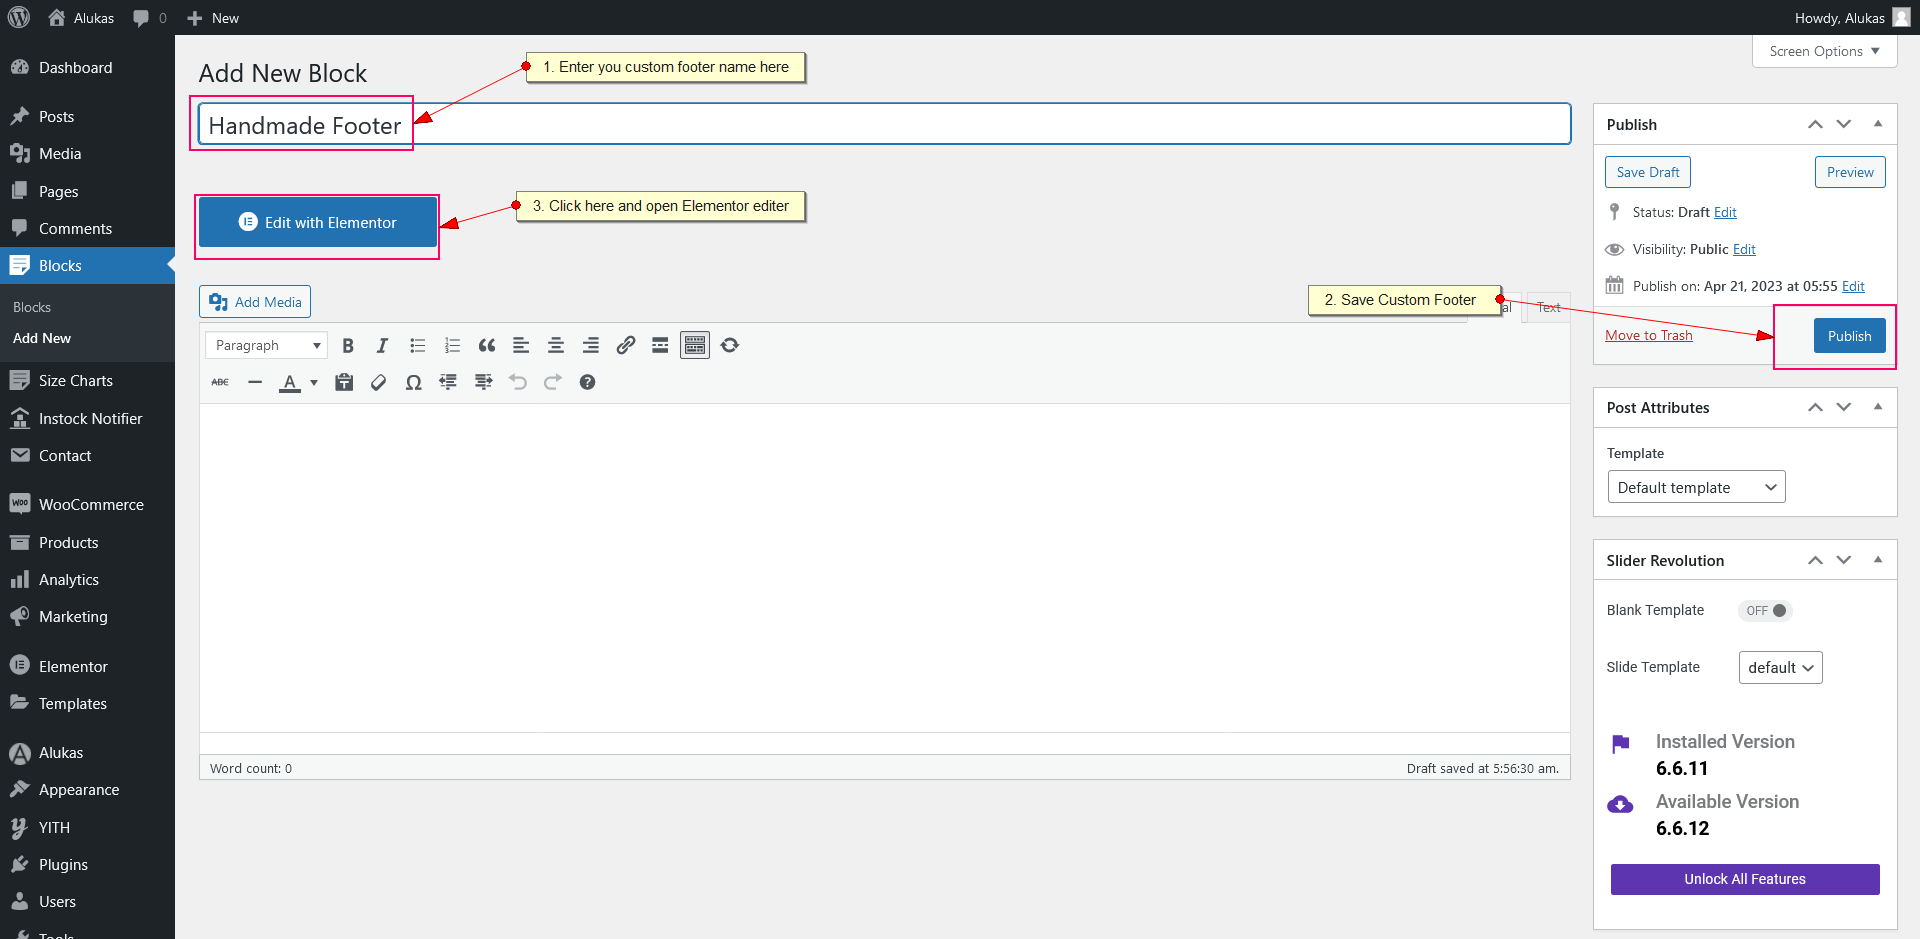
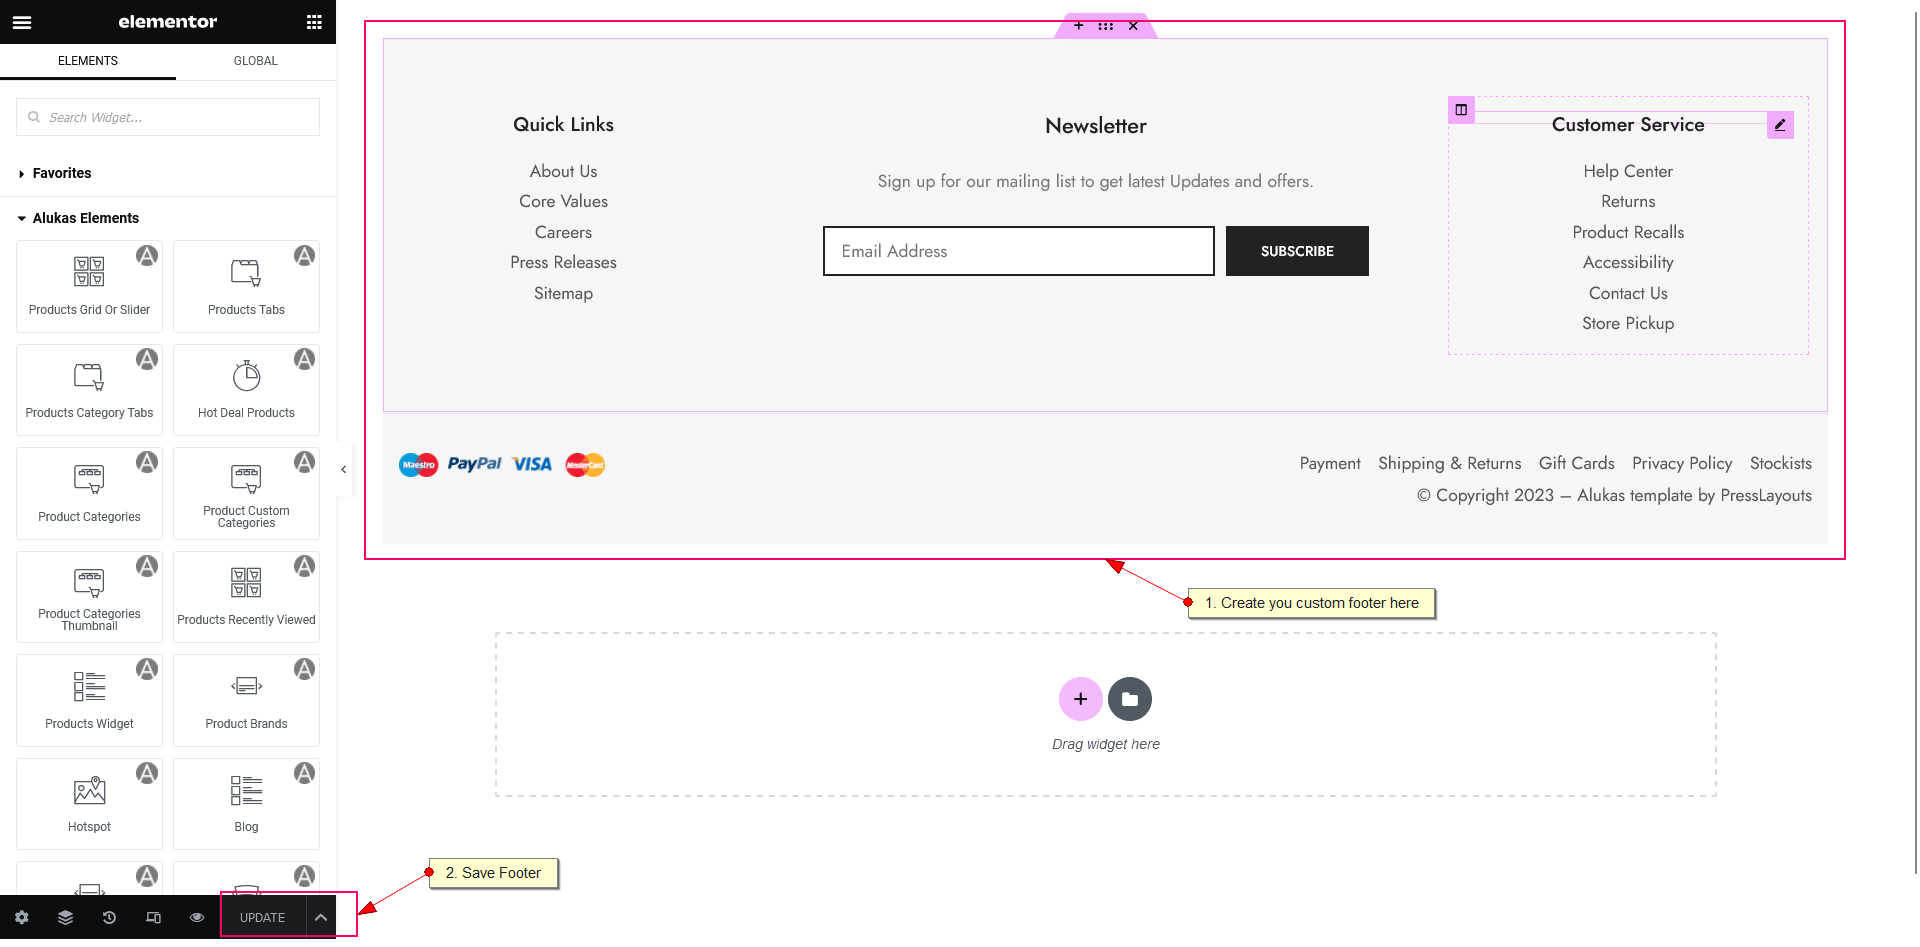
Custom Footer
You can build custom footer with Elementor builder and use it in footer. Please go to Alukas > Theme Options > Footer and select Footer style as Custom Block and follow below guide
Theme Options
Theme Options located in WP Dashboard → Alukas → Theme Options includes all global options that affect your entire website. These options can be overwritten by page options of any custom page.
General
This section contain the following options:
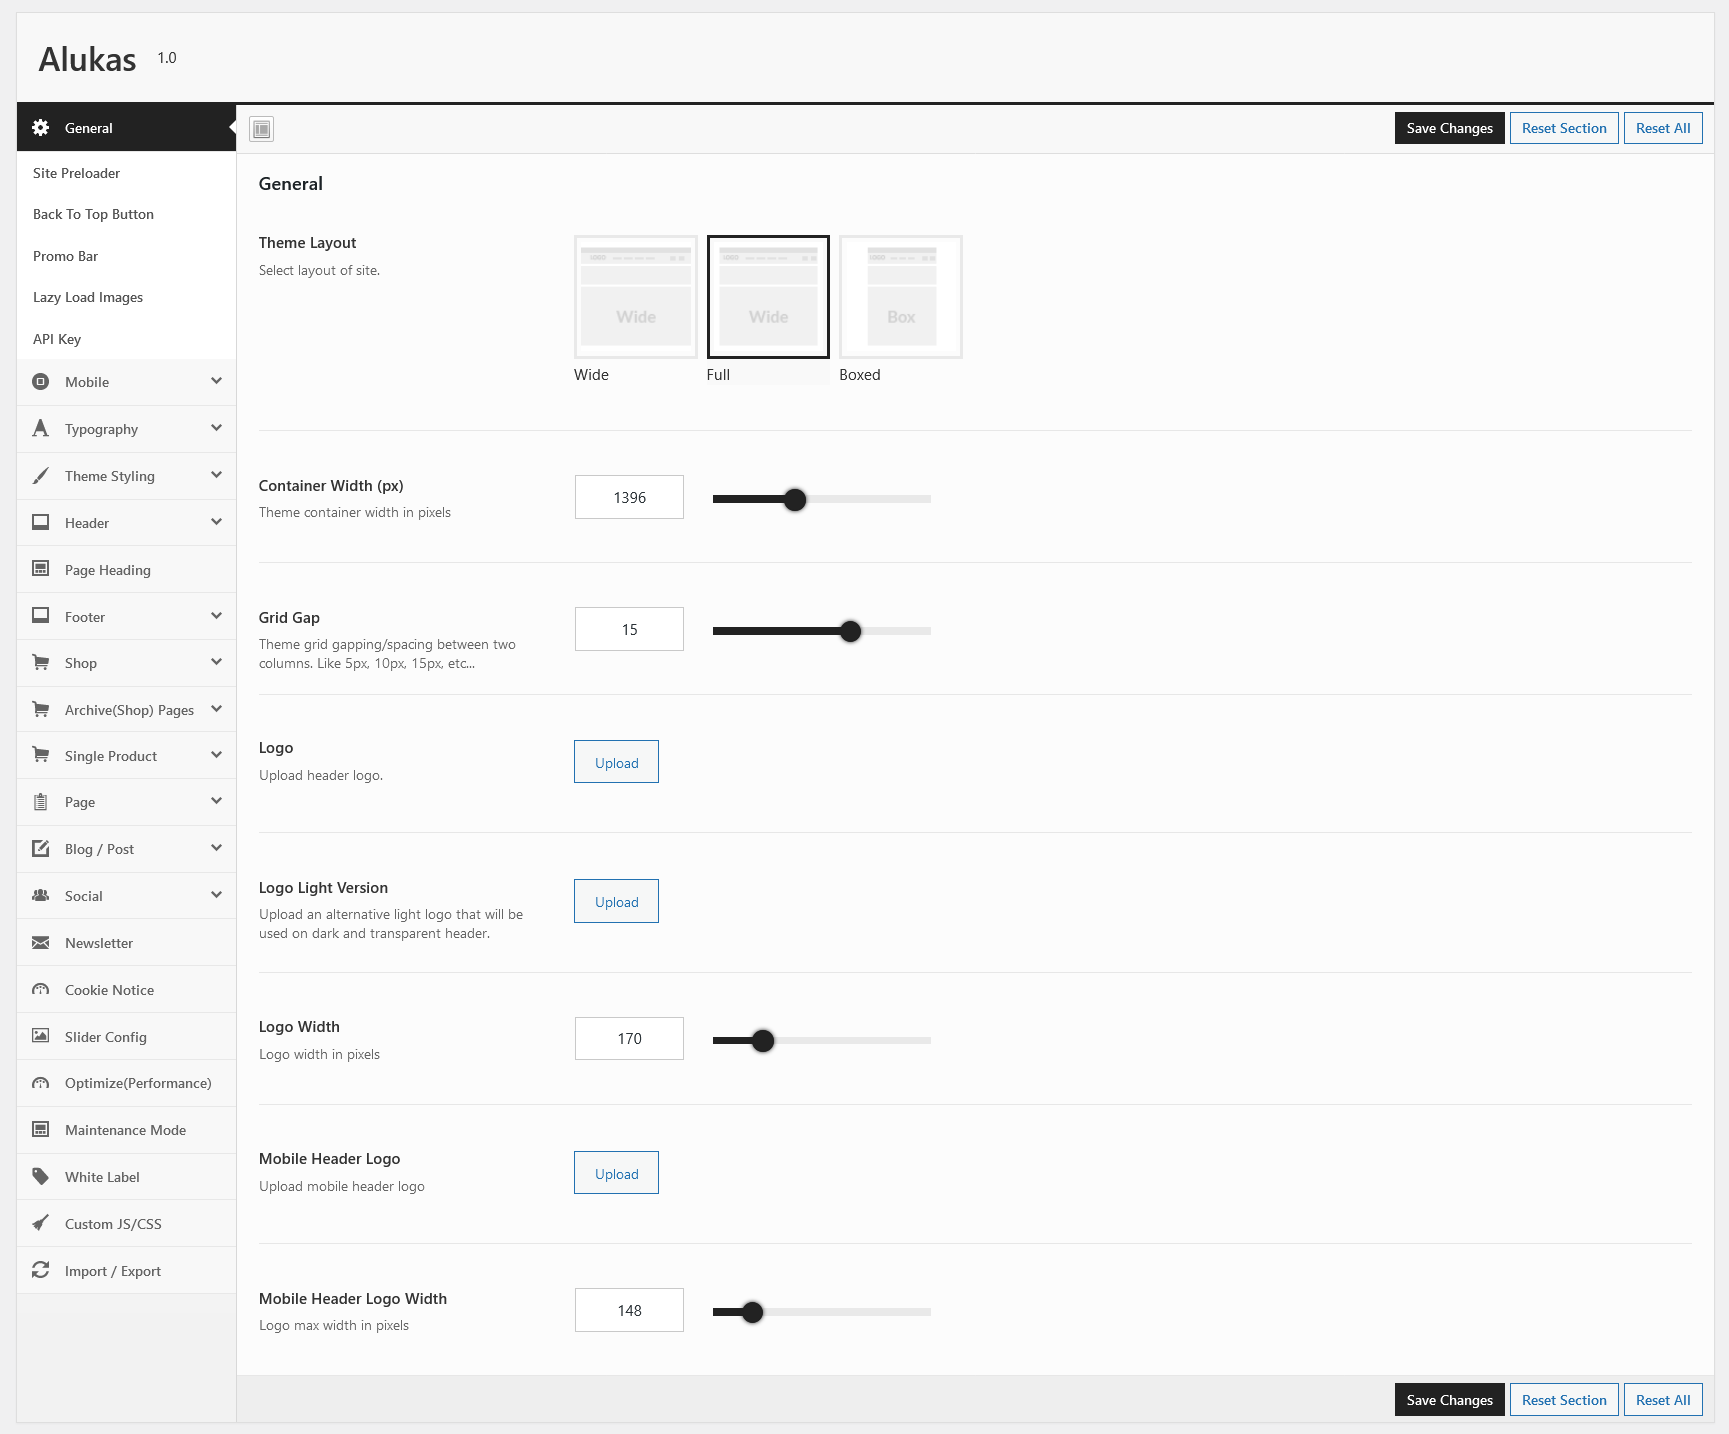
- Theme Layout : Select your site layout wide, full or box.
- Container Width : Enter site container width.
- Grid Gap : Select Grid gap here.
- Logo : Upload your site logo.
- Logo Light Version : Upload an alternative light logo that will be used on dark and transparent header.
- Logo Width : Set your logo width.
- Mobile Header Logo : Upload mobile header logo.
- Mobile Header Logo Width : set mobile logo width.
Site Preloader
This section contain the following options:
- Site Preloader : Enable/disable preloader on your website.
- Preloader Background : Set preloader background color.
- Preloader Image : Set preloader type as per your need.
- Choose Preloader Style : Choose preloader style.At this moment we have 5 styles.
- Upload Preloader Image : Upload preloader image.It will be show when you select preloader image as custom option.
Back To Top Button
This section contain the following options:
- Button : Enable/disable back to top button.
- Button In Mobile : Enable/disable back to top button in mobile device.
Promo Bar
This section contain the following options:
- Promo Bar : Enable/disable Promo Bar.
- Height : Set promo bar height.
- Position : Select location for promo bar.
- Position Type : Select position type for promo bar.
- Message : Enter promo message.
- Button : Enable link button in promo bar.
- Button Text : The text of the more info button.
- Enter Url : The text of the more info button.
- Open link in New Tab : Select the link target for more info page.
- Close Button : Enable close button.
- Promo Bar Dismissing : Enable/Disable promo bar dismissing on button close.
Lazy Load Images
This section contain the following options:
- Lazy Load Images : Enables lazy load to reduce page requests.
API Key
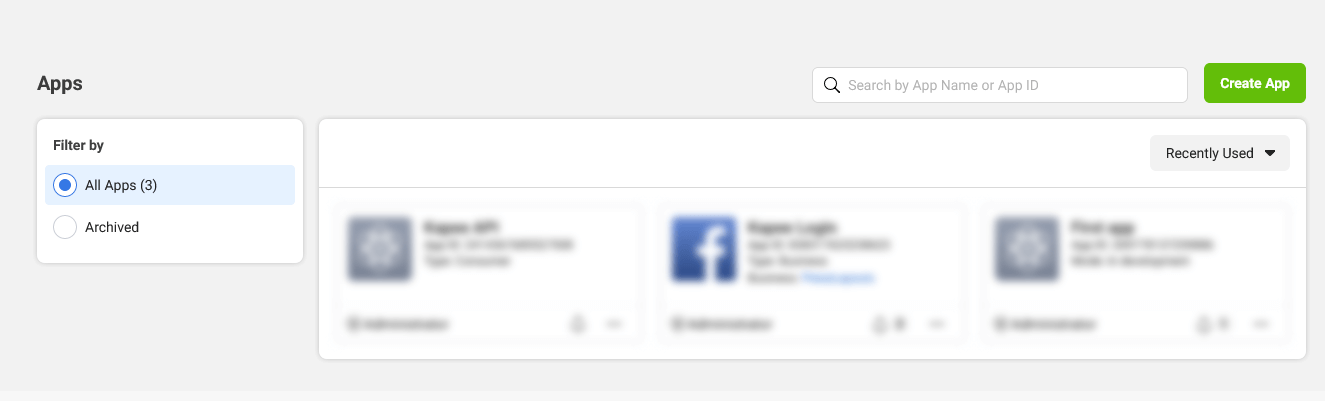
How to generate Instagram Acccess Token
1) First go to Facebook Developers Account and login with your own facebook credencials. Then clikc on create App button.
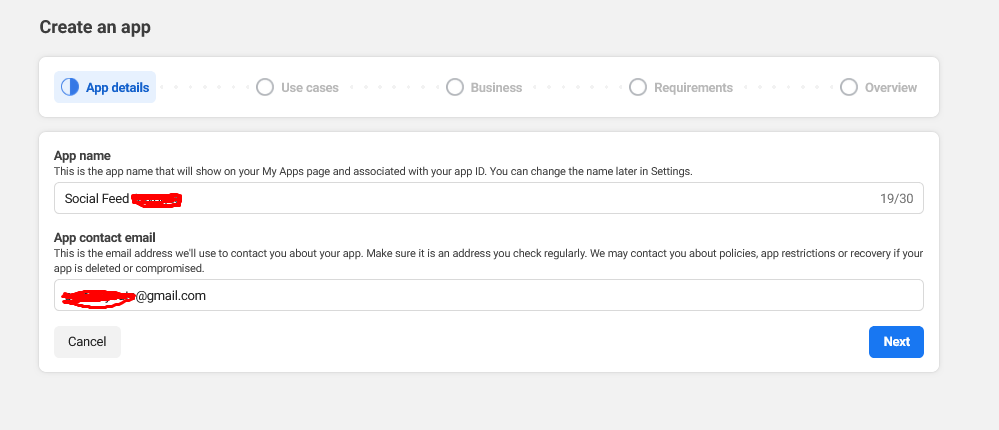
2) Enter app details and press next button.
3) Select Other Options and press next button.
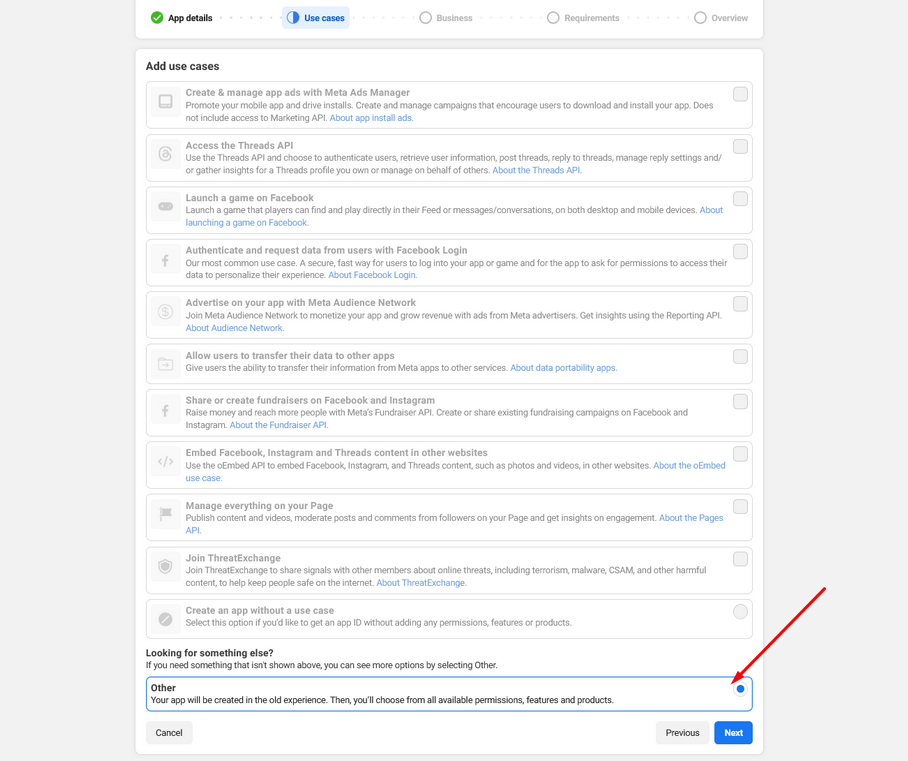
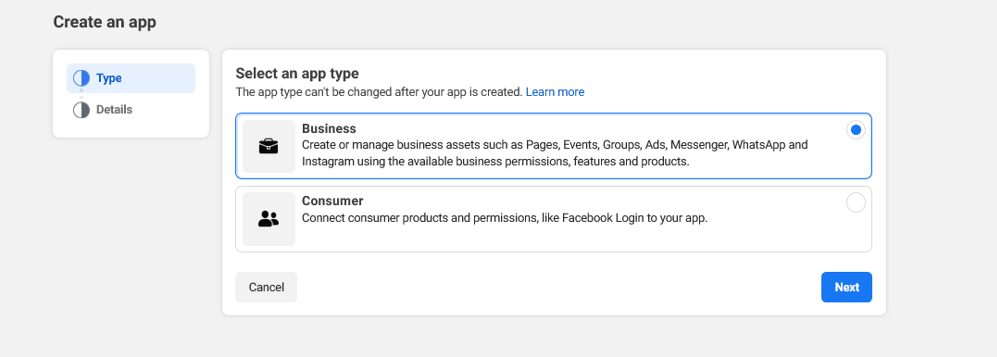
4) Select Business Options and press next button.
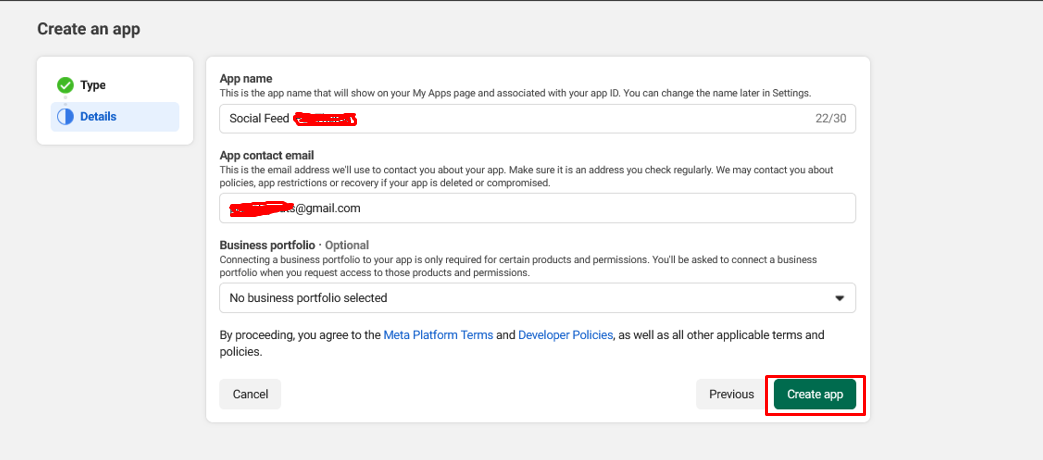
5) Here, Entere you App Display Name, App Contact email and choose business account if you have one. And hit Create app button.
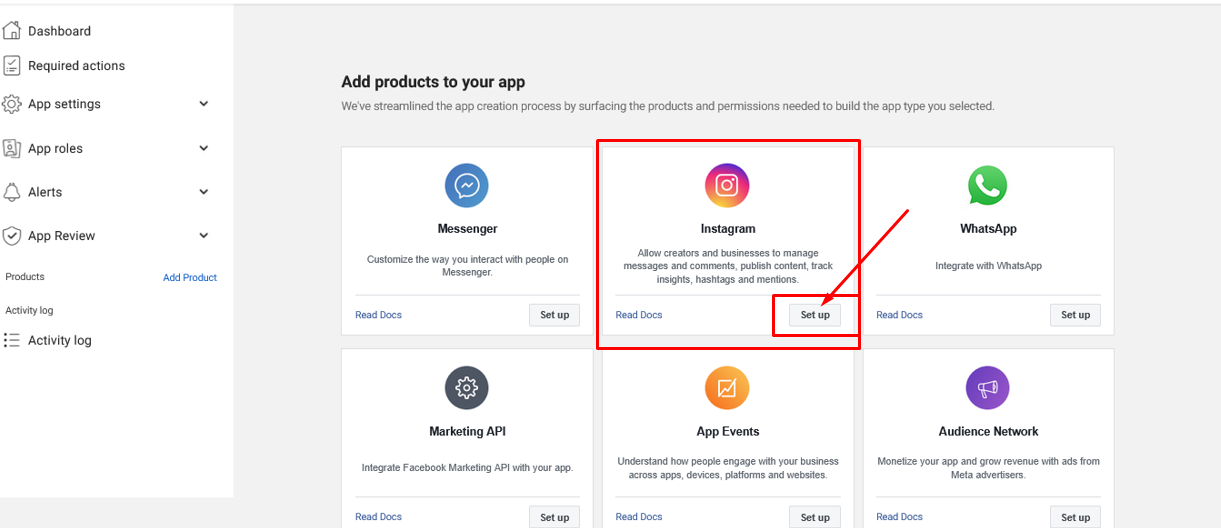
6) Now choose isntsagram app and click on Set up button.
7) Go to App Roles and click on Add People button.

8) Select Instagram Tester and Enter instagram user name which you want to fetch media.

9) Click on Apps and Website link and goes to instagram.
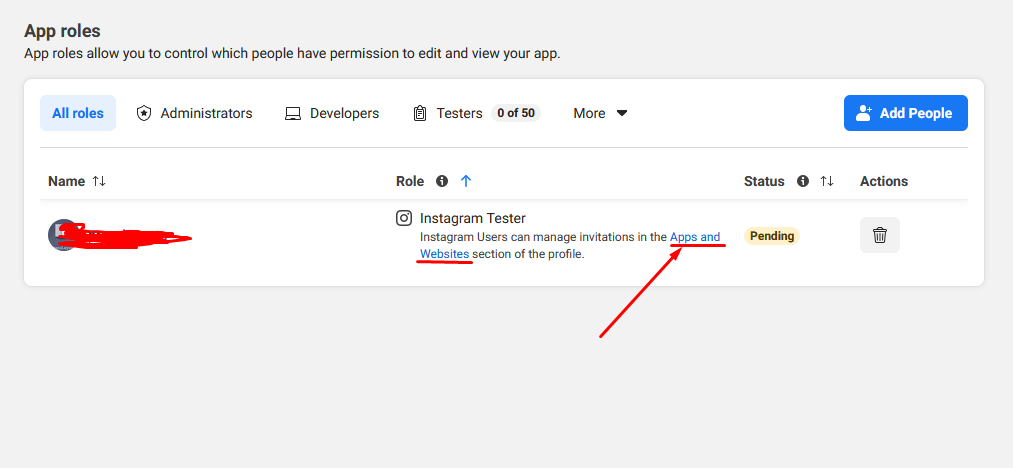
10) There accept Tester Invites request.

11) Now go to Instagram => API setup with Instagram business login and clikc on Generate Token link.
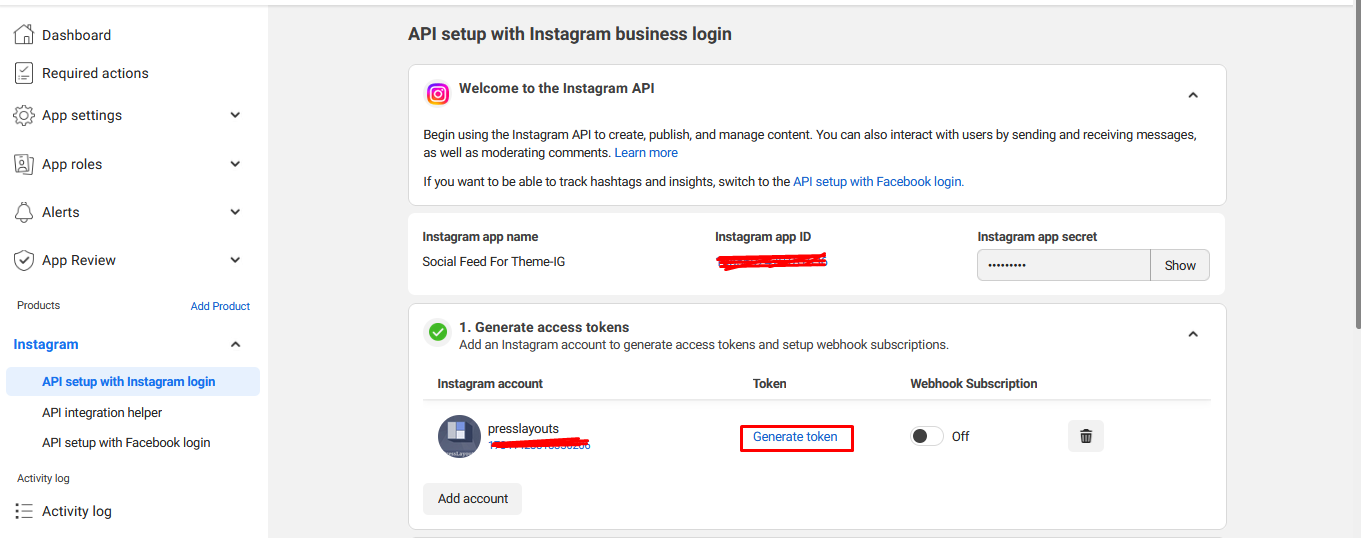
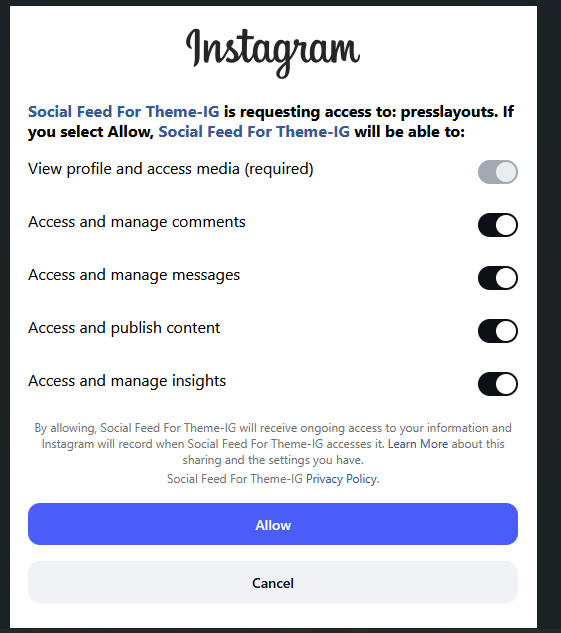
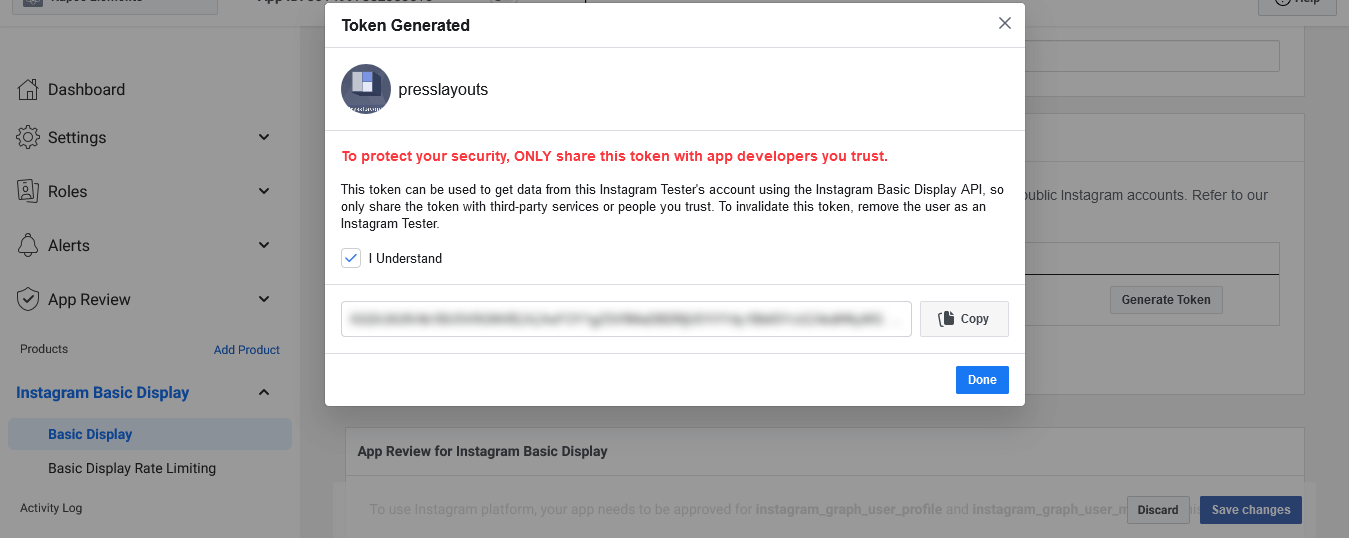
12) Now your instagram token is generated.
13) Copy the generated token and put it to Instagram Access Token option. See ScreenShot
14) In instagram widget, Select image data source as API. See ScreenShot
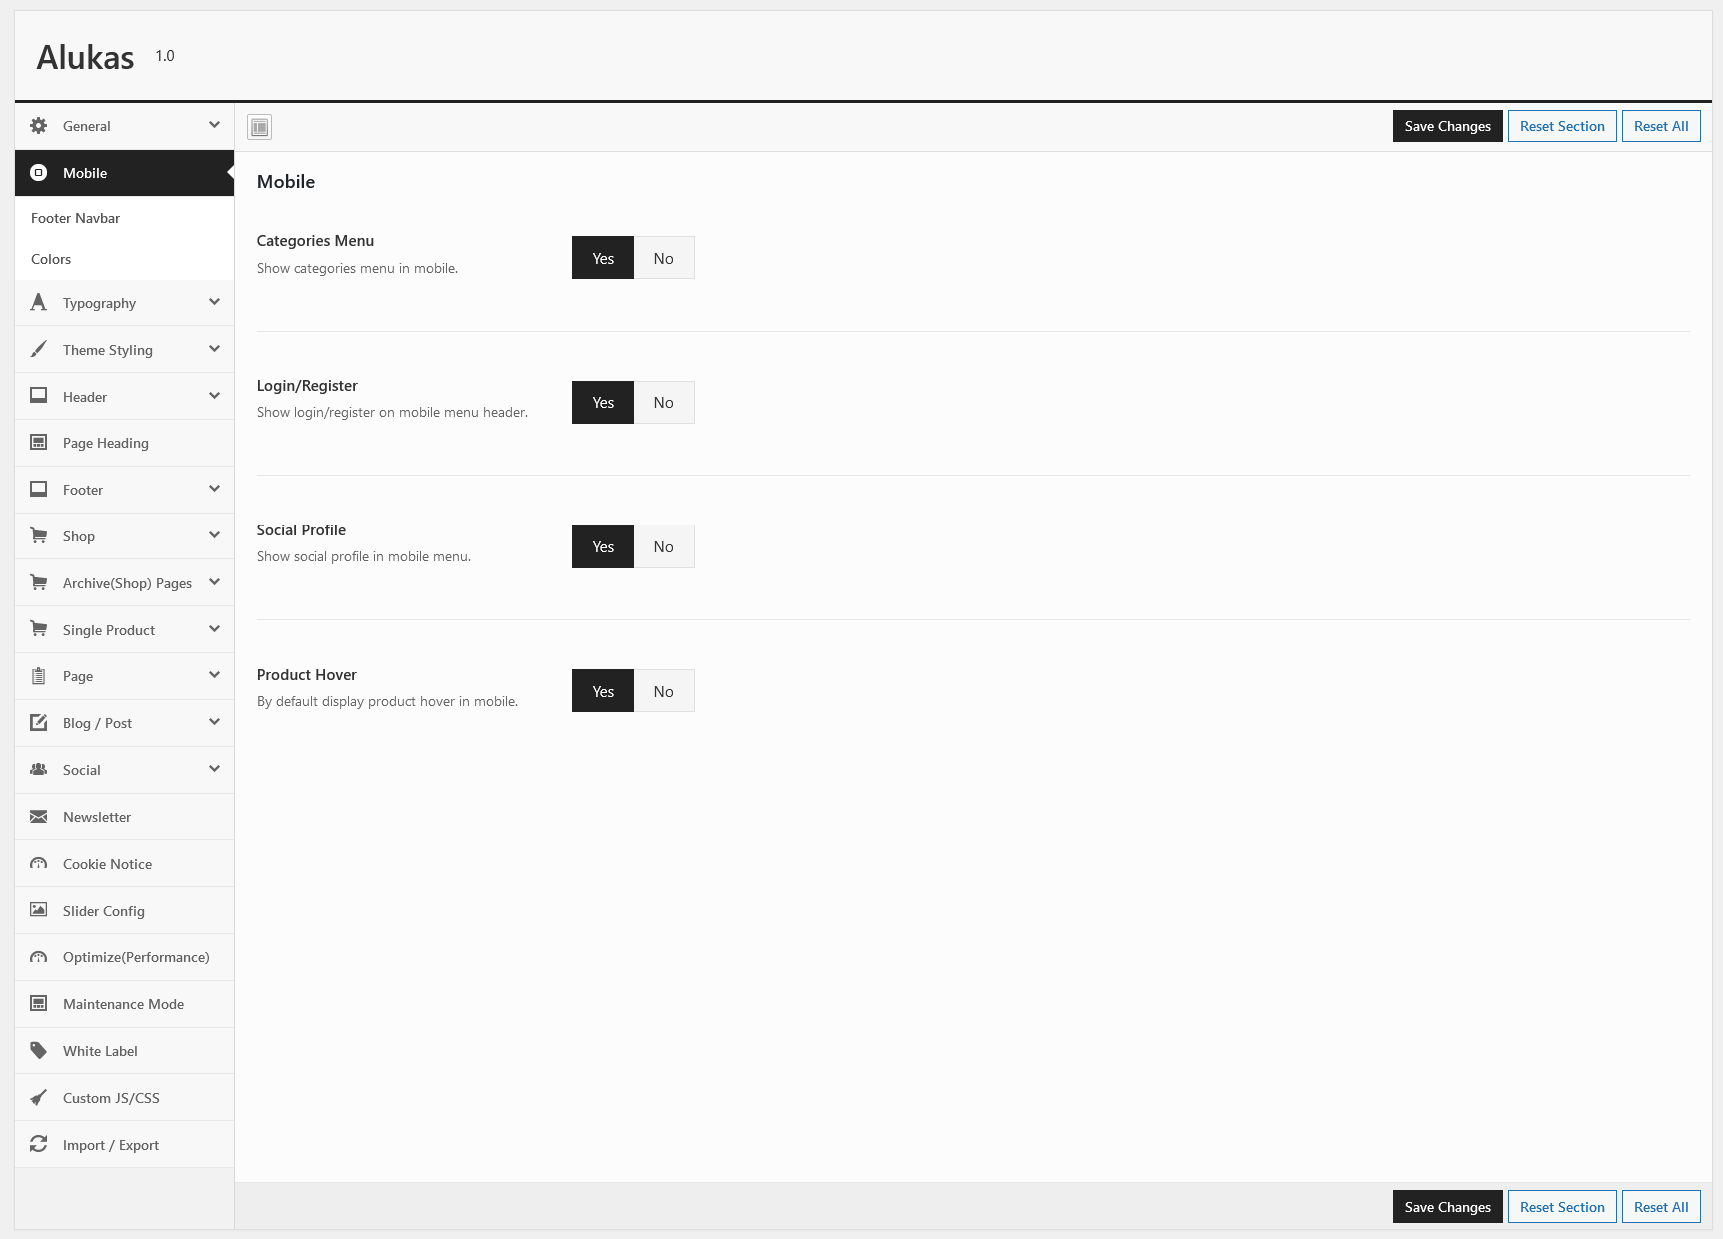
Mobile
You can mange mobile option here. Like mobile menu bg color, Mobile bottom navbar etc.
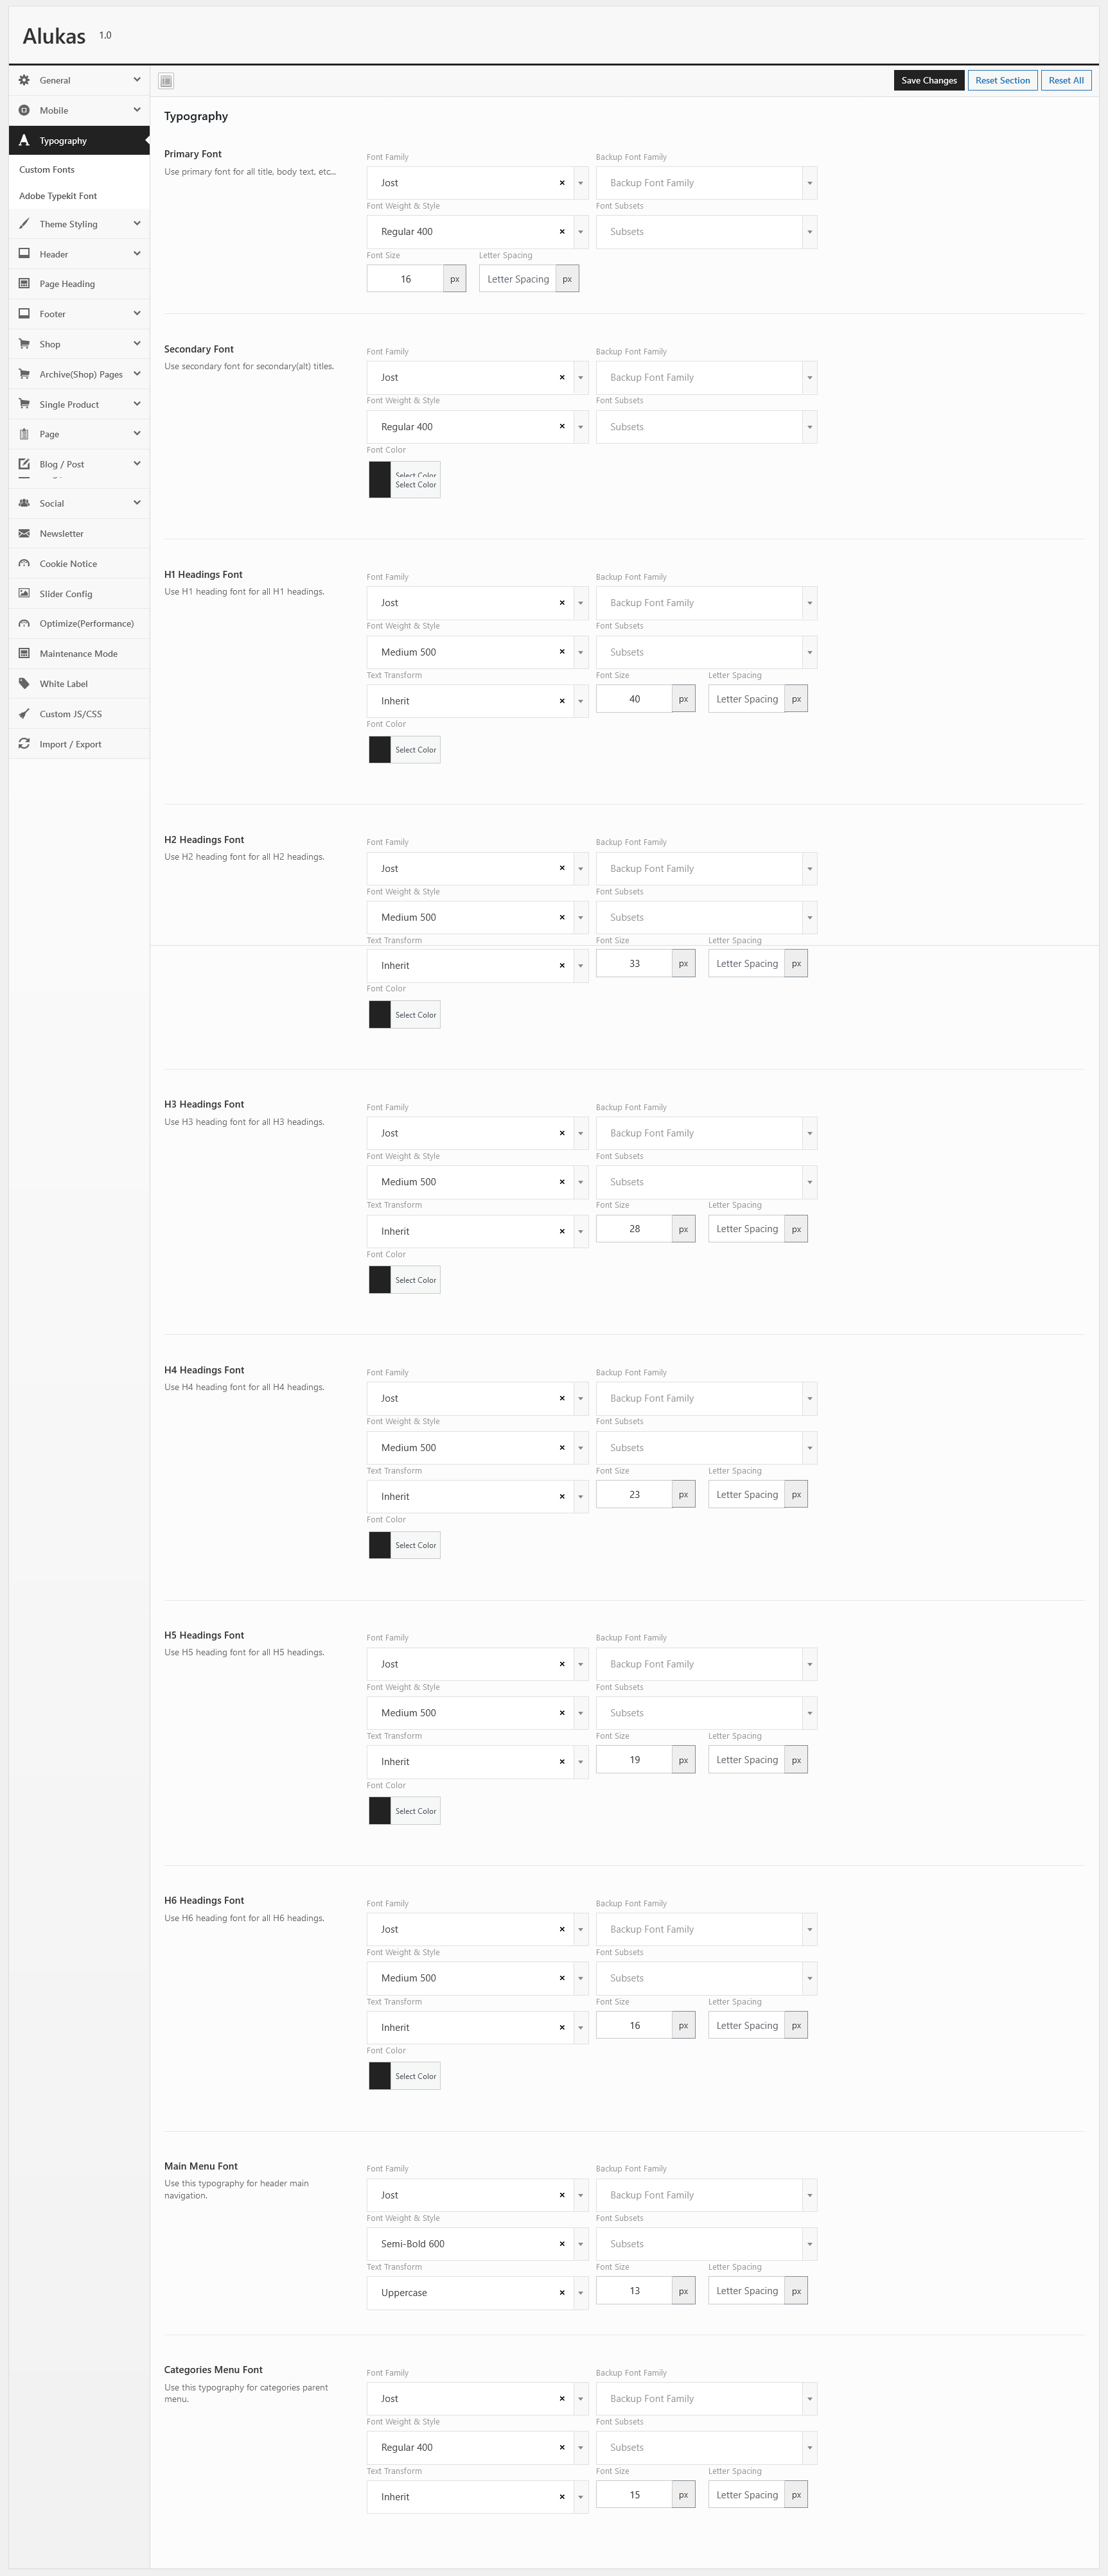
Typography
You can select font family, font size, font weight, line height etc..
Custom Fonts
This section you can enable custom font and upload font library.
Adobe Typekit Font
This section you can enable adobe typekit font.After enable typekit font you need to enter typekit id and list of font family name(every font family separated by comma) you want to include in site.
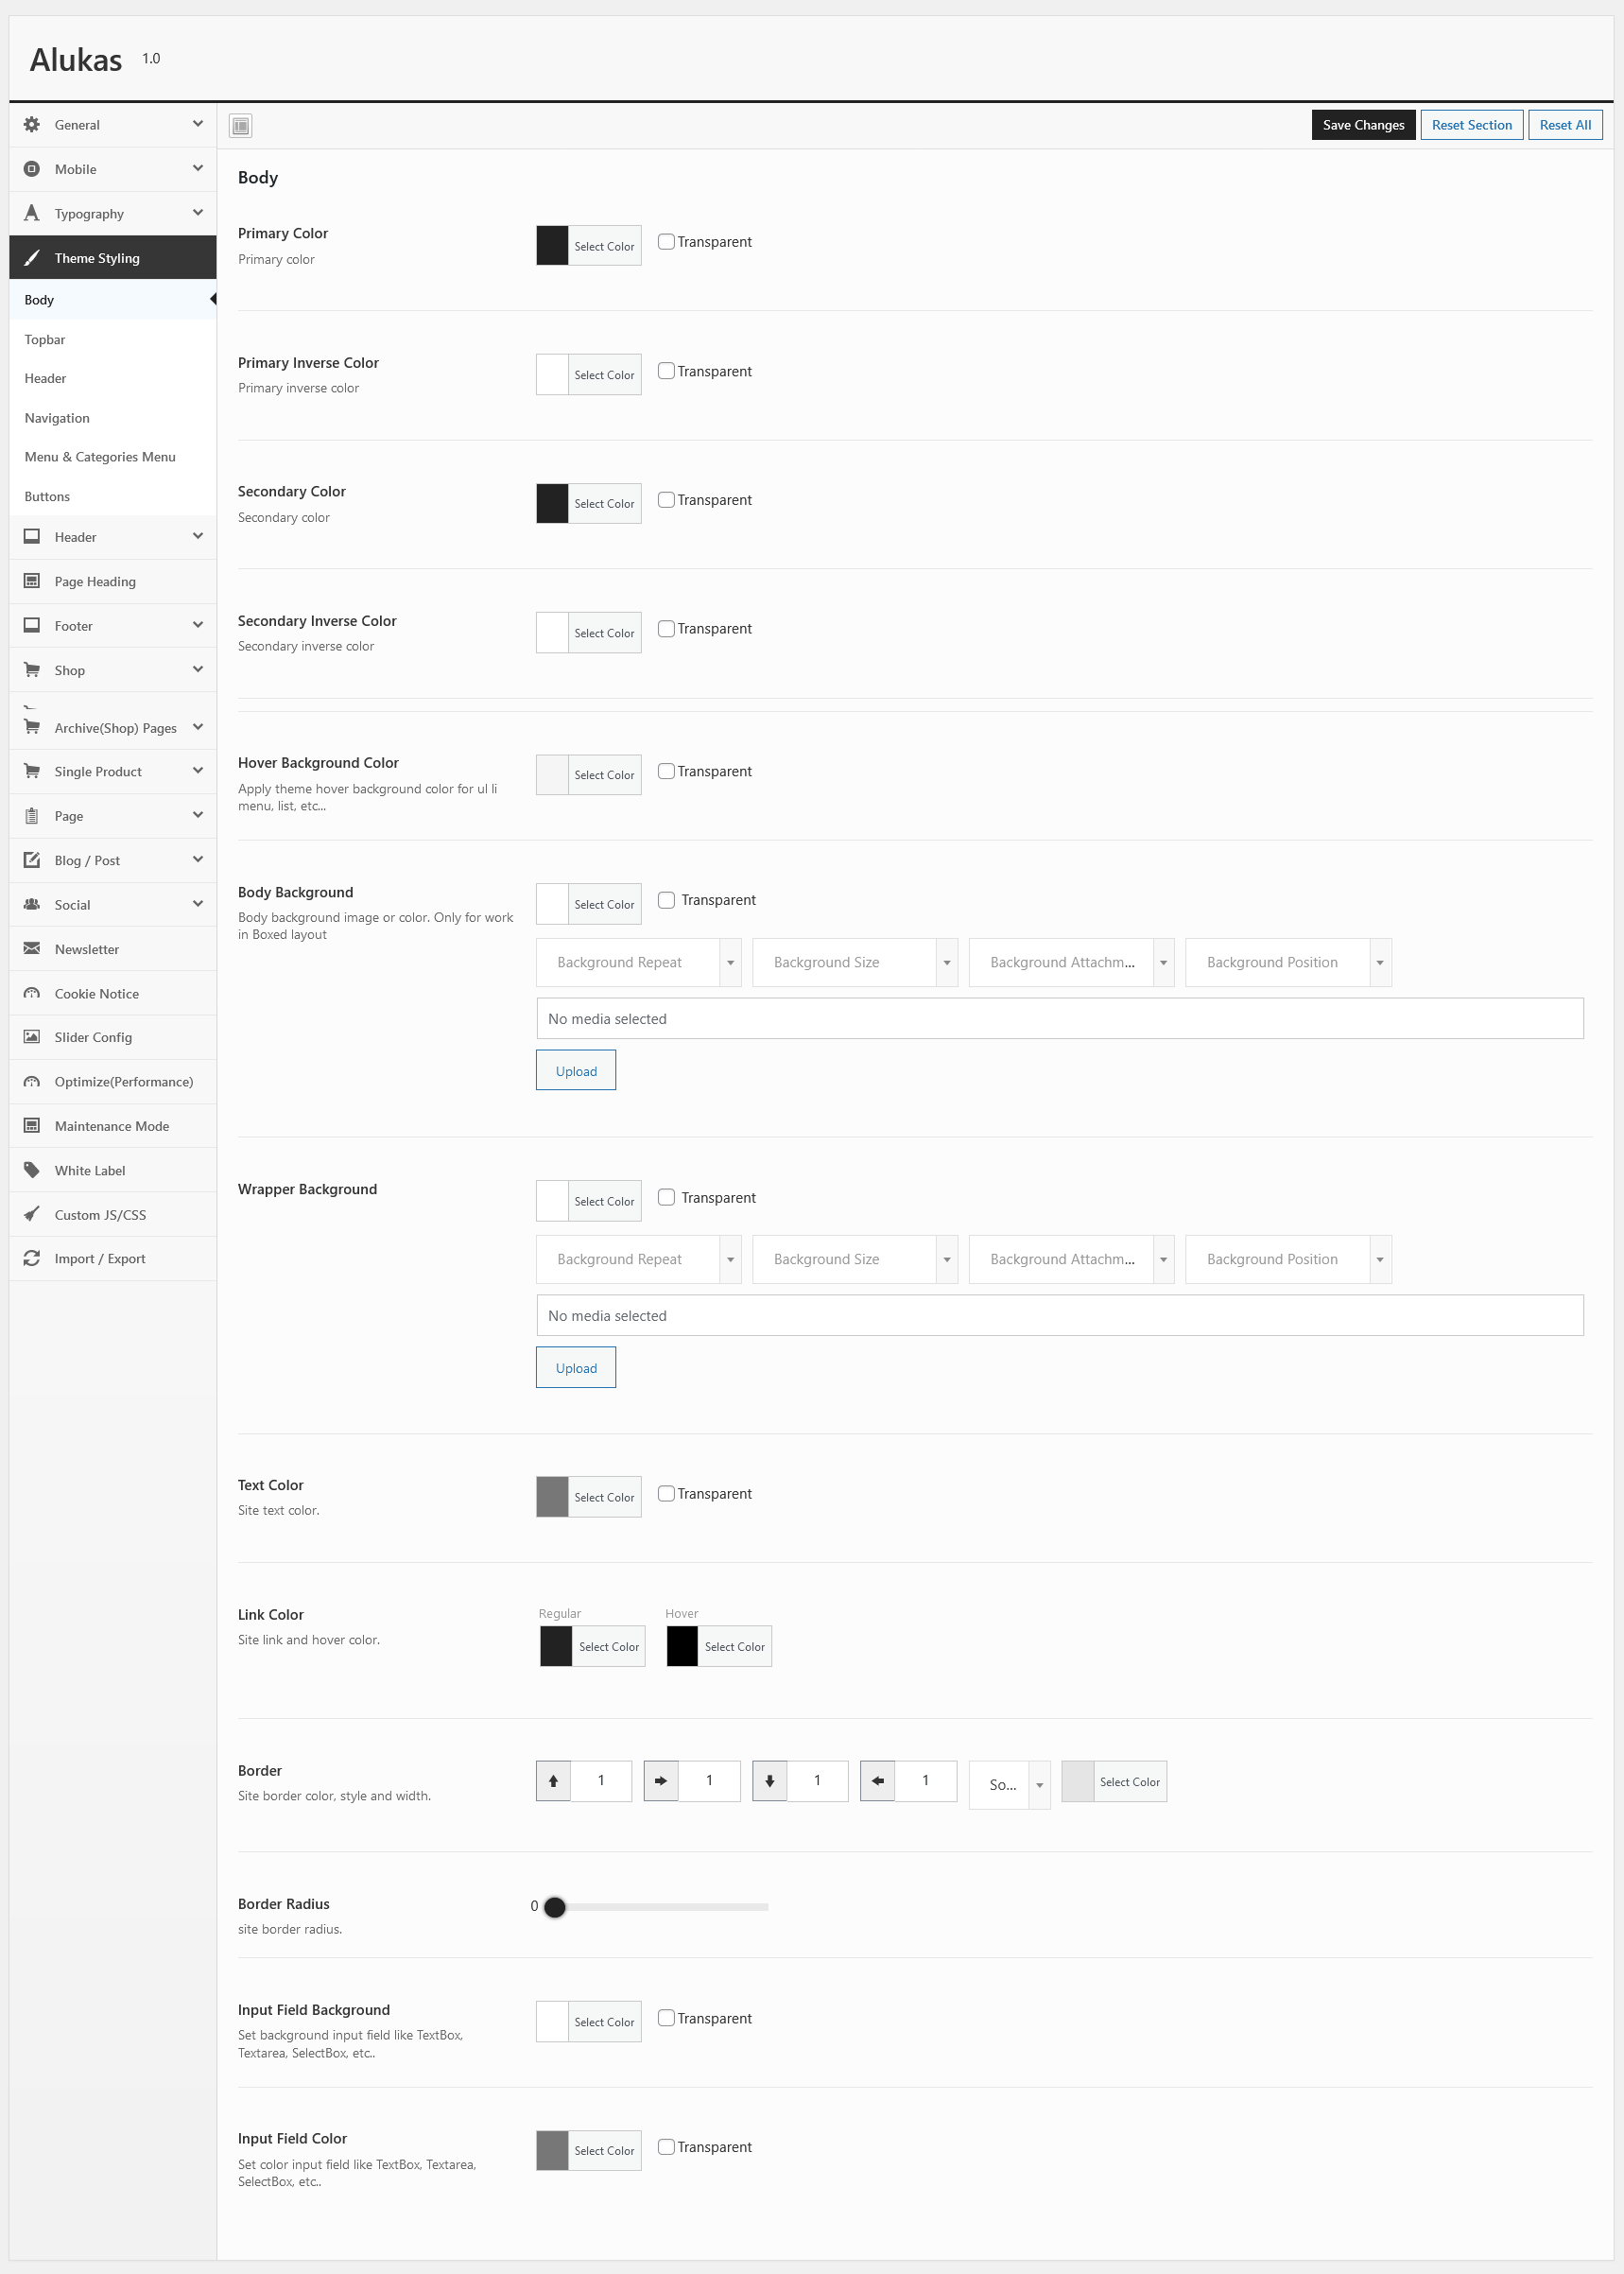
Style And Colors
This section you can manage all color options like font color,background color,link color,hover color etc.
Header
This section you can manage following options.
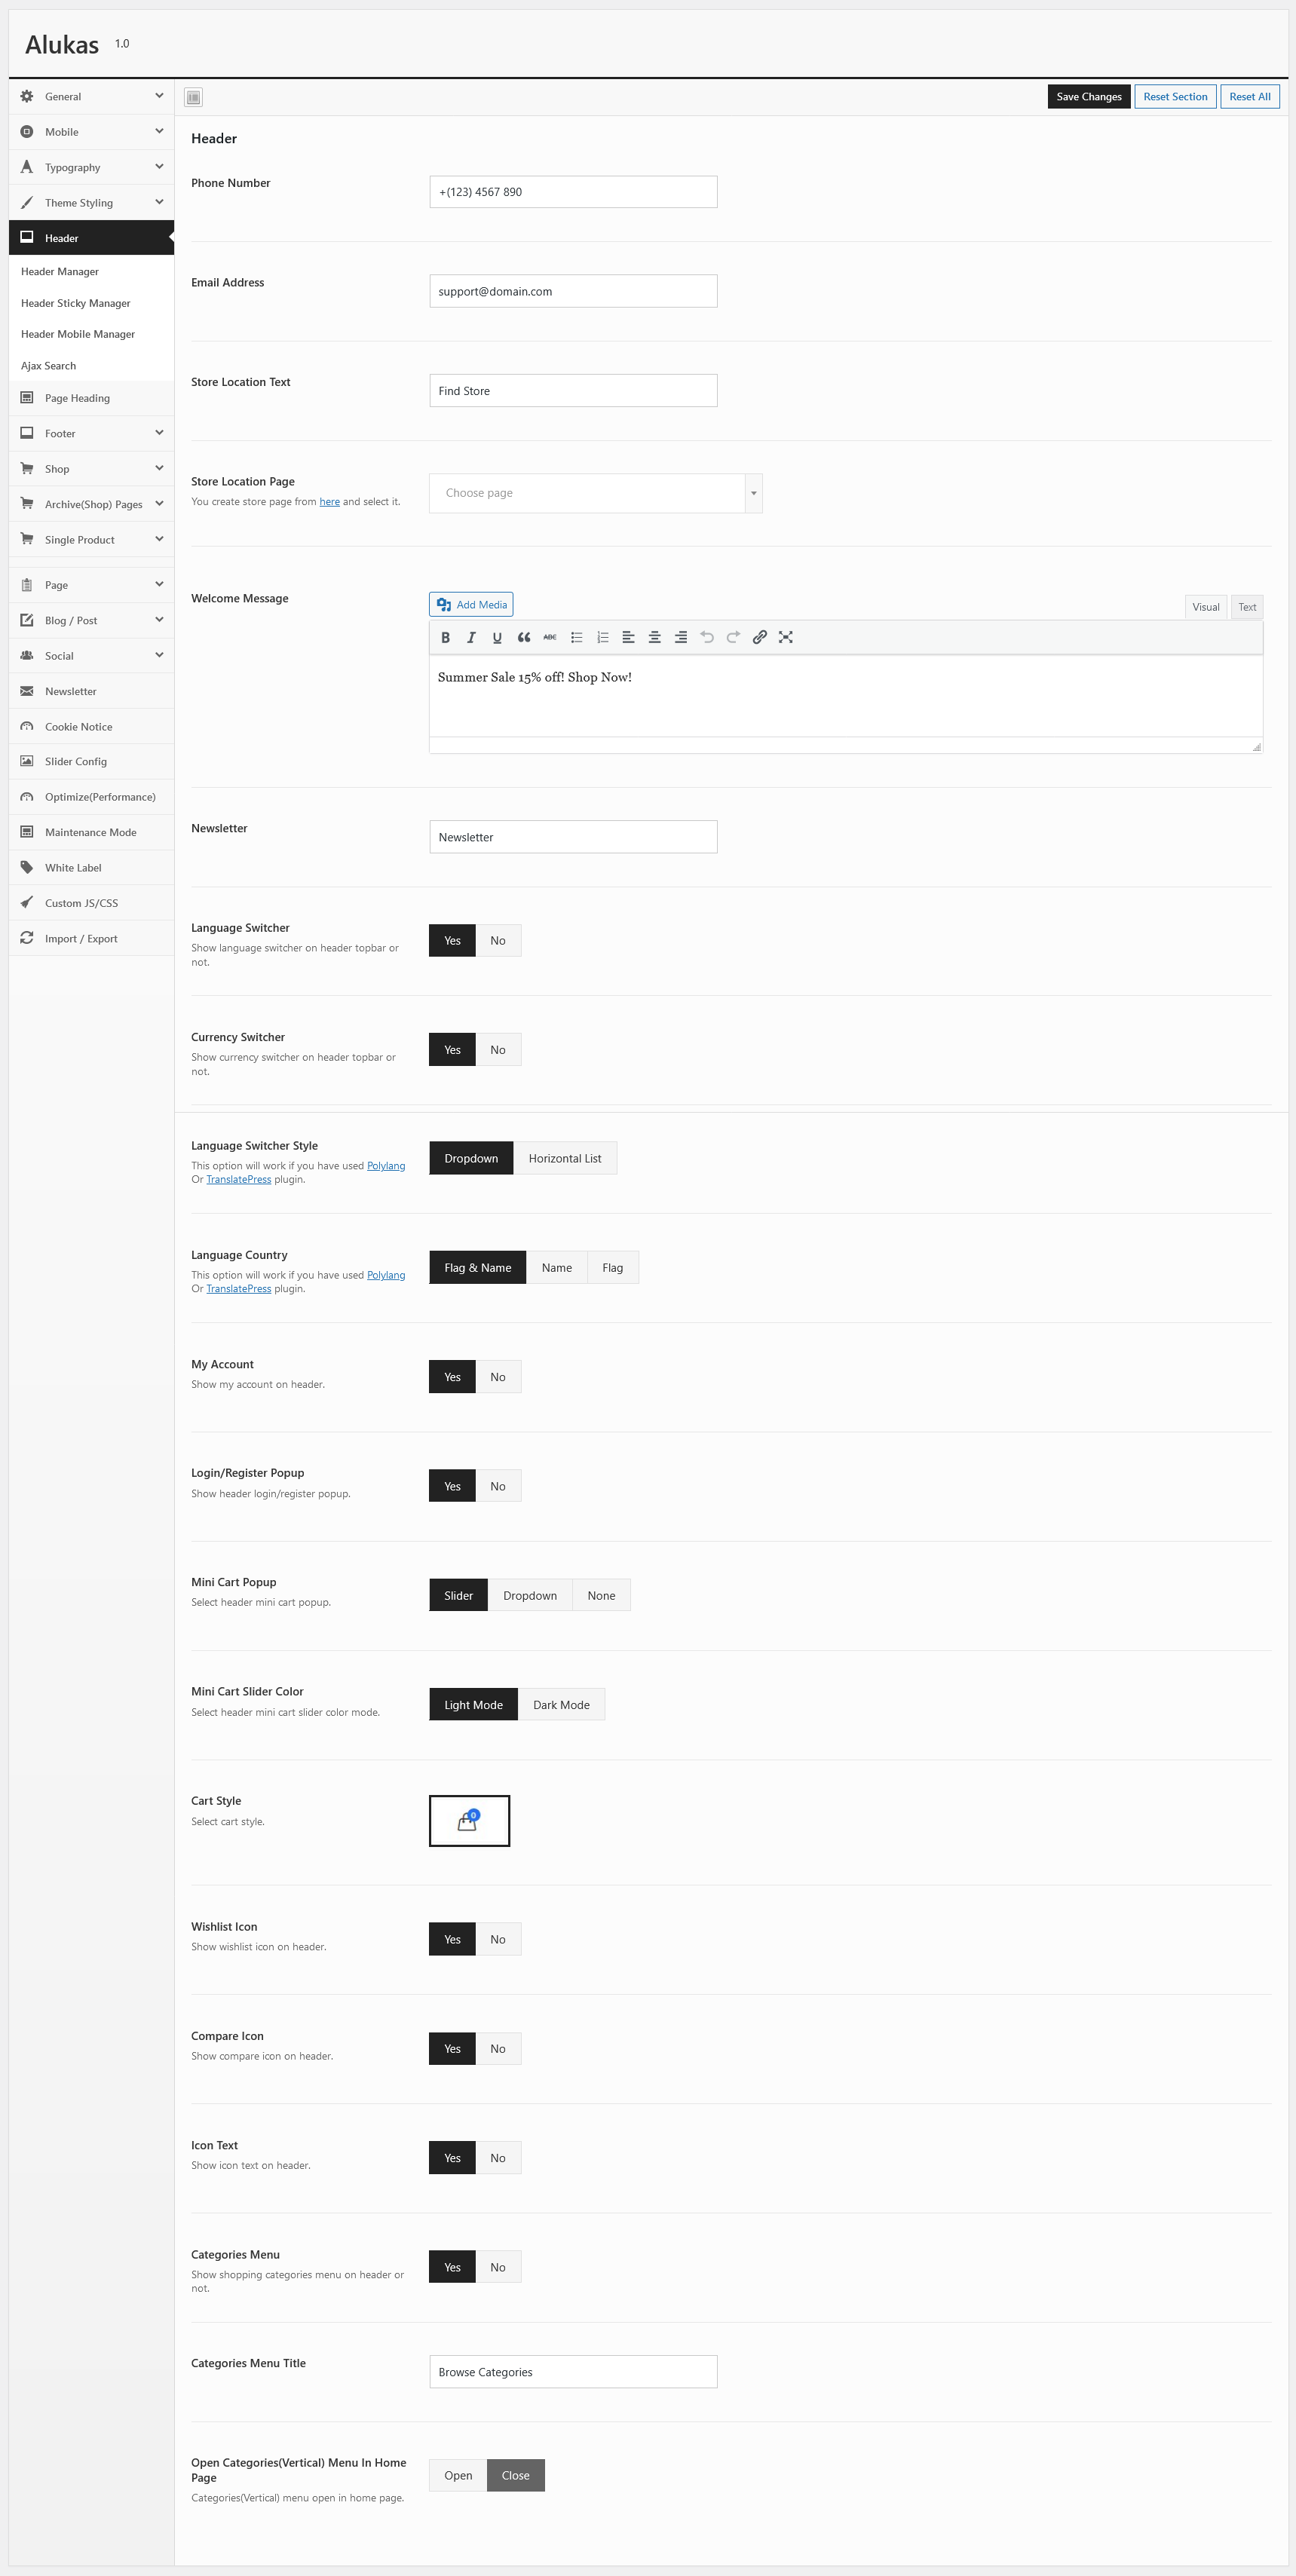
- Phone Number : Enter phone number.
- Email Address : Enter email address.
- Store Location : Enter store location.
- Store Location Page : Select store location page.
- Welcome Message : Enter welcome message.
- Newsletter : Enter newsletter button text.
- Language Switcher : Enable/Disable language switcher.
- Currency Switcher : Enable/Disable Currency switcher.
- Language Switcher Style : Select language switcher style. This option will work if you use Polylang plugin.
- Language Country : Select language country option. This option will work if you use Polylang plugin.
- My Account : Enable/disable my account option.
- Login/Register Popup : Enable/disable header login/register popup.
- Mini Cart Popup : Enable/disable header minicart popup.
- Cart Style : Select cart style.
- Wishlist Icon : Show/Hide wishlist icon.
- Compare Icon : Show/Hide wishlist icon.
- Icon Text : Show/Hide icon text.
- Categories Menu : Show/Hide category menu.
- Categories Menu Title : Enter shop by categories menu title.
- Open Categories(Vertical) Menu In Front Page : Categories(Vertical) menu open in front page.On other page open with hover.
Page Heading
This section you can manage following options.
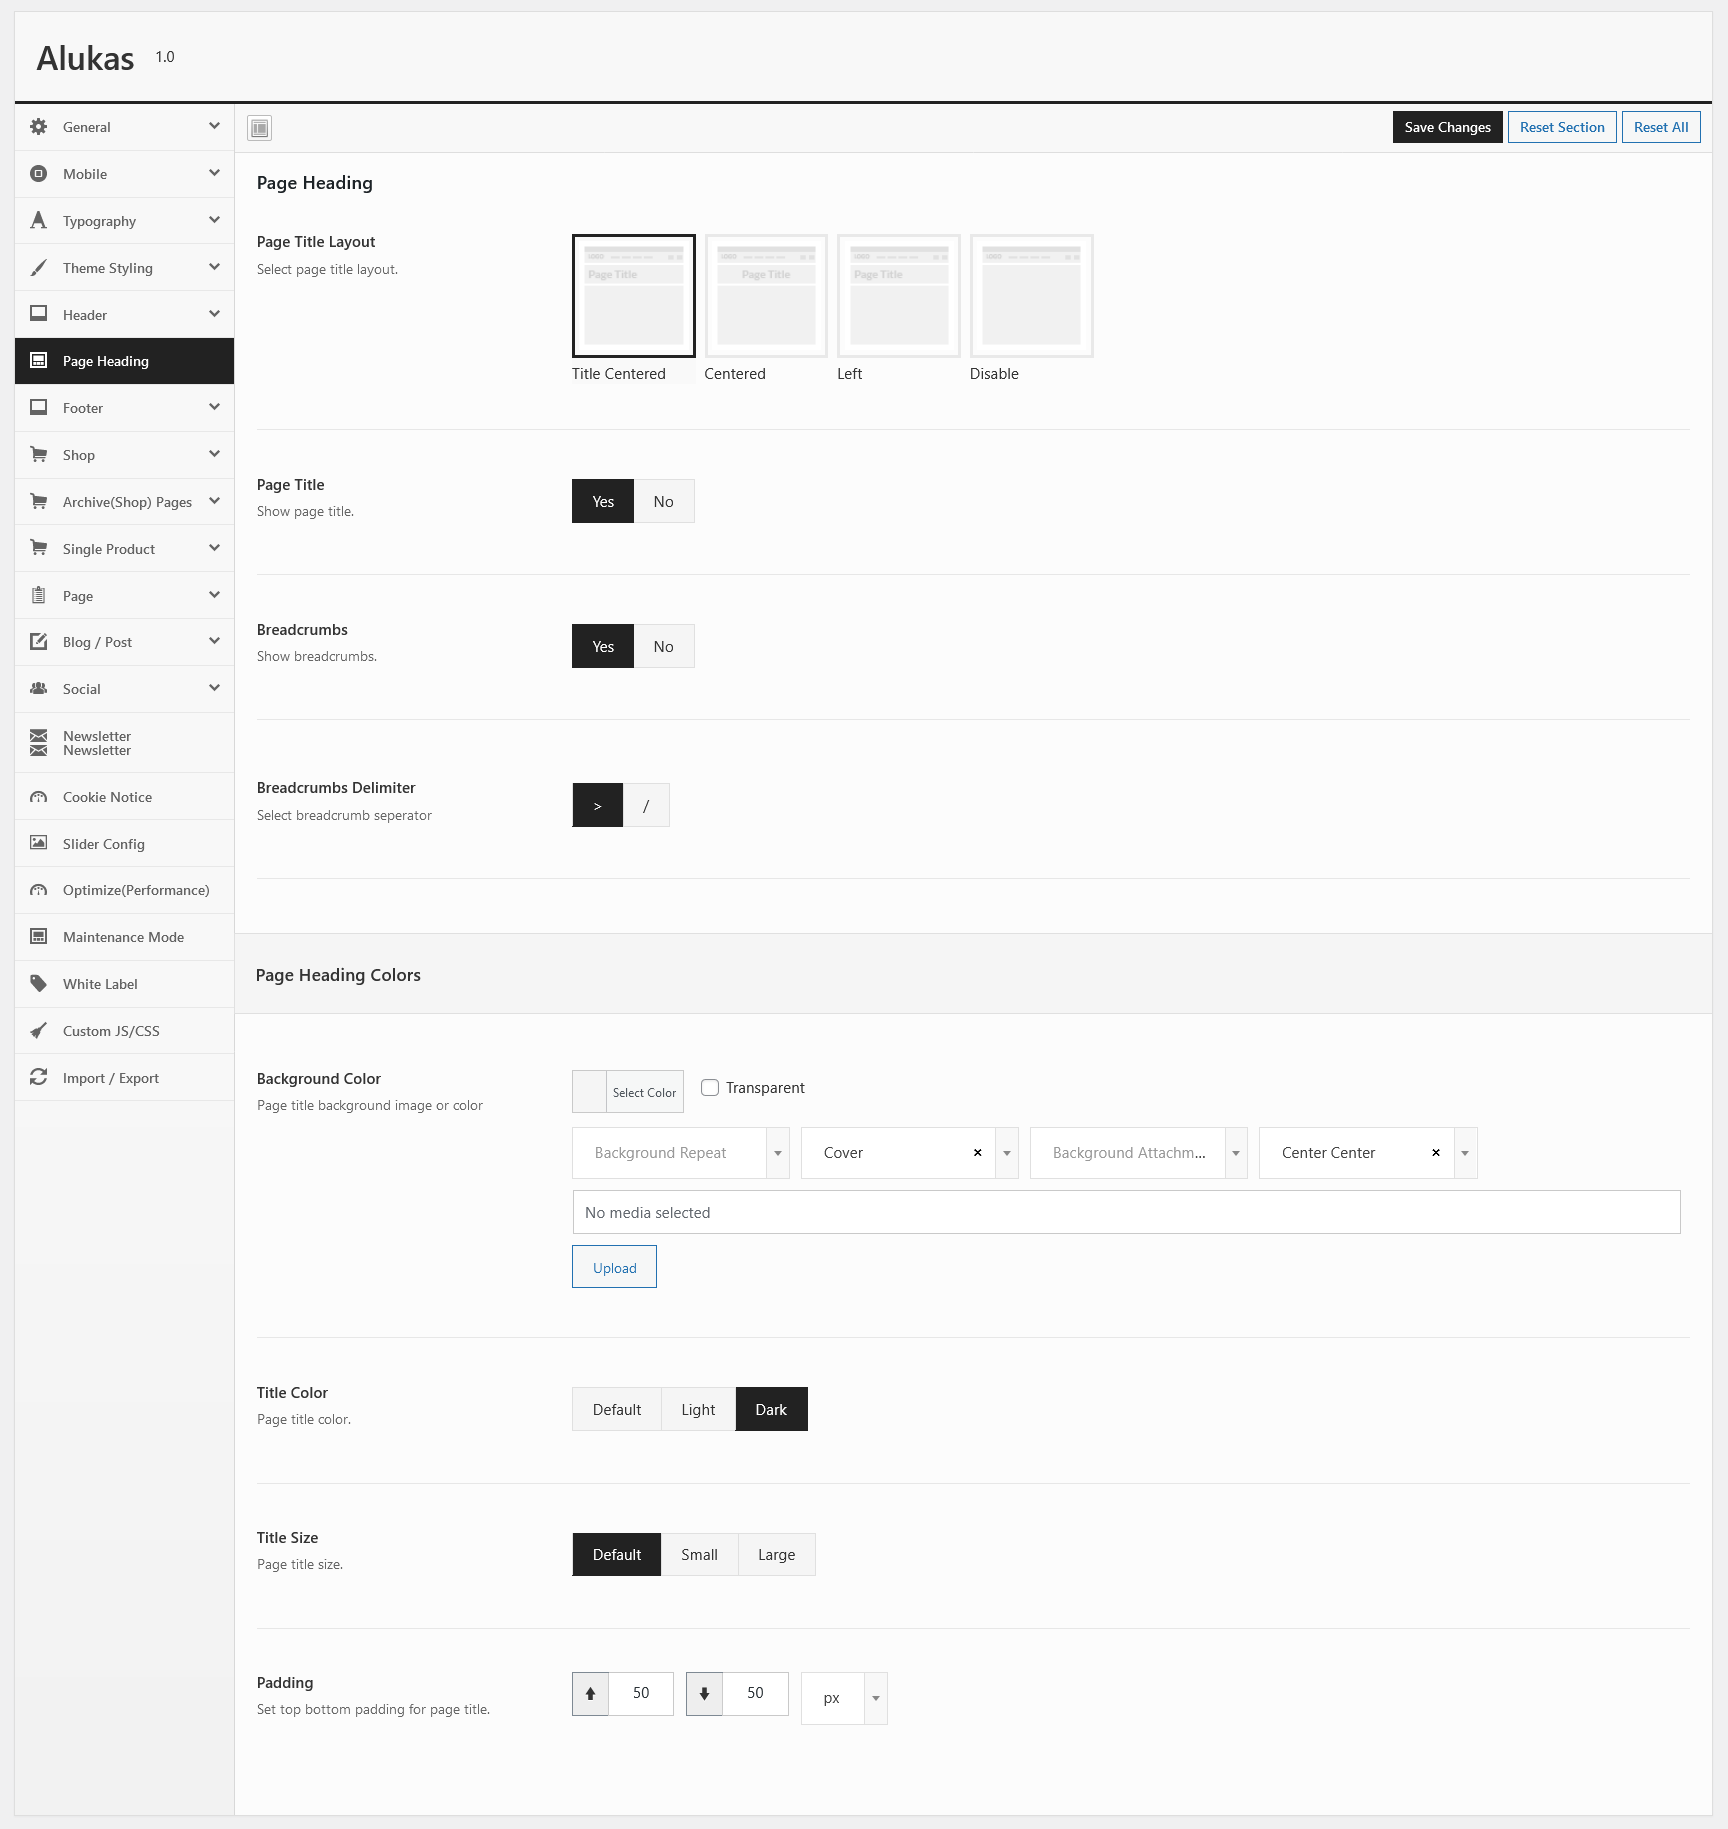
- Page Heading Layout : Select page heading layout.Disable for hide heading area.
- Page Title : Select if you want to show or hide page heading.
- Breadcrumbs : Select if you want to show or hide the breadcrumbs.
- Breadcrumbs Delimiter : Select breadcrumb separator
Footer
This section you can manage following options.
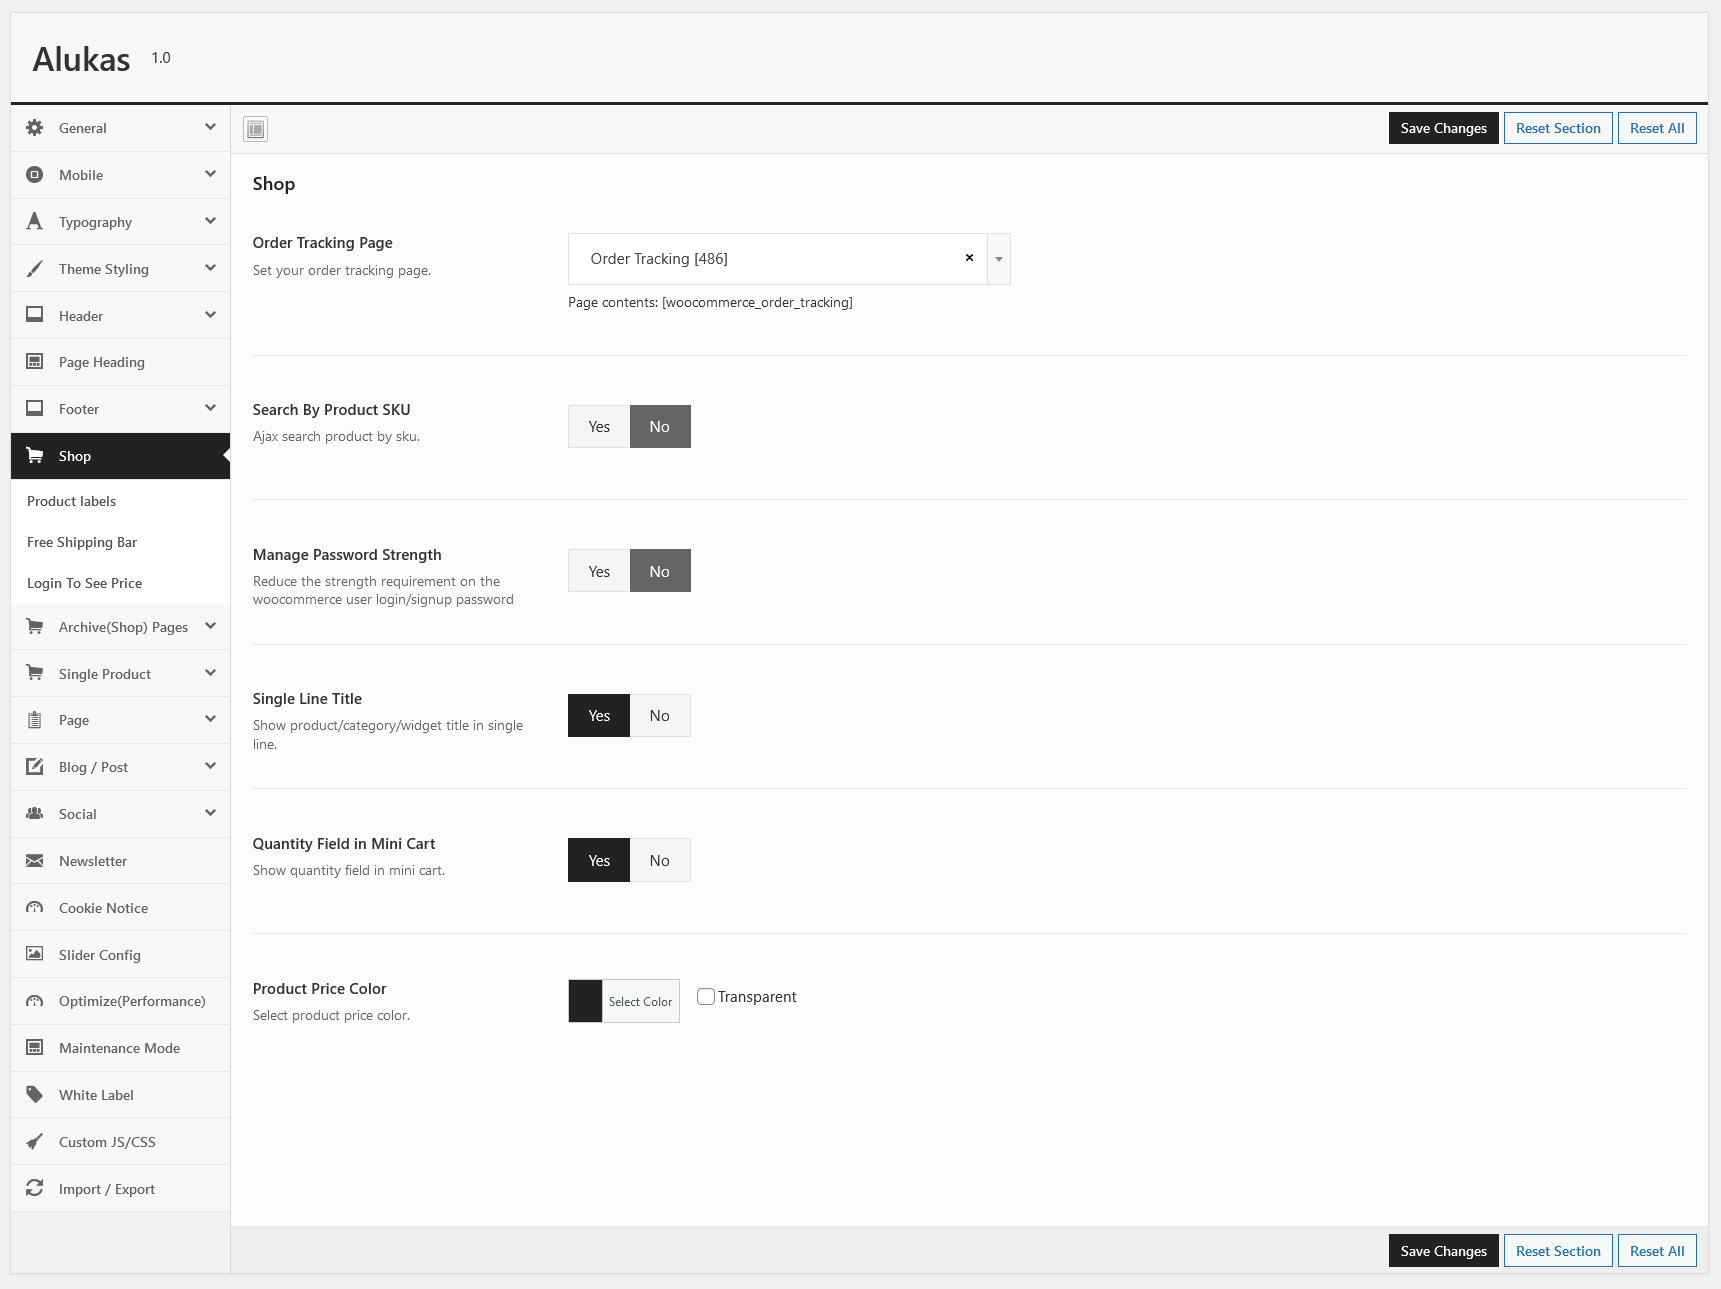
Shop
This section you can manage following options.
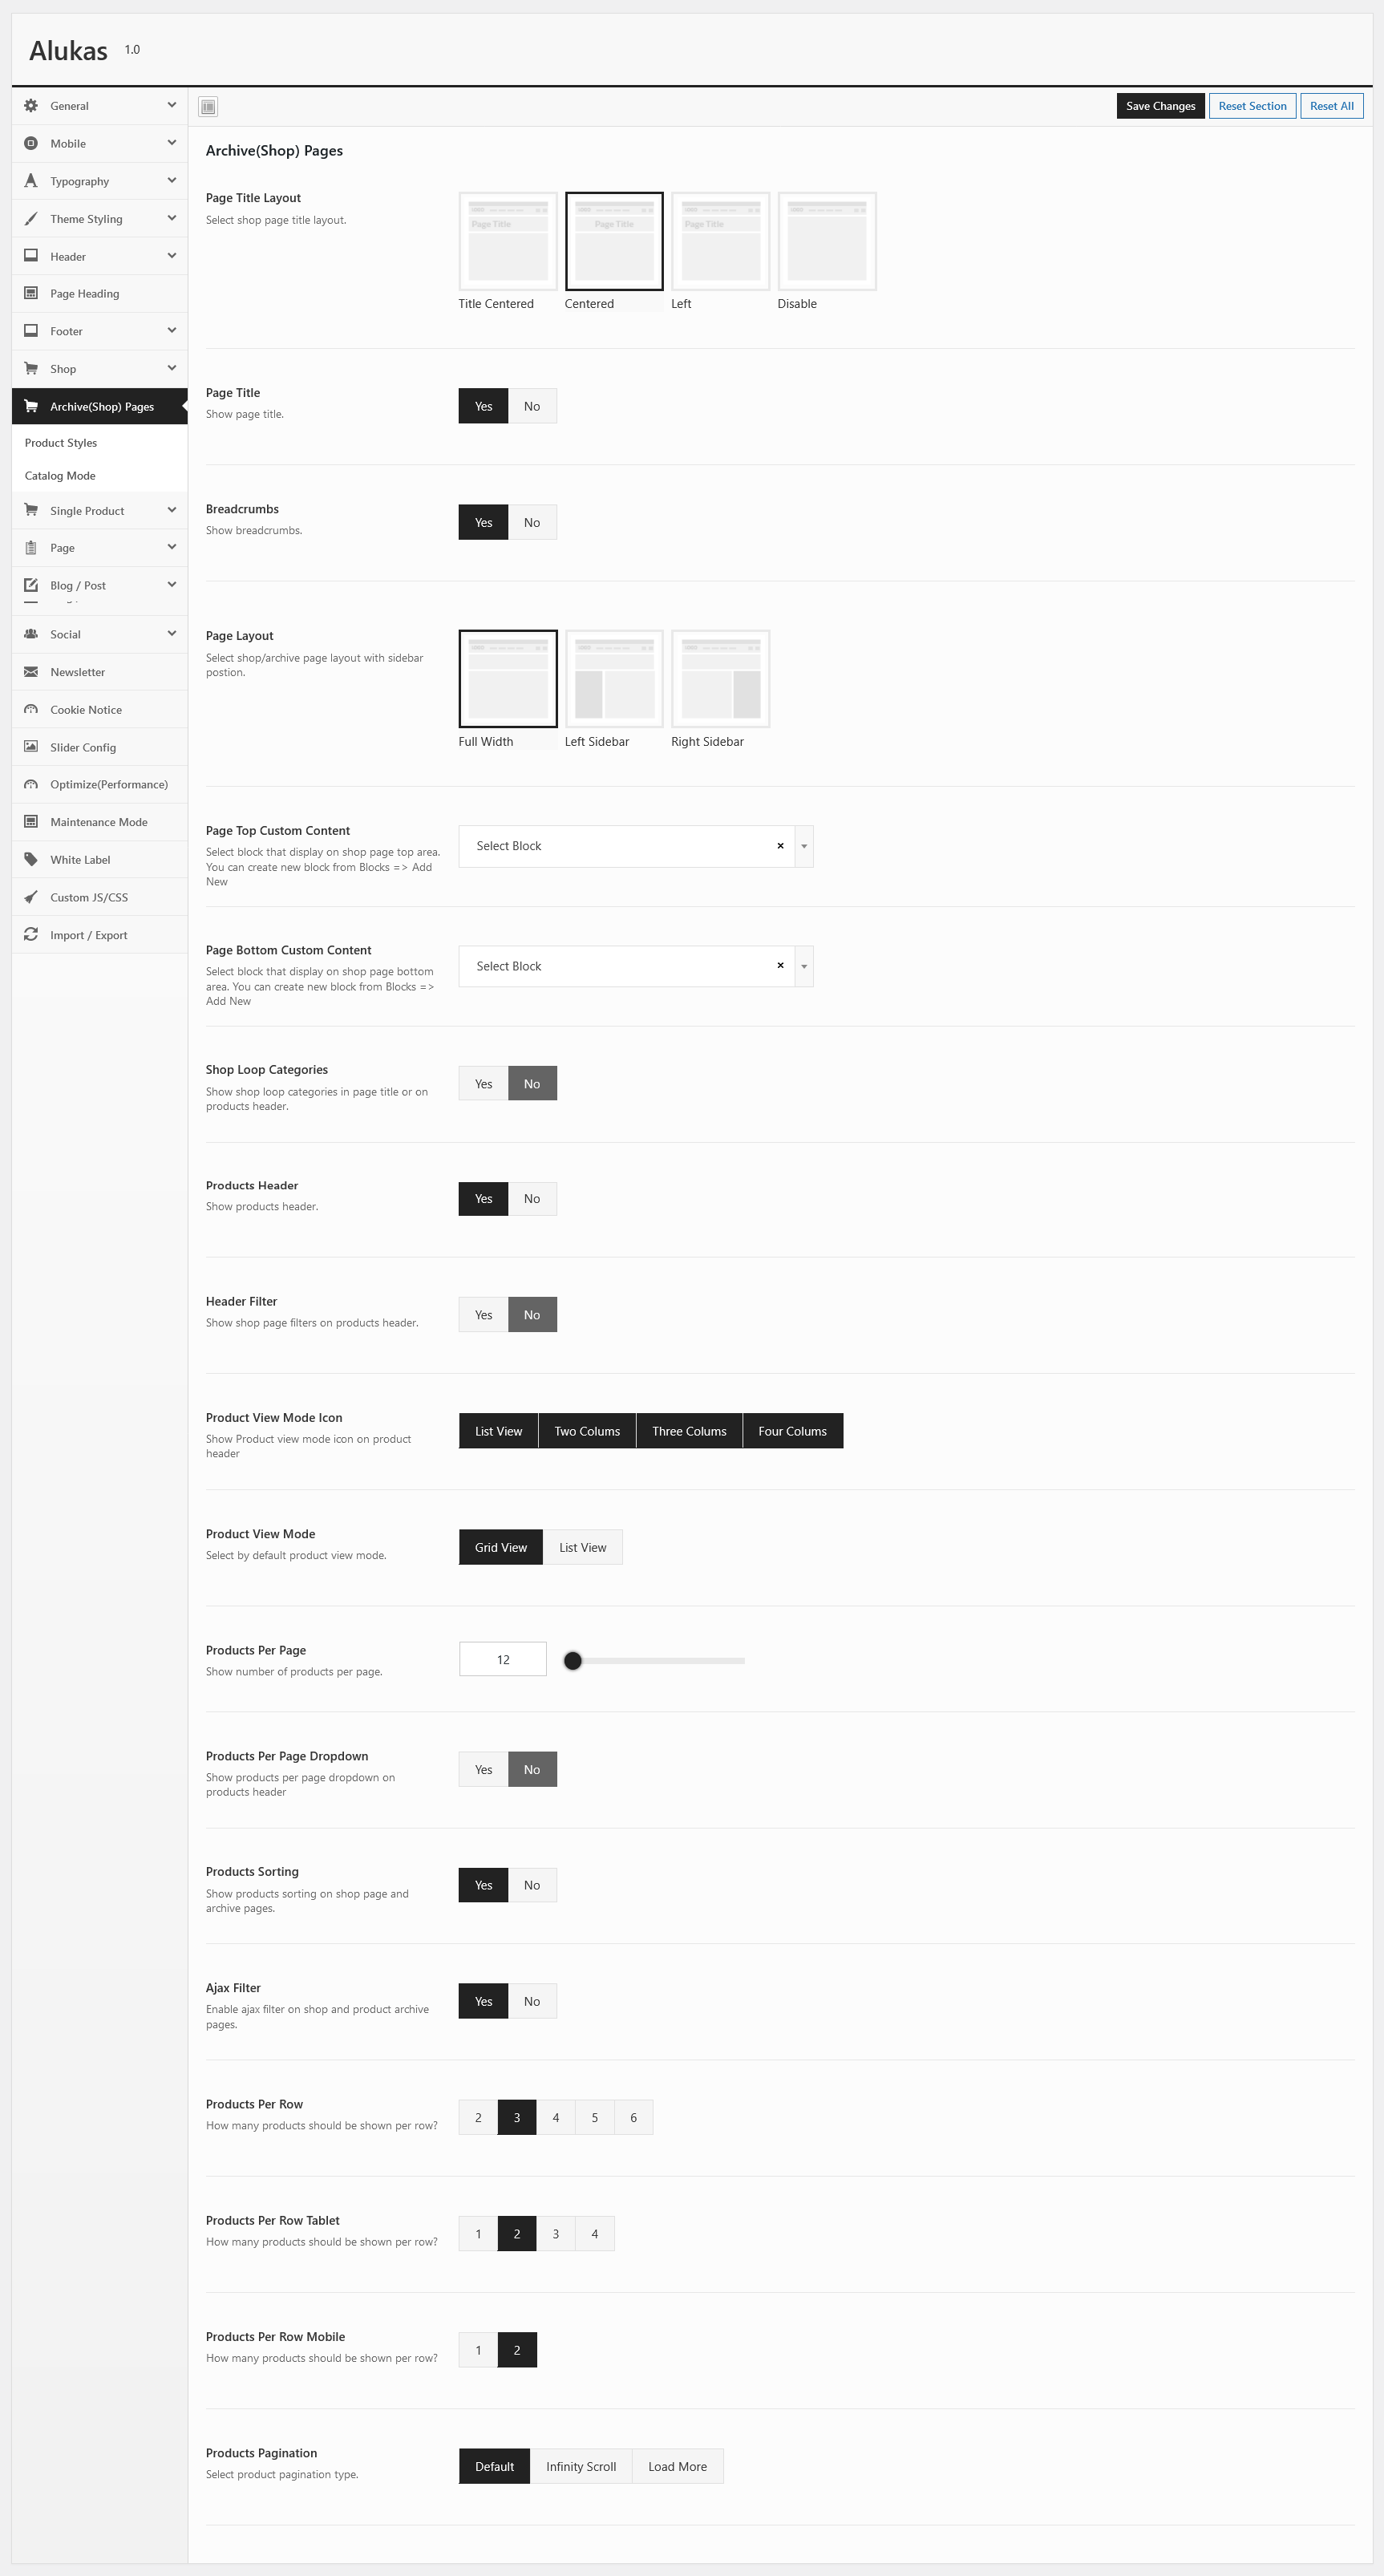
Archive(Shop) Pages
This section you can manage following options.
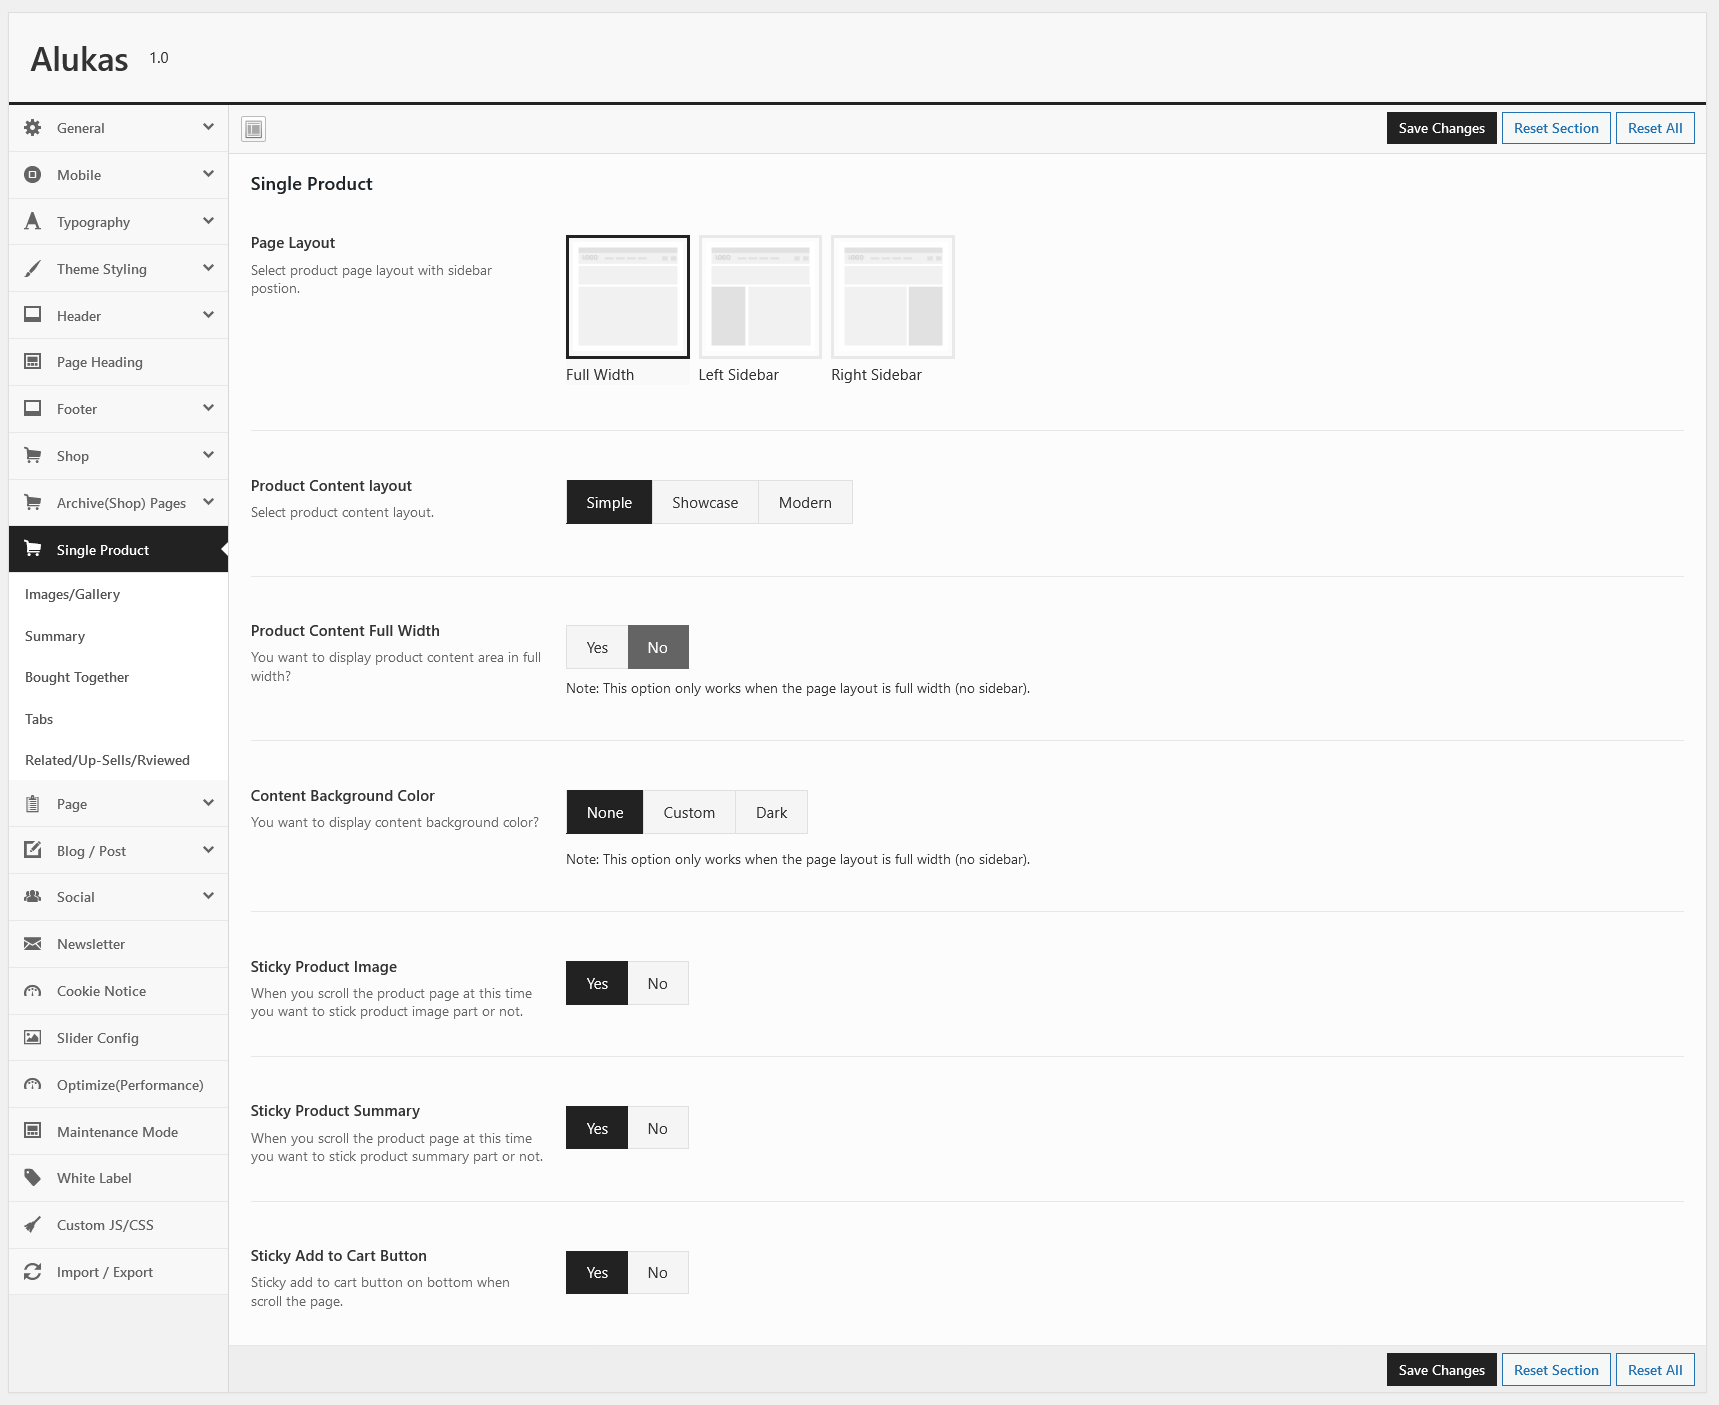
Single Product
This section you can manage following options.
Pages
This section you can manage following options.

- Page Layout : Select page layout with sidebar position.
- Sidebar Width : Select sidebar width. It will be hide if page layout is "Full Width"
- Sidebar Widget Area : Select sidebar which display on shop page.It will be hide if page layout is "Full Width"
- Page Comments : Show/Hide the page comment.
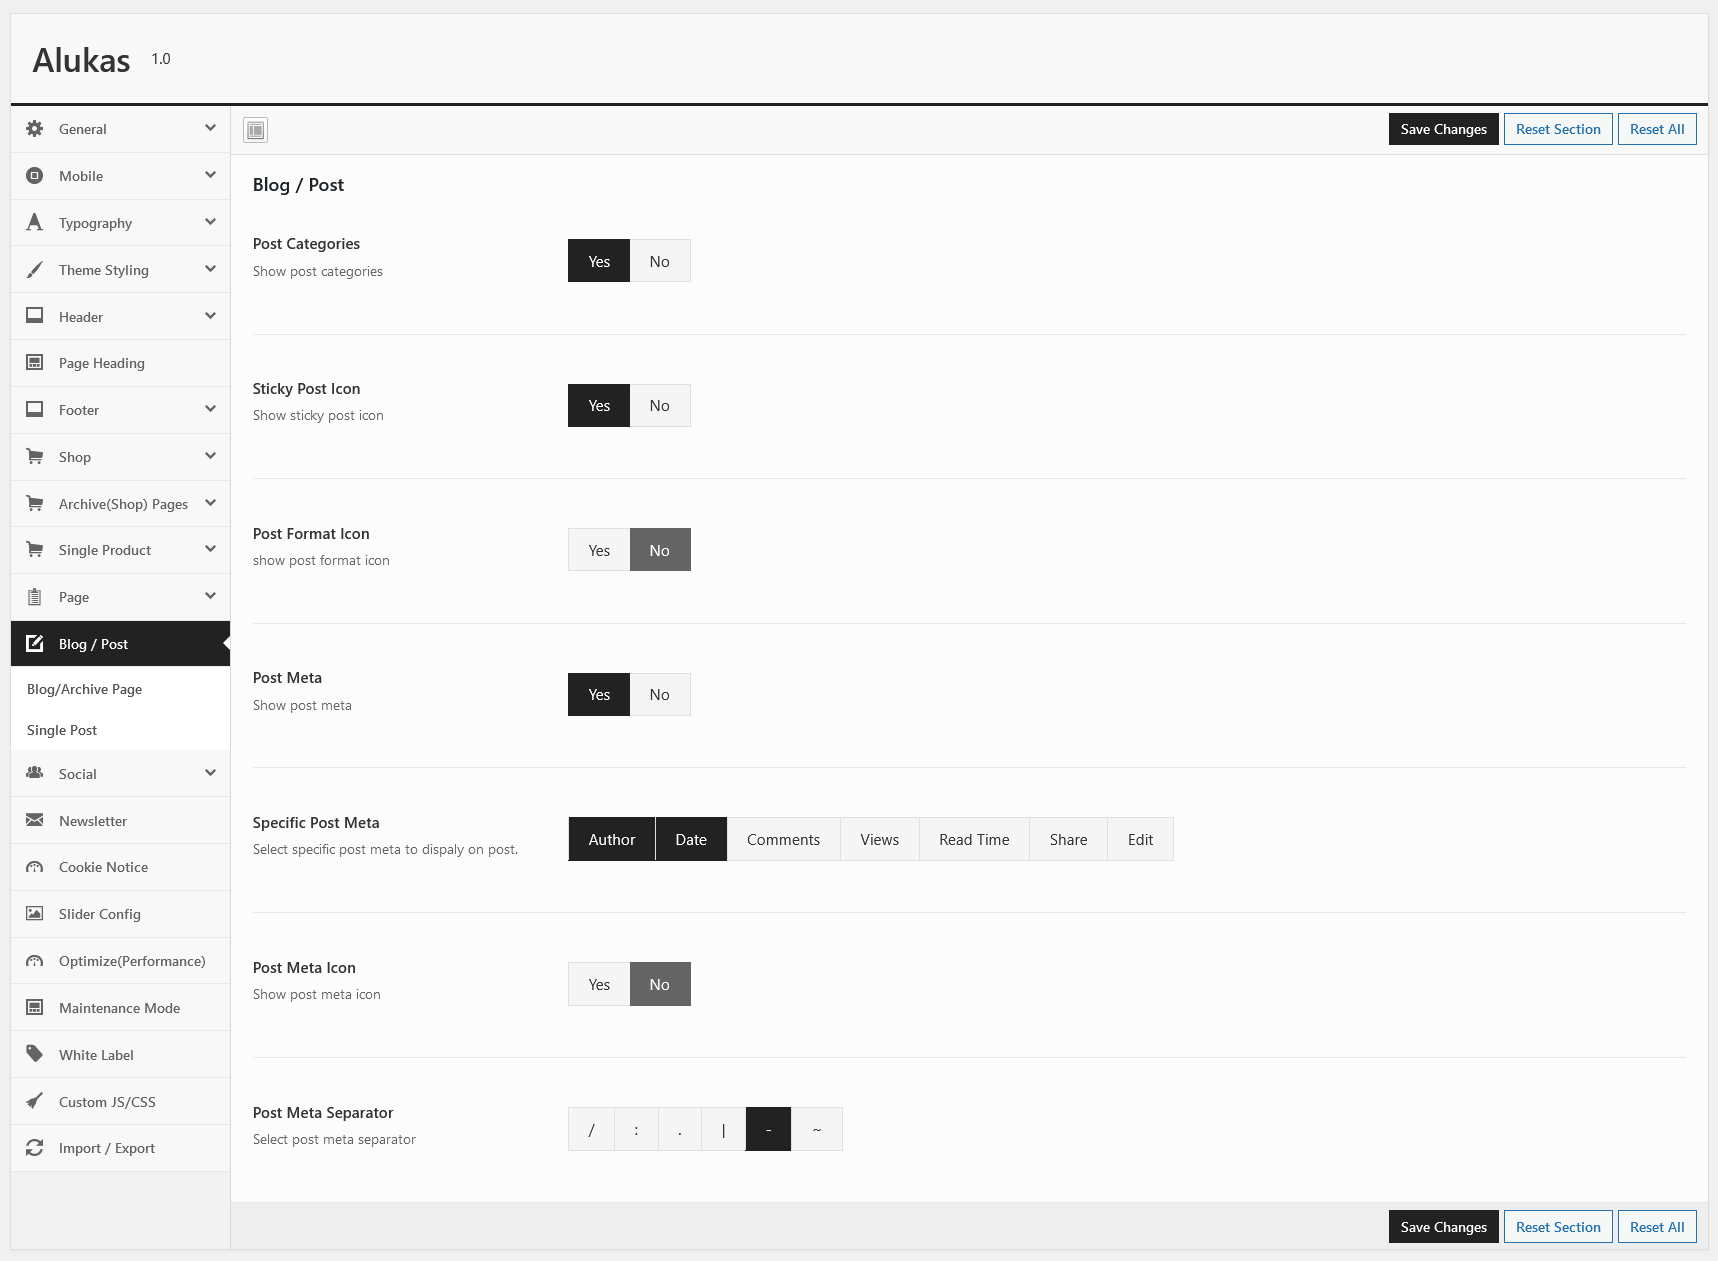
Blog / Post
This section you can manage following options.
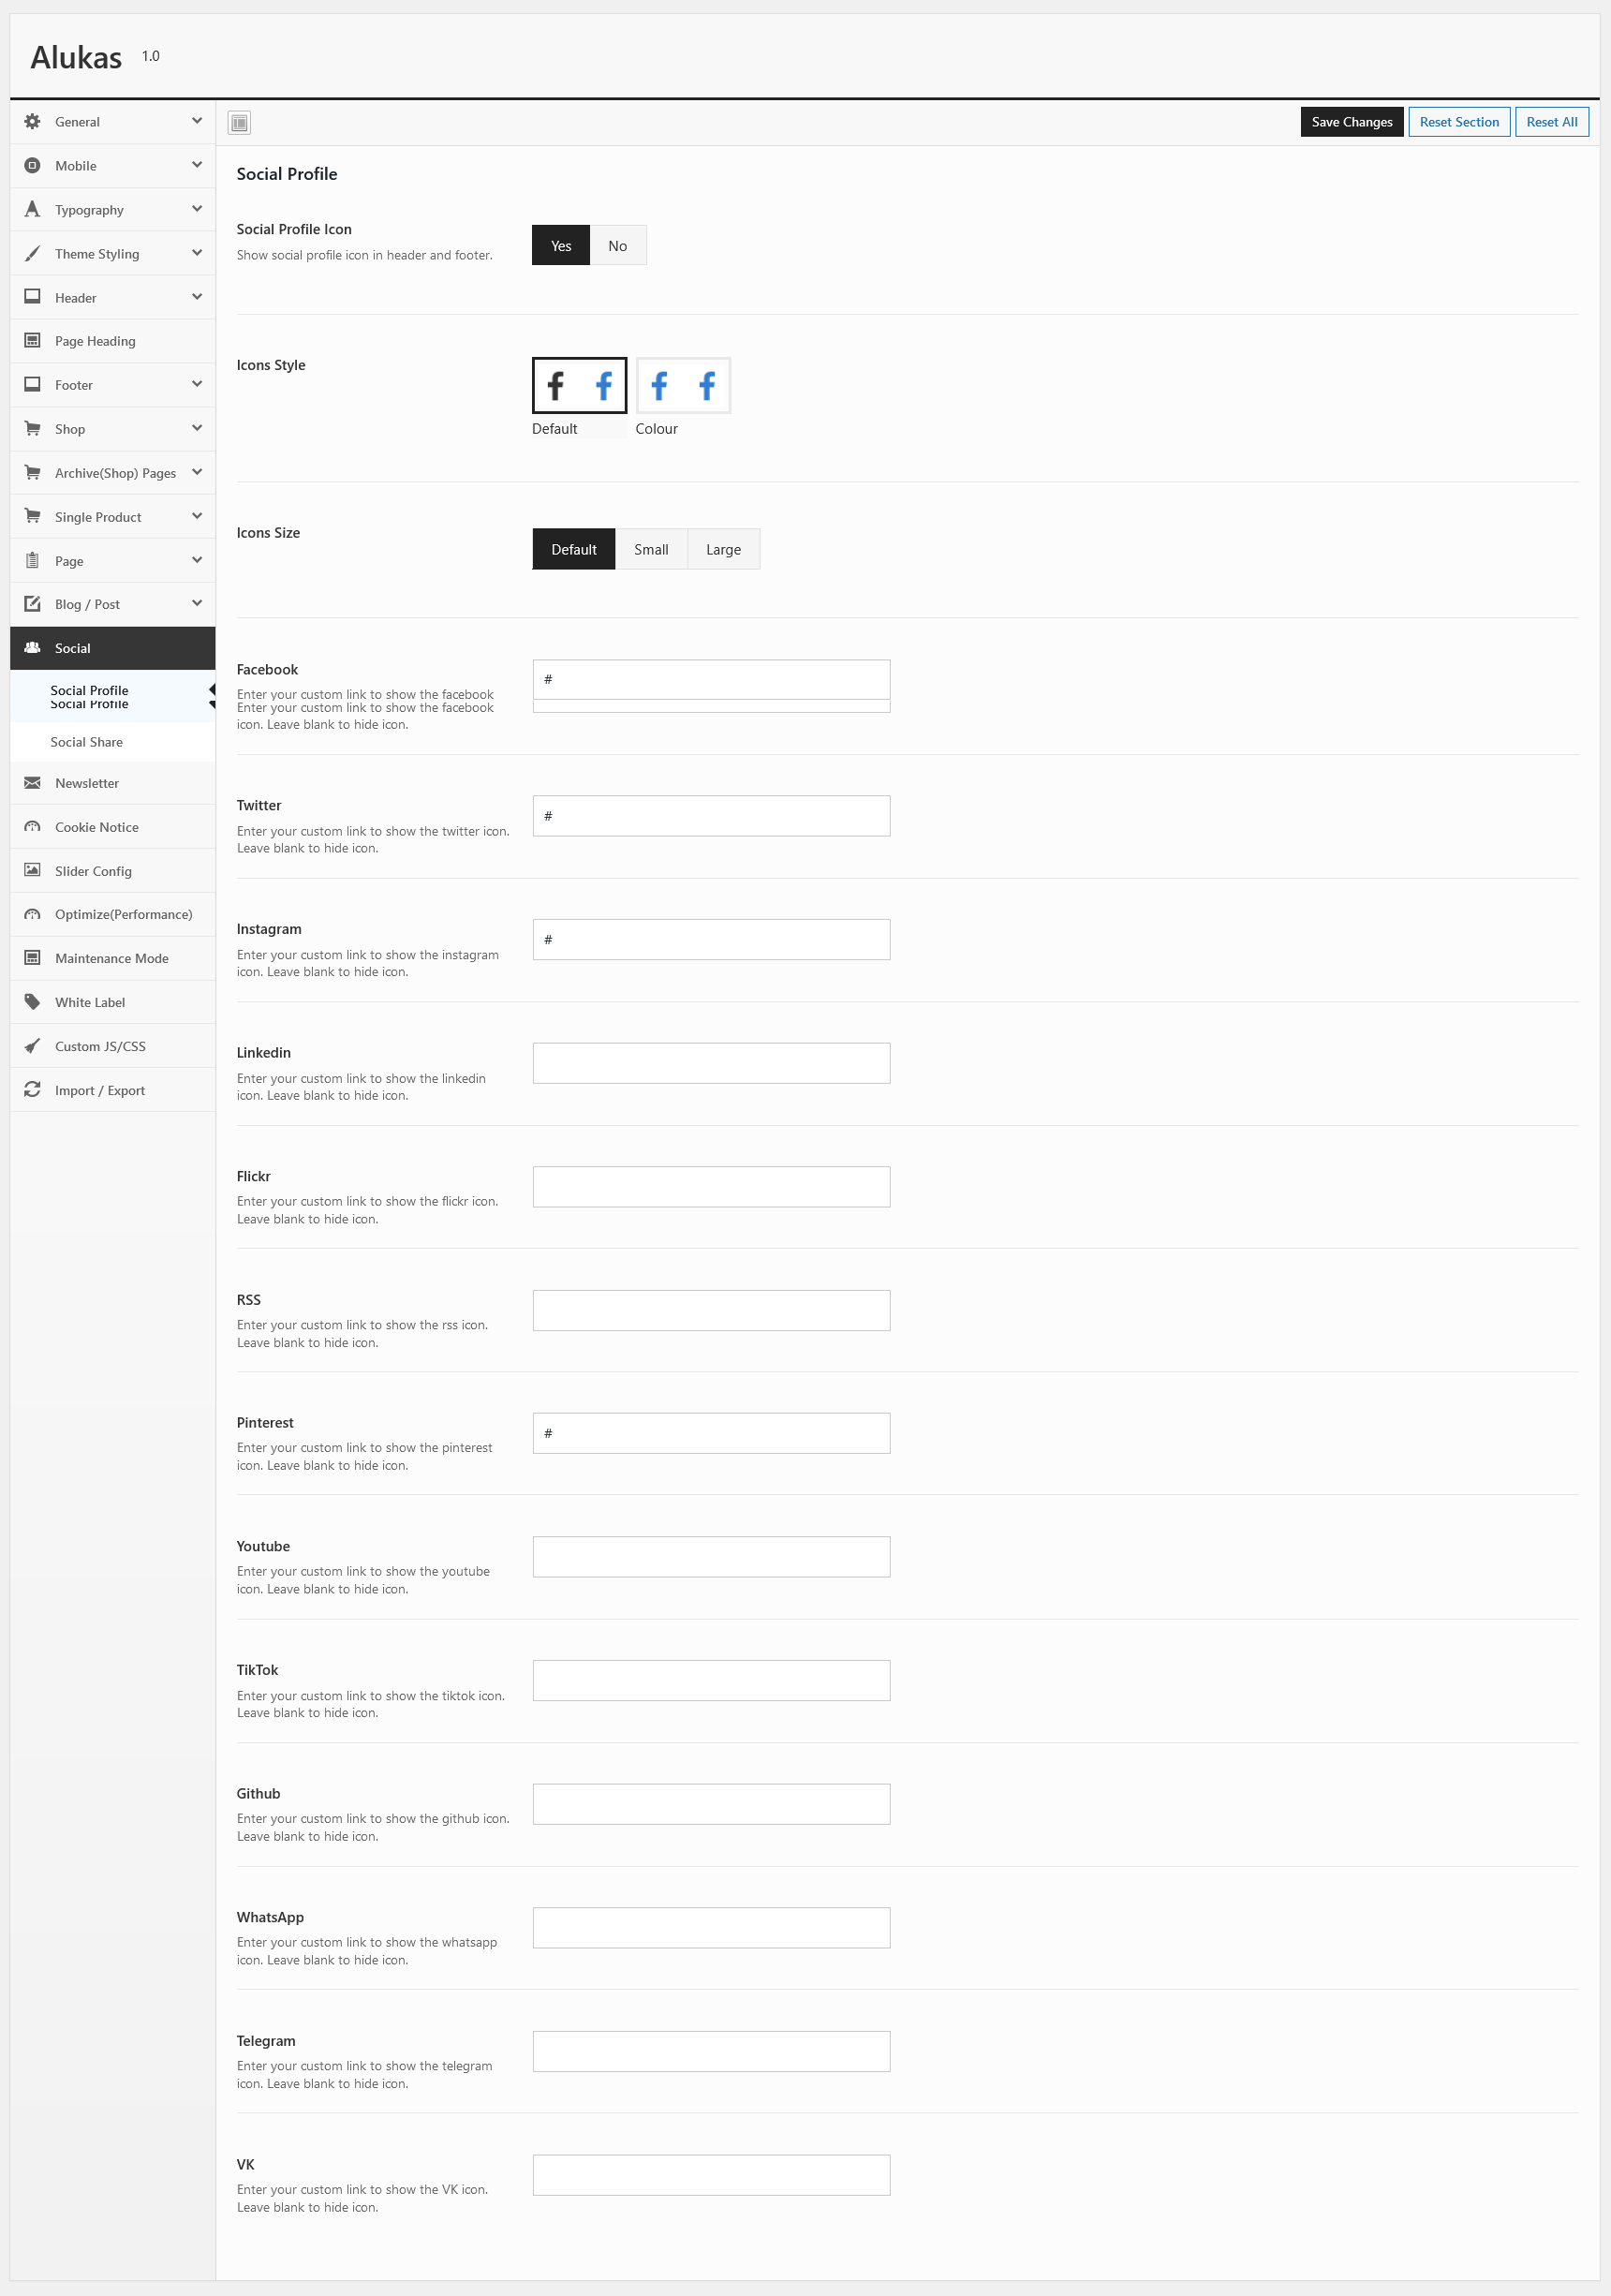
Social
This section you can manage following options.
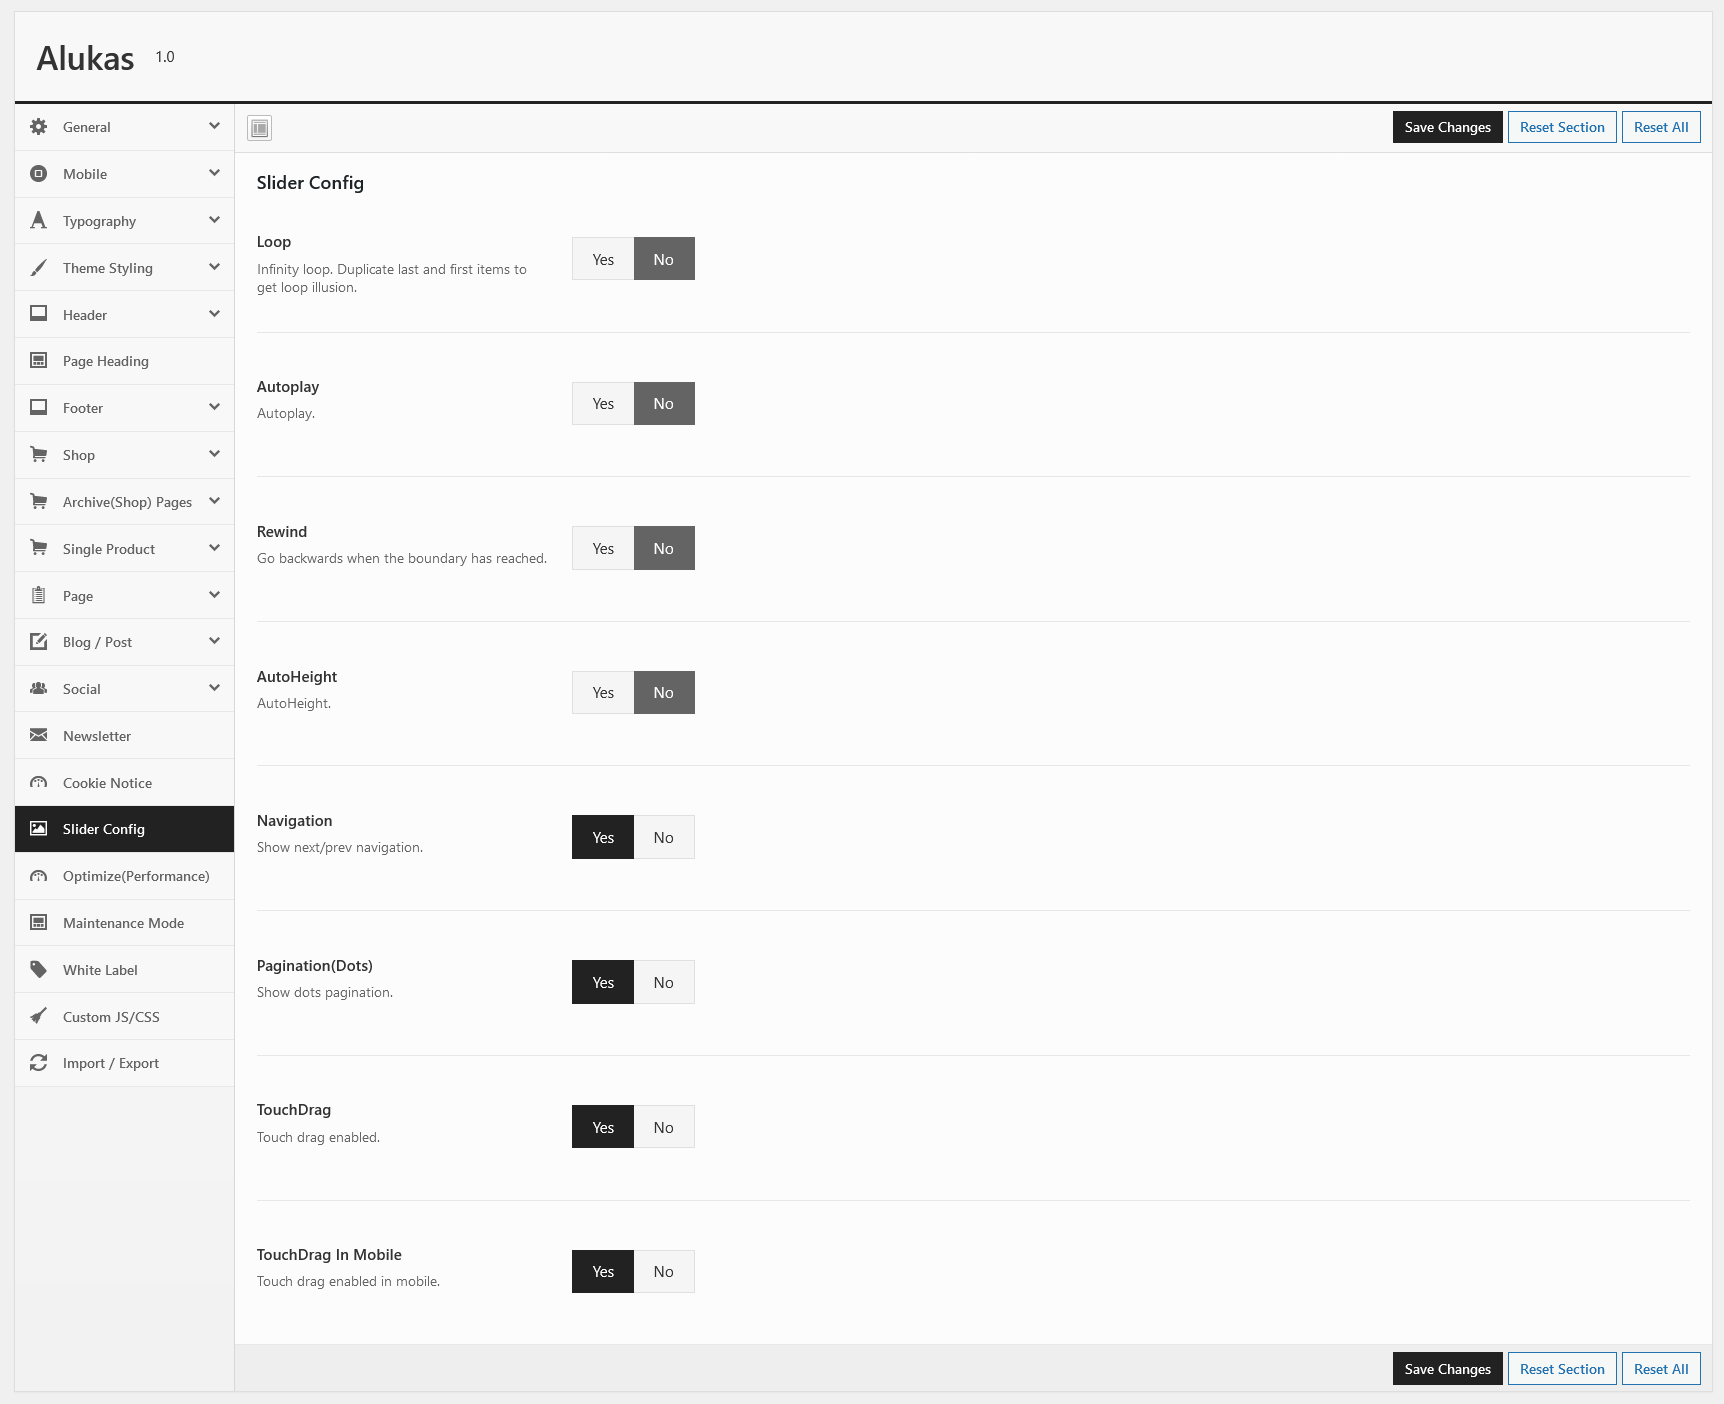
Slider Config
Newsletter
This section you can manage following options.
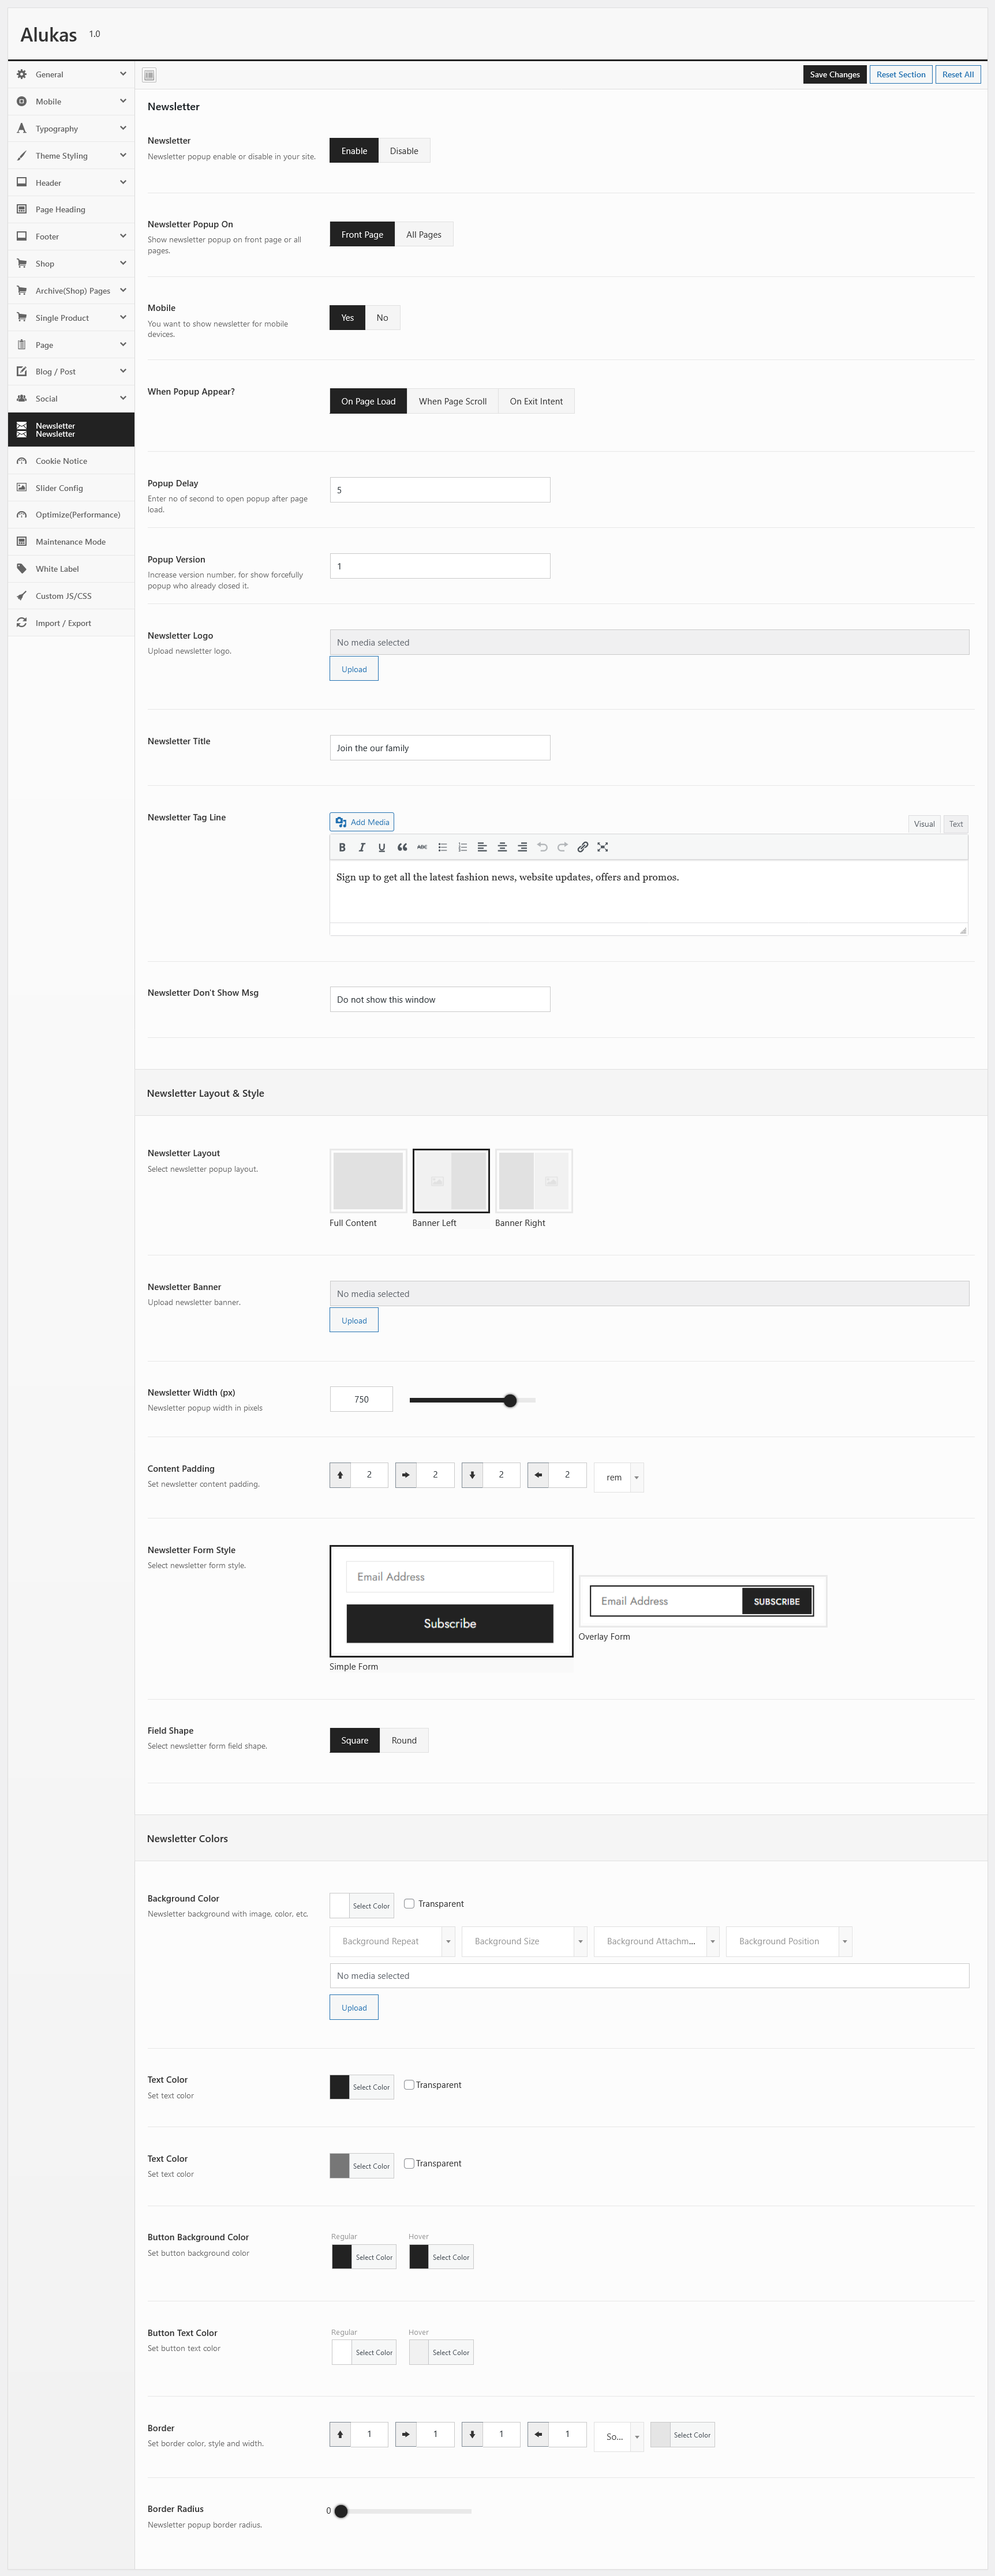
- Newsletter : Enable/Disable Newsletter popup on your site
- When Popup Appear? : Select options when load popup.
- Popup Delay : Enter no of second to open popup after page load.
- Open when user scroll % of page : Enter number when show popup.100% - For end of page.IT will be show if you select popup appear type "When Page Scroll".
- Newsletter Title : Enter popup title.
- Main content : Enter popup content.
- Newsletter Don't Show Msg : Enter don't show message text.
- Mobile : Show/Hide in mobile.
- Background Color : set popup background color or image.
- Title Color : Select title color schema.
- Button Background Color : Select button background color and hover color.
- Button Text Color : Select button color and hover color.
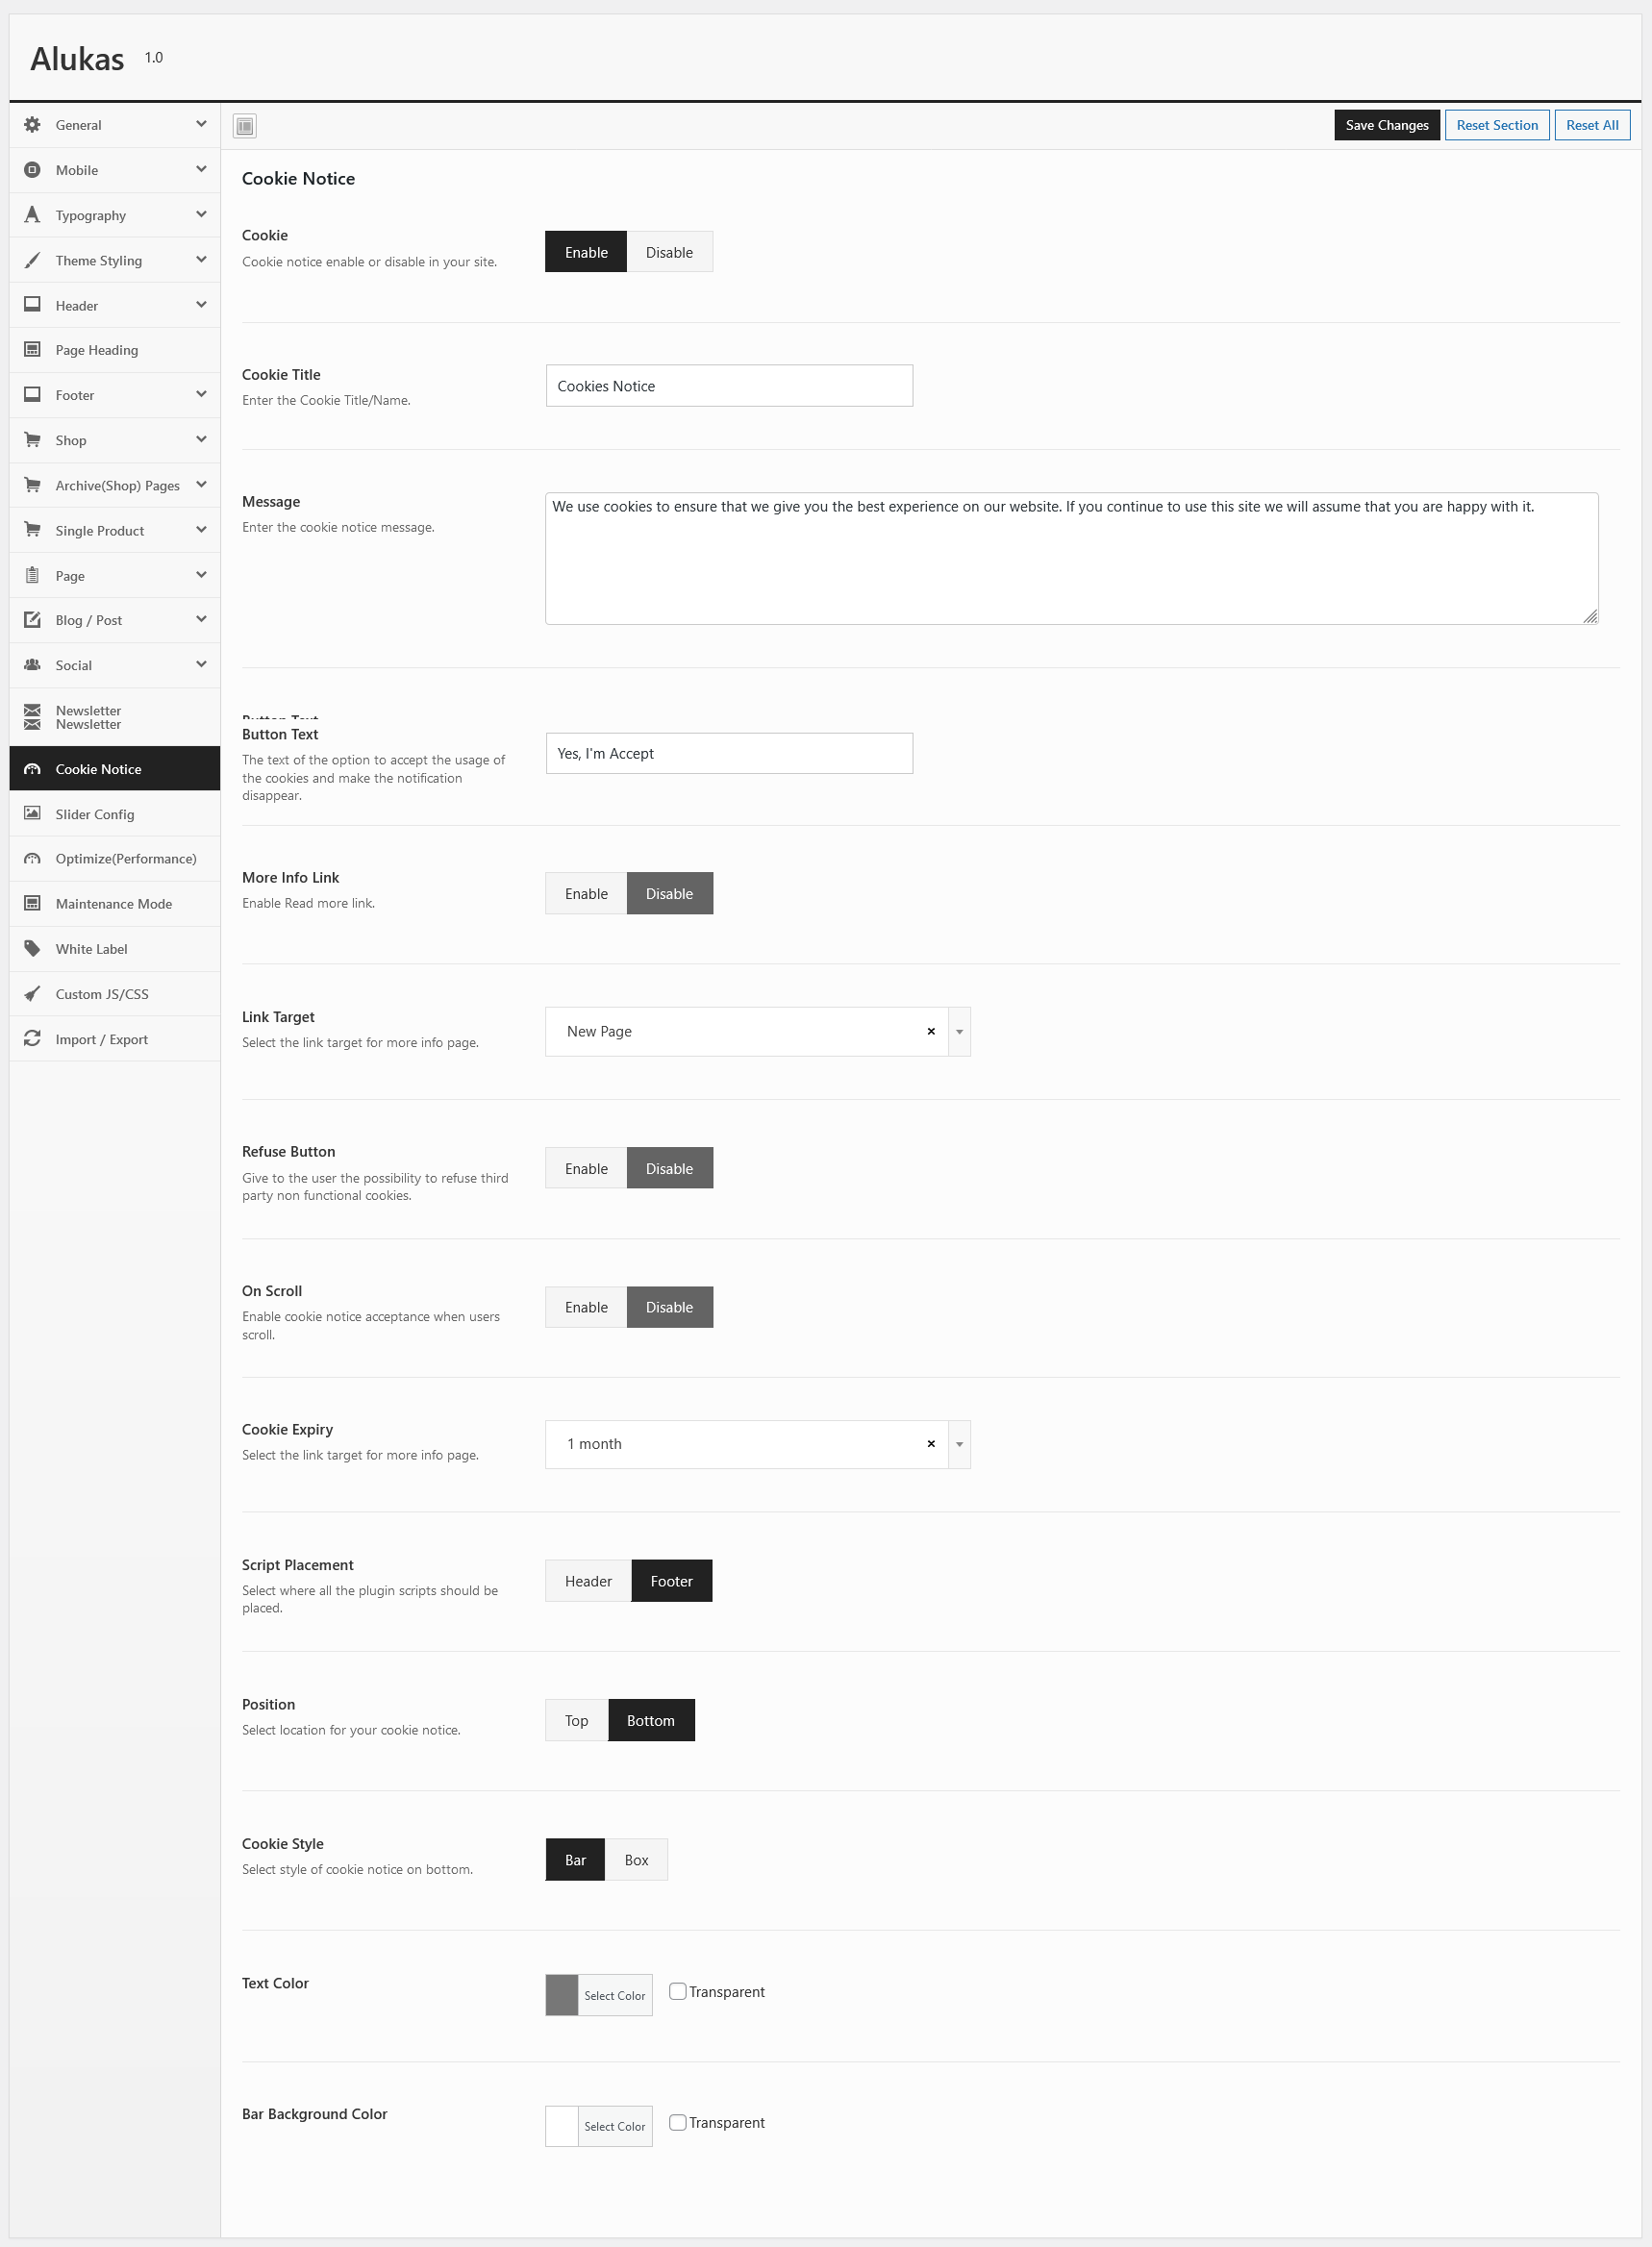
Cookie Notice
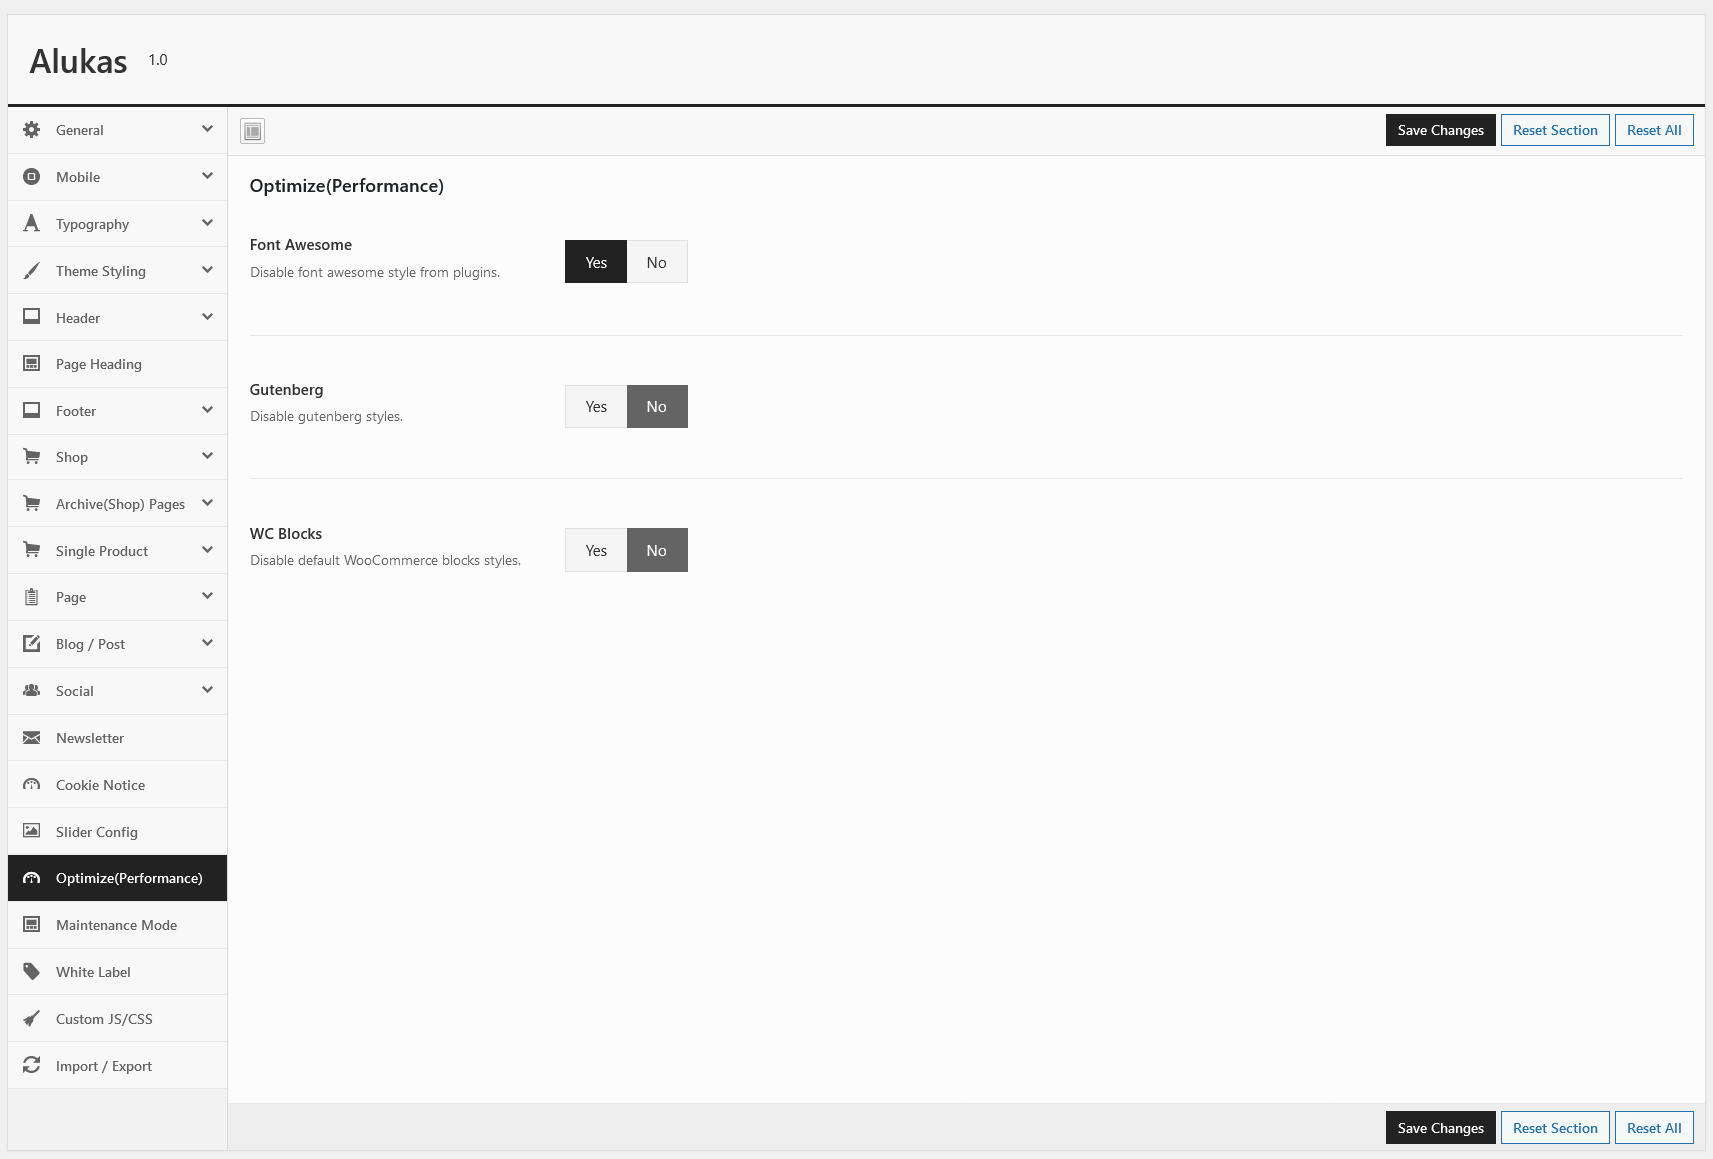
Optimize(Performance)
Maintenance Mode
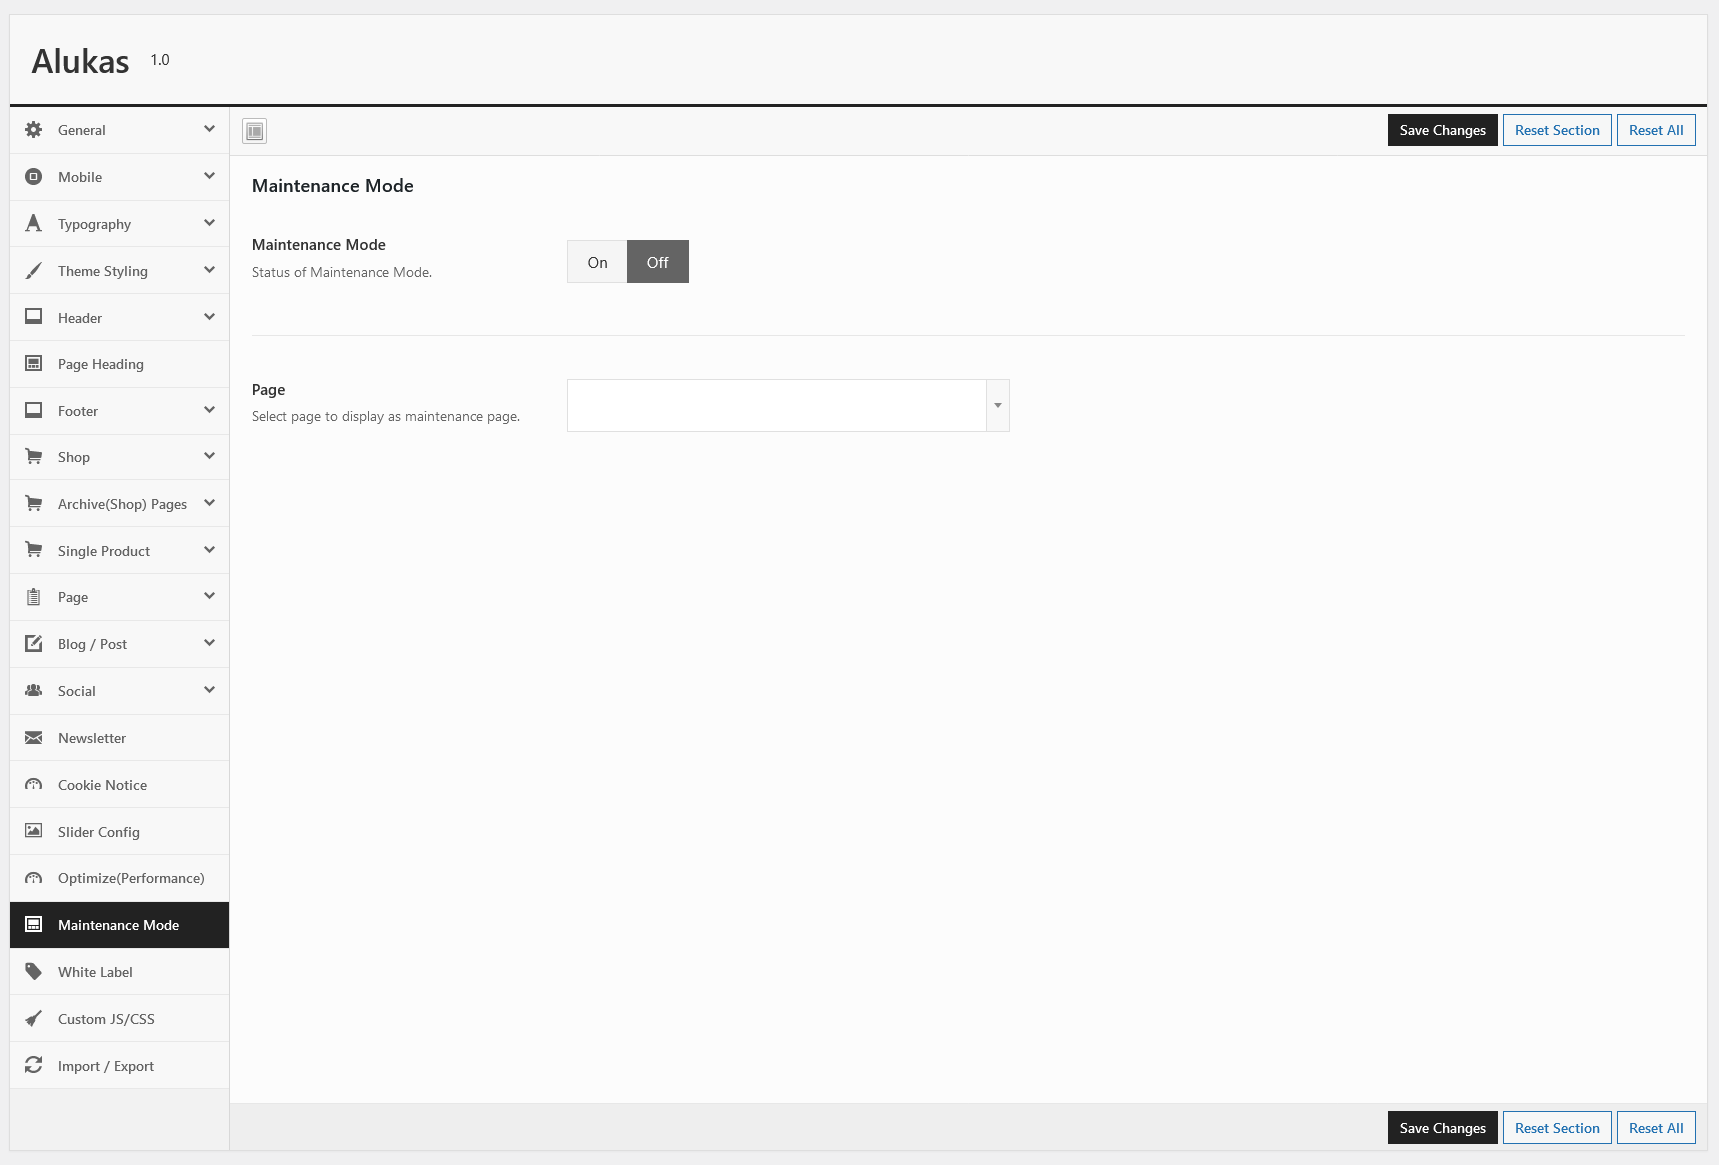
- Maintenance Mode : Status of maintenance mode On/Off
- Page : Select page to display as maintenance page. If you don't want to display header and footer in maintenance then select page template as "Maintenance".
Custom Css/Js
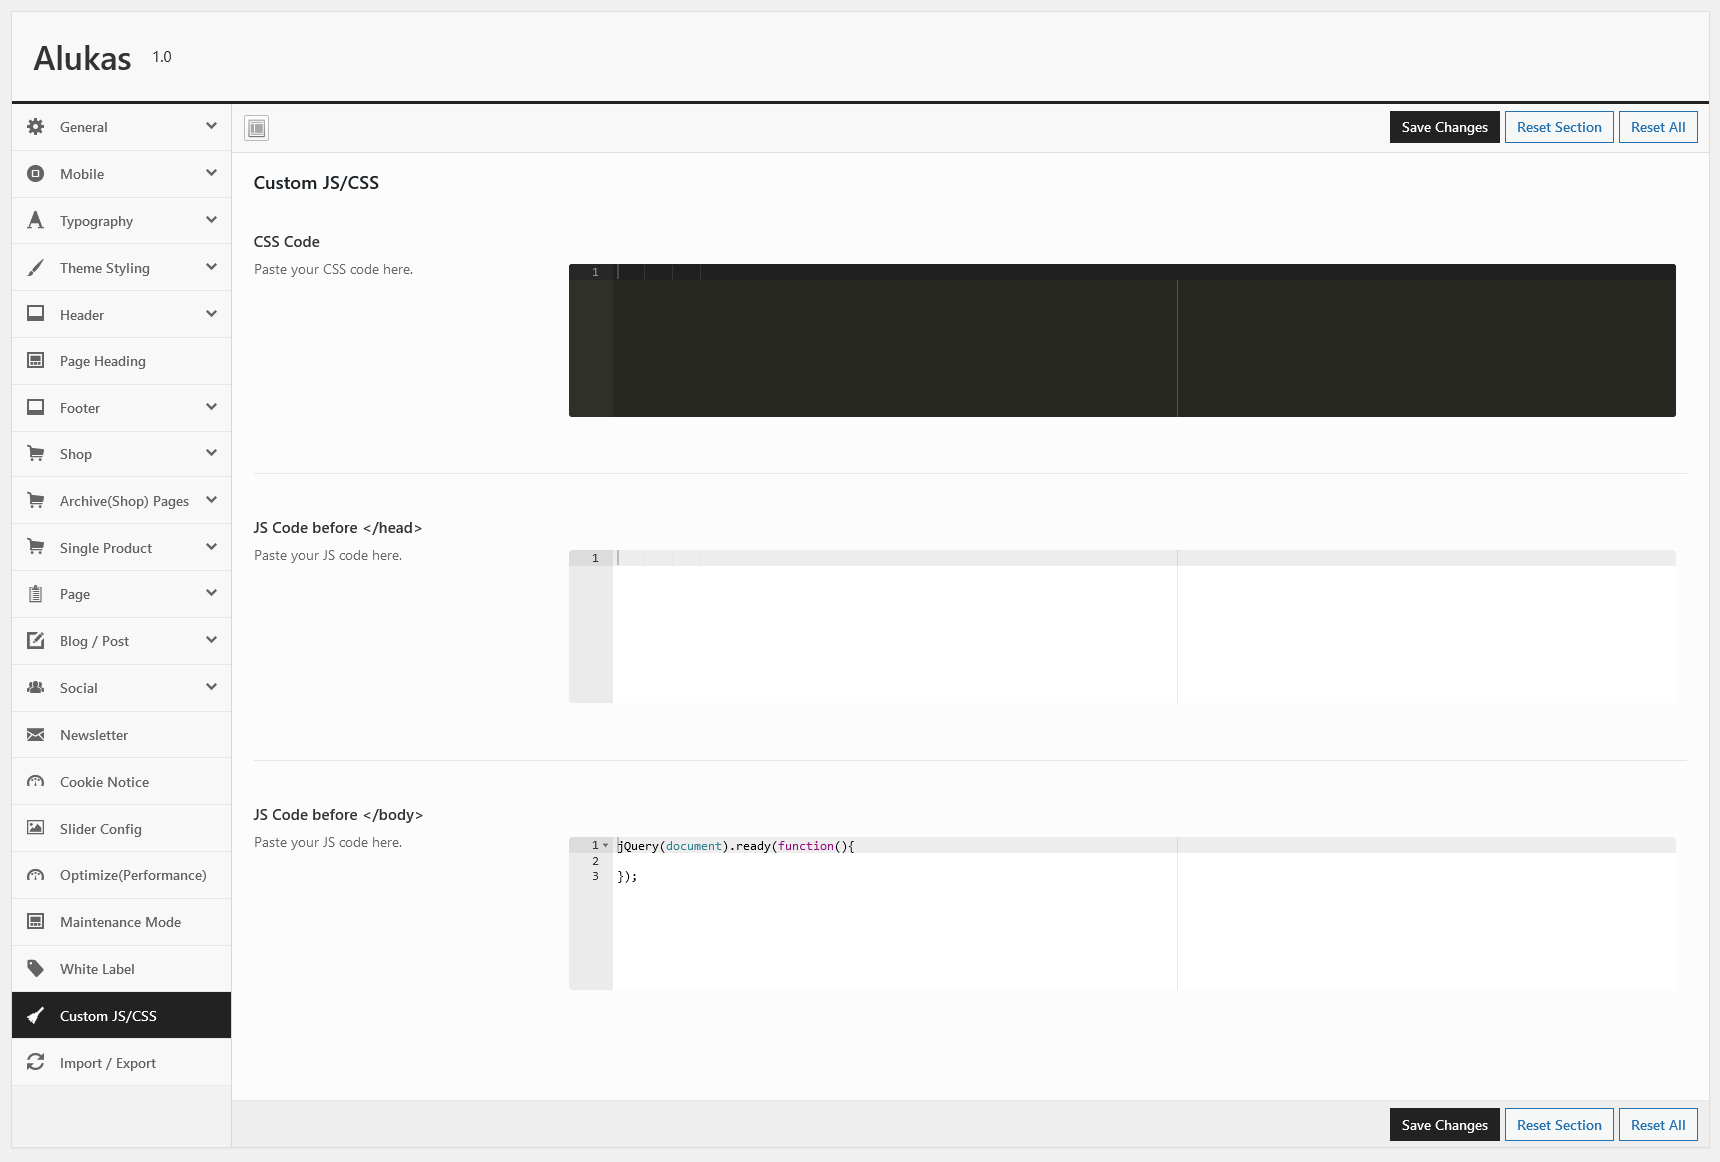
- CSS Code : Custom css code here.
- JS Code before head: Paste your custom JS code here.That will be load before head.
- JS Code before body: Paste your custom JS code here. That will be load before body.
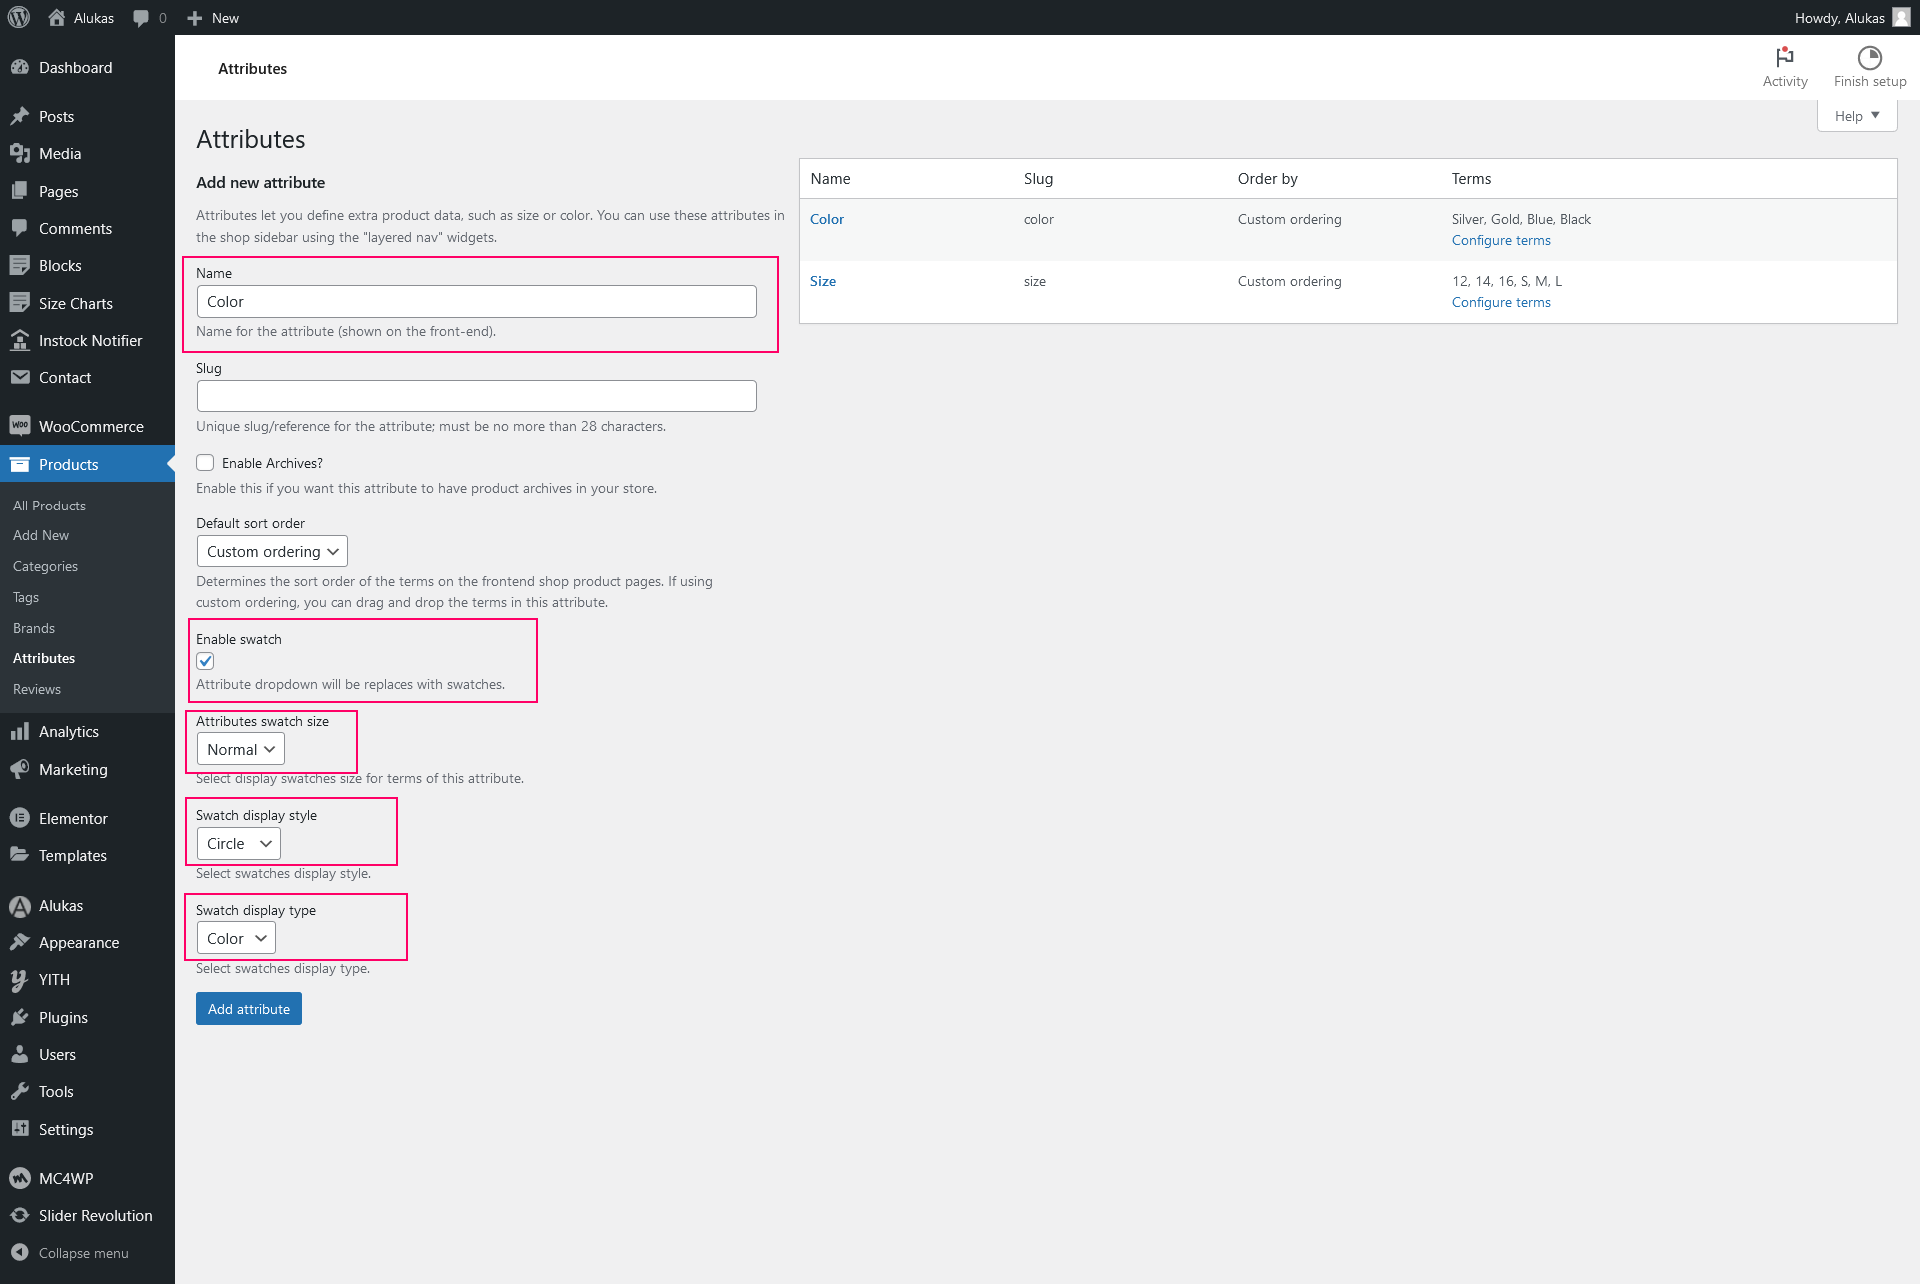
Product Attributes/Swatches
To display product attributes (colors, size) you have to create product attributes first.
Follow below step to create attribute and swatches.
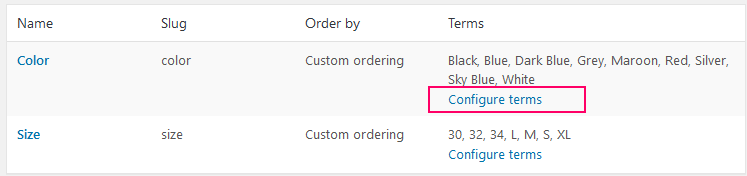
- Go to Product > Attribute to add a new attribute or edit an exists attribute.
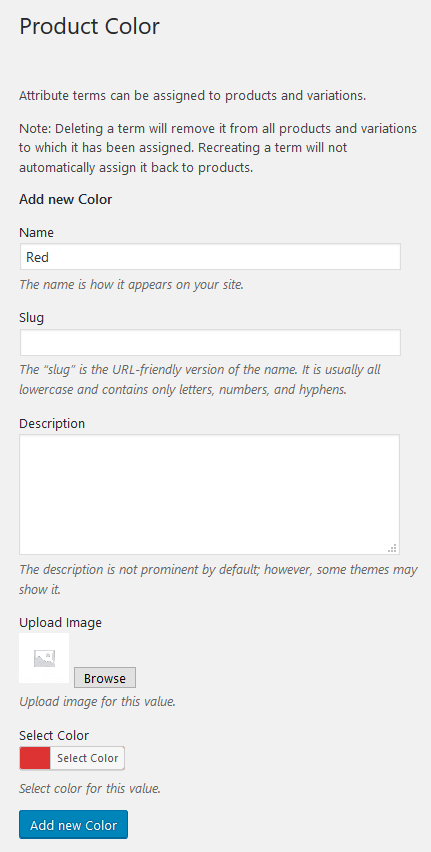
- Click on Configure terms to add new colors like red,blue etc.
- Add new terms.
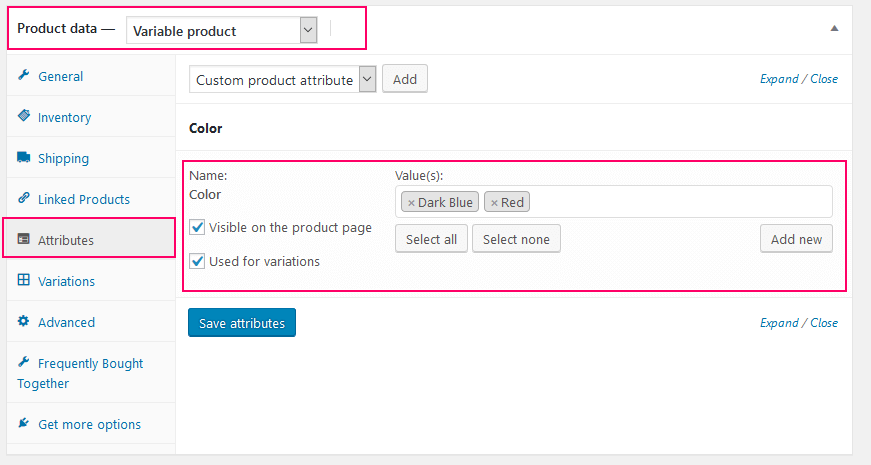
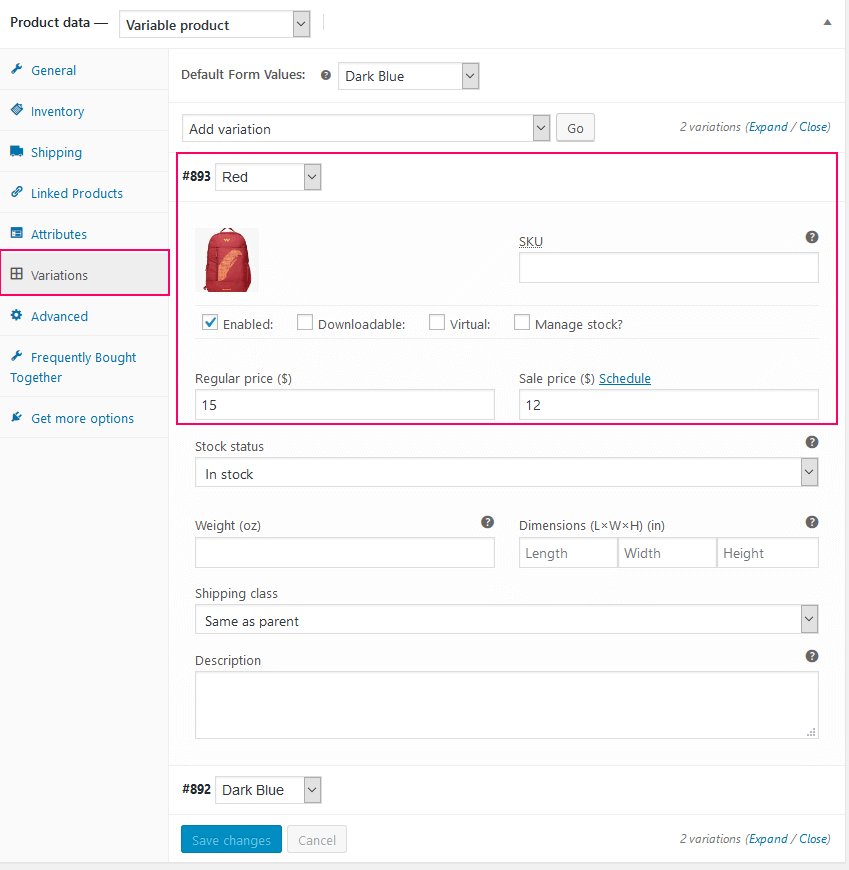
- Then, set variations for Product variable:(Product > Add new)
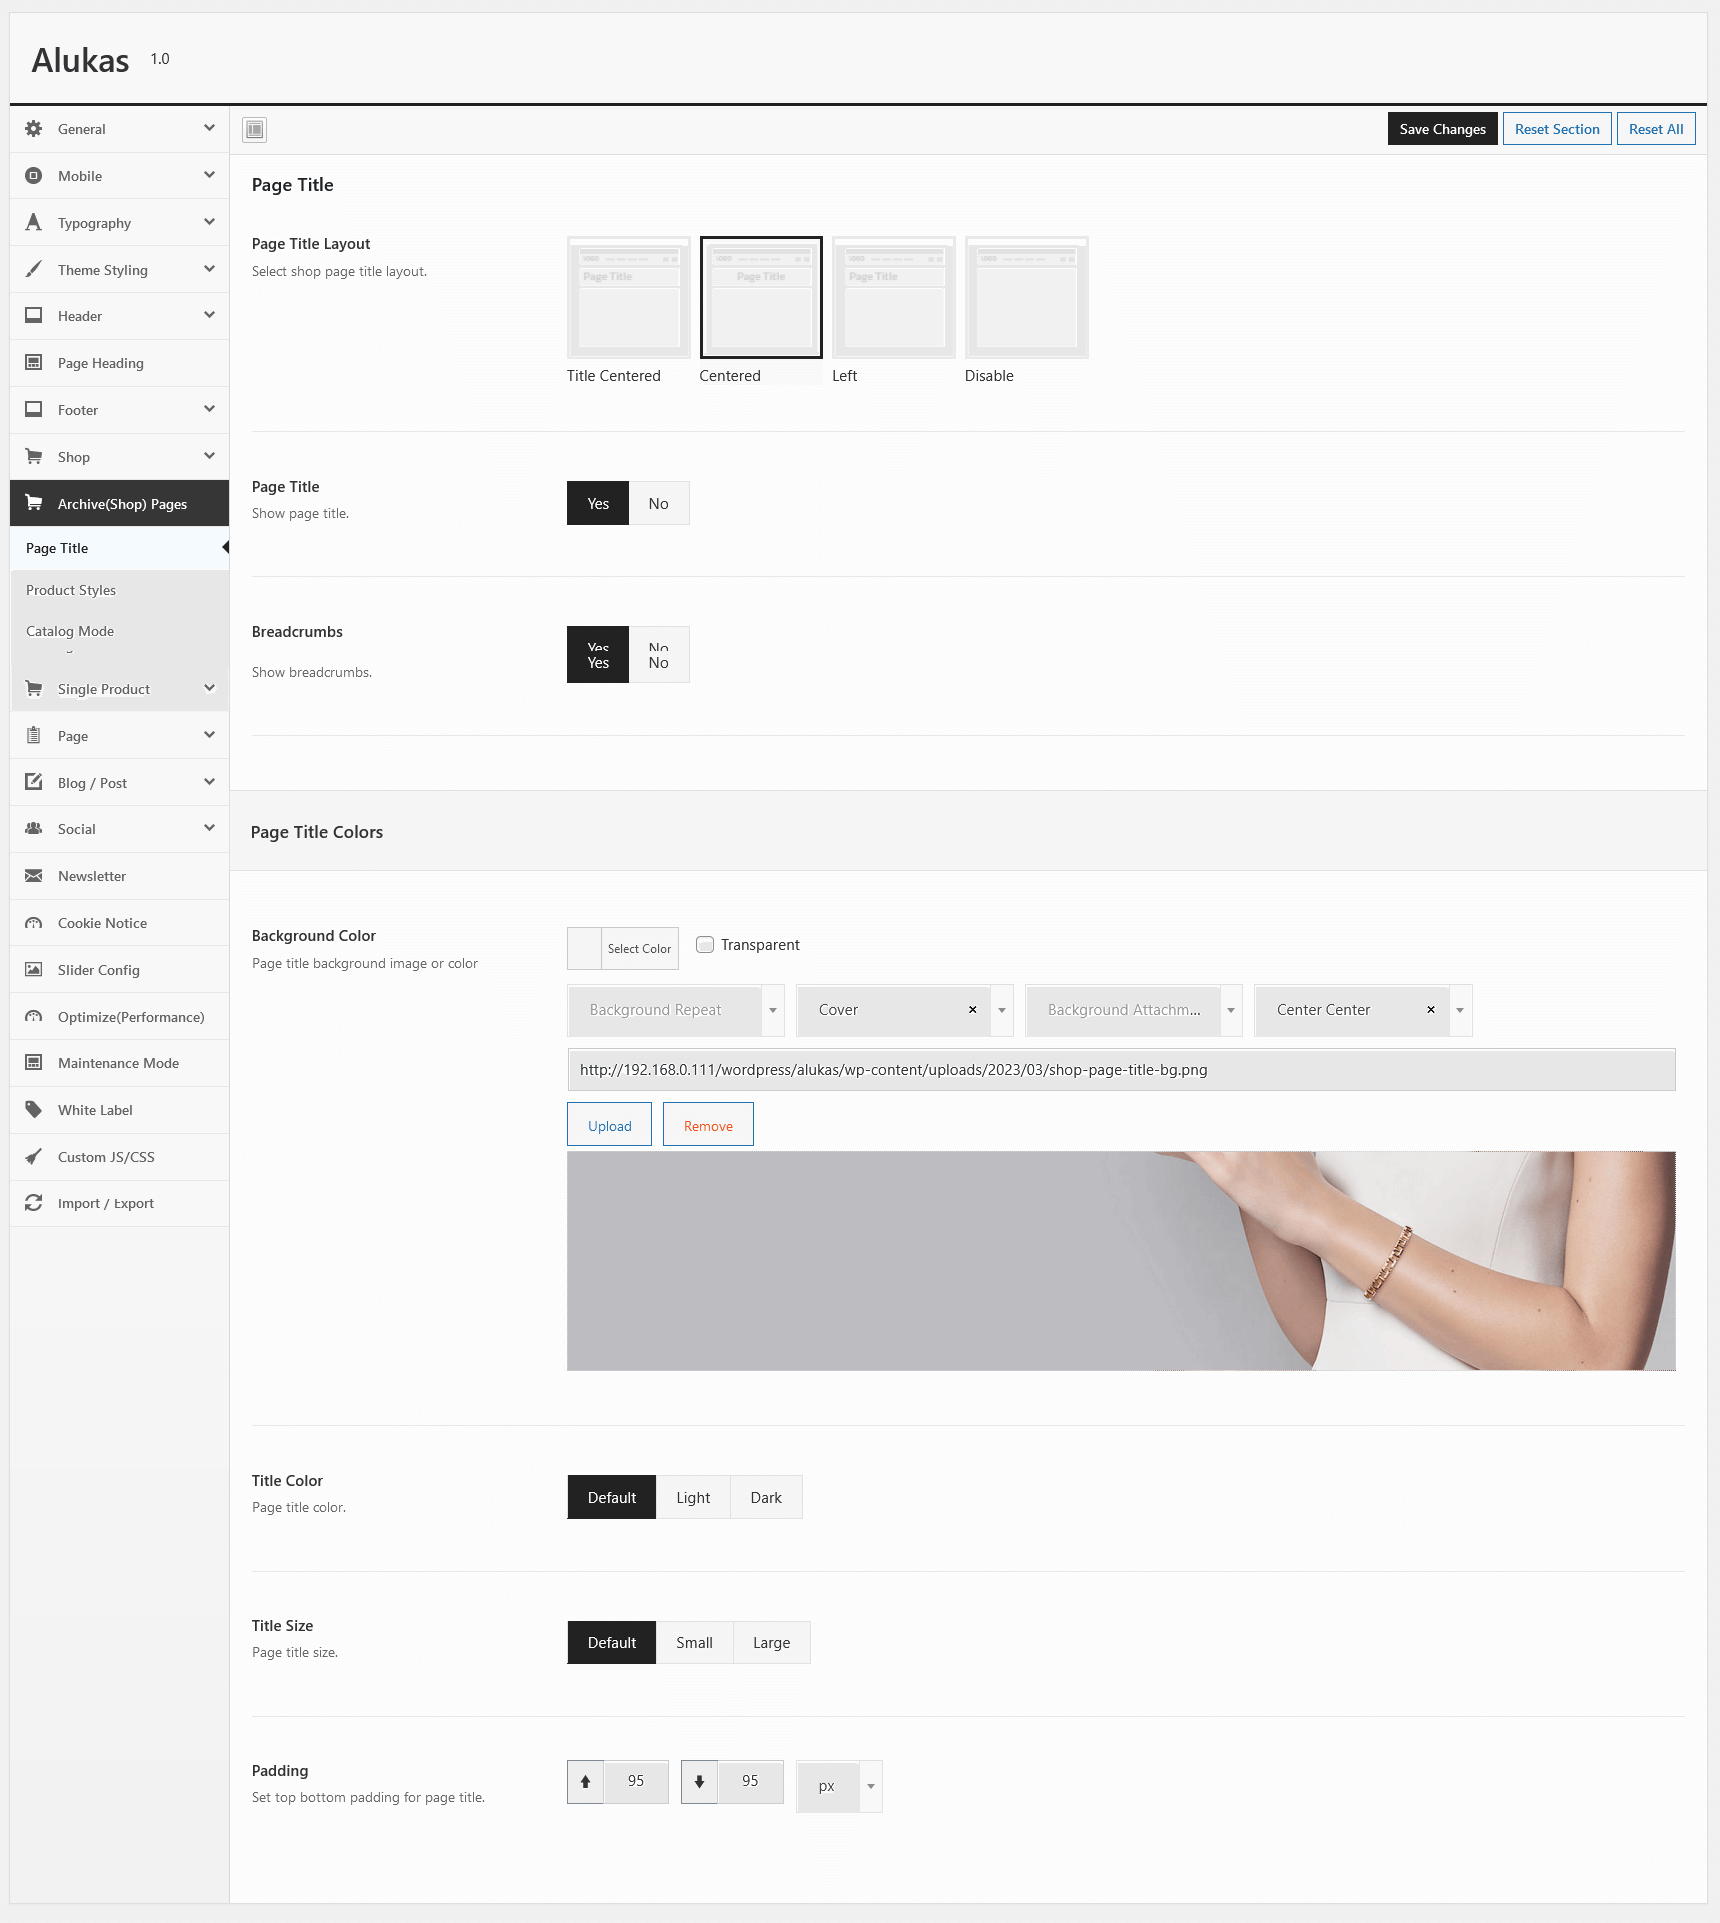
Shop Page Title Background Image
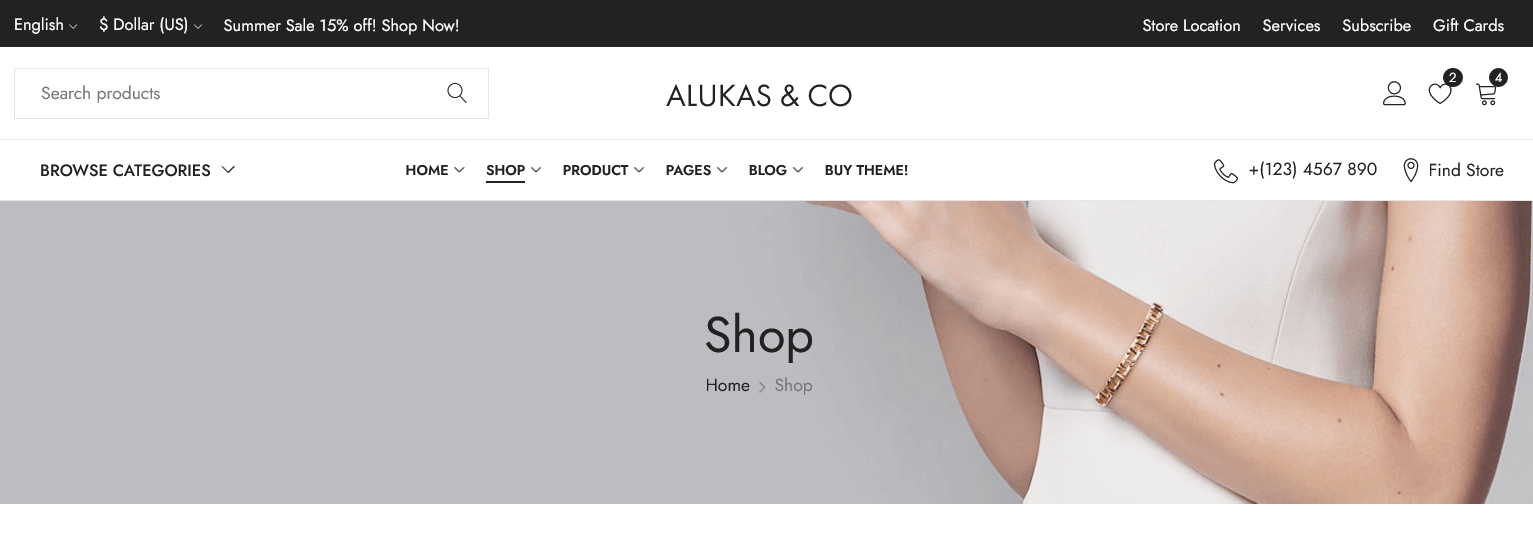
Please go through the following points to learn how to set page title background image:
- Login to your wp-admin.
- Go to Alukas => Theme Options => Archive(Shop) Pages => Page Title .
- There you can manage shop page title options .
Product Options
In this area you can manage single page options like page layout,video link,size chart,360 degree images etc.
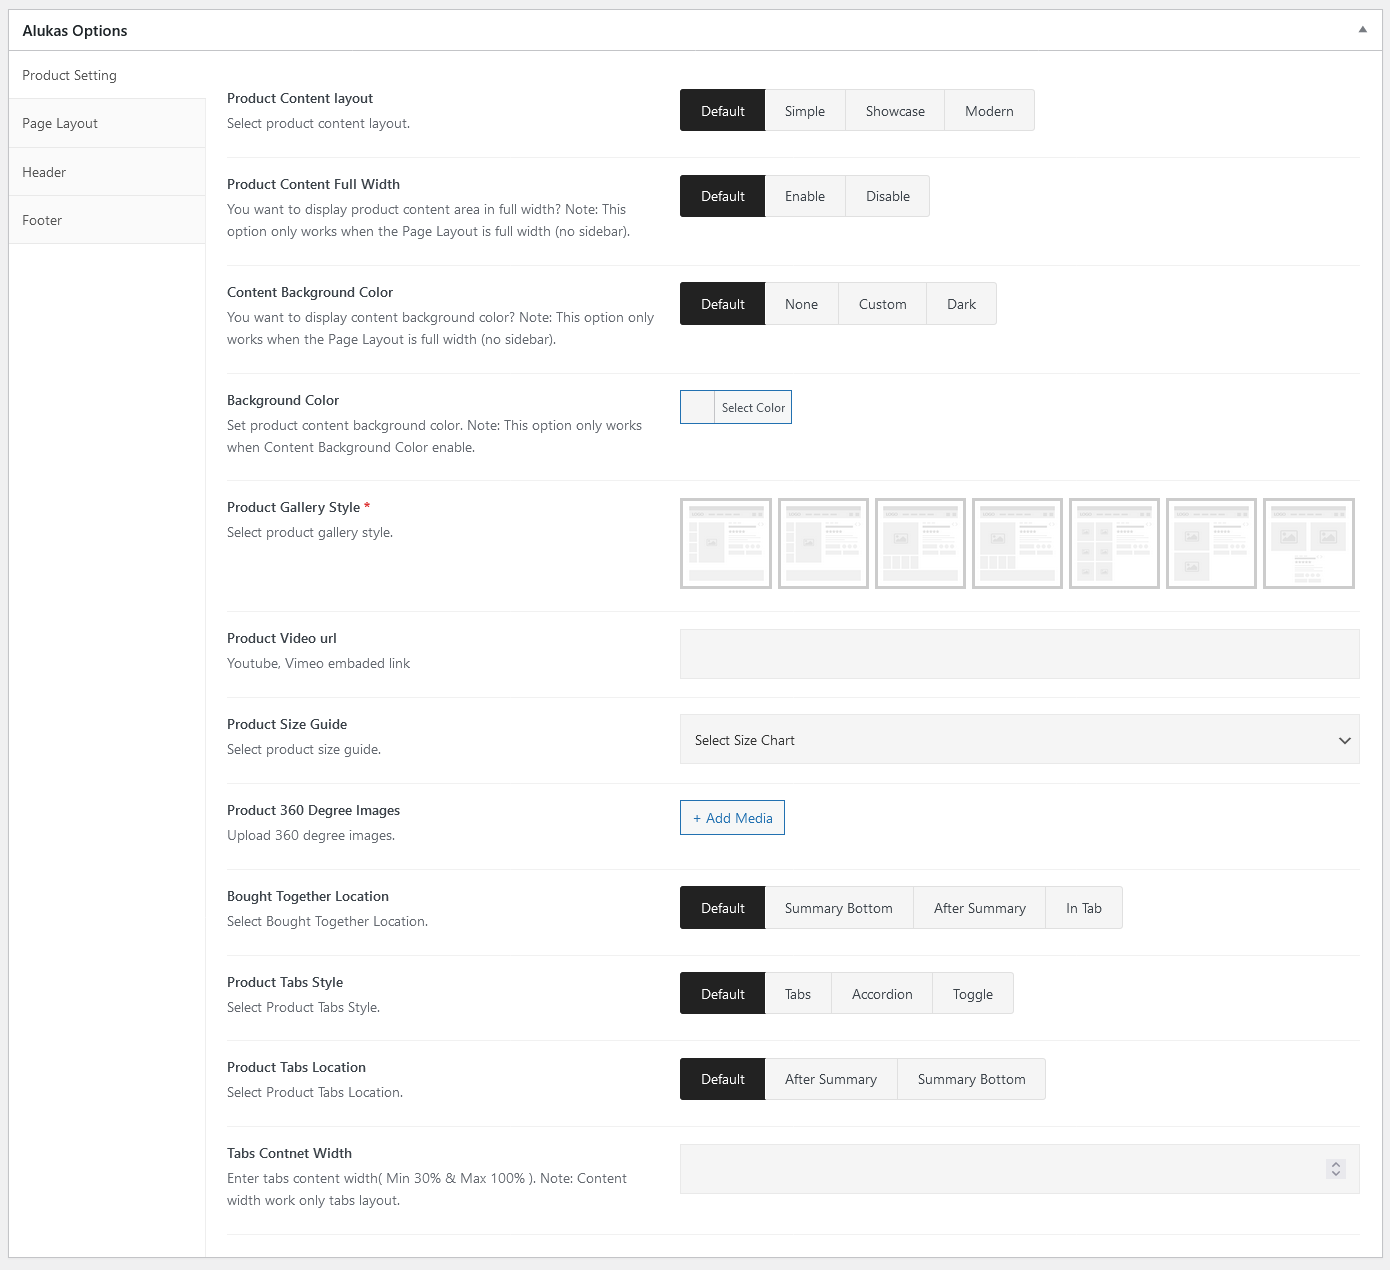
- Product Content layout : Select product page content layout.
- Product Content Full Width : Enable/disable content full width.
- Content Background Color : Select content background style.
- Background Color : Select background color.
- Product Gallery Style : Select gallery style.
- Product Video url : Enter product video url.
- Product Size Guide : Select size guide chart.You can create size guide chart from Size Chart > Add New.
- Product 360 Degree Images : Upload 360 degree product images.
- Bought Together Location : Select location.
- Product Tabs Style : Select tab style.
- Product Tabs Location : Select tab location.
- Tabs Contnet Width : Enter tab content width.
Product Custom Tab
In this section you add product custom tab
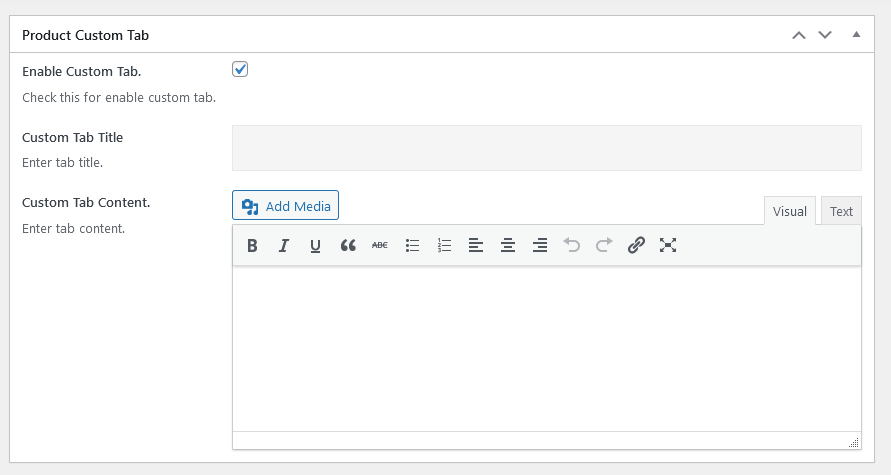
- Enable Custom Tab : Check this for add custom tab.
- Custom Tab Title : Enter custom tab title.
- Custom Tab Content : Enter custom tab content.
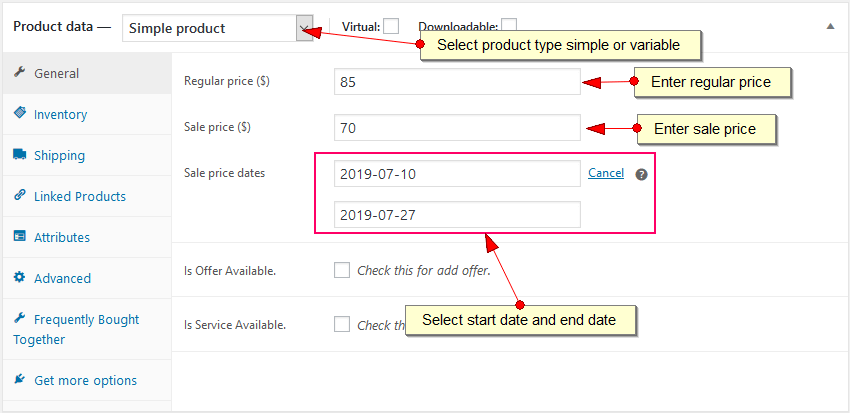
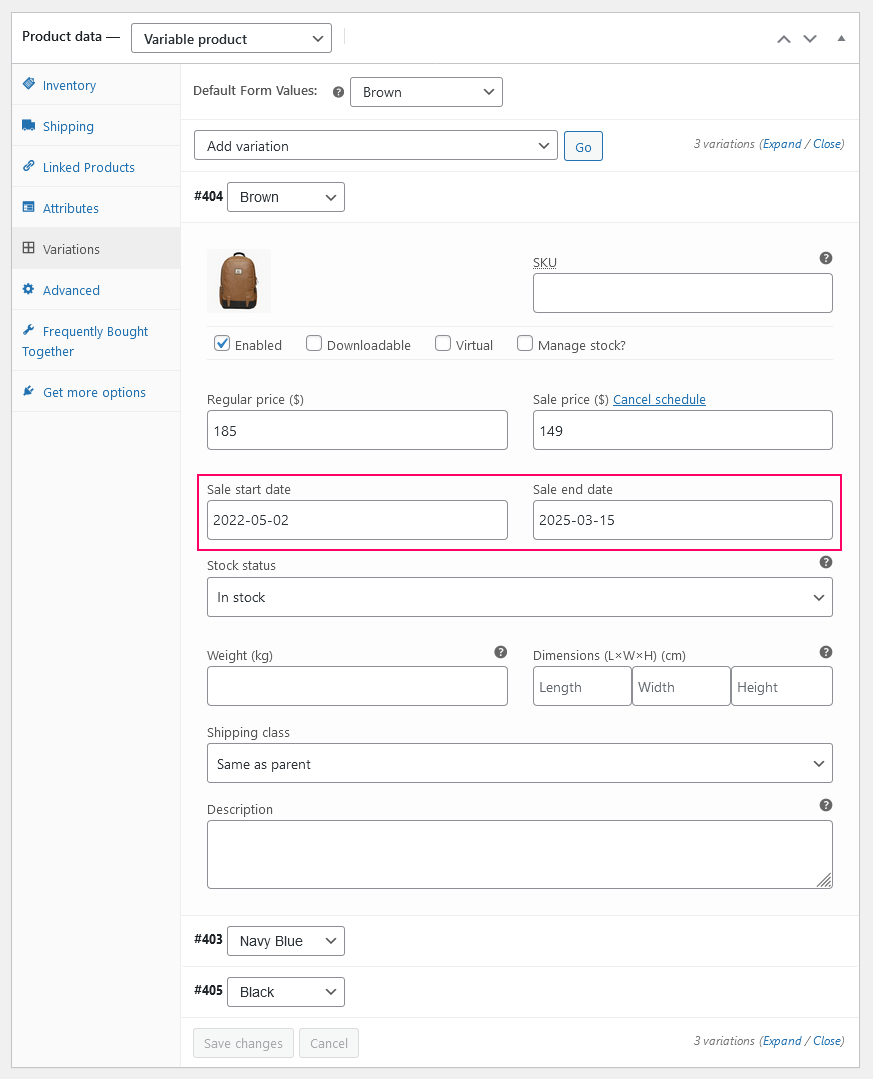
Product Countdown Timer
For simple product
For Variable product
Delivery & Return
You can enable Delivery & Return feature from Alukas => Theme Options => Single Product => Advance Options. See below screenshot

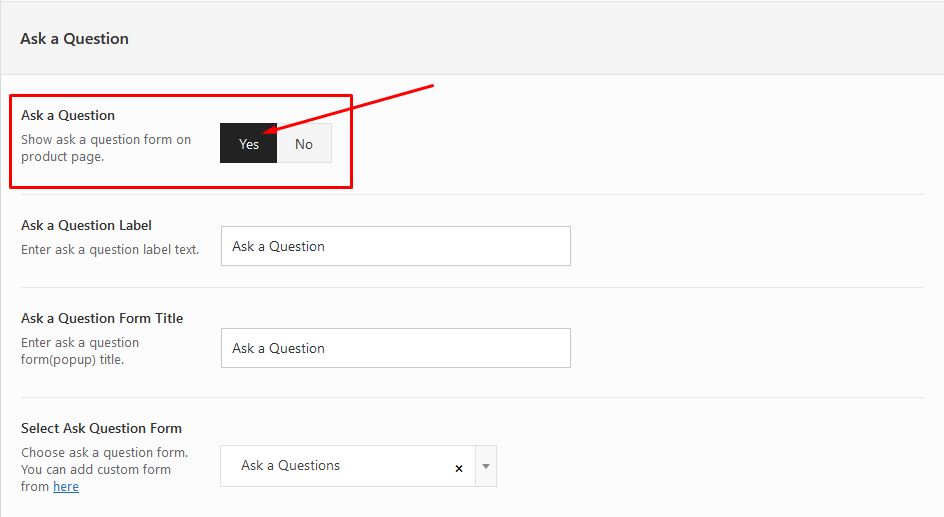
Ask a Questions
You can enable Ask a Questions feature from Alukas => Theme Options => Single Product => Advance Options. See below screenshot
Ask a Questions Form
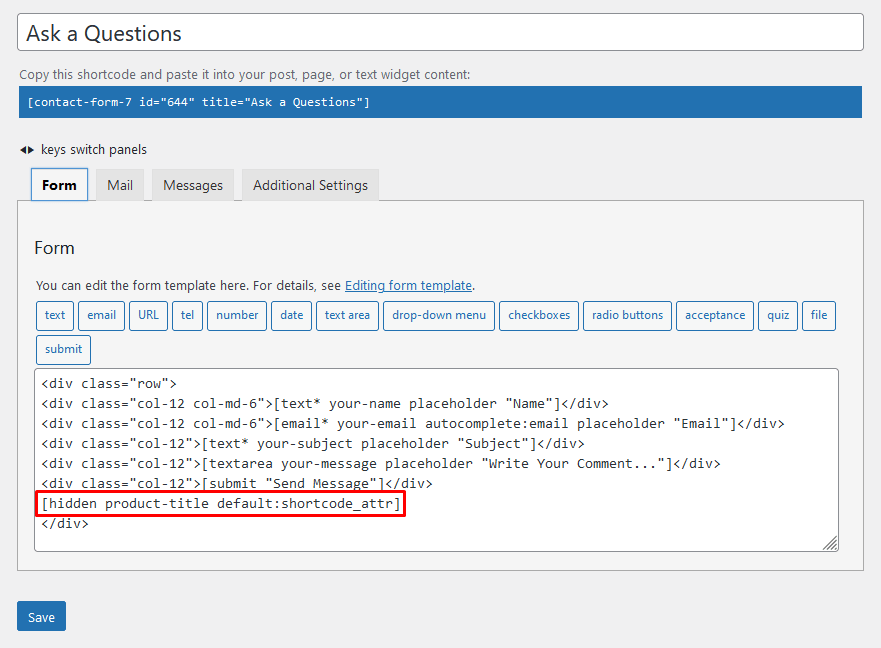
Form HTML
Here : [hidden product-title default:shortcode_attr] field for get current product title
Ask a Questions Mail Settings
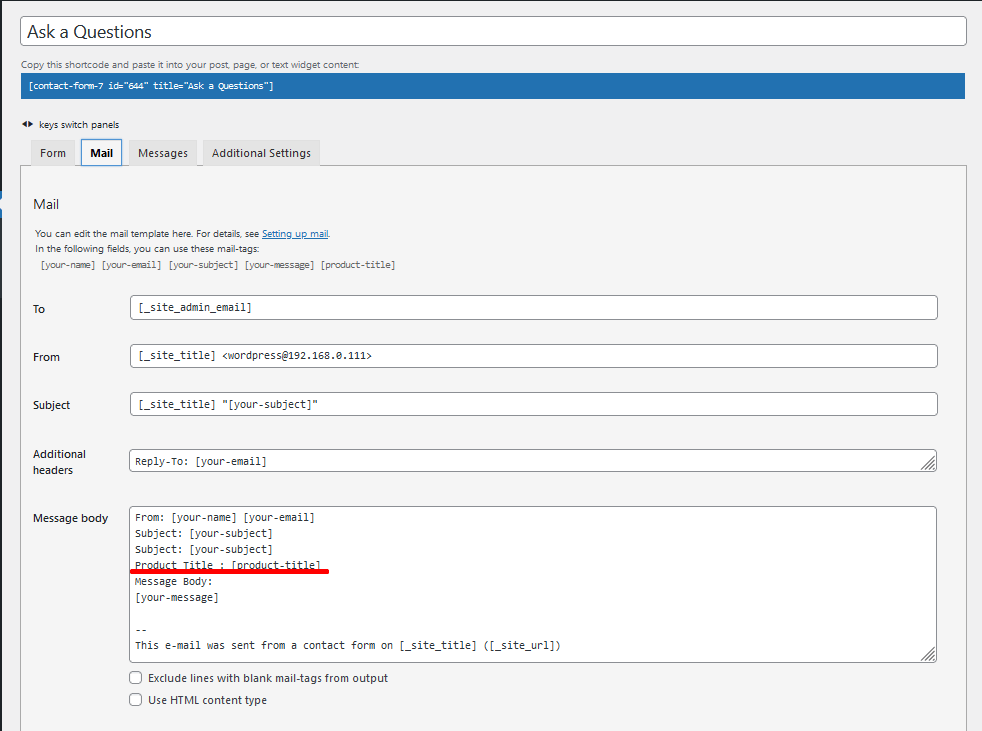
Use [product-title] tag for show display product title in mail.
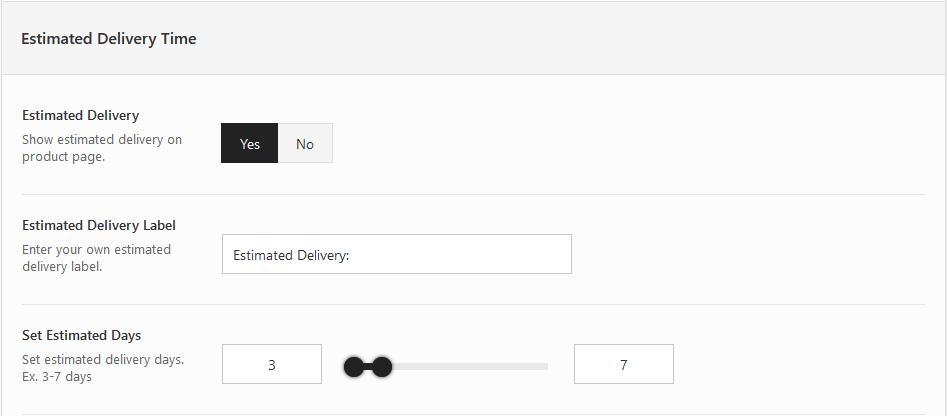
Estimated Delivery Time
You can enable Estimated Delivery Time feature from Alukas => Theme Options => Single Product => Advance Options. See below screenshot
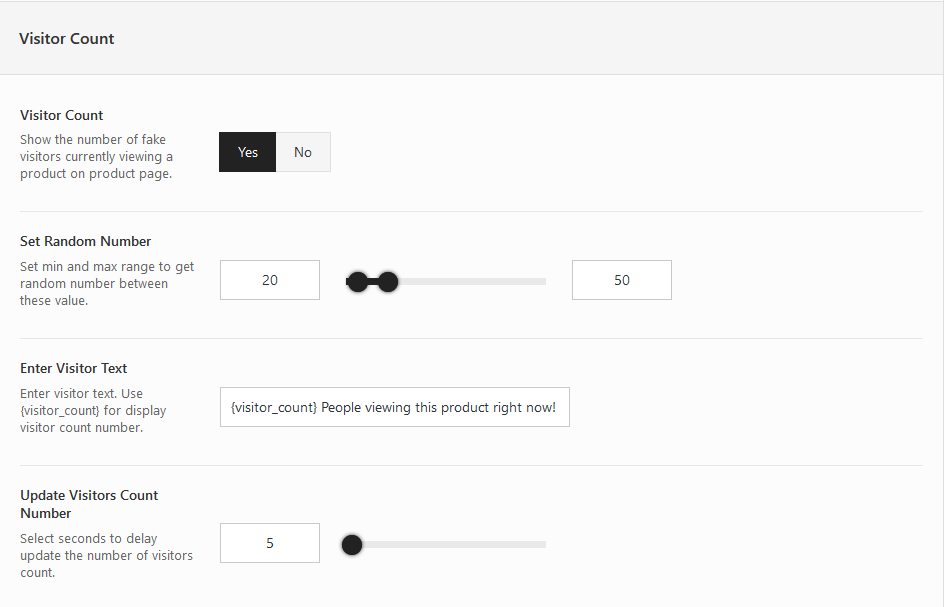
Visitor Count
You can enable Visitor Count feature from Alukas => Theme Options => Single Product => Advance Options. See below screenshot
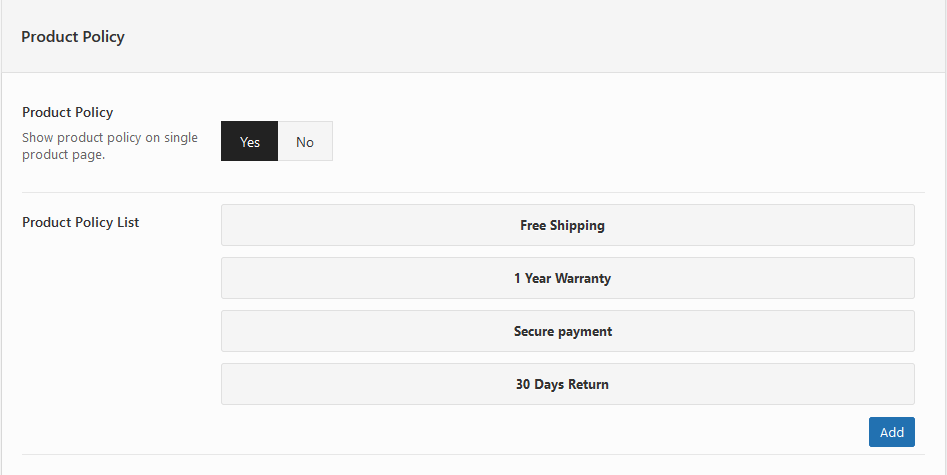
Product Policy
You can enable Product Policy feature from Alukas => Theme Options => Single Product => Advance Options. See below screenshot
Trust Badge Image
You can enable Trust Badge Image feature from Alukas => Theme Options => Single Product => Advance Options. See below screenshot
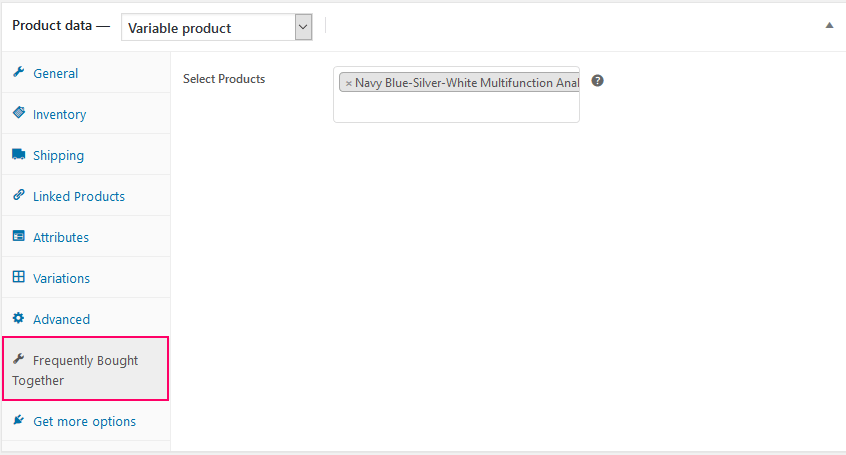
Frequently Bought Together
Choose products which you recommend to be bought along with your particular product.
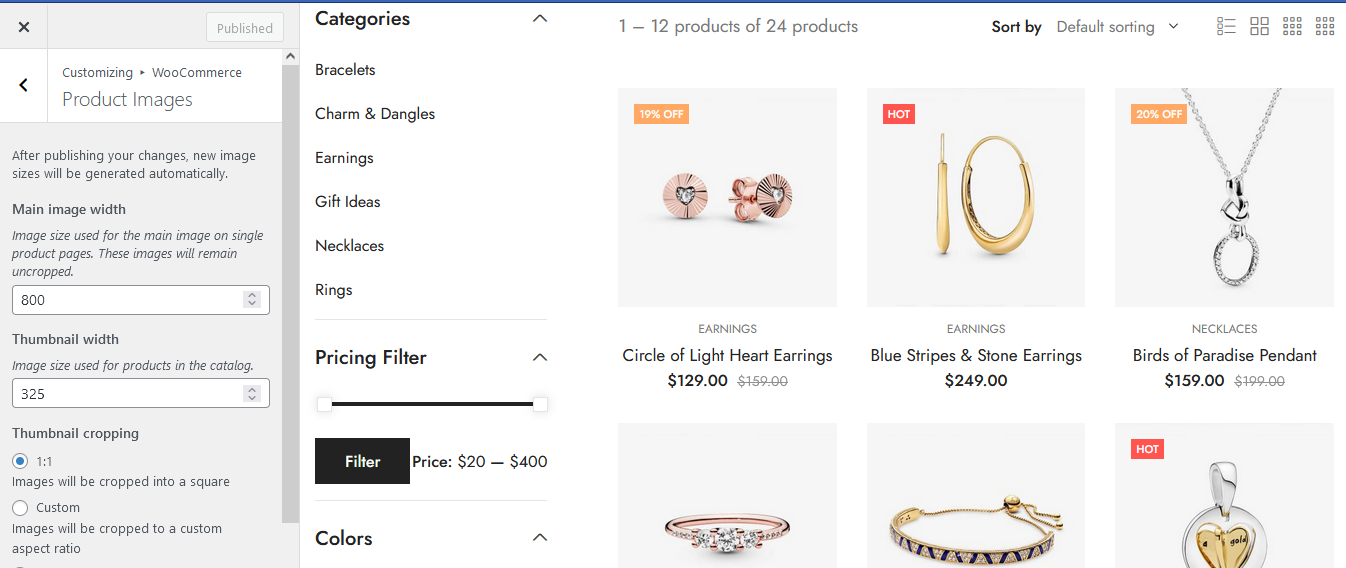
Product Image Size Settings
Please go to Appearance => Customize => WooCommerce => Product Images. .
Documentation & Tutorials
WooCommerce Getting Started Guide
Video Tutorials
- What is WooCommerce?
- How To Install WooCommerce WordPress Plugin?
- How To Import WooCommerce Dummy Data?
- How To Get Better Product URL With Custom Permalink?
- How To Use Shop Page For Homepage?
- How To Display Product Categories On Shop Page?
- How To Change Shop Currency?
- How To Add A Simple Product?
- How To Sell A Service Product?
- How To Sell A Digital Product?
- How To Sell An Affiliate Product?
- How To Use Product Attributes?
- How To Add A Variable Product With Variations?
- How To Change Product Images Size?
- What Are Up Sells and Cross Sells?
- How To Create A Coupon Code?
- How To Add Terms & Conditions At Checkout Page?
- How To Enable Registration On "My Account" Page?
- What is System Status page?
Elements
Elementor Page Builder will help you manage your content at the WordPress sites and build any layout you can imagine in a few minutes without coding. You can read Elementor Documentation to get more details.
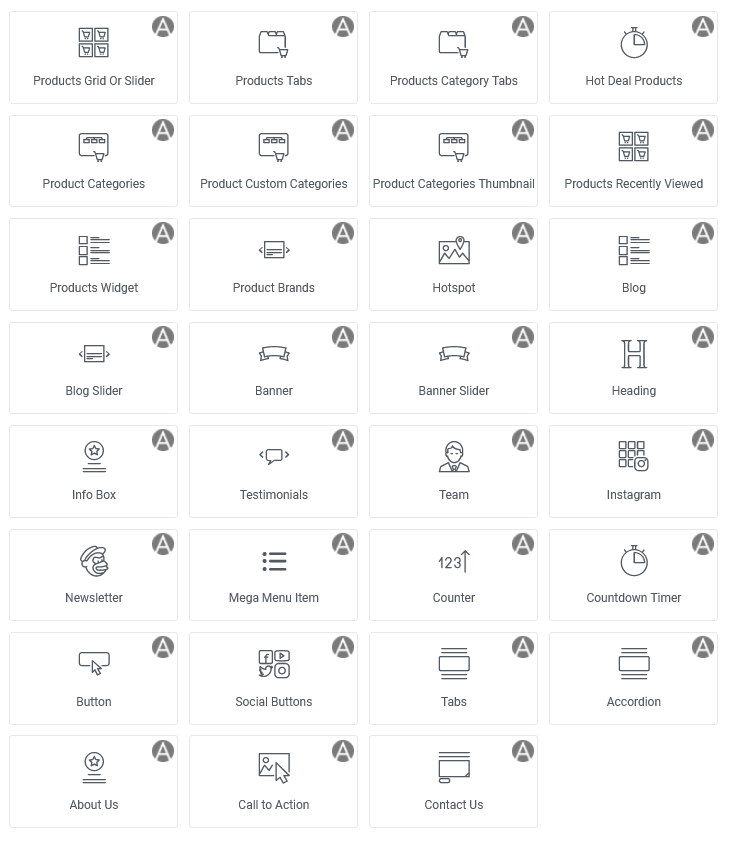
In Alukas, we also create some new elements that will help you build your website a lot easier.
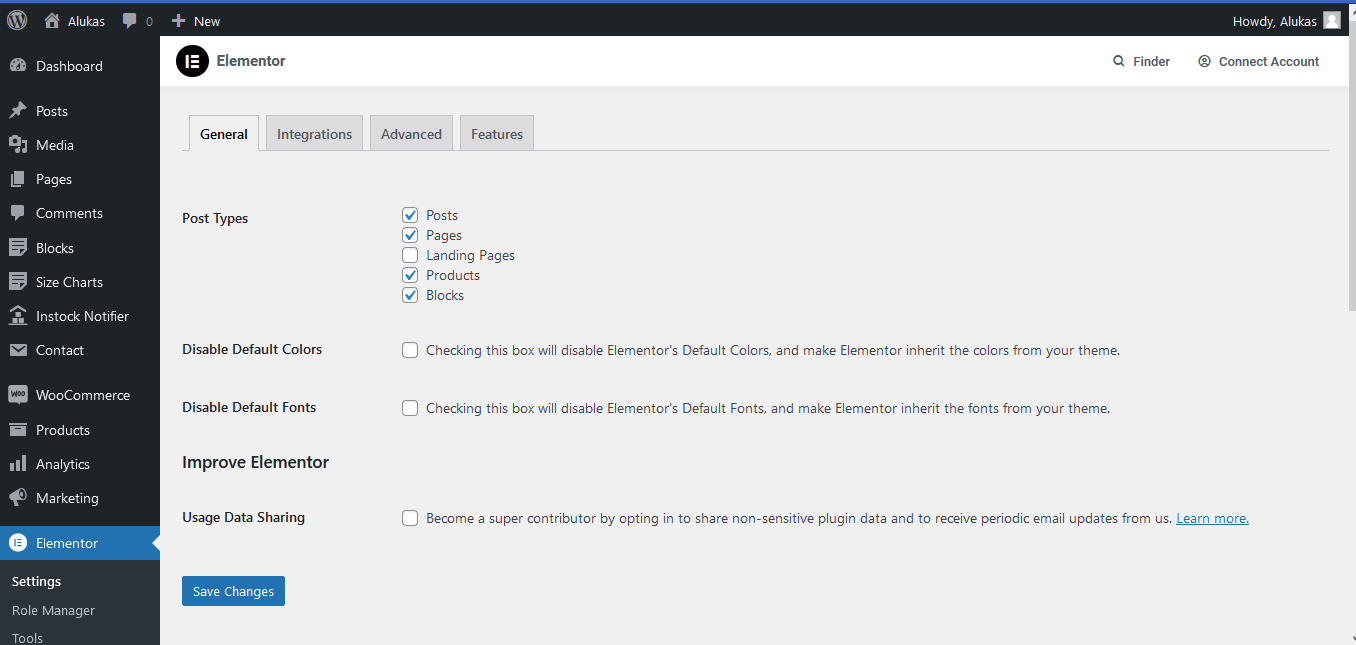
Elementor Settings
Enable elementor page builder for specific post type.
Widgets
Revolution Slider
Revolution Slider included with themepackage.This slider is 100% responsive and has many amazing options. You can follow plugin documentation guide here.
Note : You don't directly purchase the Revolution Slider plugin. So you can not update it by yourself. It is also not recommended. When it has a new version, we will be careful to test and include it in new theme version.
Elementor
Enable Elementor for pages, posts and custom post types. Read more read Elementor Plugin Documentation.
Contact Form 7
Contact Form 7 is a Contact Form creation plugin that is very flexible and easy to use. It manages multiple contact forms, plus you can customize the form and the mail contents flexibly with simple markup. The form supports Ajax-powered submitting, CAPTCHA, Akismet spam filtering and so on. Read more on how to Create your own Contact Forms a few sections up in Creating Contact Forms or find out more on the plugin Contact Form 7 Plugin Documentation.
YITH WooCommerce Wishlist
These Plugins allow users adding products to wishlist them.
YITH WooCommerce Wishlist Plugin
More info on how to use these plugins can be found at YITH WOOCOMMERCE WISHLIST Documentation pageYITH WooCommerce Compare
These Plugins allow users adding products to comparing them.
YITH WooCommerce Compare Plugin
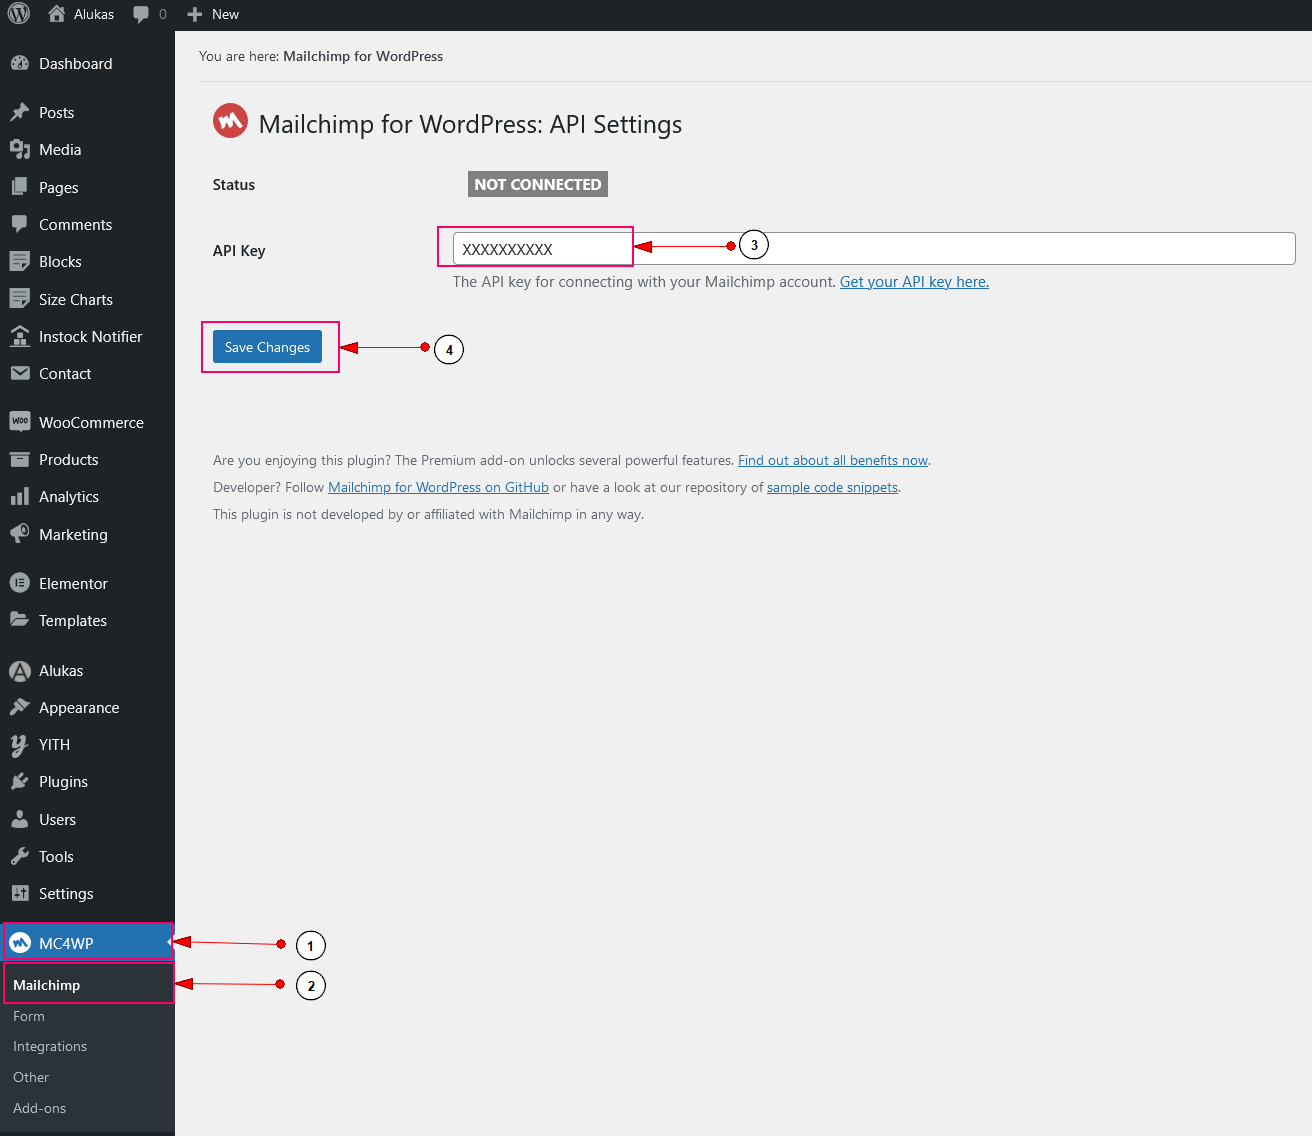
More info on how to use these plugins can be found at YITH WooCommerce Compare Documentation pageMailChimp for WordPress
MailChimp for WordPress comes with a free plugin, which is awesome by itself. It is actively used on nearly half a million sites and has been very well received by the WordPress community.
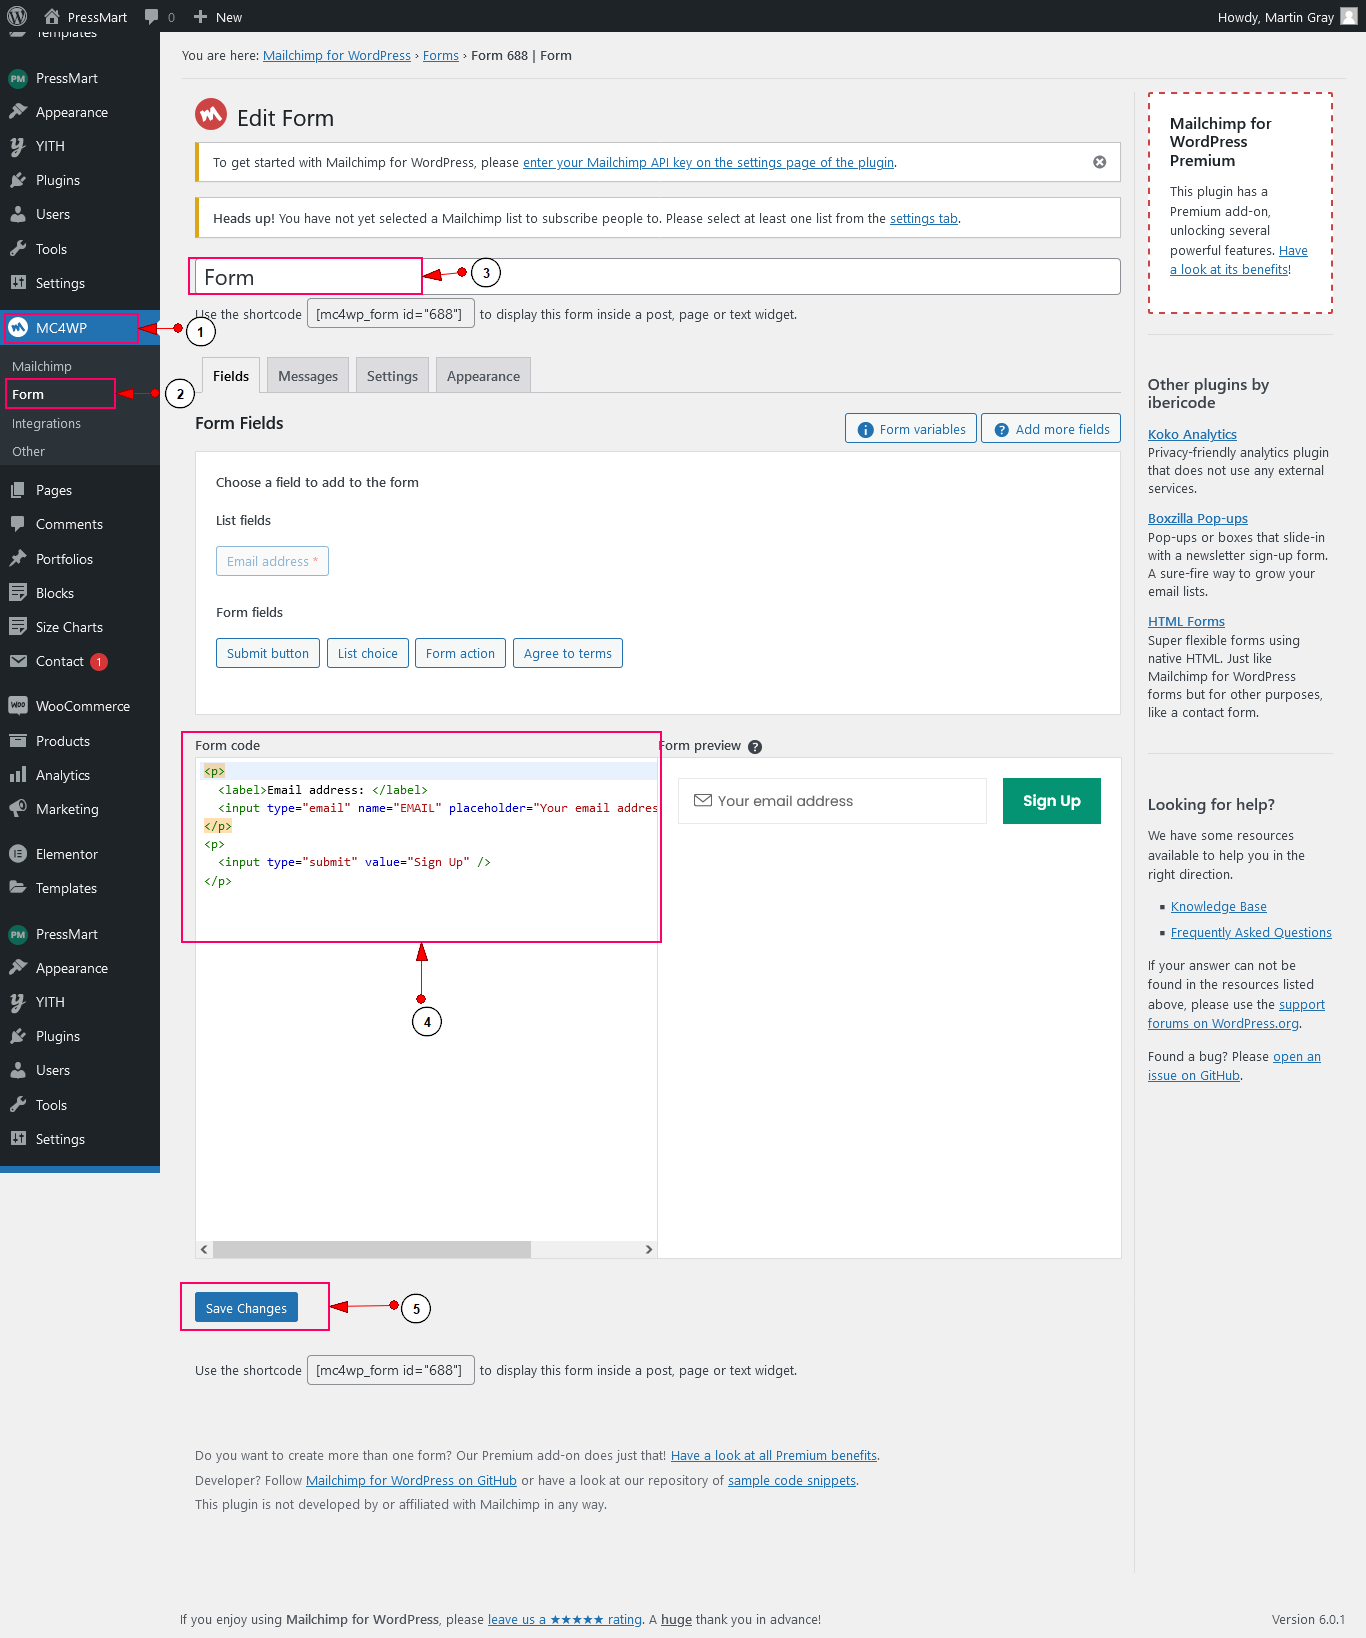
Form HTML
Form HTML With Agree to Terms checkbox
MailChimp for WordPress Plugin
More info on how to use these plugins can be found at MailChimp for WordPress Documentation page1. How to find purchase code?
Note : Without purchase code you can't import our demo content.
- Log into your Envato Market account.
- Hover the mouse over your username at the top of the screen.
- Click ‘Downloads’ from the drop-down menu.
- Click ‘License certificate & purchase code’ (available as PDF or text file).
For more detail Click Here
2. Theme is missing the style.css stylesheet error
That's a common issue caused by not uploading the correct zip file. Go back to http://themeforest.net/downloads and when clicking the Download button, choose the "Installable WordPress file only". And upload this zip file.
3. Are you sure you want to do this?
After browsing for your theme and clicking the "Install Now" button, it’s possible your WordPress installation will ask "Are you sure you want to do this?" This could be due to the fact that you are trying to install the wrong zip file (remember – you want the "Installable WordPress file only") or it’s possible the upload limit on your server isn’t large enough.You'll need to contact your hosting company to have them increase upload_max_filesize value up to 32MB, or you may install the Theme via FTP.
4. 500 Internal Server Error
Please extend below php configuration of our theme requirement in php.ini or Contact your host provider support team and extend below detail.
5. White Screen Of Death or PHP Error Notice
A "white screen of death" happens when there is a PHP error on the site but WP_Debug isn’t enabled on the server. So the first thing to do would be to enable WP_Debug so you can read what the actual error is and thus fix the problem.
6. How to show Registration Form on My Account page?
Please go Woocommerce > Settings on admin sidebar.
Please go Accounts section.
Please check Enable registration on the "My Account" page in Registration Options.
7. How to setup Language Switcher and Currency Switcher?
You can show wpml language switcher or wpml currency switcher.
You should enable Show WPML Language Switcher and Show WPML Currency Switcher options in Alukas > Theme Options > Header.
Before enable these options, you should install WPML and WooCommerce Multilingual - run WooCommerce with WPML plugins.
You should configure wpml language switcher in WPML > Languages > Language switcher options. You can see here for more details.
You should configure wpml currency switcher in WPML > WooCommerce Multilingual > Manage Currencies. You can see here for more details.
8. How to update Revolution Slider And Alukas Extensions Plugins?
Important: Before update this plugin, you should delete this plugin in Plugins on admin sidebar.
- Please go Plugins on admin sidebar.
- Please select these plugins.
- Please deactivate these plugins.
- Please select these plugins.
- Please delete these plugins.
- Please go Appearance > Install Plugins on admin sidebar.
- Please select these plugins.
- Please install these plugins.
- Please activate these plugins.
9. Outdated WooCommerce Templates
In case you're seeing a notification in your administration dashboard saying the theme includes some outdated WooCommerce templates, it means you've recently updated WooCommerce but haven't updated the theme yet.
Updating the theme to its latest version will fix the outdated templates.
10. Demo Content Duplicated
When you import our demo content, it can take several minutes depending on the speed of your server. Each time the button is clicked it will import the content, so if it is clicked twice it will import everything two times. There are two ways to get rid of duplicate content.
Method 1: WP Reset Plugin – This plugin is the fastest way to get rid of content. However, it will remove all content from your database and leave the default theme activated. It does not remove plugins, but will deactivate them and remove all pages, posts, menus, sliders, widget data, etc. Basically it removes all the content that you imported from our theme. Only do this if you are able to start over. Click Here To Download.
Method 2: Manual Removal – This method will take longer and simply involves manually removing duplicate items. For example, go to the Appearance > Menu and delete and duplicate items one by one. Same thing for pages, post, sliders, etc.
11.How to create tracking order page?
Create new page and put [woocommerce_order_tracking] shortcode in page. After then you can configure that page in Alukas => Theme Options => Shop. There you can set Order Tracking Page.
Thank you for purchasing our theme
If you have any questions that are beyond the scope of this documentation. Please feel free here.
Thanks so much!
Social Links
This widget allows you to display social links.Here display those links which you added in Alukas > Theme Options > Social > Social Profile.