BigBazaar - Documentation
1) Indtroduction
Thank you for purchasing BigBazaar WordPress Theme! In this document you will find information on how to install, manage and update your theme, as well as create content, install plugins, import Demo data etc. For the latest version of this Document please visit the Online Documentation. If you have any questions that are beyond the scope of this help file, please feel free to contact us from here. We will do our best to answer you in shortest of time.
Need Support?
We are always happy to help and we value our customers. All our files come with User Manual prepared specifically for each product – these help files are located inside your download packages.
Support for our items includes:
- Responding to questions or problems regarding the item and its features
- Fixing bugs and reported issues
- Providing updates to ensure compatibility with new software versions
Item support does not include:
- Customization and installation services
- Support for third party software and plugins
Support requests are processed on business days from 8:00 to 20:00 (GMT + 5.30 ) within 24hrs (usually less) in the order they were received. Support request sent during weekends/holidays will be processed on Monday or the next business day.
If you have any questions regarding to theme issues, please send us support request here.
You Need Installation or Customization Services?
If you need help Installation, Website/Theme Customization or Development, Add Specific Functionality, Back-end Custom Work, Front-end Custom Work, Custom Theme/Plugin Development, Theme & Plugin Updates and Testing & Bug Fixing, Please send us request HERE with your requirement. Our expert technical team will help you with some fees.
Our More Items:
2) Theme Installation
If you've downloaded whole theme package, unzip it. There you will find the theme installation file , documentaion, bigbazaar.zip, bigbazaar-child.zip, etc.

Alternatively you can simply download the installable WordPress file.

When you are ready to install the theme, you must first upload the theme files and then activate the theme. For this purpose, unzip the file that you downloaded from themeforest and there you would find theme bigbazaar.zip file and upload it via WordPress installer. The theme files can be uploaded in two ways
Notice:- Need to be required extend your maximum file upload size, If install theme via WordPress OR Import demo data. We decided to share some tips about how to extend your maximum file upload size in WordPress
Edit your wp-config.php file and enter something like:
define('WP_MEMORY_LIMIT', '256M');
If you can see the php.ini file then change parameters or add.
upload_max_filesize = 64M
post_max_size = 64M
max_execution_time = 480
max_input_vars = 3000
In case that tip does not work with 64MB, try it with 10MB.
1) Installation via WordPress
Step 1 - Login to your WordPress Dashboard.
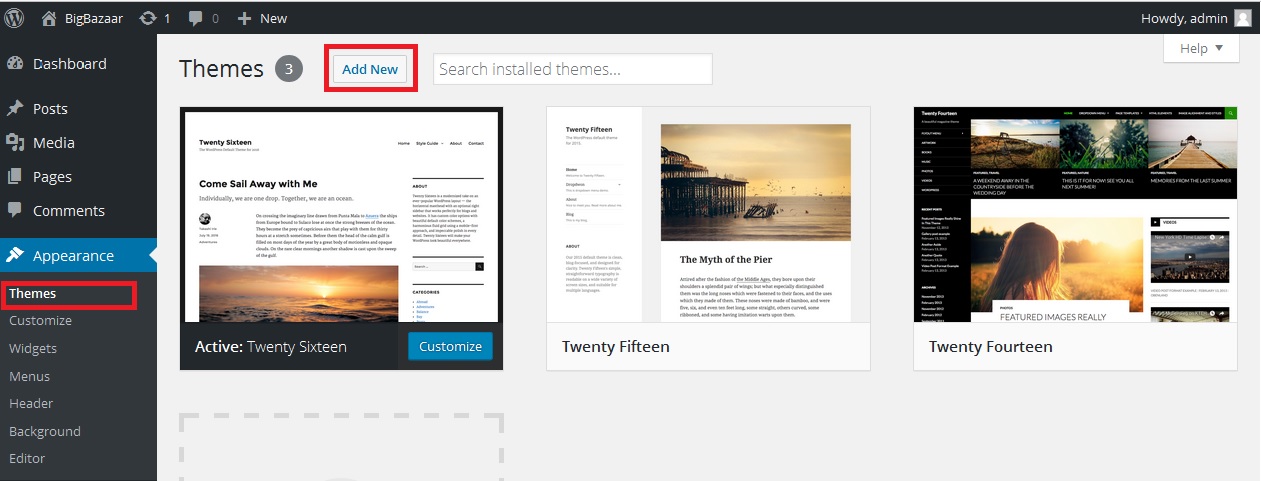
Step 2 - Go to Appearance > Themes. Click the Add New button or Add new theme link. (check screenshot below).
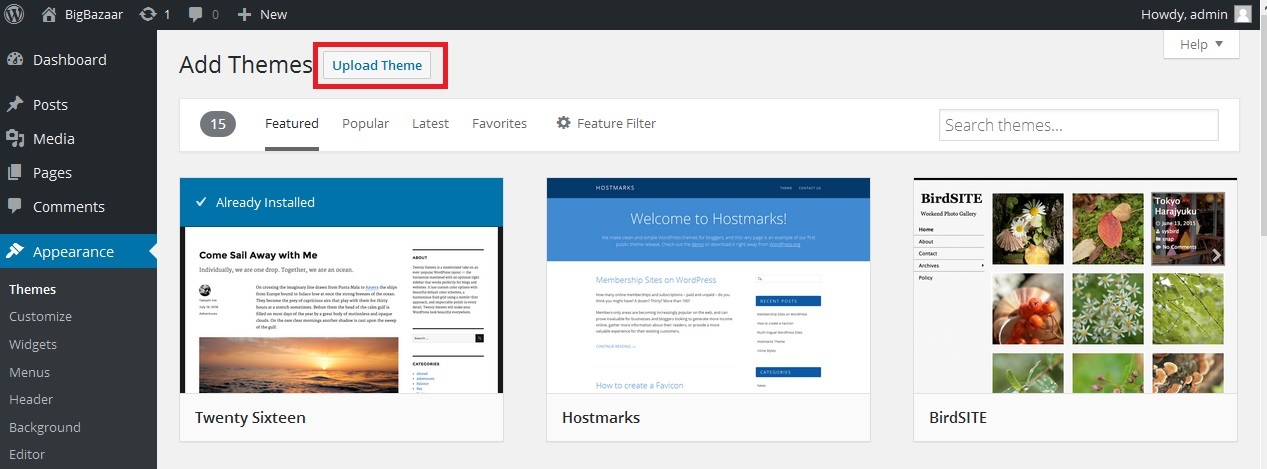
Step 3 - Click on the Upload Theme button. Locate bigbazaar.zip and click Install Now.

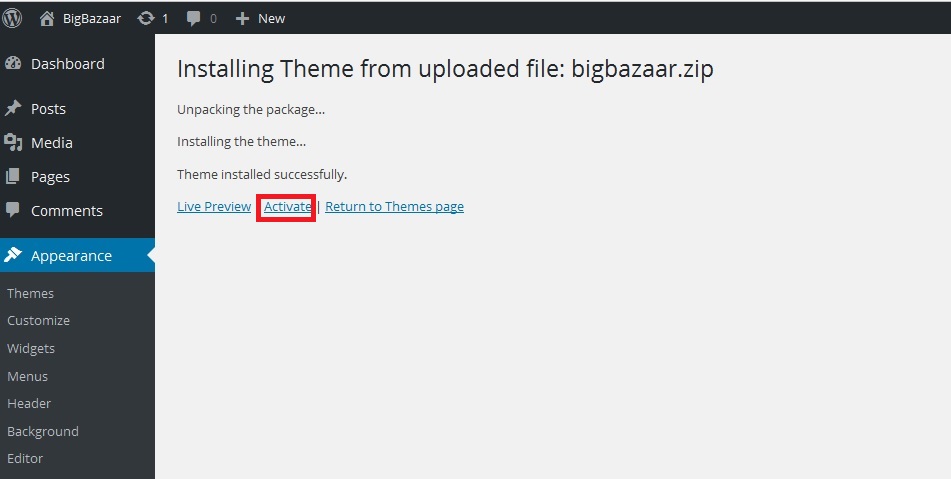
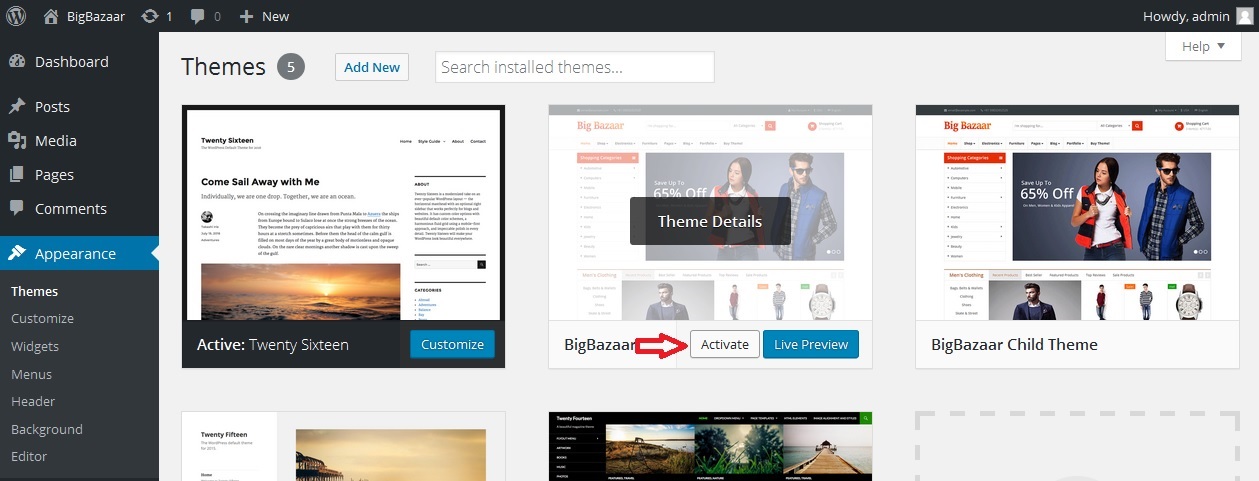
Step 4 - Click on the Activate button to activate BigBazaar. Congratulations, you have now activated BigBazaar! You can now proceed with BigBazaar's Plugin Installation.
OR
2) Installation via FTP
Step 1 - Log into your Hosting server using an FTP client (like FileZilla or WinSCP).
Step 2 - Locate bigbazaar.zip that you found in your ThemeForest Package and unzip it somewhere on your hard drive. Once it is unzipped it will look like a folder named bigbazaar with all theme files in it.
Step 3 - Locate your WordPress installation and upload the theme directory bigbazaar (you unzipped in the previous step) into ../wp-content/themes/ in your WordPress installation.
Step 4 - Click on the Activate button to activate BigBazaar. Congratulations, you have now activated BigBazaar! You can now proceed with BigBazaar's Plugin Installation.

3) Plugins Installation
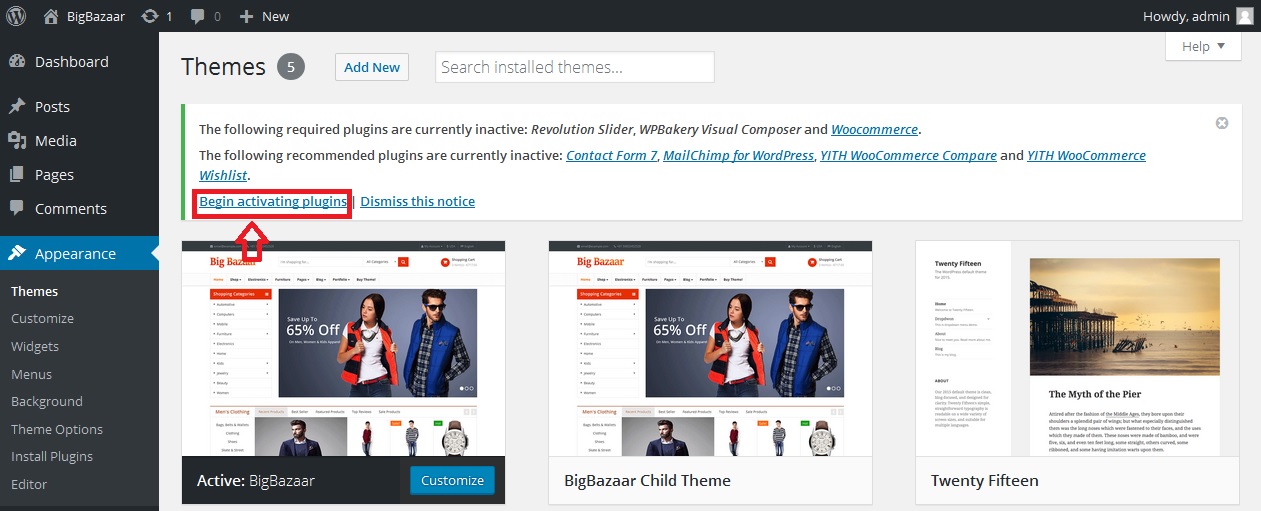
Once your theme is installed you will get a prompt at the top of your Dashboard that will ask you to install BigBazaar's plugins. Follow below step and install and active plugins.
Step 1 - Click on the Begin activating plugins links Or Go to Appearance > Install Plugins.
Step 2 - Select all plugins that you wish to install (Selecting all of them is recommended).
Step 3 - Change Bulk Actions drop to Install then click Apply in order to install the selected Plugins.

Step 4 - After all plugin Installed then click on below Return to Required Plugins Installer link.
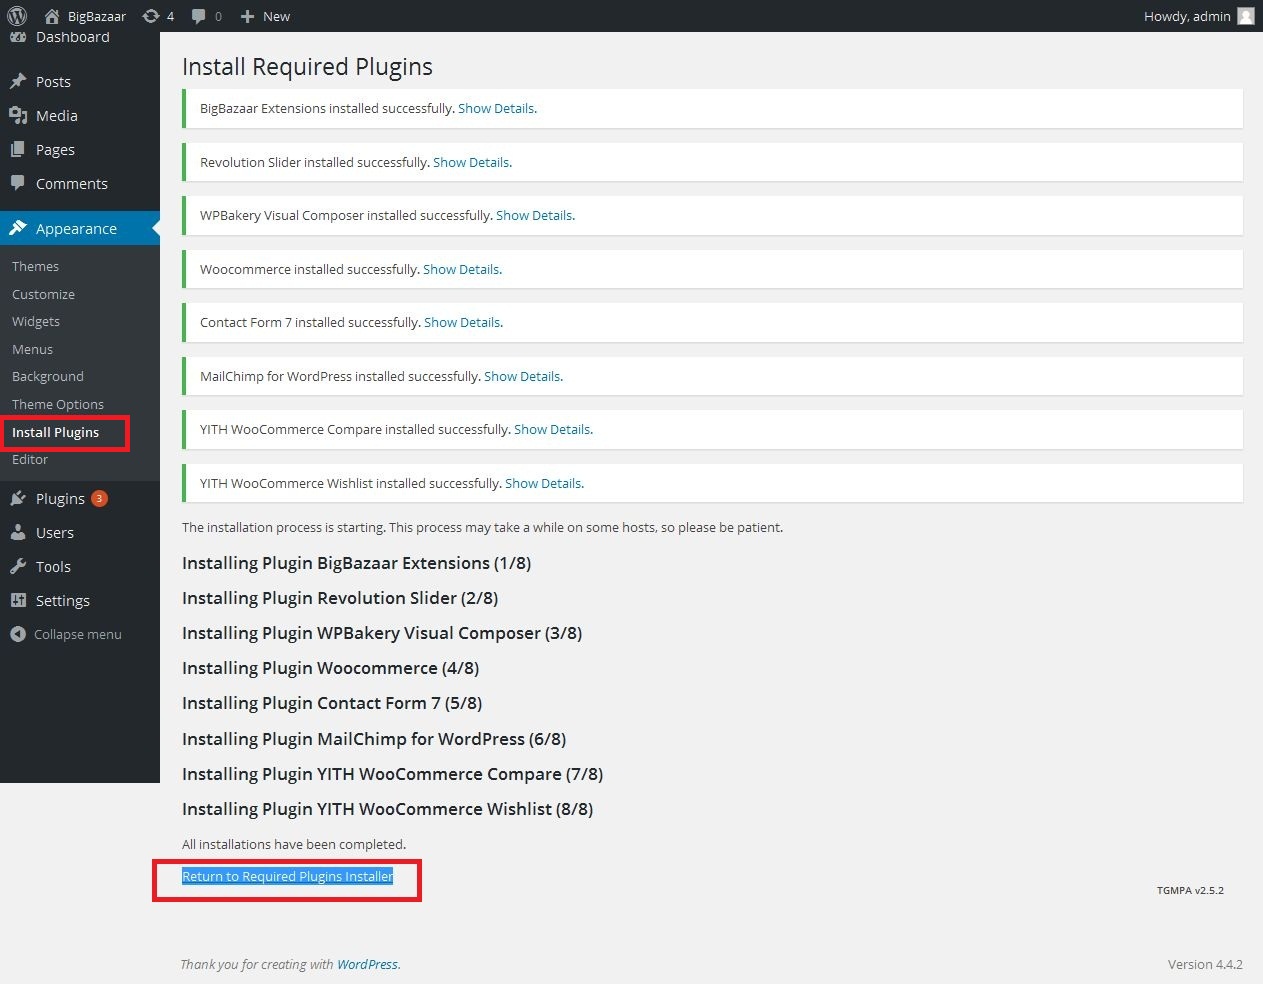
Step 6 - Select again all plugins and Change Bulk Actions drop to Active then click Apply order to active the selected plugins.
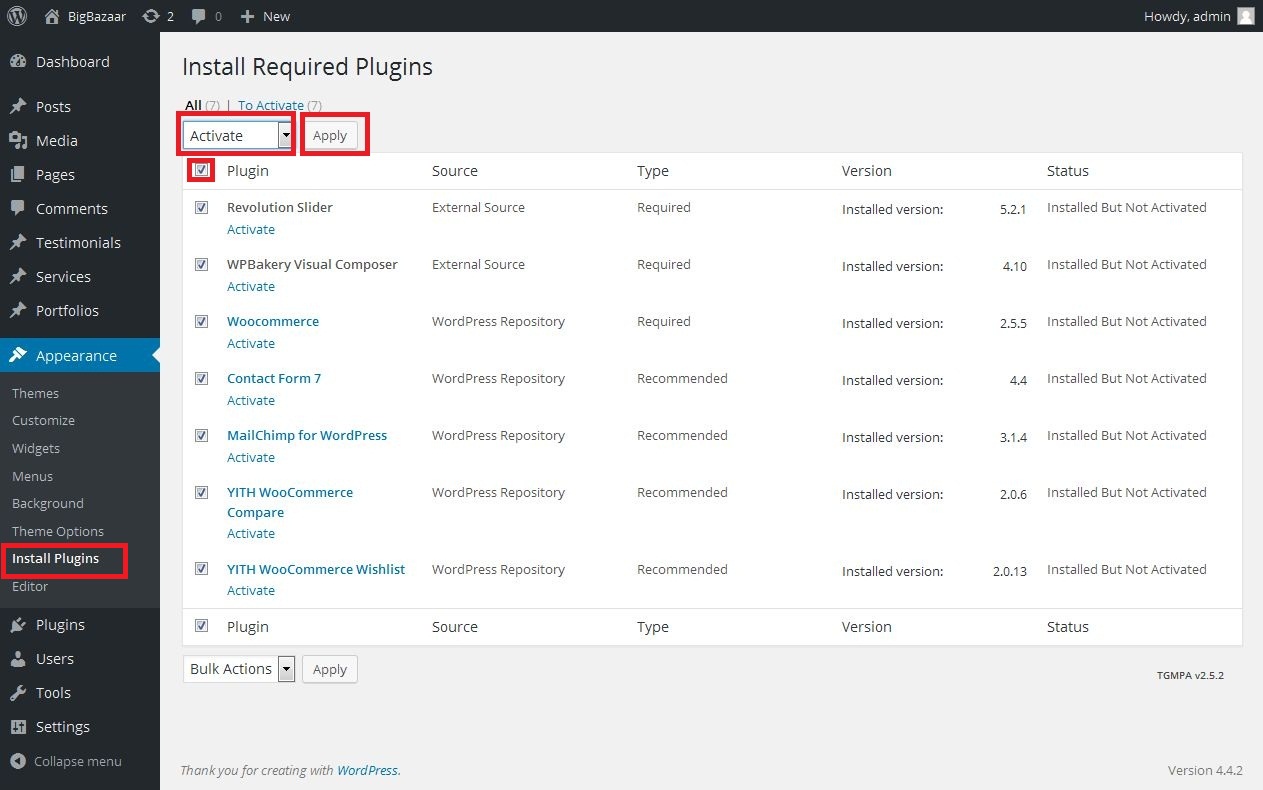
Step 7 - All Plugin actived then after now go to import demo data.
4) Import Demo Data
Once you have installed all theme Plugins you can import the BigBazaar Demo Content. Importing demo content will copy sliders, widget, theme options, products data, posts, pages and portfolio posts, this will replicate the live demo.
Notice - Before you import our Sample Data, you need to set up the image size of your product as you want.
Go to Appearance > Customize > WooCommerce > Product Images and change/set below image size suitable with your site.
Remember to save your setting.

If you see different image dimensions you should change them to match the dimensions above. If you've already been using WooCommerce with another theme it's likely that the thumbnail dimensions were different to that recommended for BigBazaar. As a result, we recommend you use the Regenerate thumbnails plugin to regenerate thumbnails to be optimized for BigBazaar.
Regenerate Thumbnails Go to Tools -> Regen. Thumbnails and click Regenerate All Thumbnails. If you have a lot of thumbnails this may take a few minutes to complete. Source image sizes We recommend you source images are at least 425px * 525px to ensure they appear correctly in BigBazaar.
Step 1 - Go to Appearance > Theme Options > Import Demo Data.
Notice - Import demo data before need to be required extend upload file size, execution time etc... otherwise generate error. Read above Theme Installation Notice.
Step 2 - Choose any one preset layout and click on it thumb image. It can also take a minute to complete import demo data.

5) Logo Upload
Follow the steps below to upload your own logo to BigBazaar Theme.
Step 1 - Go to Appearance > Theme Options > General Settings.
Step 2 - Click on Header Logo Upload Button then upload your Logo Image file.

Step 3 - You can do so below the Favicon Icon - Upload a favicon image.
7) Header Setup
This section describes how to setup your BigBazaar Header, style your header, live search etc...
Go to Appearance > Theme Options > Header.

9) Select your Website's Home Page
Once you have created/imported some Pages to your WordPress installation you can select one of the pages to be your Home Page. Here's how to do that:
Step 1 - Go to Settings > Reading in your Dashboard.
Step 2 - Go to Under Front page displays select A static page (select below) from the drop down.
Step 3 - Select the Static Page you want to set as your Home Page under the Front page: dropdown.

10) Theme Options(General)
Customize your General Theme Options globally here, manage your Wrapper Style, Page width, Smooth Scroll option
Step 1 - Go to Appearance > Theme Options > General Settings in your Dashboard.

Go to Appearance > Theme Options > Cookie Notice in your Dashboard.

Go to Appearance > Theme Options > Newsletter in your Dashboard.

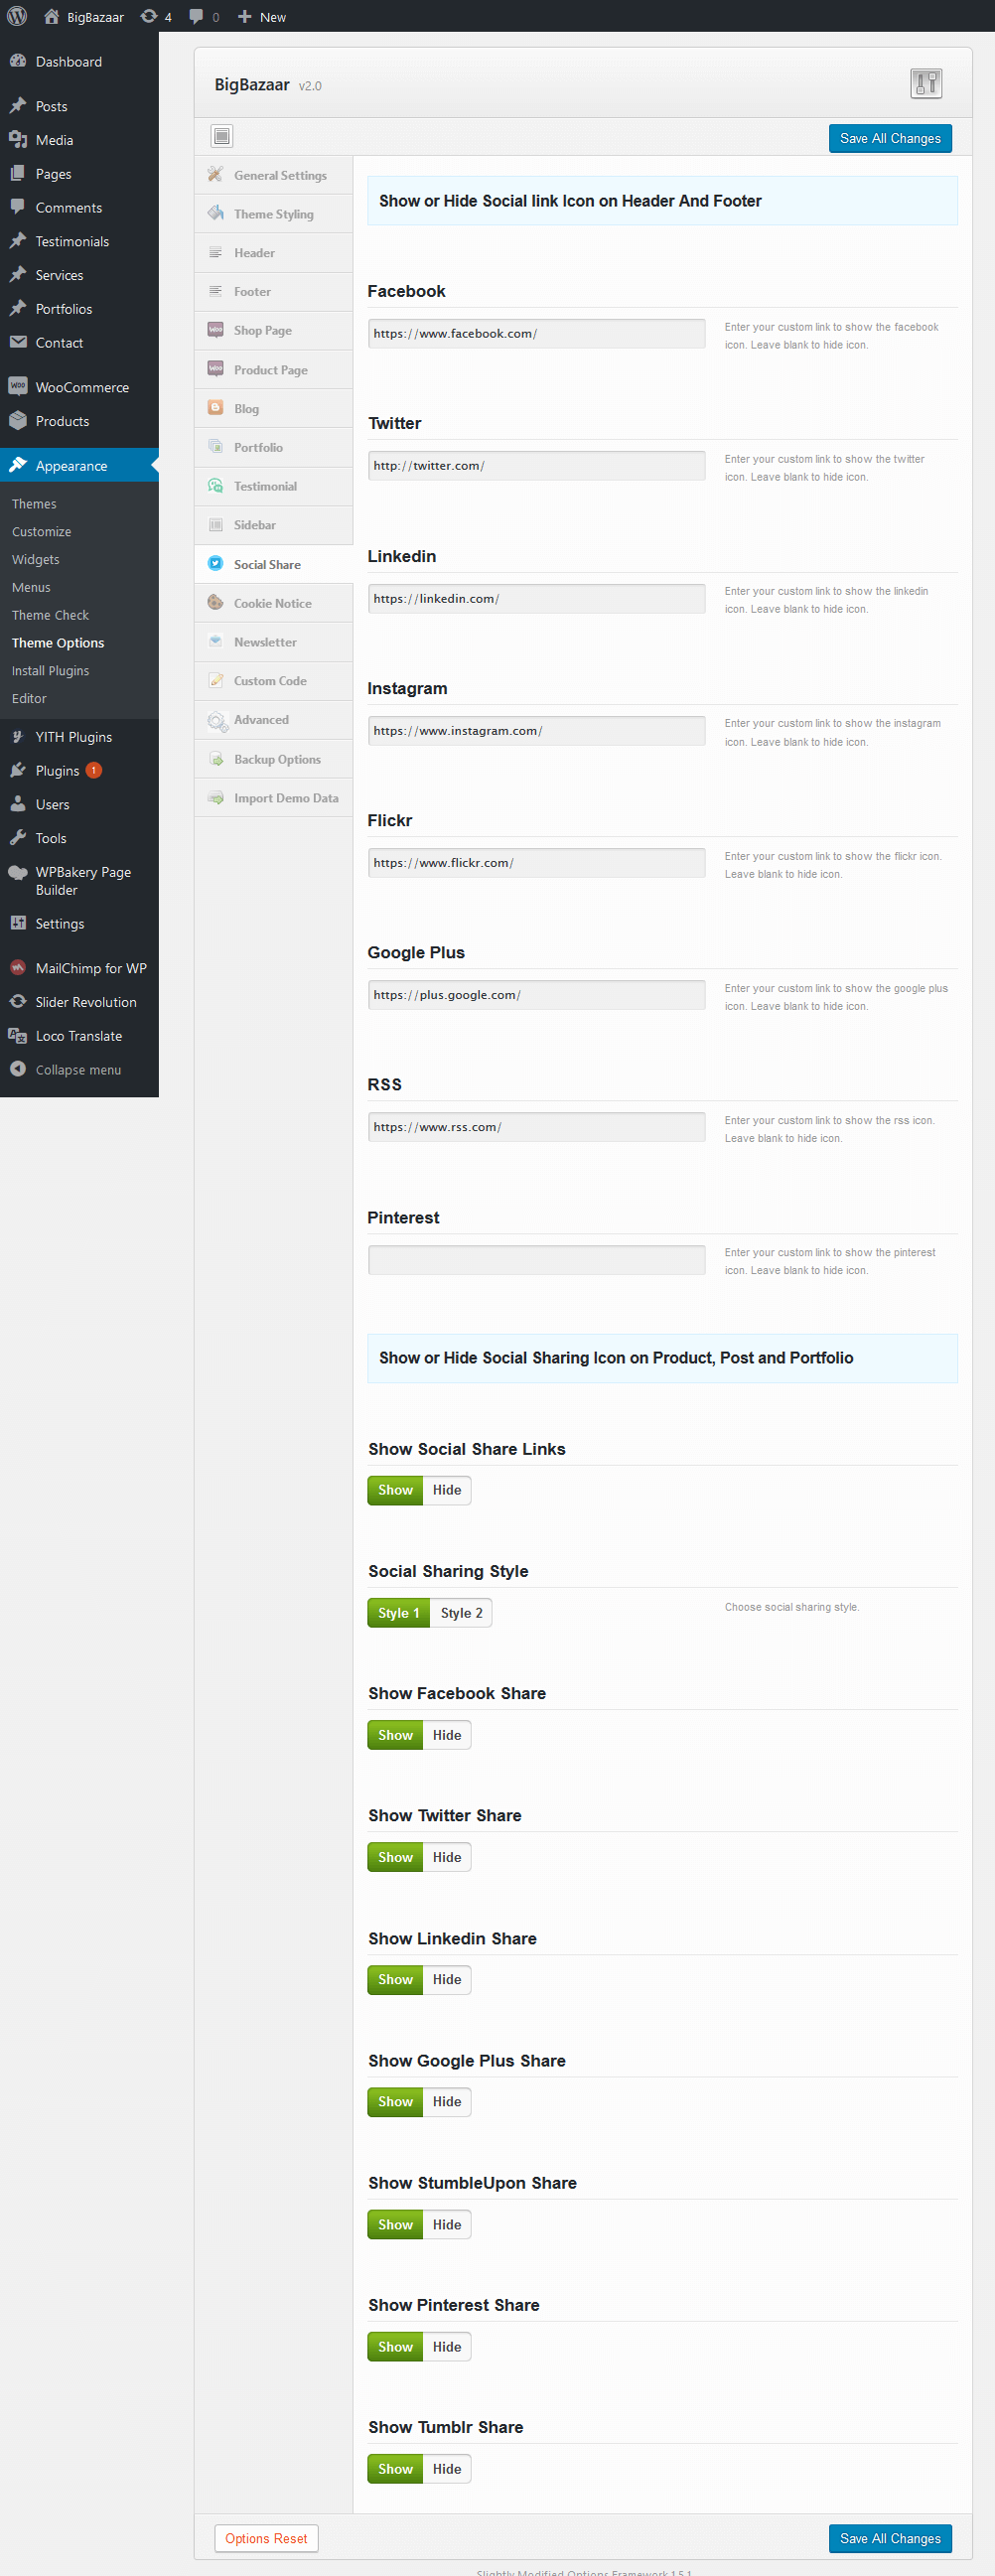
Go to Appearance > Theme Options > Social Share in your Dashboard.
11) Theme Colors
BigBazaar lets you set a global website colors, topbar colors, header colors, naviagation bar colors, menu colors, footer colors, copyright colors and with all background pattern.
Step 1 - Go to Appearance > Theme Options > Theme Styling in your Dashboard.

13) Widgets
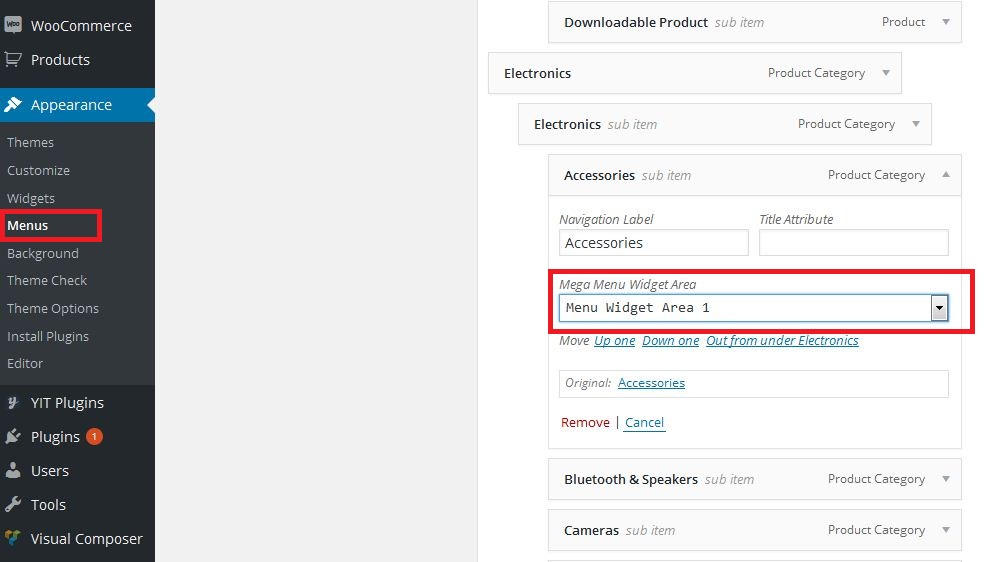
You can customize your sidebars and footers with BigBazaar easily by adding custom widgets to your widget areas (Sidebars/Footer columns). By default BigBazaar comes with the following widget areas: Widget Area, Shop Page Widget Area, Single Product Widget Area, Menu Widget Area 1, Menu Widget Area 2, Menu Widget Area 3, Footer Widget Area 1, Footer Widget Area 2, Footer Widget Area 3, Footer Widget Area 4. Your Blog page and posts use the Widget Area by default. You can change the sidebar on a per Post/Page basis.
13.1) Adding widgets
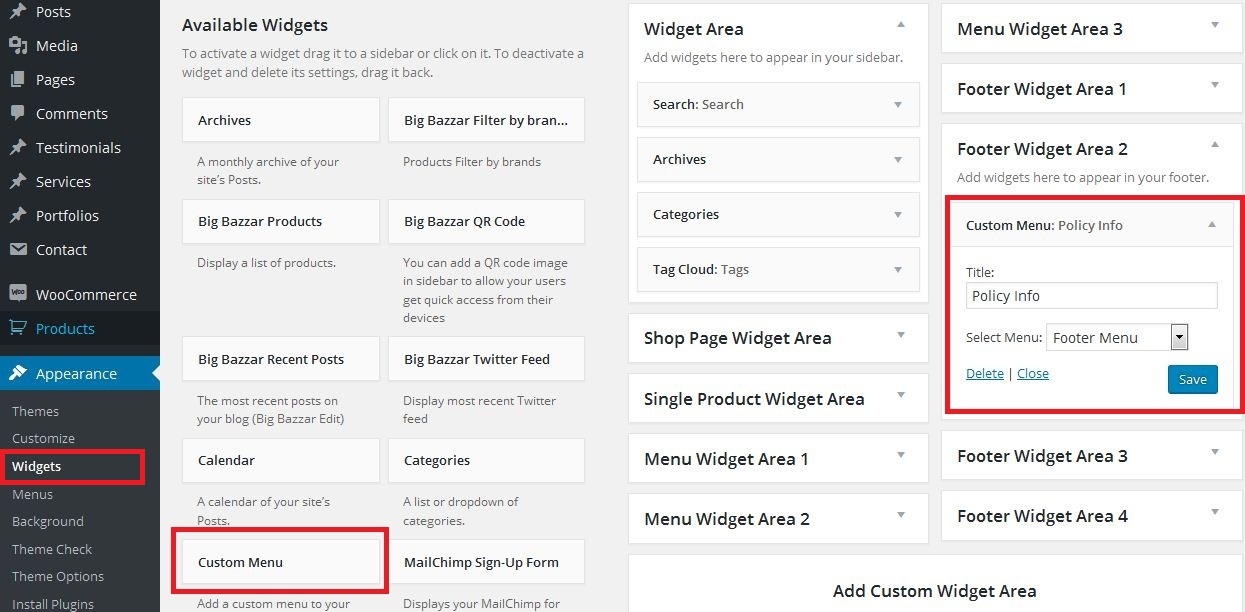
Step 1 - Go to Appearance > Widgets in your Dashboard. You will see your available Widgets to the left and your available Widget areas to the right.
Step 2 - Drag Any widget you want to add to a Widget Area from the left section onto the right and into the Widget Area box you are going for.

Step 2 - Your Custom Widget Area you have created bottom Widgets page will also appear to the right as well as the Footer Widget Areas.

*) Upload Variation Image With Specific Size
Uploding variation image with specific size then display proper and perfect image with good look page.
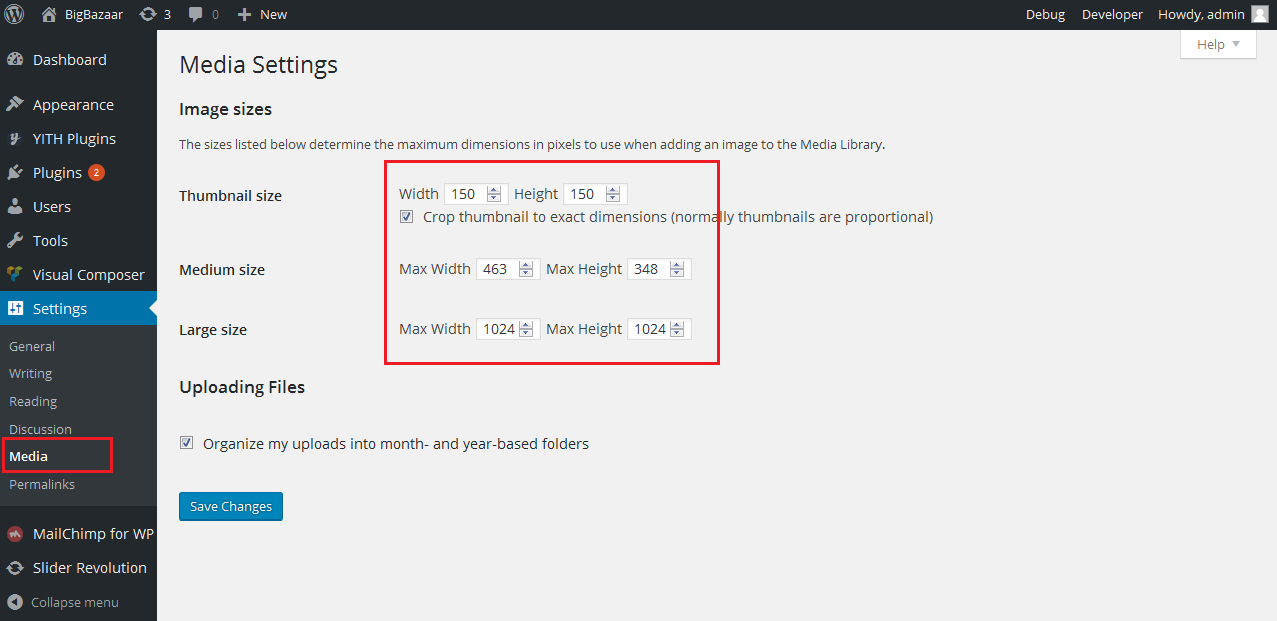
The sizes listed below determine the maximum dimensions in pixels to use when adding an image.
1) Media Settings
2) Product Image Settings
Go to Appearance > Customize > WooCommerce > Product Images and change/set below image size options

*.1) Logo Image Size:
Upload header logo image with 200 x 45 size.

*.2) Post Featured Image Size:
Upload post featured image with 960 x 540 size.

*.3) Portfolio Featured Image Size:
Upload portfolio featured image with 770 x 500 size.

*.4) Product Image Size:
Upload product image with 850 x 995 size.

*.5) Product Banner Image Size:
Upload product banner image with 440 x 600 size. This size image upload inside banner of Categories and Products shortcode and view on home page

*.6) Product Brand Image Size:
Upload brand image with 250 x 132 size.
14) WooCommerce (Products)
BigBazaar is fully compatible with WooCommerce so you can start your online shop with it in a matter of minutes. All you need to do is install WooCommerce plugin, setup your products and start selling!
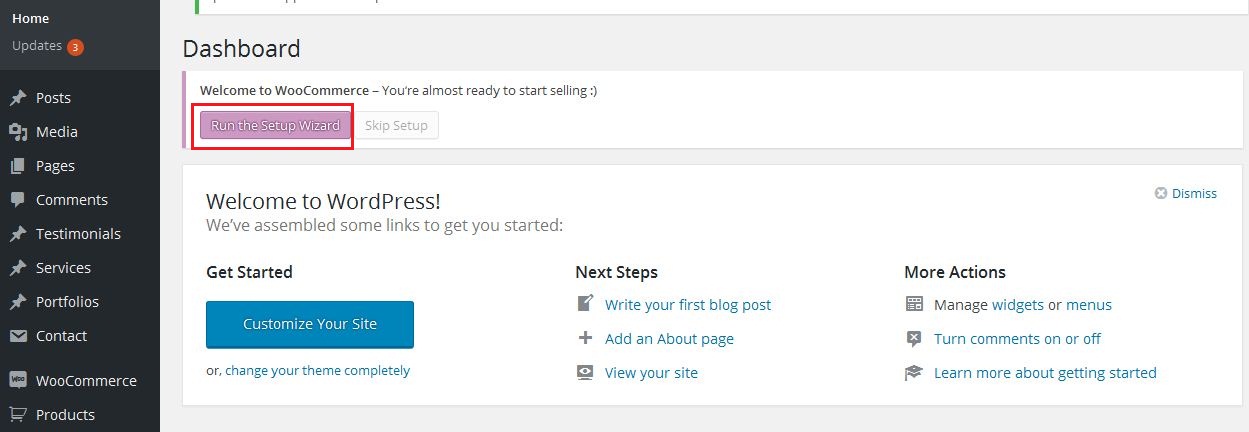
Activate plugin and Setup WooCommerce (see screenshot)
WooCommerce Plugin
You're now ready to proceed with configuring the rest of the theme. If you choose not to import the Demo Data you can proceed with adding content pages which we'll go through a little bit later in the docs. If you choose to start adding products and categories to WooCommerce manually, be sure to check out the following good guides by WooThemes:
WooCommerce Getting Started Guide
14.1) Shop Page Theme Options
BigBazaar has some custom Theme Options related to shop page that will help you manage your shop page. Head over to Appearance > Theme Options > Shop Page to explore them.

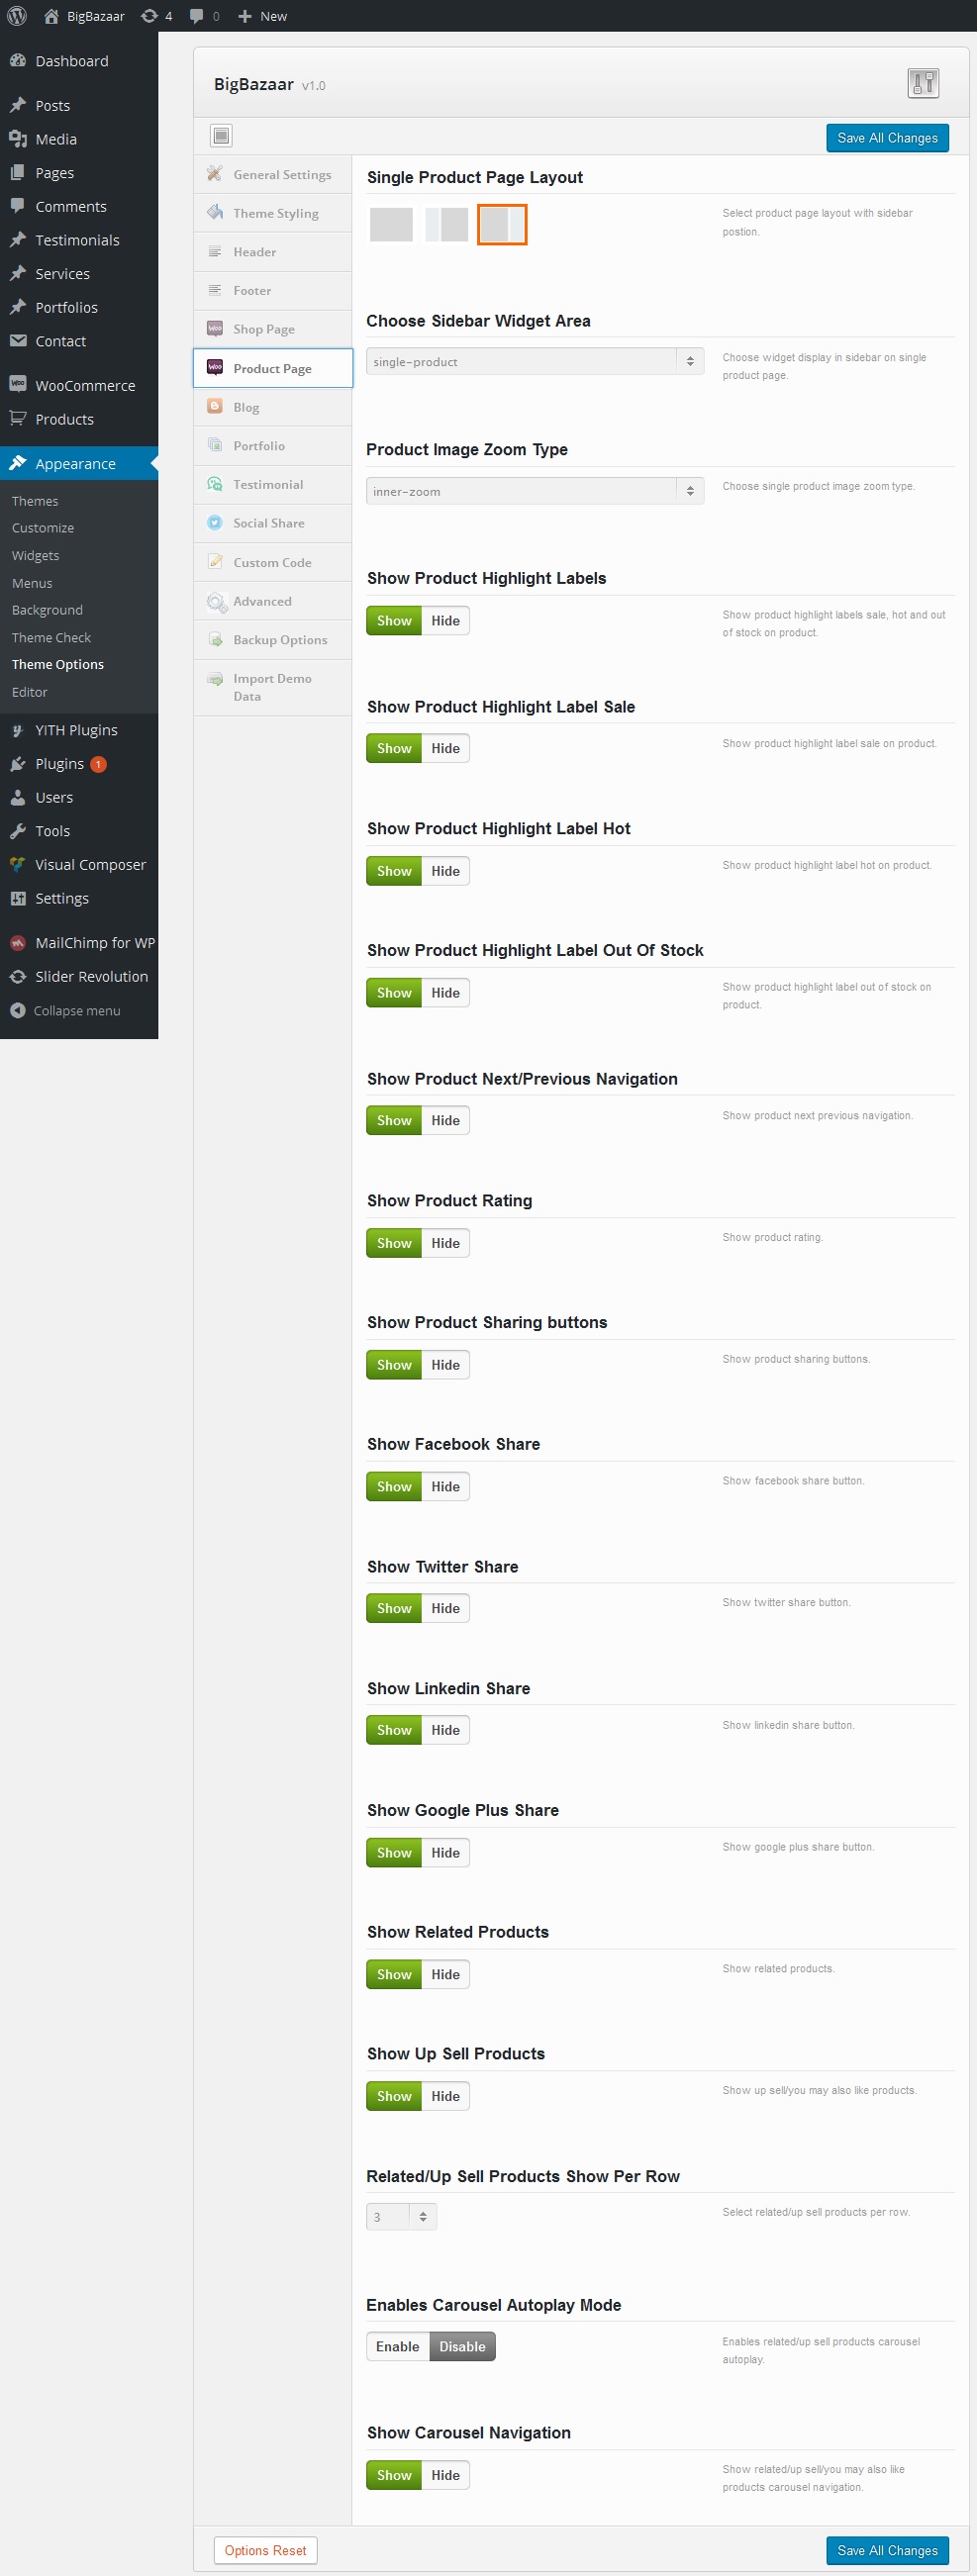
14.2) Product Page Theme Options
BigBazaar has some custom Theme Options related to product that will help you manage your product detail page. Head over to Appearance > Theme Options > Product Page to explore them.
15) Creating Pages (Rows & Columns)
Content management is a breeze with BigBazaar and it requires absolutely no coding skills. Using a highly customized version of the Visual Composer plugin the theme offers a user friendly Drag'n'Drop interface for easy page creation and editing. Follow these simple steps to create a Page with BigBazaar:
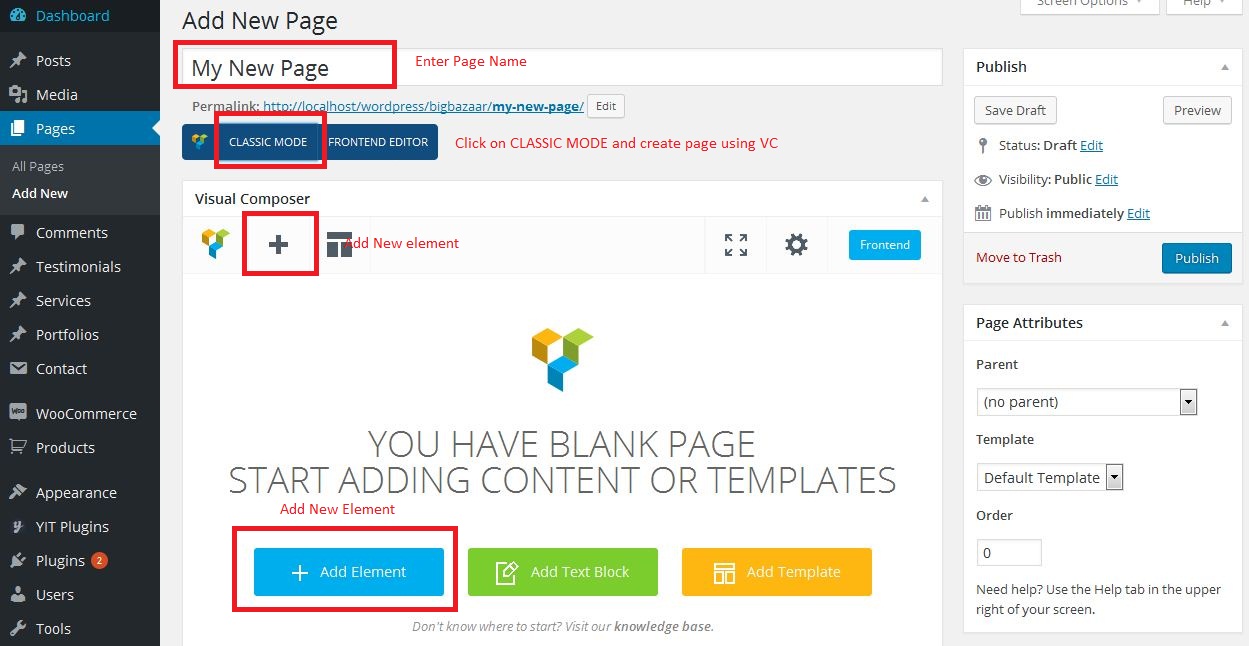
Step 1 - Go to Pages > Add new in your Dashboard. Add a Title to your Page (top field).
Step 2 - Switch to Backend Editor if you are currently under Classic Mode (button below Title field).
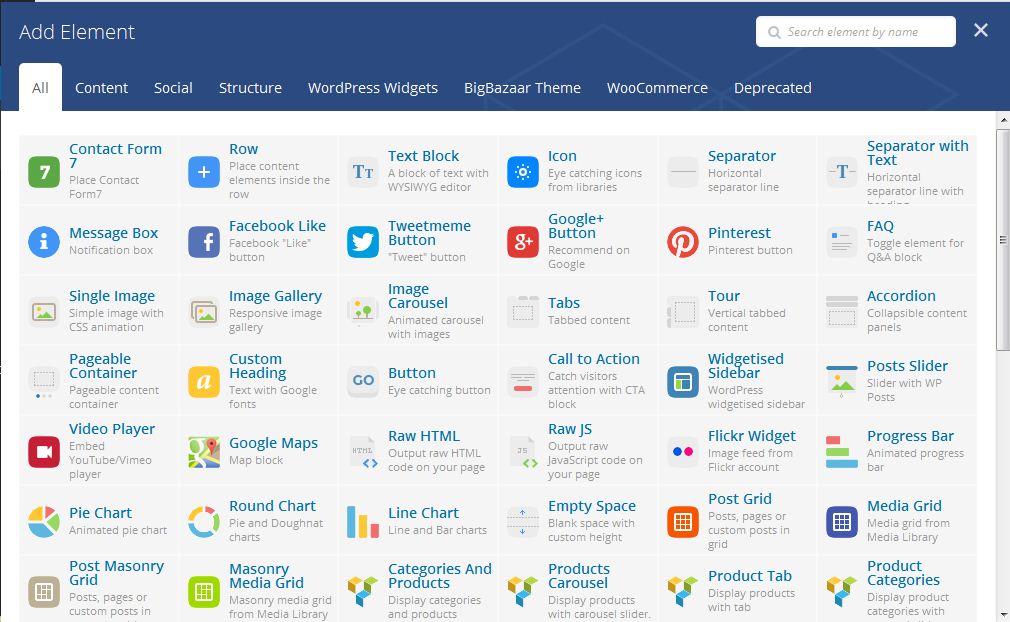
Step 3 - Start adding page content by clicking on the Plus button or Add Element.
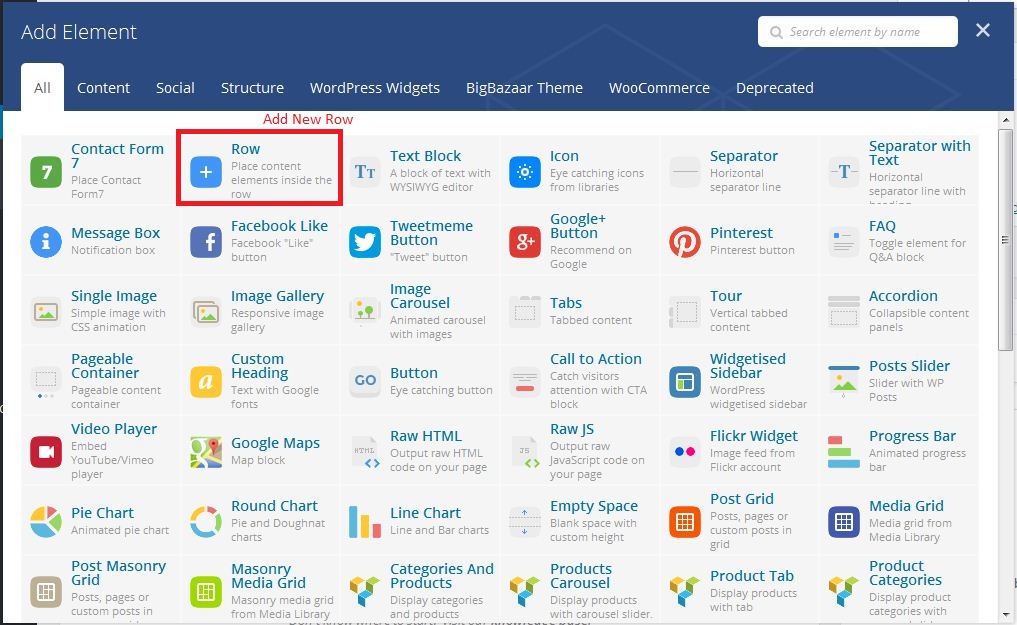
Step 4 - The Add Element Popup appears, click on the first element in order to add a new Row to your page. A Row is a main building block of a page, you can split your Rows into Columns, place various elements into your rows, set Row Backgrounds, effects etc.
Step 5 - Once you have the new Row added to your page you can split that Row into Columns in order to organize elements nicely in it. Once you split your Row into column you can start adding different Page Elements into your columns. If you want to edit your Row/Column Settings click on the small Pen icon (top right corner of the Row/Column). You can also Duplicate your Row with the Icon (duplicate icon) next to it or Remove the Row/Column with the icon to the right (trash bin icon).

15.1) Row Settings (General)
Step 1 - Start adding page content by clicking on the Plus button or Add Element.
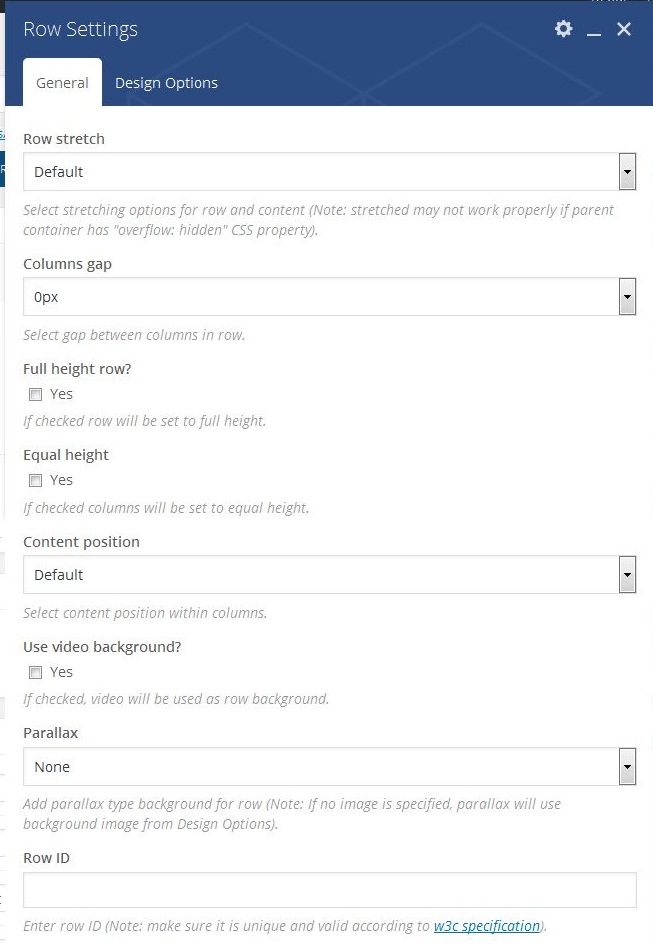
Step 2 - Set your Row stretch setting.
Default will have your Row to follow your regular wrapper content width and the content within the Row to go into the center.
Select Stretch Row if you want your Row to go full width on your screen and the content to go into the center along with the regular wrapper content width - useful when you want content in the center but you want a full-width background of your row.
Select Stretch Row and Content if you want your Row to go full width on your screen and the content to go flow full width as well outside of the regular wrapper content width but with some padding to the sides - useful when you want content to flow full width of your screen and you want a full-width background of your row.
Select Stretch Row and Content (no paddings) if you want your Row to go full width on your screen and the content to go flow full width as well outside of the regular wrapper content width with no padding to the sides - useful when you want content to flow full width of your screen and you want a full-width background of your row. Please experiment with all of these options after you set a Background color to your Row and add some elements to your Row's columns in order to understand how they work.

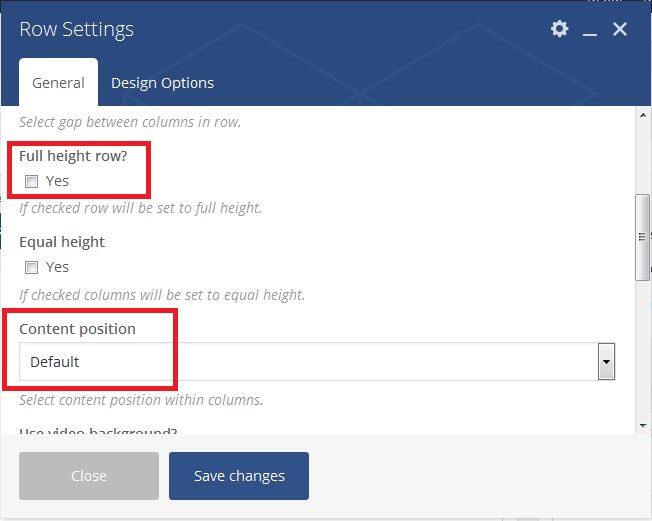
Step 3 - Full height row?
Check this option if you want your Row to automatically stretch to your screen's height. If checked you can also pick the Content Position in a dropdown below.
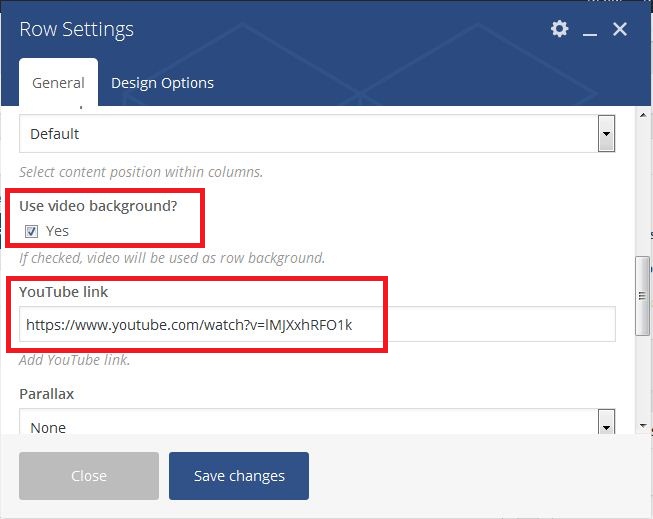
Step 4 - Use video background?
Check this option if you want to apply a Youtube Video background to your Row. If checked you should also enter the Youtube Video URL below.
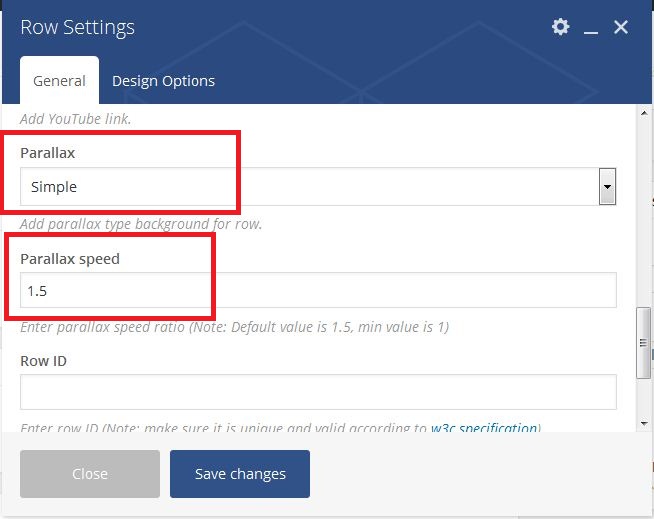
Step 5 - Set your Parallax setting.
Selecting an option here different than None will let you set a background image to the Row with Parallax Effect on Scroll. You can either upload a new image or set one from your Library. The difference between Simple and With Fade is in that With Fade adds an extra Fade Out effect to your Row content on user scroll (content fades out once Row is scrolled down).
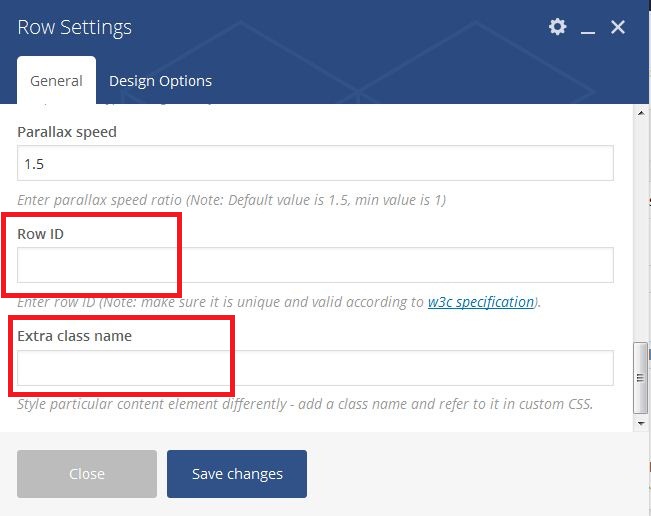
Step 6 - Optional ID and Class. You can add those if you want to target this specific Row in you CSS or your Javascript code.
16) Adding/Editing Page Elements
Adding Page Elements to your Page is pretty straightforward. First you need to have created a new page, added a Row to it and defined your Row Columns (read more in the previous section).
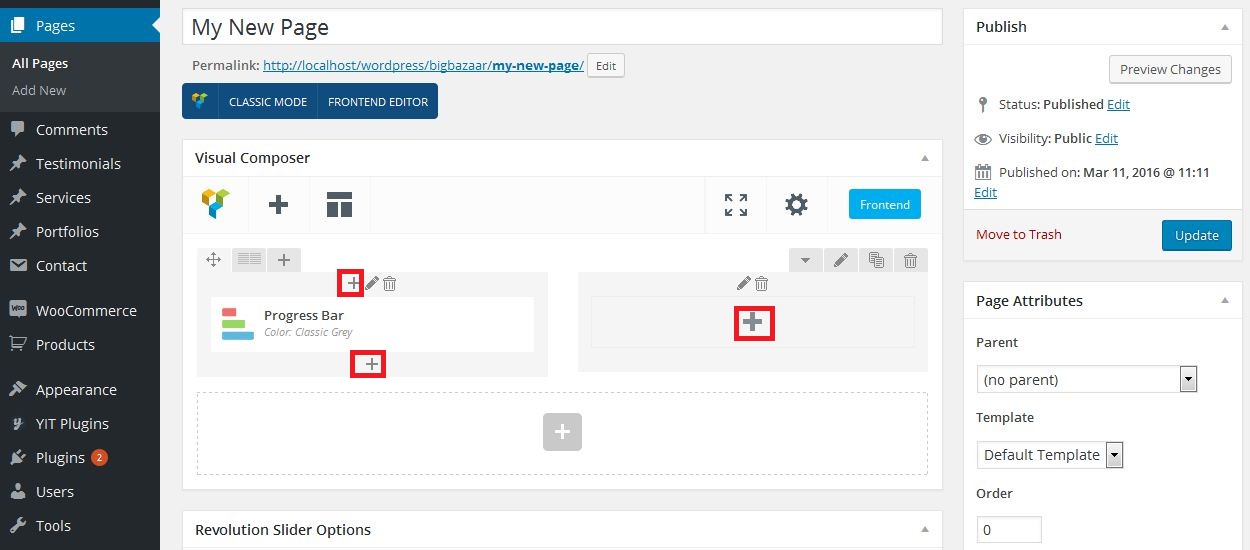
Step 1 - Click on one of the Plus Icons within the column you want to add a new element to.
Step 2 - OThe Page Elements dialog will appear, click on the element you want to add to your Column/Row.
Step 3 - The Element Settings Dialog of the Element you are adding appears. Customize your element anyway you please, then click Save.
Step 4 - Your element is now in the Column you added it to. Once you hover your newly added element you will see a small popup that let's you manage it. You can do the following with your elements:
Move - Drag your element via the Direction Icon to move it around within the Column,Row or Page.
Edit - Click on the Pen Icon to edit your Element's properties.
Clone - Click on the Copy Icon to duplicate your Element.
Delete - Click on the Trash Bin Icon to remove your Element.

17) Manage Page Settings
Page settings on a per page basis while editing your page under the each per Page Layout Options.

Show Title - Show page title or no of the page.
Show Breadcrumb - Show page Breadcrumb or no of the page.
Sidebar Position - Choose sidebar position of the page/post.
Sidebar Widget - Choose widget of sidebar.
18) Creating Posts
Creating Posts with BigBazaar is pretty straightforward. Follow the steps below to create your own Posts now.
Step 1 - Go to Posts > Add New in your Dashboard.
Step 2 - Enter your Post Title at the top of the Edit post.
Step 3 - Enter your Post content.
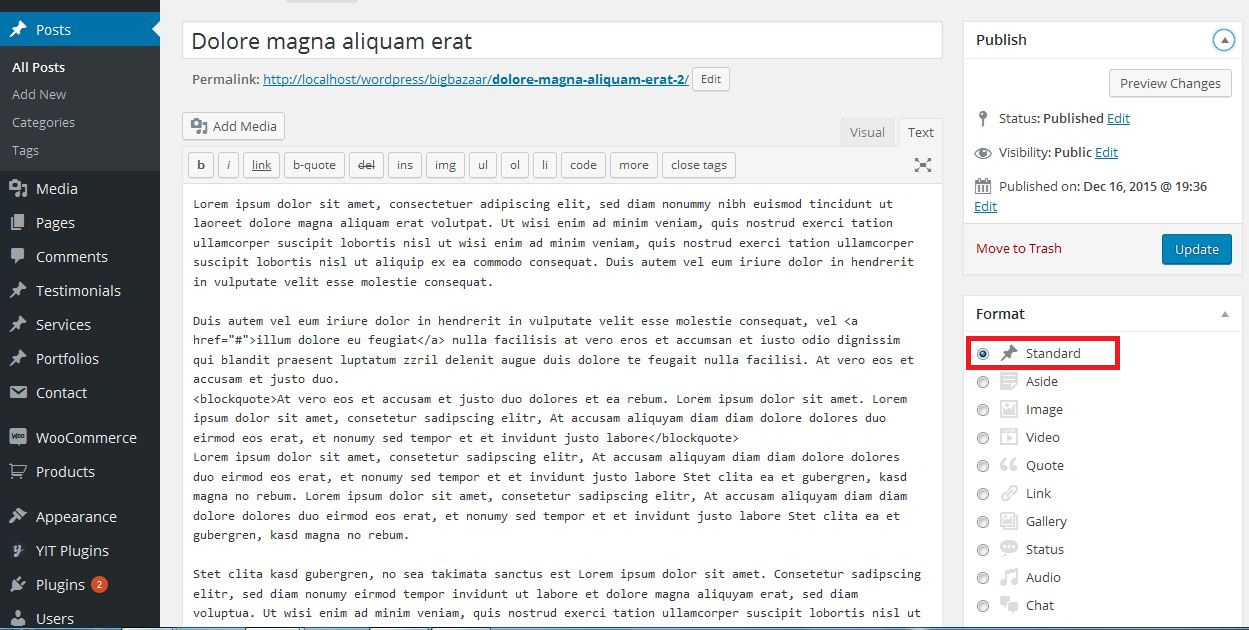
Step 4 - Select Post Format, Category, Tags and other meta data if you want it.
Step 5 - Upload a Featured Image for this Post.
Step 6 - Click on Publish/Update button.
18.1) Post Formats
Standard - This is the Standard Post type with a single Featured Image that displays on top of the Post content.
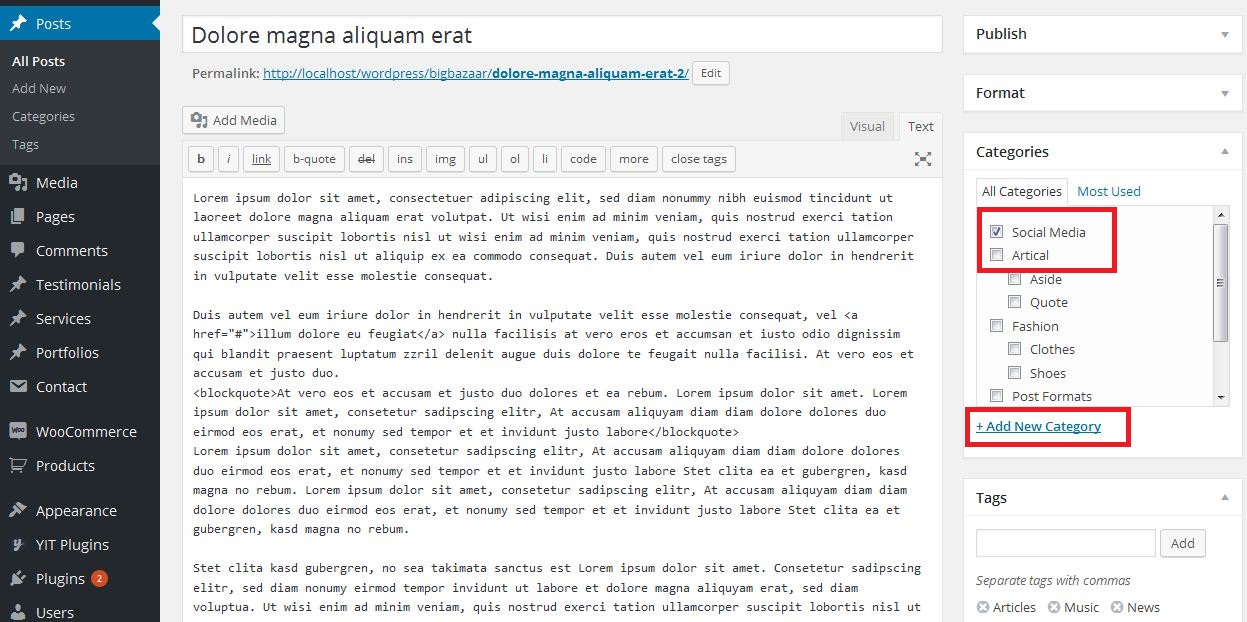
18.2) Post Categories
You can manage Post Categories via the Dashboard > Post > Categories section or straight into the Post Editor. While editing a Post find the Categories section to the right, check the boxes of the existing Categories you want to add this Post to or add a new Category below.
18.3) Post Tags
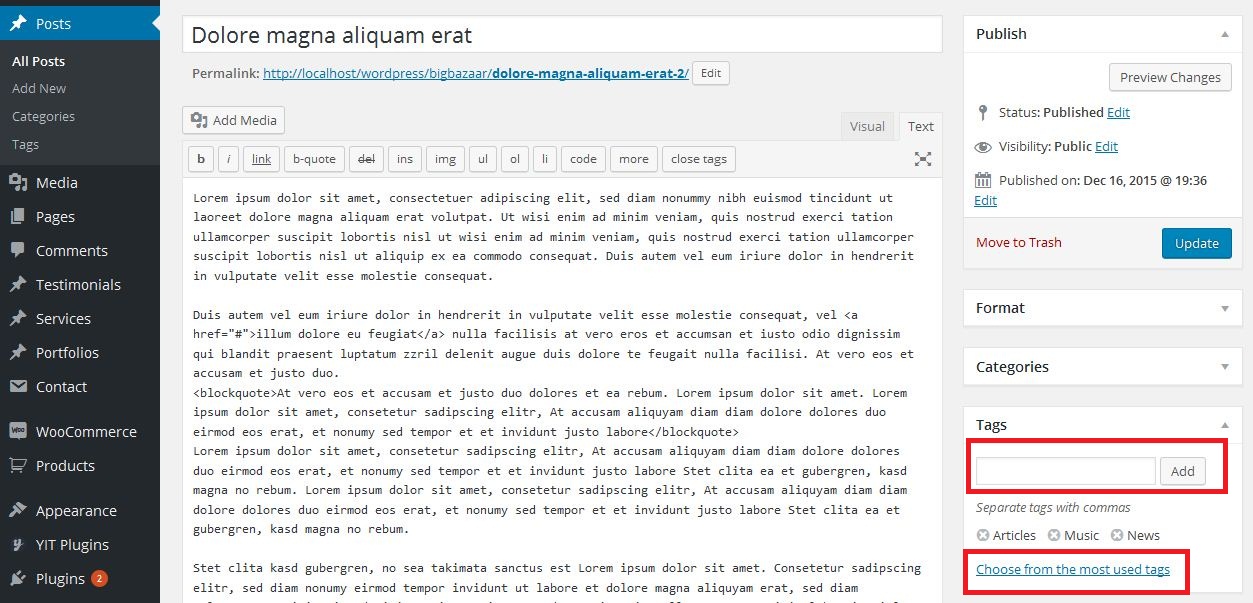
You can manage Post Tags via the Dashboard > Post > Tags section or straight into the Post Editor. While editing a Post find the Tags section to the right, type in the new Tag you want to add to this Post or click on the Choose from the most used tags Link in order to see the existing tags and add one of them by clicking on it.
19) Creating a Blog Page
Creating a blog Page is quite easy with BigBazaar. Follow the steps below the create a blog Page with a category Filter dropdown in the top right corner.
Step 1 - Go to Pages > Add New in your Dashboard
Step 2 - Enter your Blog page Title.
Step 3 - From the Page Attributes > Template dropdown in the right select the Blog template. Save and you are Done!

Show Title - Show blog page title or not.
Show Breadcrumb - Show blog page breadcrumb or not.
Show Posts Per Page - Show number of post per blog page.
Blog Style - Select blog page style. Available 3 type blog page style Large Image, Small Image and Masonry Grid.
Show Post Columns - Show post column of the blog page. Column option apply only on above masorny grid option.
Sidebar Position - Choose sidebar position of the page/post.
Sidebar Widget - Choose widget of sidebar.
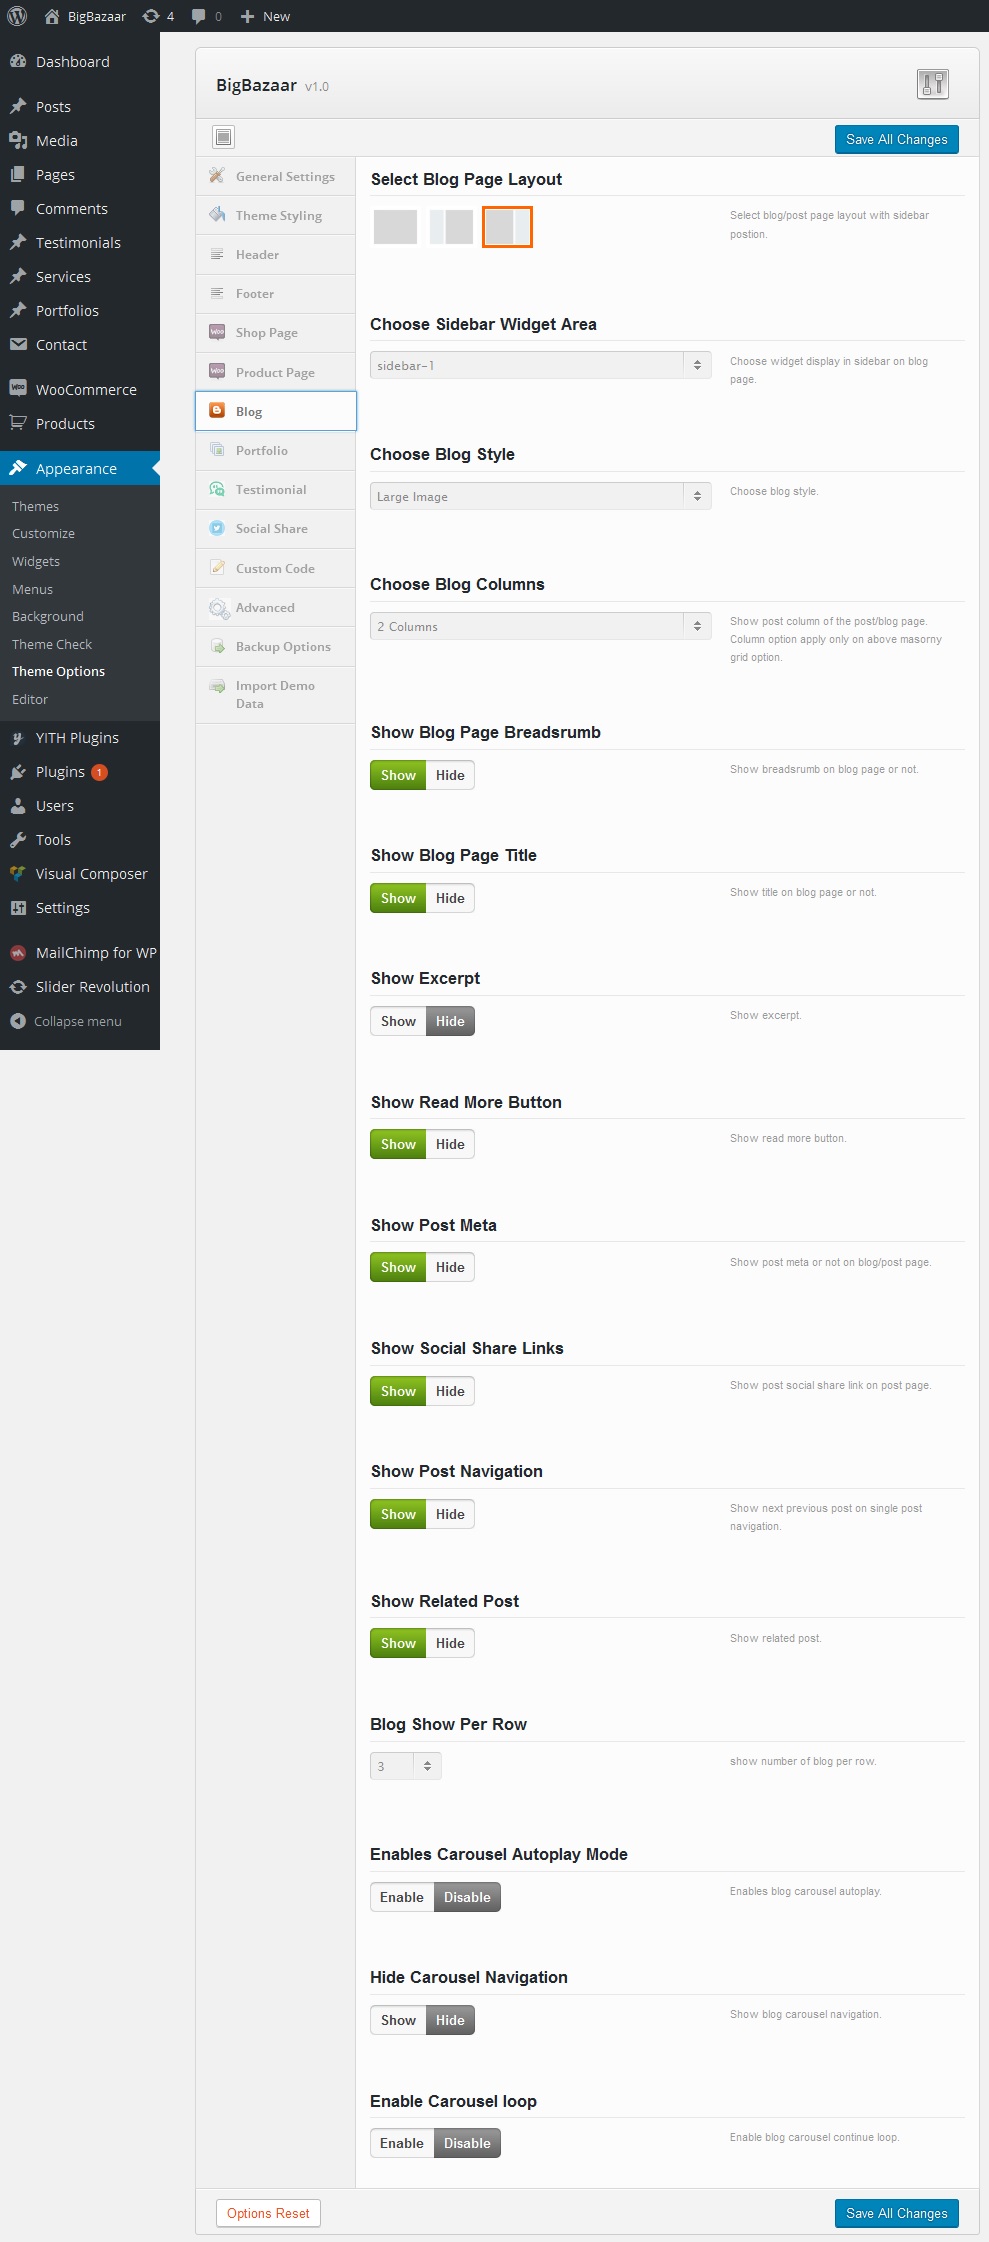
19.1) Blog/Post Theme Options
BigBazaar has some custom Theme Options related to Blog that will help you manage your blog page and post detail page. Head over to Appearance > Theme Options > Blog to explore them.
20) Creating Portfolio Items
BigBazaar ships with a Portfolio custom post type that lets you feature your work in style. To create your Portfolio items follow the steps below:
Step 1 - Go to Portfolio > Add New in your Dashboard.
Step 2 - Enter your Portfolio Item Title at the top of the Edit Portfolio.
Step 3 - Enter your Portfolio content.

Step 4 - Select Portfolio Category, Portfolio Skills on right side and enter other portfolio information in content bottom.
Step 5 - Upload a Featured Image for this Portfolio Item.
Step 6 - Click on Publish/Update button.
20.1) Portfolio Categories
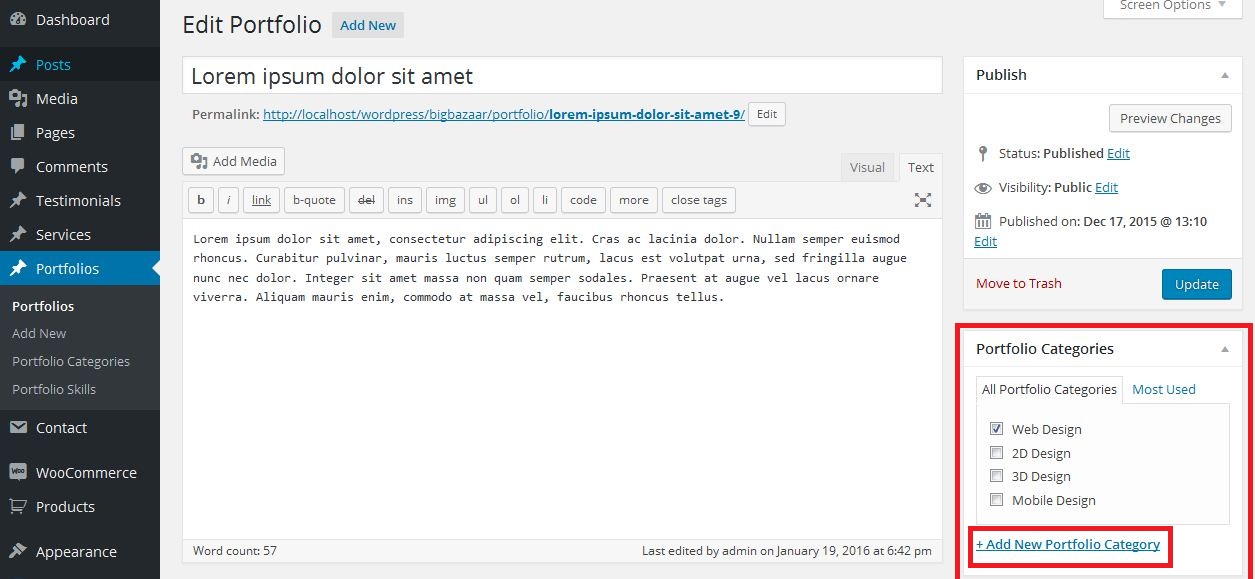
You can manage Portfolio Categories via the Dashboard > Portfolio > Categories section or straight into the Portfolio Item Editor. While editing a Portfolio Item find the Portfolio Categories section to the right, check the boxes of the existing Categories you want to add this Portfolio Item to or add a new Category below. Make sure you have your categories set up before trying to create a Filterable Portfolio Page or a filterable Portfolio Grid.
20.2) Portfolio Skills
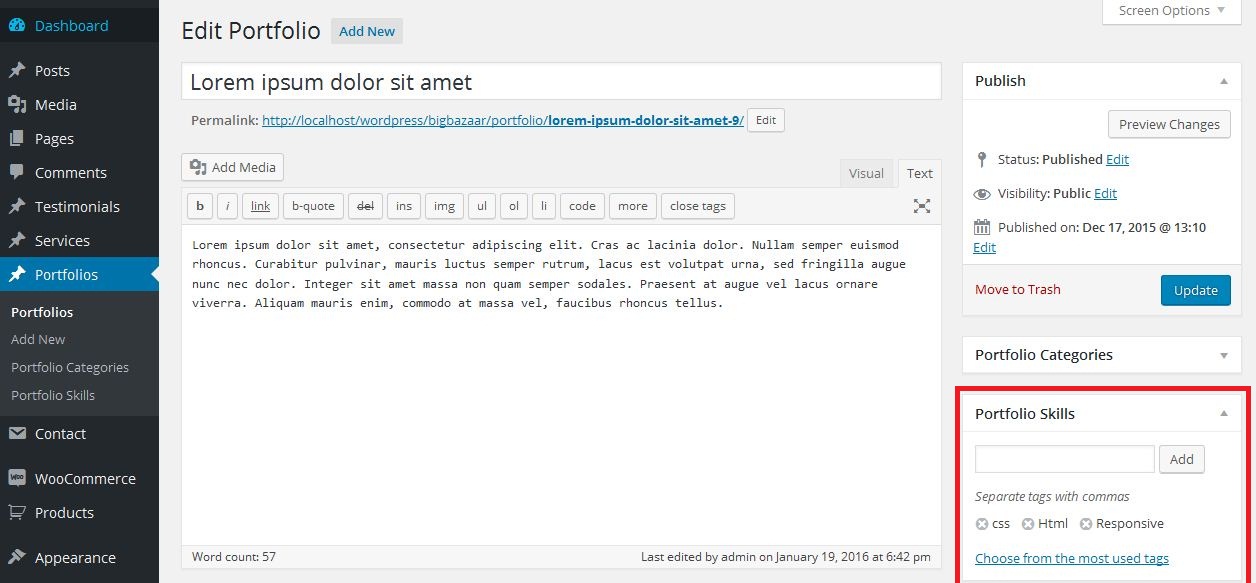
You can manage Portfolio Skills via the Dashboard > Portfolio > Skills section or straight into the portfolio Editor. While editing a Portfolio find the Skill section to the right, type in the new Skill you want to add to this Skill or click on the Choose from the most used skill Link in order to see the existing skill and add one of them by clicking on it.
21) Creating a Portfolio Page
Creating a Portfolio Page is quite easy with BigBazaar. Follow the steps below the create a Portfolio Page with a category Filter dropdown in the top right corner.
Step 1 - Go to Pages > Add New in your Dashboard
Step 2 - Enter your Portfolio page Title.
Step 3 - From the Page Attributes > Template dropdown in the right select the Portfolio template. Save and you are Done!

Show Title - Show Portfolio page title or not.
Show Breadcrumb - Show Portfolio page breadcrumb or not.
Show Portfolio Per Page - Show number of Portfolio per Portfolio page.
Select Portfolio style - Select Portfolio page style. Available 2 type Portfolio page style Normal Grid, and Masonry Grid.
Show Portfolio Columns - Show portfolio columns of the page.
Sidebar Position - Choose sidebar position of the Portfolio page.
Sidebar Widget - Choose widget of sidebar.
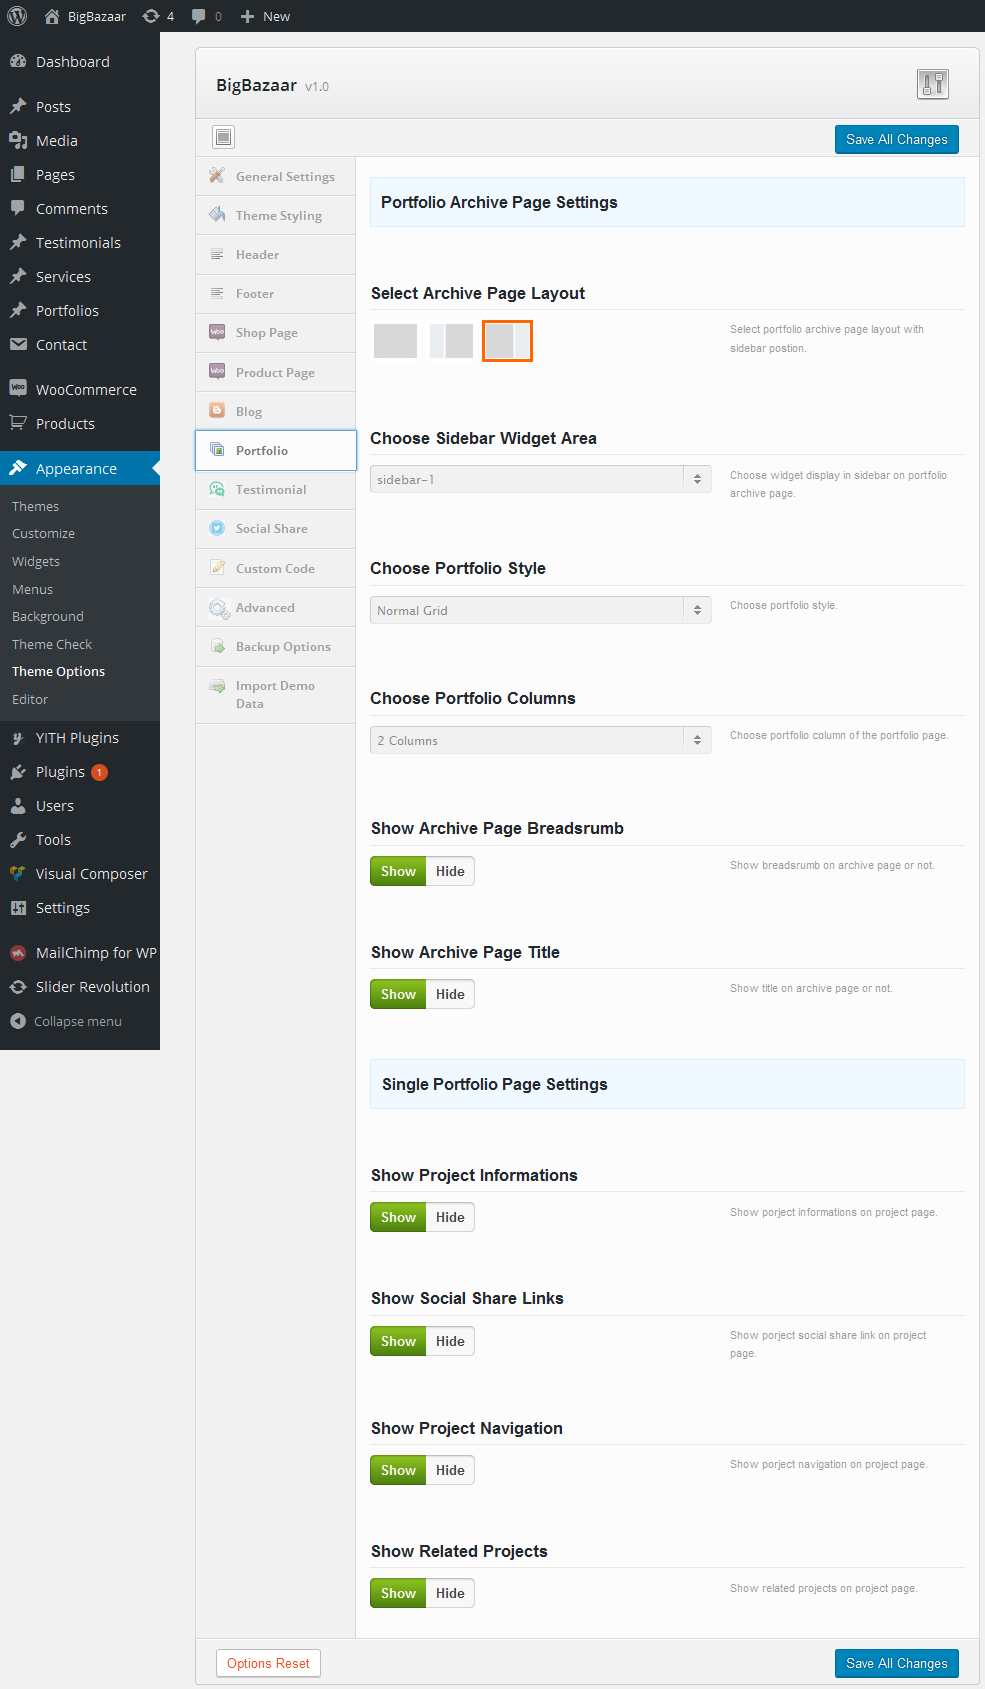
21.1) Portfolio Theme Options
BigBazaar has some custom Theme Options related to Portfolio that will help you manage your portfolio page and portfolio detail page. Head over to Appearance > Theme Options > Portfolio to explore them.
22) Creating Services
BigBazaar ships with a Services custom post type that lets you feature your work in style. To create your Services follow the steps below:
Step 1 - Go to Services > Add New in your Dashboard.
Step 2 - Enter your Service Title at the top of the Edit Service.
Step 3 - Enter your Service content.

Step 4 - Select Service Category on right side. Top Services category Means Services add on page top side with small content and Bottom Services category means add servers on page bottom side with few long content.
Step 5 - Select Service icon in Service Options under content bottom.
Step 6 - Click on Publish/Update button.
23) Creating Testimonials
BigBazaar ships with a Testimonials custom post type that lets you feature your work in style. To create your Testimonials follow the steps below:
Step 1 - Go to Testimonials > Add New in your Dashboard.
Step 2 - Enter your Testimonial Title at the top of the Edit testimonial.
Step 3 - Enter your Testimonial content.

Step 5 - Upload a Featured Image for this Testimonial user.
Step 6 - Enter Designation and Enter Company Name of use in Testimonial Options under content bottom.
Step 7 - Click on Publish/Update button.
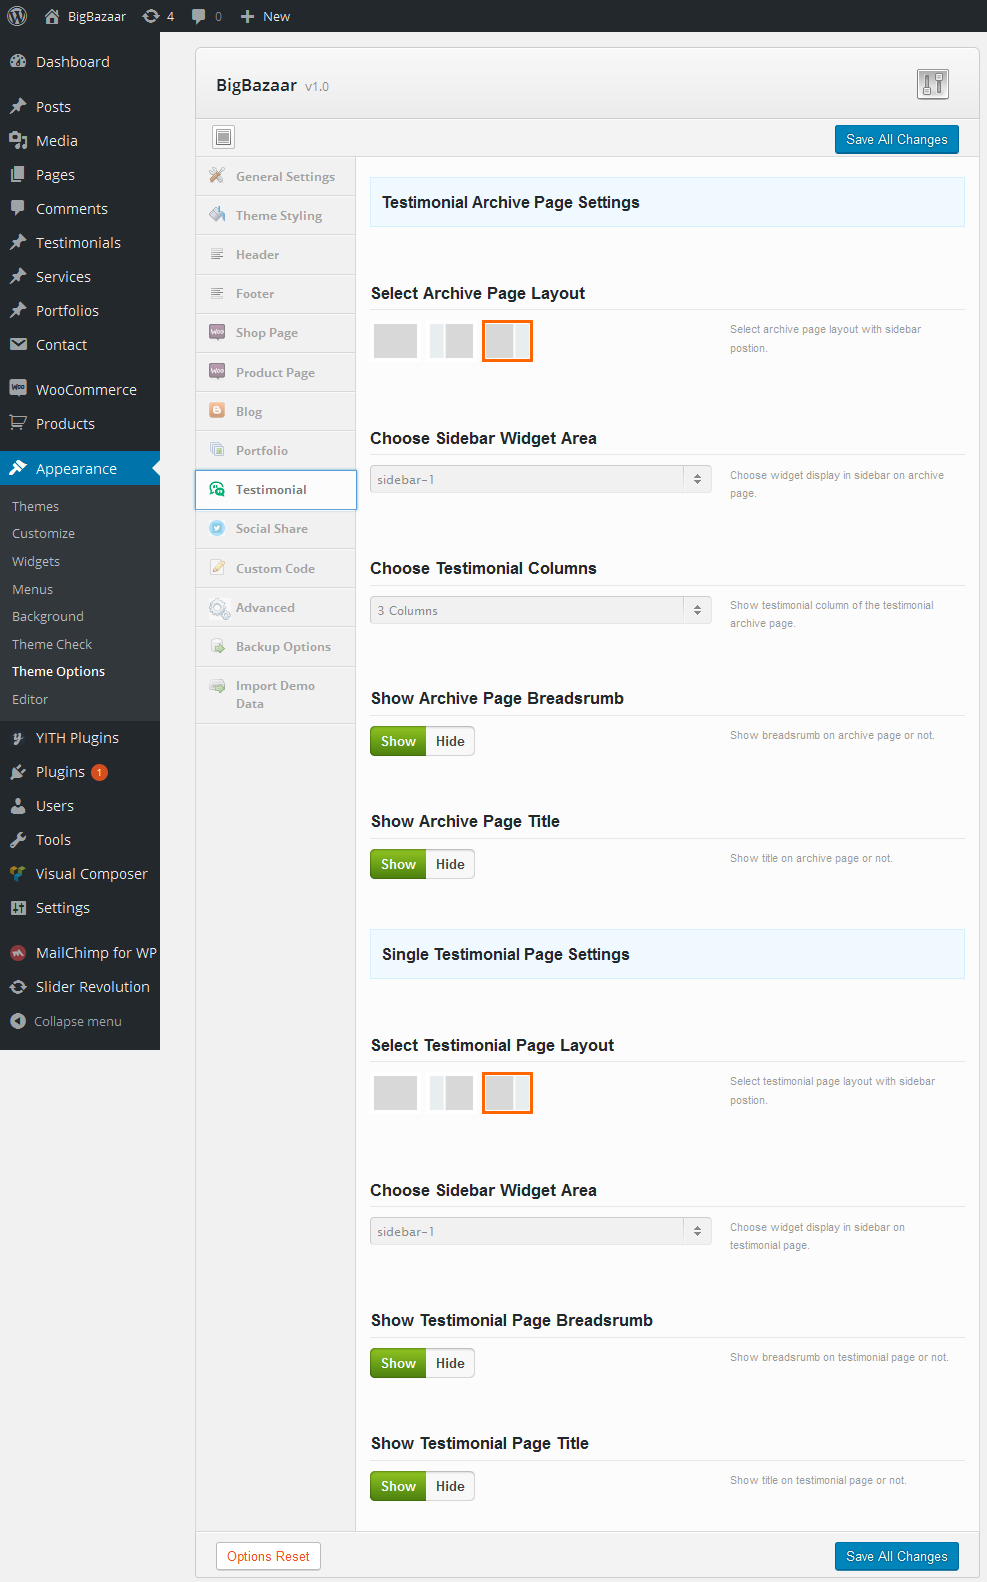
23.1) Testimonial Theme Options
BigBazaar has some custom Theme Options related to Testimonials that will help you manage your testimonials page and testimonial detail page. Head over to Appearance > Theme Options > Testimonial to explore them.
25) Visual Composer
BigBazaar Theme package contains Page Builder plugin. It's a great plugin and we recommend using it as a primary tool for building your site's content.
26) Revolution Slider
Revolution Slider is the most popular WordPress slider solution out there with tons of awesome features. It is an all-purpose slide builder that allows for showing almost any kind of content with highly customizable, transitions, effects and custom animations. Due to its visual oriented interface and countless options, Slider Revolution is suited for all!
Revolution Slider
Revolution Slider comes with BigBazaar Theme for free and should be used only with BigBazaar Theme. Please read the documentation and tutorials on how to use Revolution Slider here.
26.1) Updating your Revolution Slider Plugin
Updating your Revolution Slider plugin is rather easy, all you need to do is overwrite the current plugin version files with the latest ones provided within your Package. From your favorite FTP program, delete the folders/files in the following directory: wp-content/plugins/revslider/
Then replace them with the folders/files located inside the "revslider" folder that can be found inside the revslider.zip file from your package.
Never uninstall/reinstall the plugin, as that would also delete your previously built sliders. Instead, as long as the following instructions are followed, any previously built sliders will be saved and still exist once the update process is complete!
27) Contact Form 7
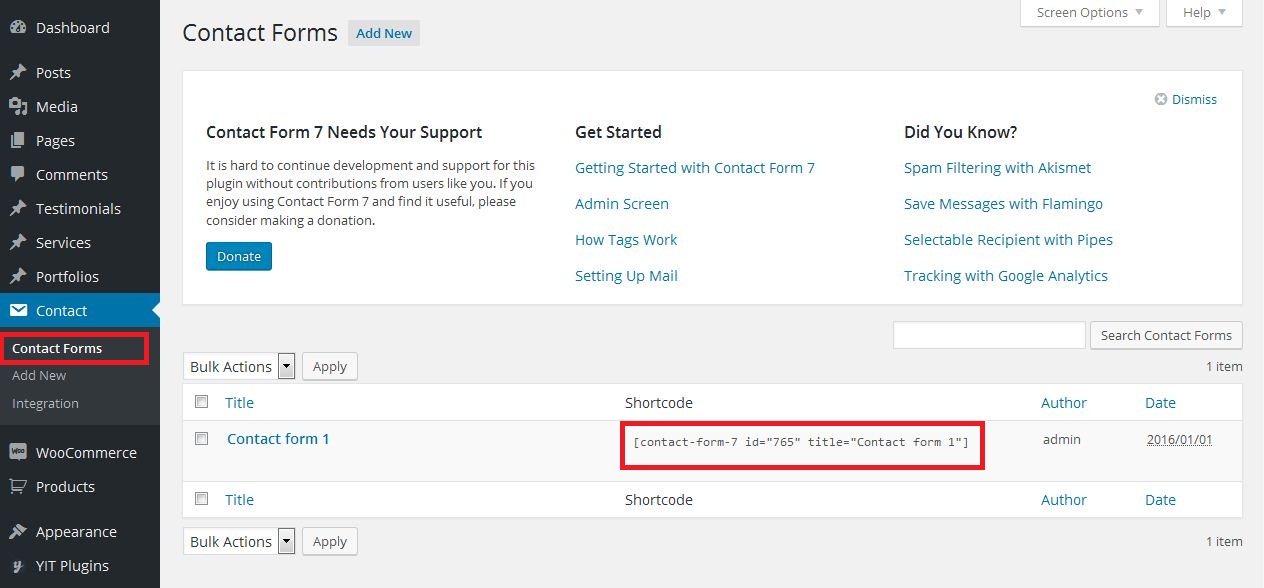
Contact Form 7 is a Contact Form creation plugin that is very flexible and easy to use. It manages multiple contact forms, plus you can customize the form and the mail contents flexibly with simple markup. The form supports Ajax-powered submitting, CAPTCHA, Akismet spam filtering and so on.
Contact Form 7 Plugin
Read more on how to Create your own Contact Forms a few sections up in Creating Contact Forms or find out more on the plugin Contact Form 7 Plugin Documentation.28) YITH WooCommerce Wishlist
These Plugins allow users adding products to wishlist them.

YITH WooCommerce Wishlist Plugin
More info on how to use these plugins can be found at YITH WOOCOMMERCE WISHLIST Documentation page29) YITH WooCommerce Compare
These Plugins allow users adding products to comparing them.

YITH WooCommerce Compare Plugin
More info on how to use these plugins can be found at YITH WooCommerce Compare Documentation page30) MailChimp for WordPress
MailChimp for WordPress comes with a free plugin, which is awesome by itself. It is actively used on nearly half a million sites and has been very well received by the WordPress community.

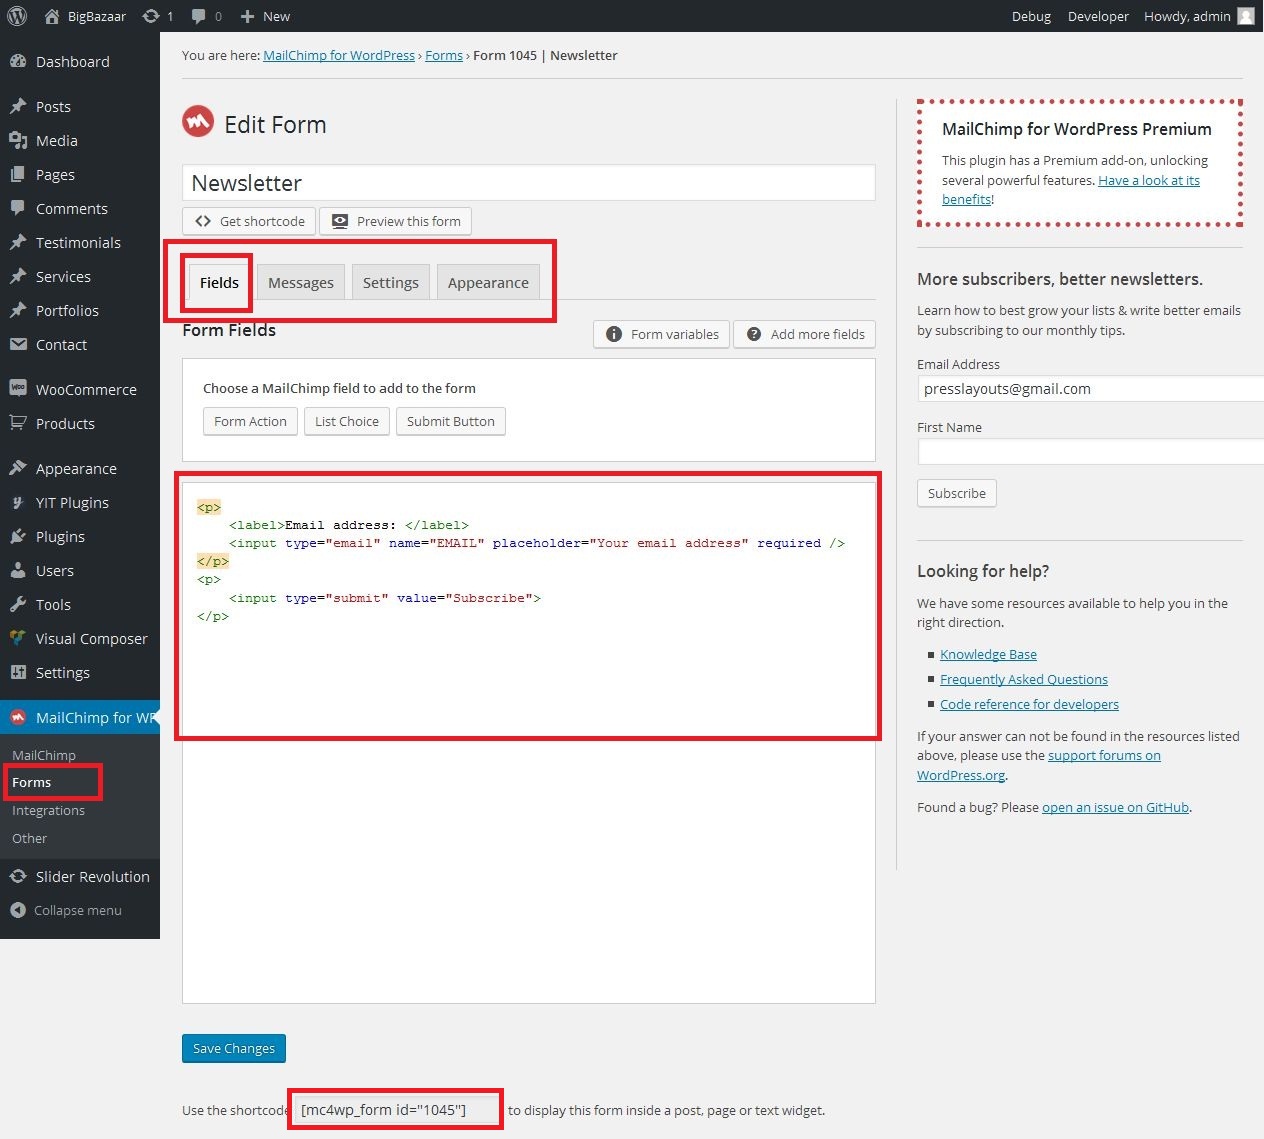
Notice - Copy above shortcode and past in Dashboard > Appearance > Theme Options > Footer inside Newsletter Shortcode textbox.
MailChimp for WordPress Plugin
More info on how to use these plugins can be found at MailChimp for WordPress Documentation page31) BigBazaar Shortcodes
Together with Visual Composer default shortcode, BigBazaar has built in 11 other shortcodes, we have used both default shortcodes and our BigBazaar shortcodes to build our BigBazaar theme.
Before you have read How to build Home page using Visual Compare? If you read more page build info then read Creating Pages section.
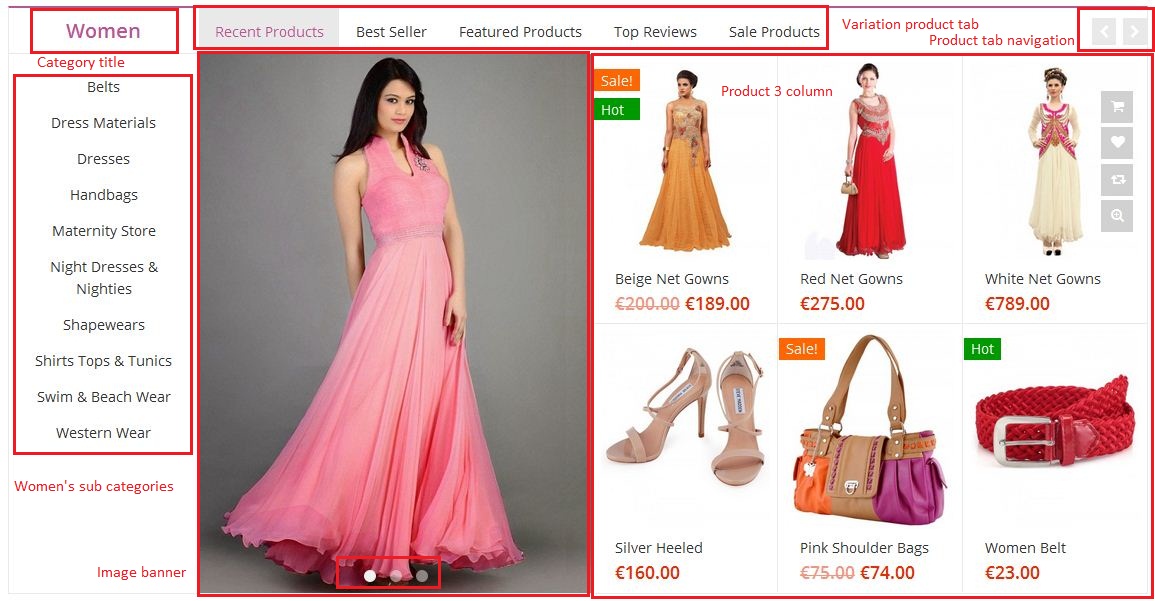
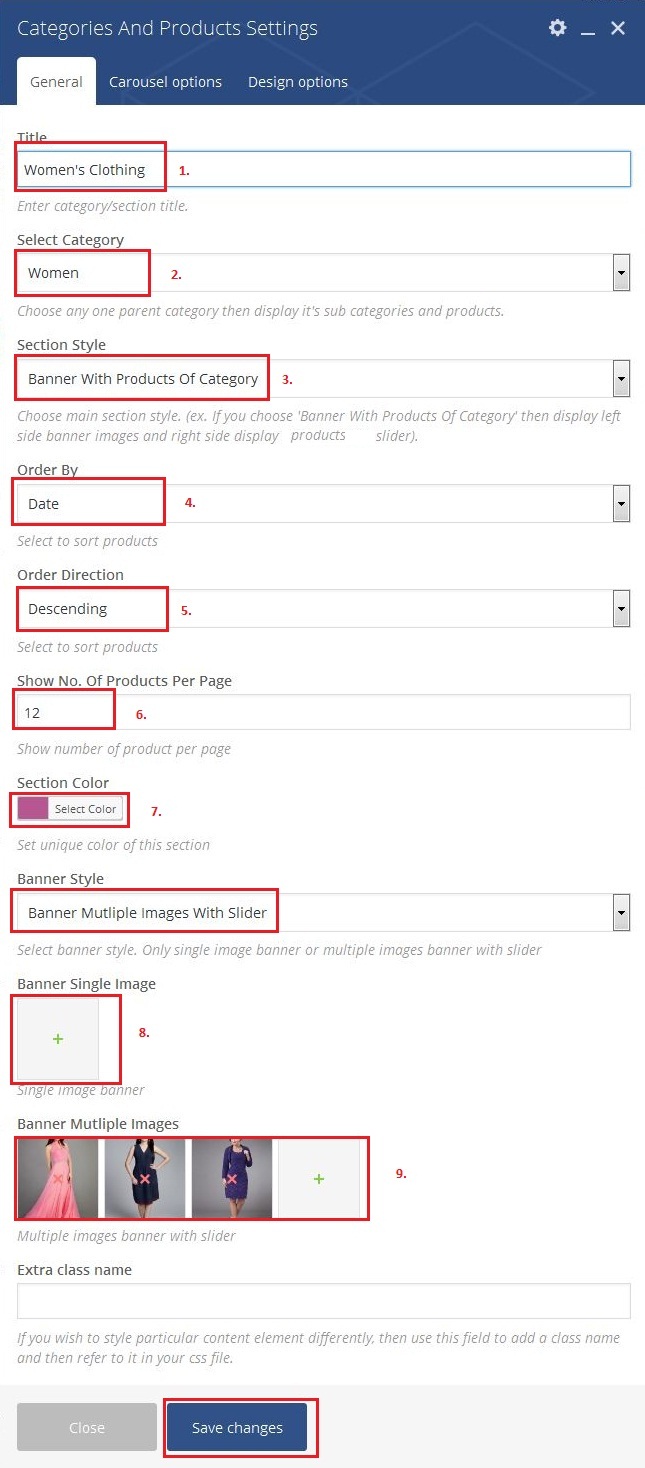
31.1) Categories And Products
This shortcode use to display product categories and products with image banner of selected parent category.
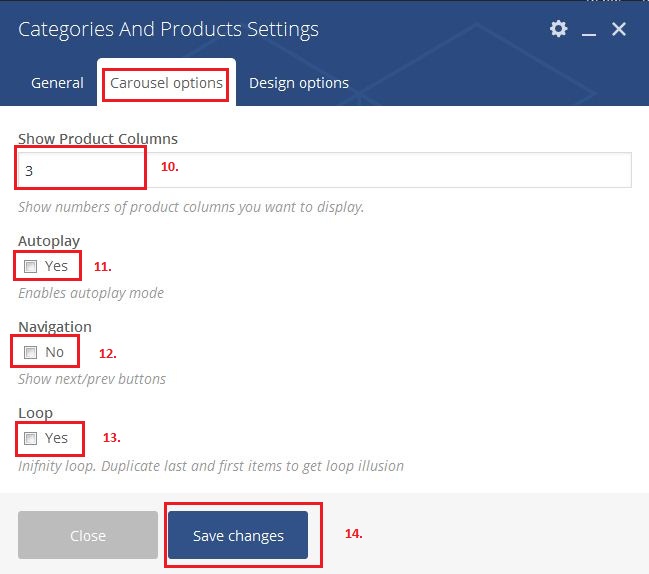
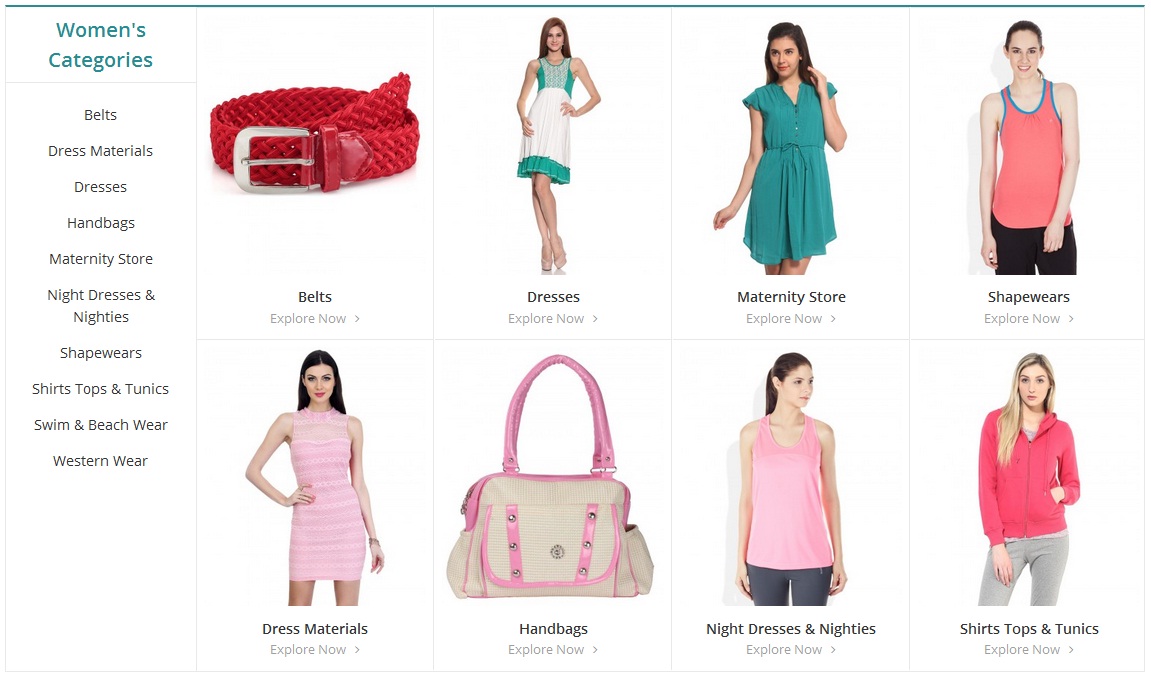
You can see first shortcode demo image and after setting in below image.
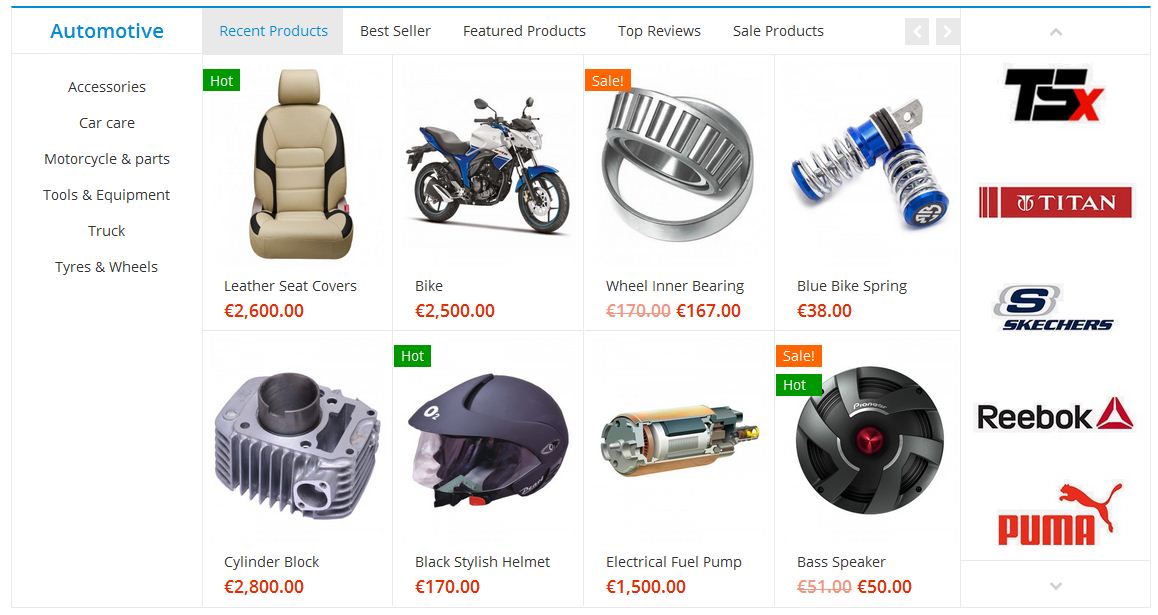
if you select section style is Brands With Products Of Category. then display left side sub categories and right side products and brands slider. You can see below demo.
if you select section style is Only Sub Categories Of Category. then display left side sub categories and right side image with sub categories slider. You can see below demo.
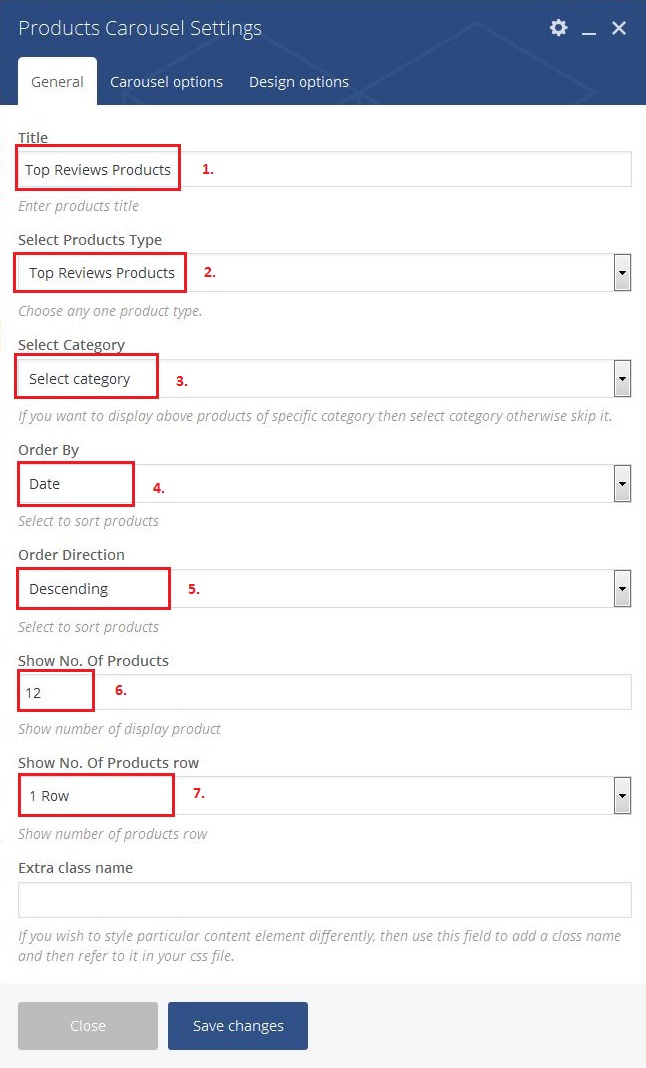
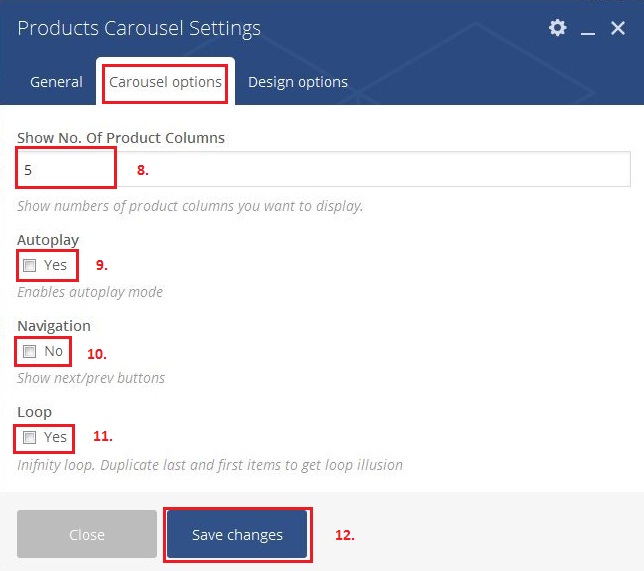
31.2) Products Carousel
This shortcode use to display only one variation type of products with carousel slider.
You can see first shortcode demo image and after setting in below image.

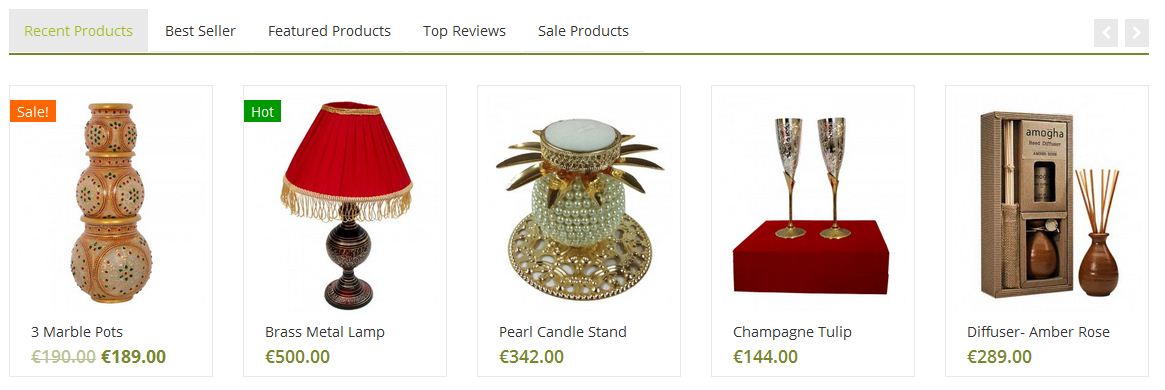
31.3) Products Tabs
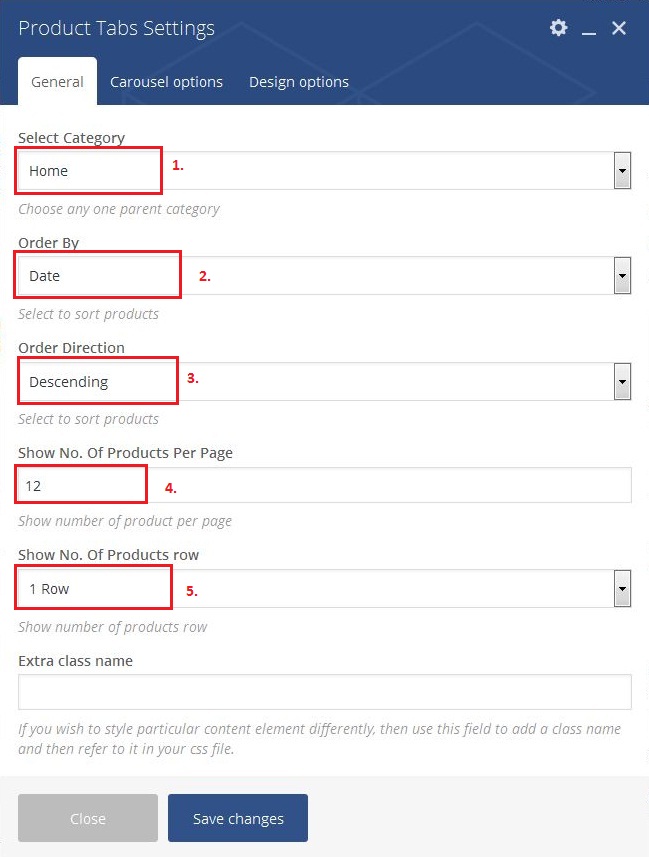
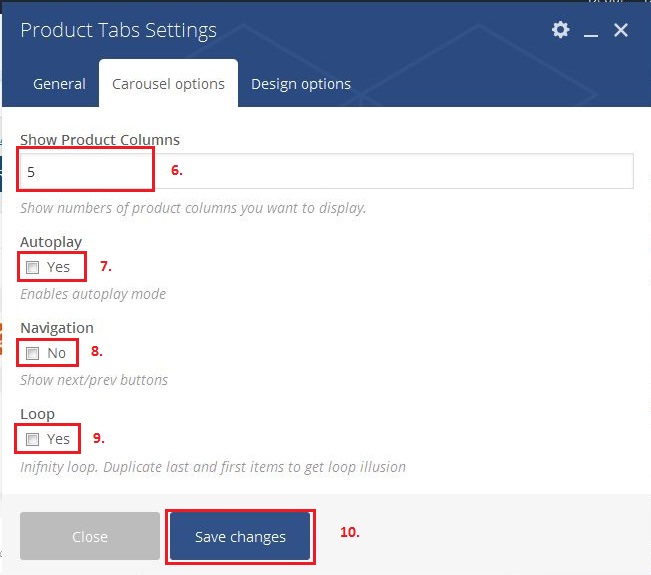
This shortcode use to display all variation type of products tabs with carousel slider.
You can see first shortcode demo image and after setting in below image.
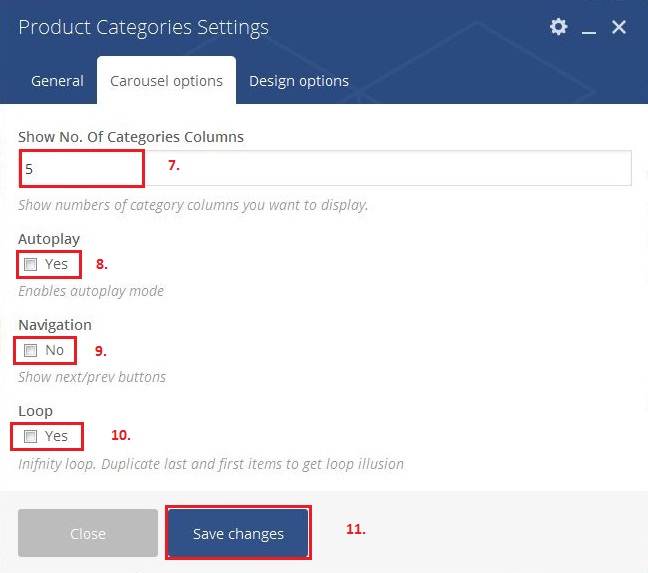
31.4) Products Categories
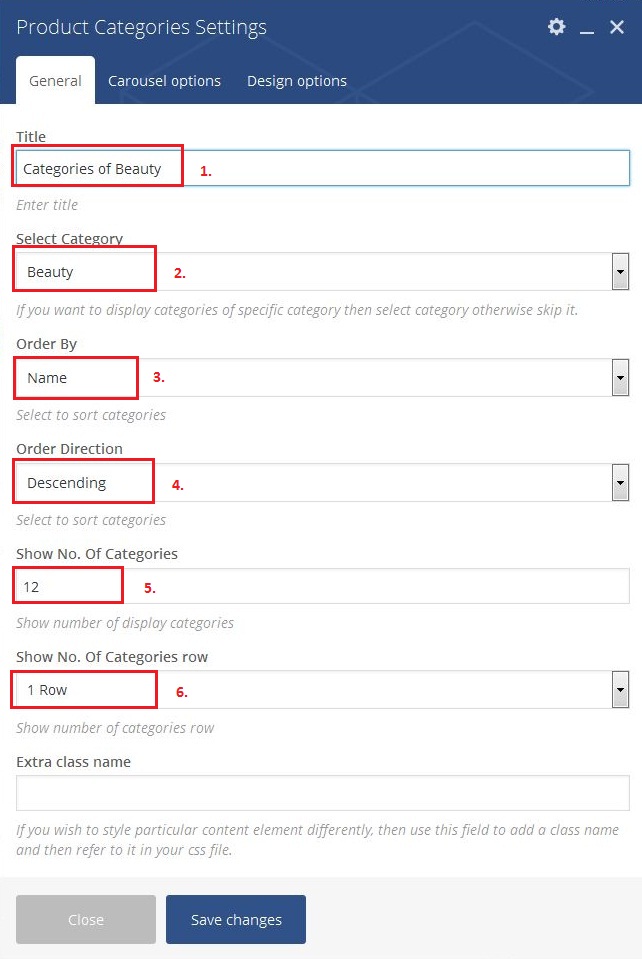
This shortcode use to display product Categories with carousel slider.
You can see first shortcode demo image and after setting in below image.
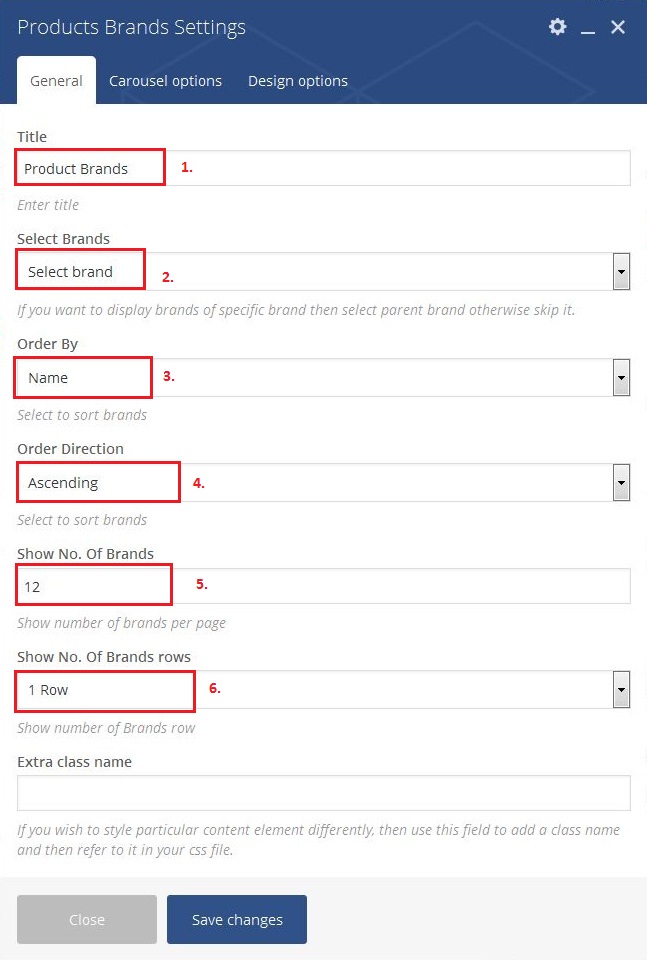
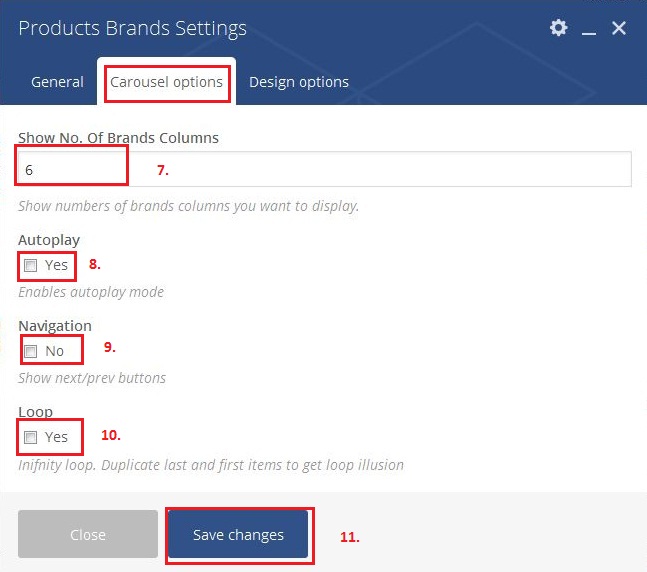
31.5) Products Brands
This shortcode use to display product brands with carousel slider.
You can see first shortcode demo image and after setting in below image.
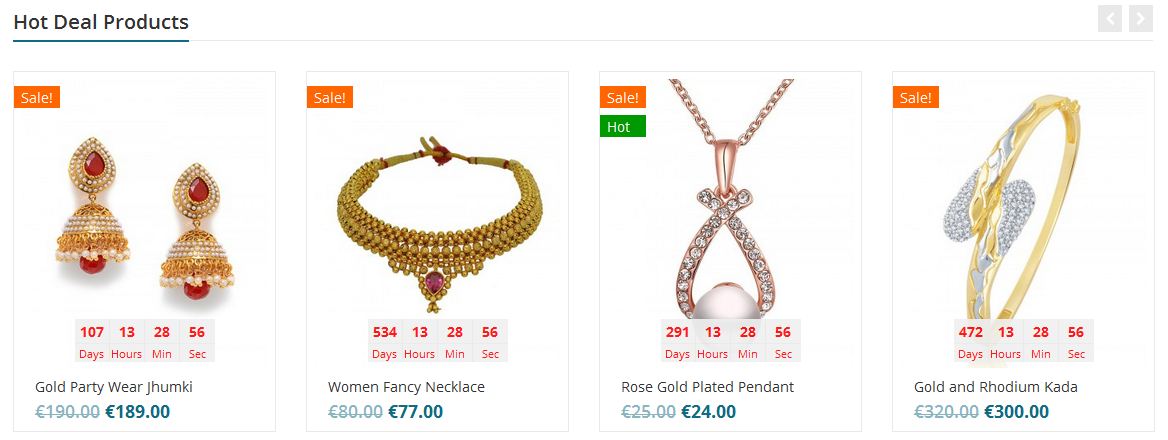
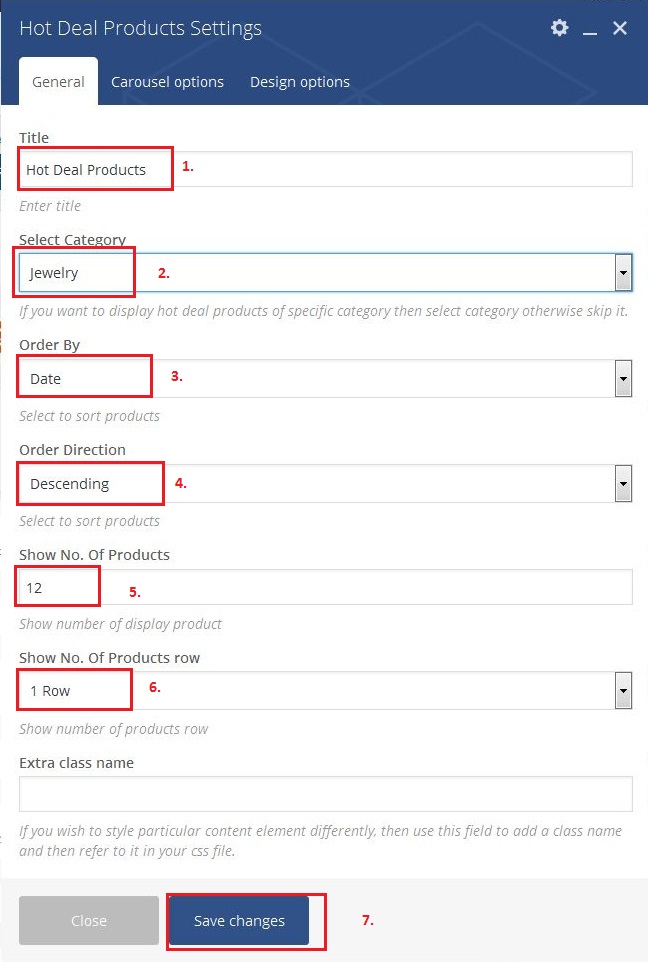
31.6) Hot Deal Products
This shortcode use to display hot deal products with carousel slider.
You can see first shortcode demo image and after setting in below image.
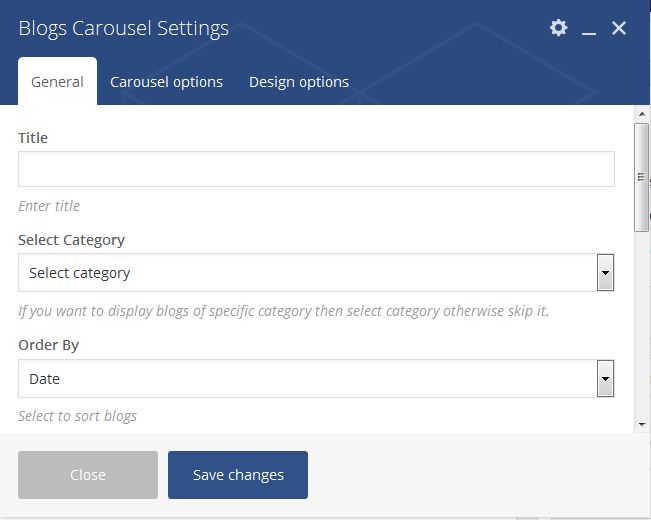
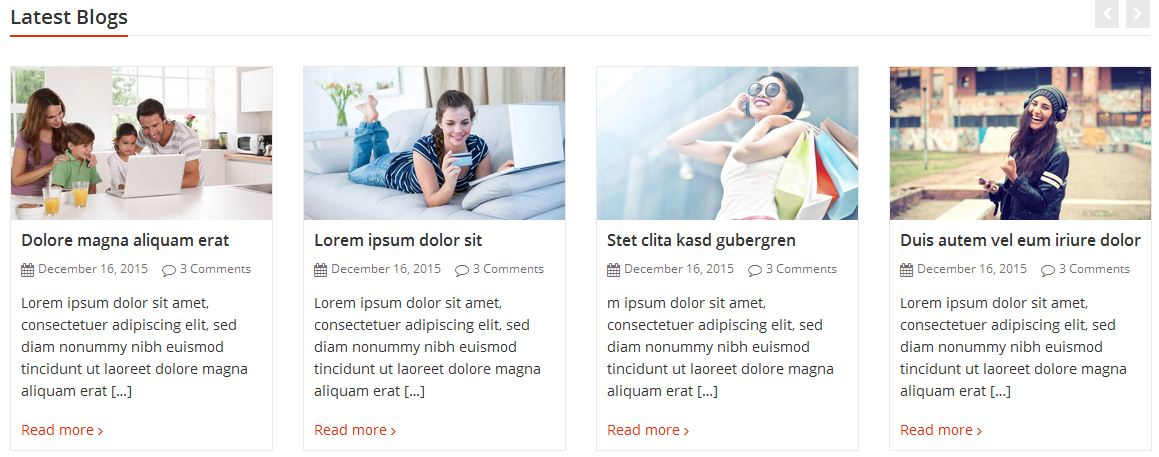
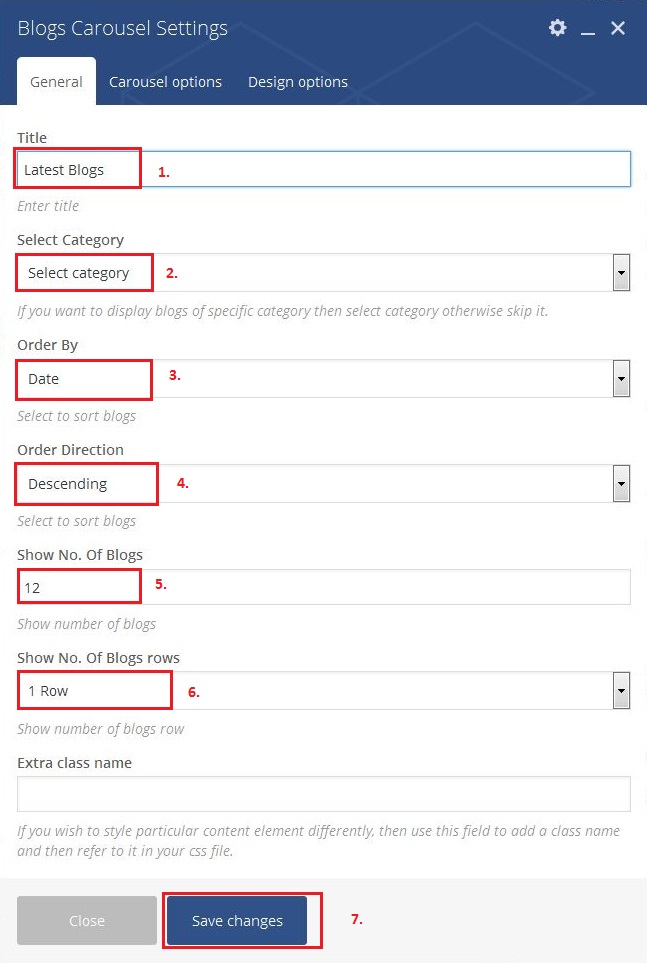
31.7) Blogs Carousel
This shortcode use to display blogs with carousel slider.
You can see first shortcode demo image and after setting in below image.
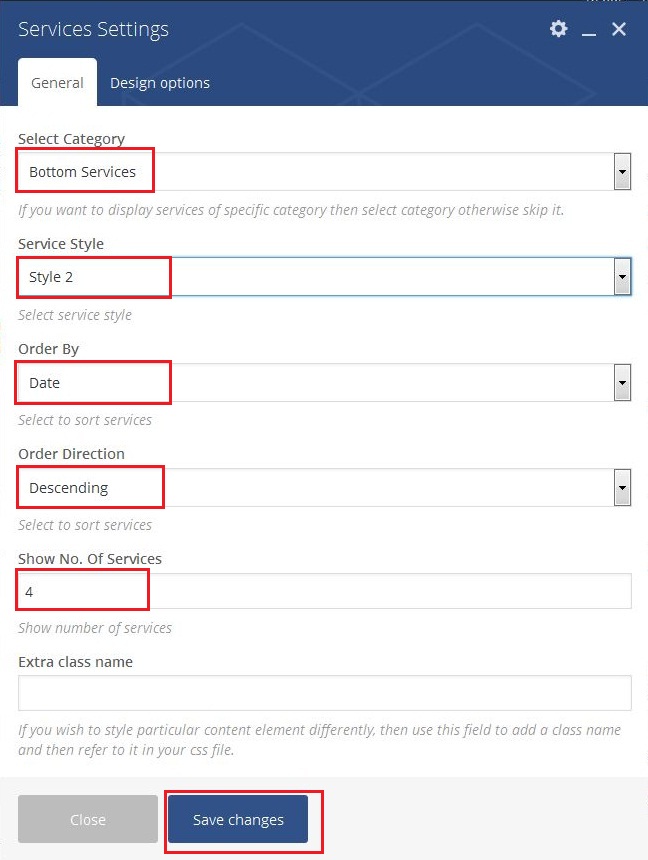
31.8) Services
This shortcode use to display services on your site and your commitment about your service, it will make the customer has a good overview about your shop such as safe, good support and a large system all over the world.
You can see first shortcode demo image and after setting in below image.
Services Style 1
Services Style 2
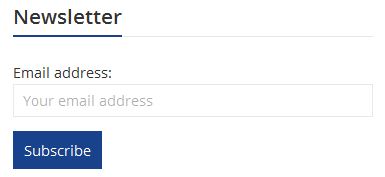
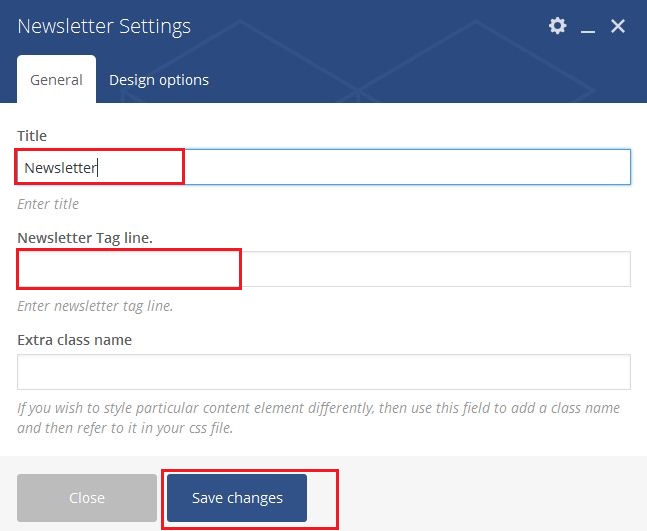
31.9) Newsletter
This shortcode use to MailChimp helps you to email the right people at the right time. You can send automated emails based on customer behavior and preferences, it will help the customer to receive all the information from your online shop.
You can see first shortcode demo image and after setting in below image.
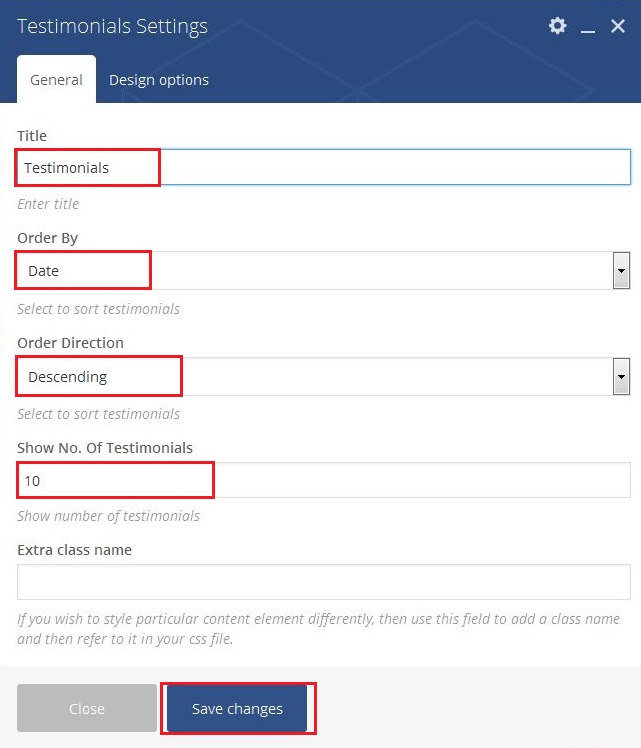
31.10) Testimonials
This shortcode use to display peoples say testimonial.
You can see first shortcode demo image and after setting in below image.
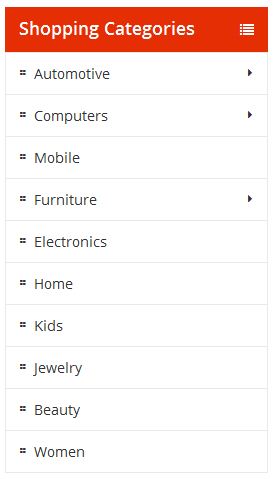
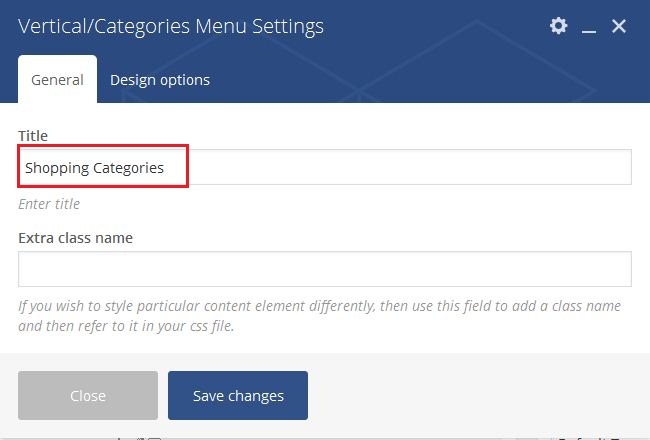
31.11) Vertical/Categories Menu
This shortcode use to display vertical/categories menu.
You can see first shortcode demo image and after setting in below image.
31.12) How to create home page?
Backend home page
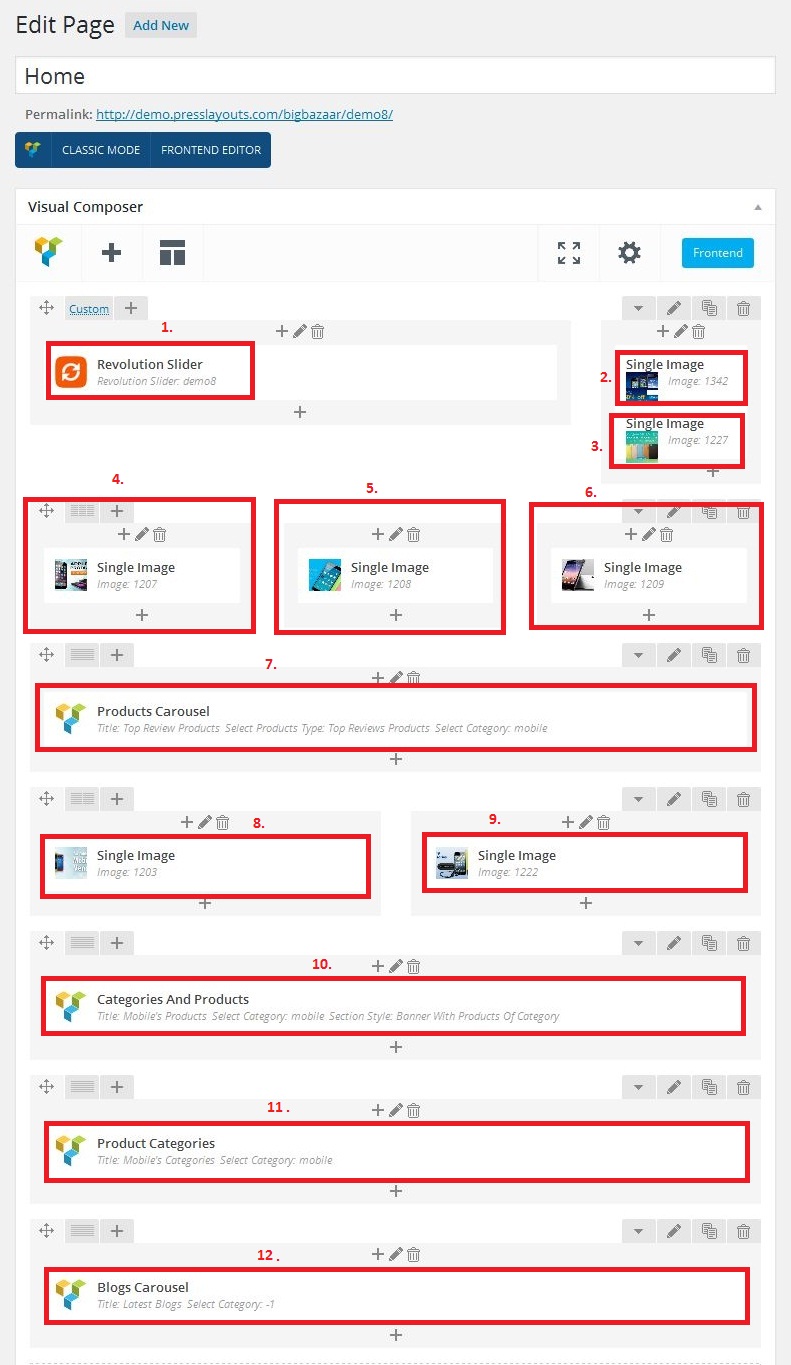
Frontend home page

32) BigBazaar Language
If you translate your own language, You read below step and translate your site:
If you are new to translating WordPress, you’re in the right place! In general, internationalization and localization (commonly abbreviated as i18n and l10n respectively) are terms used to describe the effort to make WordPress available in languages other than English for people from different locales. The actual localization is done using the GNU gettext framework, which is used by WordPress itself including the themes and plugins.
In order to make WordPress recognize the language to which you want to translate the core WordPress, the theme or the plugins, you have to define the language within the wp-config.php file or change a setting within the dashboard. The process is dependent on the WordPress version and is described below:
You can see WordPress localization documentation and theme for more details.
If you translate BigBazaar Or Plugins in your language, So please you can follow below step and translate theme:
1) Using Loco Translate Plugin:
i) Theme Translate
Step 1 - You first install loco translate plugin.
Step 2 - After admin side Loco Translate > Themes and choose BigBazaar Theme.
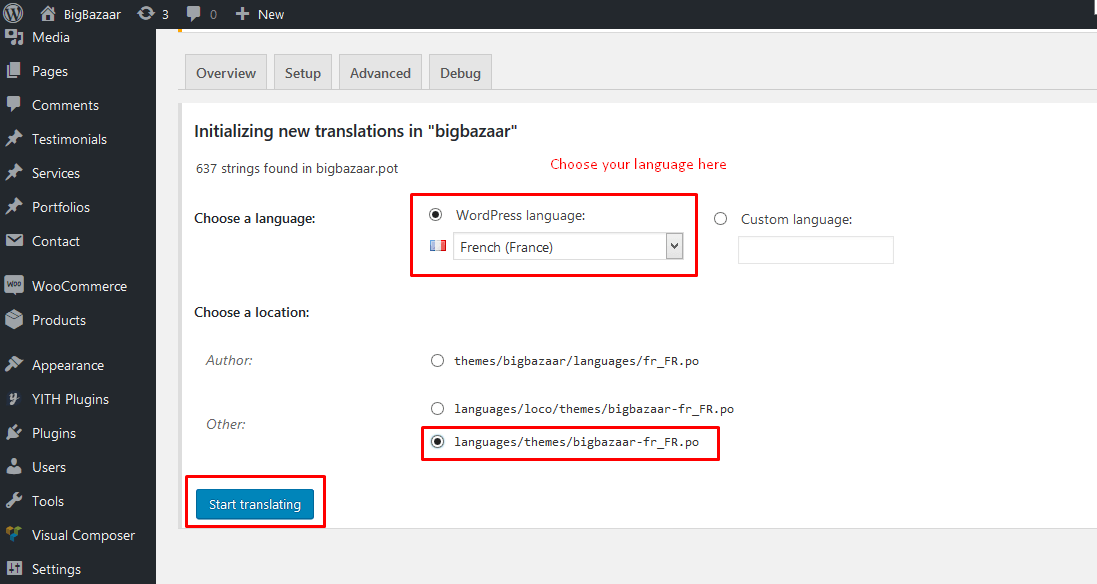
Step 3 - After Click on New Language.
Step 4-
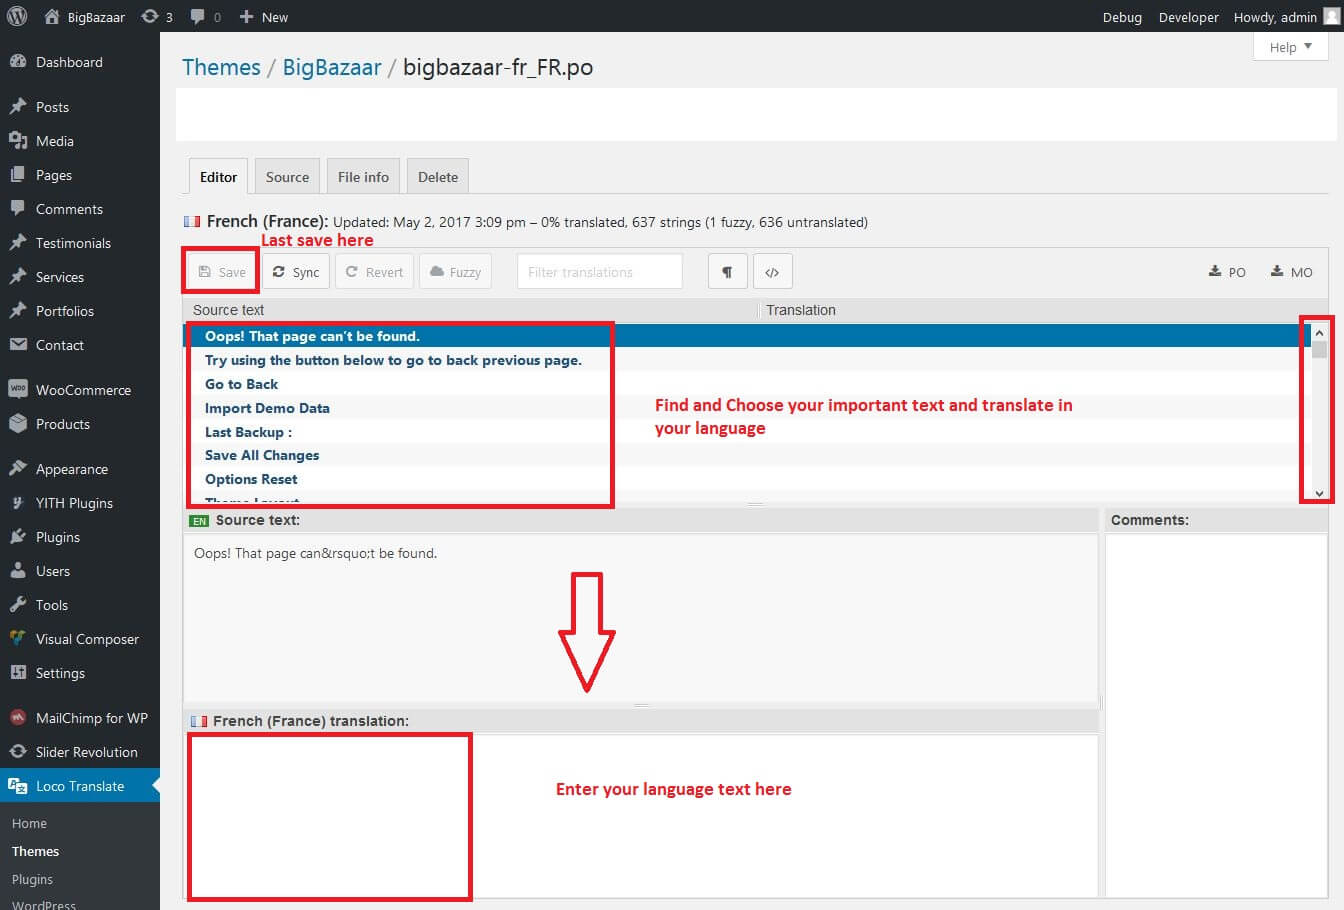
Step 5 - After done now your translated, You can check it now translate your site or not.
ii) Same as Theme's Plugin PL BigBazaar Extensions Translate:
Step 1 - Not need to again install plugin.
Step 2 - After admin side Loco Translate > Plugins and choose PL BigBazaar Extensions plugin.
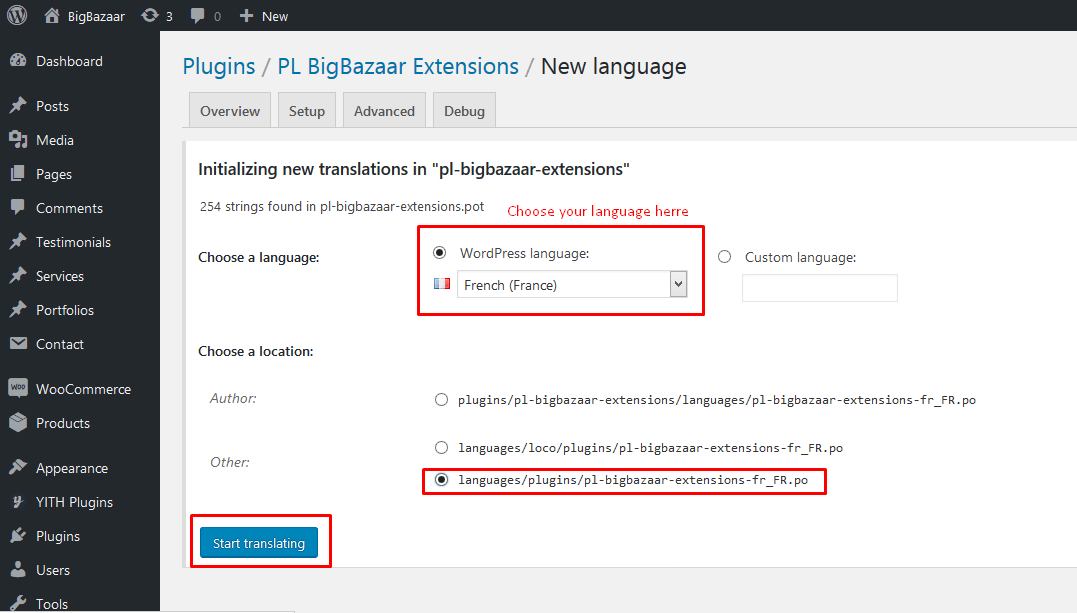
Step 3 - After Click on New Language.
Step 4-
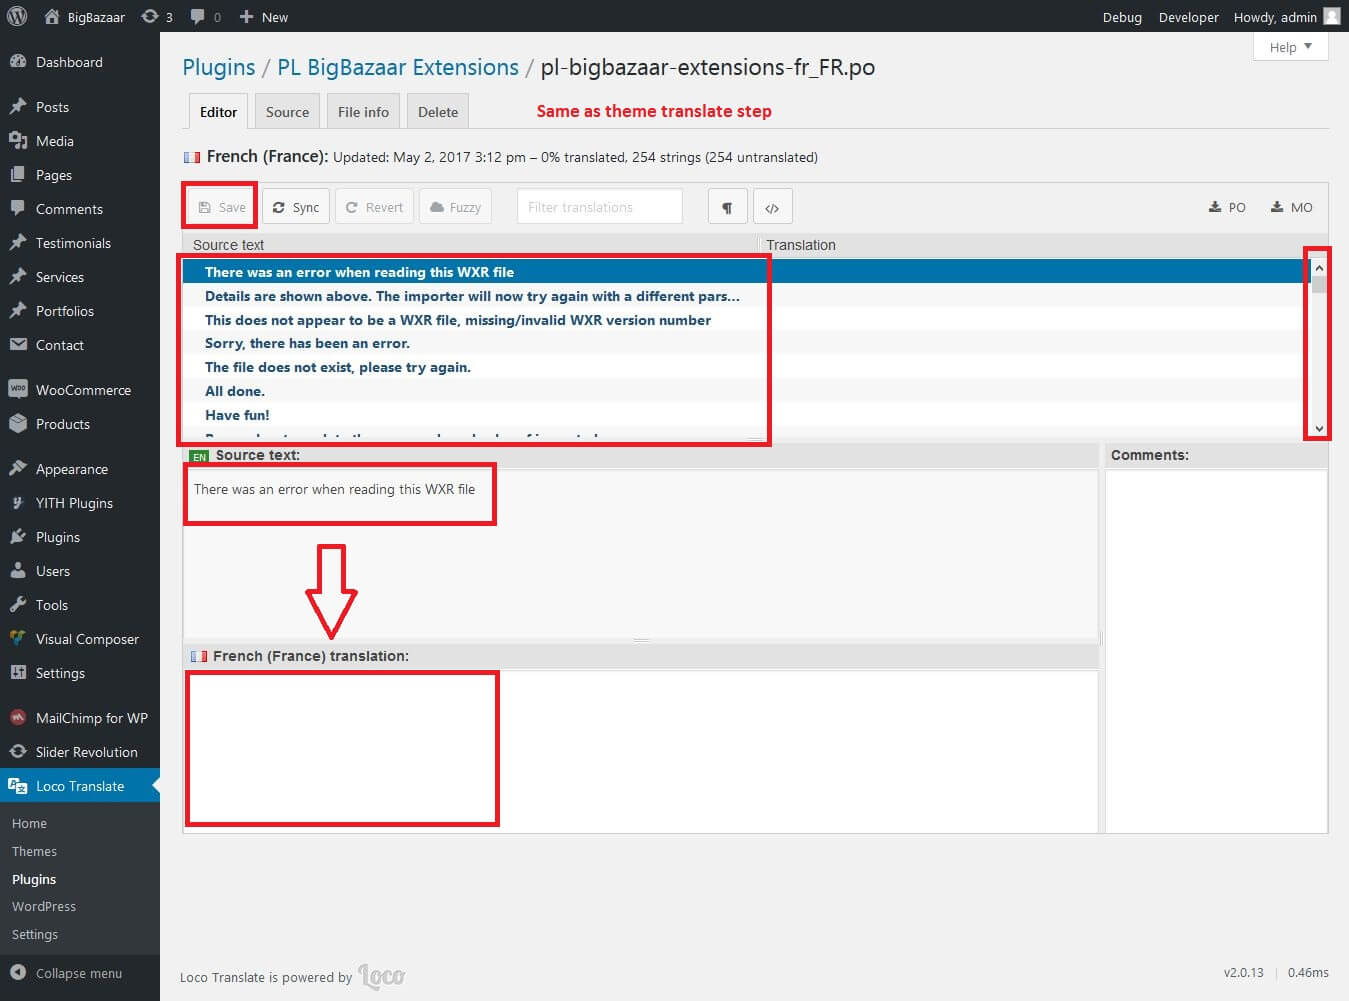
Step 5 - This is only example, You translate in your language.
2) Manual Translate
1) For Pre-WordPress 4.0 versions
Step 1 - Login to your FTP account and edit the wp-config.php file.
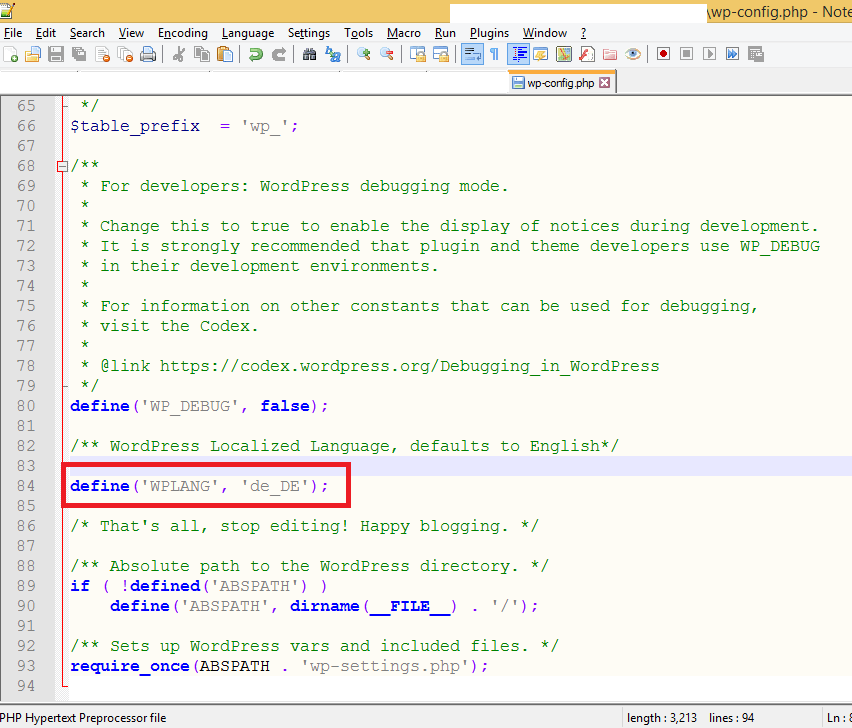
Step 2 - In the wp-config.php file, look for WPLANG constant which looks like:
define('WPLANG', '');
If the constant is not available in the wp-config.php file, please add it anywhere in a new line.
Step 3 - Define the WPLANG constructor by adding the ISO Language code of your language. The names consist of locals, a combination of language and regional dialect. For example, if you were translating to Deutsch language, change the WPLANG constant to look like the following code:
define('WPLANG', 'de_DE');
IMPORTANT NOTE – First 2 characters of a language code define the Language, the last 2 characters define the Country. Click here for more information on the ISO Language Codes.
2) For WordPress 4.0 and above
To Translate WordPress, BigBazaar Or Plugins, Just Follow This Step.
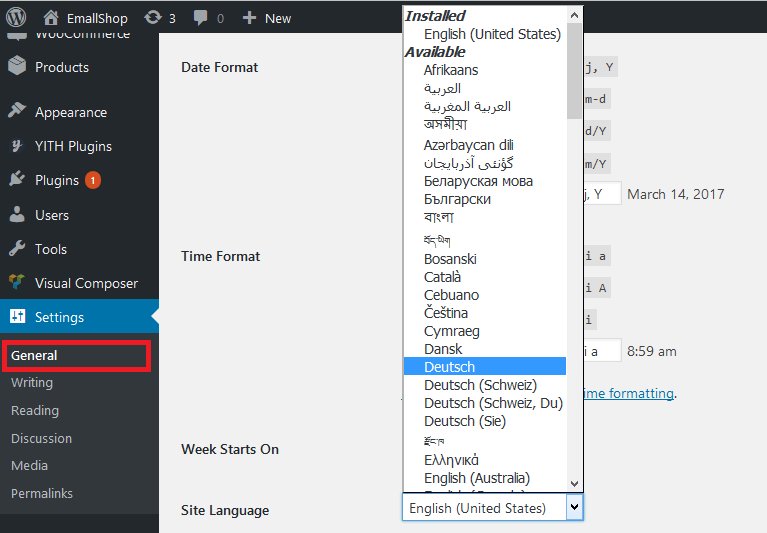
Step 1 - Change the language in the admin settings screen, Settings > General > Site Language, to your desired language.
3) Storing Inside The wp-content Folder
i) How To Store Theme Translation Files
Login to your FTP account and download theme default language pot file from follow directory folder wp-content\themes\bigbazaar\languages bigbazaar.pot file and rename file bigbazaar-de_DE.po file, After translate po file to mo file.
Place your theme translation files inside wp-content/languages/themes folder. If you don’t have the languages and themes folder, simply create the languages folder, and the themes folder inside it.
Updating the theme will not overwrite the wp-content folder. Storing your translation files here will ensure they stay intact during updates.
When storing your language files, remember that the file structure is different and must include the theme name, as well. For example, if the language files are in the Deutsch language, the file names would be bigbazaar-de_DE.po and bigbazaar-de_DE.mo.

ii) How To Store Plugin Translation Files
Login to your FTP account and download plugin default language pot file from follow directory folder wp-content\plugins\pl-bigbazaar-extensions\languages pl-bigbazaar-extensions.pot file and rename pl-bigbazaar-extensions.po file, After translate po file to mo file.
Place your plugin translation files inside wp-content/languages/plugins/ folder. If you don’t have the languages and plugins folder, simply create the languages folder, and the plugins folder inside it.
Updating the plugin will not overwrite the wp-content folder. Storing your translation files here will ensure they stay intact during updates.
When storing your language files, remember that the file structure is different and must include the plugin name, as well. For example, if the language files are in the Deutsch language, the file names would be pl-bigbazaar-extensions-de_DE.po and pl-bigbazaar-extensions-de_DE.mo.

If you create po file into .mo file in your language after all translate related query resolve. So you can do it.
33) Child Theme
BigBazaar WordPress Theme comes with a Child Theme ready to be used. Simply install the bigbazaar-child.zip and activate the Child Theme just like a regular theme after you have installed BigBazaar.
33.1) What is a Child Theme?
A child theme is a theme that inherits the functionality and styling of another theme, called the parent theme. Child themes are the recommended way of modifying an existing theme. Child themes allow you to modify or add to the functionality of the existing parent theme.
33.2) Why use a Child Theme?
Always use a Child Theme when modifying any theme files. This way you make sure a theme update will not wipe out any changes you have made to the files.
There are a few reasons why you would want to use a child theme: If you modify a theme directly and it is updated, then your modifications may be lost. By using a child theme you will ensure that your modifications are preserved.
33.3) Install and active child theme
FTP Upload
- Unzip the bigbazaar-child.zip file
- Upload the extracted bigbazaar-child theme folder into /wp-content / themes/ in your WordPress installation
- To Activate the theme, Go to Appearance > Themes and activate the installed theme
WordPress Upload
- Navigate to Appearance > Themes.
- Click Add New button and finally hit the Upload Theme

- Click on Choose File and find the bigbazaar-child.zip file on your computer and click Install Now button
- The theme will be uploaded and installed.
- To Activate the theme, Go to Appearance > Themes and activate the installed theme.
View child theme
34) Customize CSS/JS (global)
BigBazaar provides you with a useful way of adding Global CSS/JS rules to your website without editing any files. Simply head to your BigBazaar Appearance > Theme Options > Custom Code in your Dashboard and type in any CSS and JS want to globally include into all your pages.

35) Updating BigBazaar
Updating BigBazaar is rather similar to installing the theme. Follow these steps to update your theme:
Step 1 - Login to your WordPress Dashboard.
Step 2 - Go to Appearance > Themes. Deactivate BigBazaar Theme by activating a different theme.
Step 3 - Delete BigBazaar Theme, don't worry your content will not be lost.
Step 4 - Upload the latest version of bigbazaar.zip and activate it (more info in the Theme Installation section).
If you have updated/changes any theme file, you not update theme without move update code or file in child theme otherwise lost your updated file or code.
When modifying any theme files it is always best to use a Child theme, thus your file changes won’t be lost once you update your theme (check the Child Theme section for more).
36) Finally
Thank you for reading!
We hope you can create the best website with our themes.
One again, thank you so much for using our theme. As i said at the beginning, i'd be glad to help you if you have any questions relating to this theme. No guarantees, but i'll do my best to assist. If you have a more general question relating to the themes.
Do not hesitate to contact us from here.
Please take a screenshot photo with descriptions about your problem. More details about your problems help us more easier to figure out and respond you sooner.
36.1) Scope of support
Our support covers getting setup, trouble using any features and any bug fixes that may arise. Unfortunately we cannot provide support for customizations or 3rd party plugins. If you need help with customizations of your theme, please contact with us with your requirement. Our technical team will help you with some fees.
